1- Jupyter简介
- 可用于创建和共享代码与文档网络应用;
- 可在其中编写并运行代码、查看输出、可视化数据并查看结果;
- 不仅支持 Python, 还包括用于Julia、 R和其他编程语言;
- Jupyter是从IPython中迁移出来的独立应用;
- 从IPython4.0(包含)之后分离成IPython和Jupyter,IPython只具有终端接口(安装的依赖包少很多);
- 分离之后的Jupyter可以被更加广泛的使用,支持多种语言,并不断加入新特性;
2- 安装Jupyter
方式一:安装Anaconda(包含Jupyter notebook)--- 推荐
方式二:通过pip安装(同时也会安装包括Ipython等大量依赖库)
$ pip install jupyter -i https://mirrors.ustc.edu.cn/pypi/web/simple/
3- 帮助信息
jupyter --help
jupyter console --help
jupyter notebook --help
- web application等同于一个编辑器,除了支持普通代码,还包括富媒体信息如HTML,LaTex,Markdown,MathJax和各种图像格式;
- notebook documents以JSON格式保存为.ipynb文件,可以通过bfconvert转成HTML、PDF等格式;
4- 启动Jupyter console
$ jupyter console
Jupyter console 5.2.0

Python 3.6.2 (v3.6.2:5fd33b5, Jul  8 2017, 04:57:36) [MSC v.1900 64 bit (AMD64)]
Type 'copyright', 'credits' or 'license' for more information
IPython 6.2.1 -- An enhanced Interactive Python. Type '?' for help.


In [1]:

In [1]: exit
Shutting down kernel

$
5- 启动Jupyter notebook
- 交互上使用C/S结构,使用浏览器作为客户端访问页面,向后台的Jupyter Notebook服务器发送请求,并显示结果;
- 页面都被保存为 .ipynb 的类 JSON 文件格式;
- 默认启动的地址为“http://localhost:8888/tree”,可以启动多个,端口号会自动累加;
$ jupyter notebook  # 以默认参数启动
$ jupyter notebook test.ipynb  # 启动时打开test.ipynb
$ jupyter notebook --port 12345  # 启动时指定端口
$ jupyter notebook --no-brower  # 启动时不打开浏览器
$ jupyter notebook --ip="*"  # 允许任意IP连接
以默认参数启动:
$ jupyter notebook
[I 23:16:00.714 NotebookApp] Writing notebook server cookie secret to C:UsersanlivenAppDataRoamingjupyter
untime
otebook_cookie_secret
[I 23:16:01.245 NotebookApp] Serving notebooks from local directory: D:Anliven
[I 23:16:01.246 NotebookApp] 0 active kernels
[I 23:16:01.247 NotebookApp] The Jupyter Notebook is running at:
[I 23:16:01.247 NotebookApp] http://localhost:8888/?token=34be99926b1d3972f14ccc93bff0be9fa1815cc81674199f
[I 23:16:01.247 NotebookApp] Use Control-C to stop this server and shut down all kernels (twice to skip confirmation).
[C 23:16:01.249 NotebookApp]

    Copy/paste this URL into your browser when you connect for the first time,
    to login with a token:
        http://localhost:8888/?token=34be99926b1d3972f14ccc93bff0be9fa1815cc81674199f
[I 23:16:01.570 NotebookApp] Accepting one-time-token-authenticated connection from ::1
[W 23:16:01.915 NotebookApp] 404 GET /static/components/moment/locale/zh-cn.js?v=20171207231600 (::1) 7.04ms referer=http://localhost:8888/tree
[W 23:16:01.920 NotebookApp] 404 GET /i18n/zh-CN/LC_MESSAGES/nbjs.json?v=20171207231600 (::1) 2.00ms referer=http://localhost:8888/tree
默认浏览器将打开Jupyter的web界面:
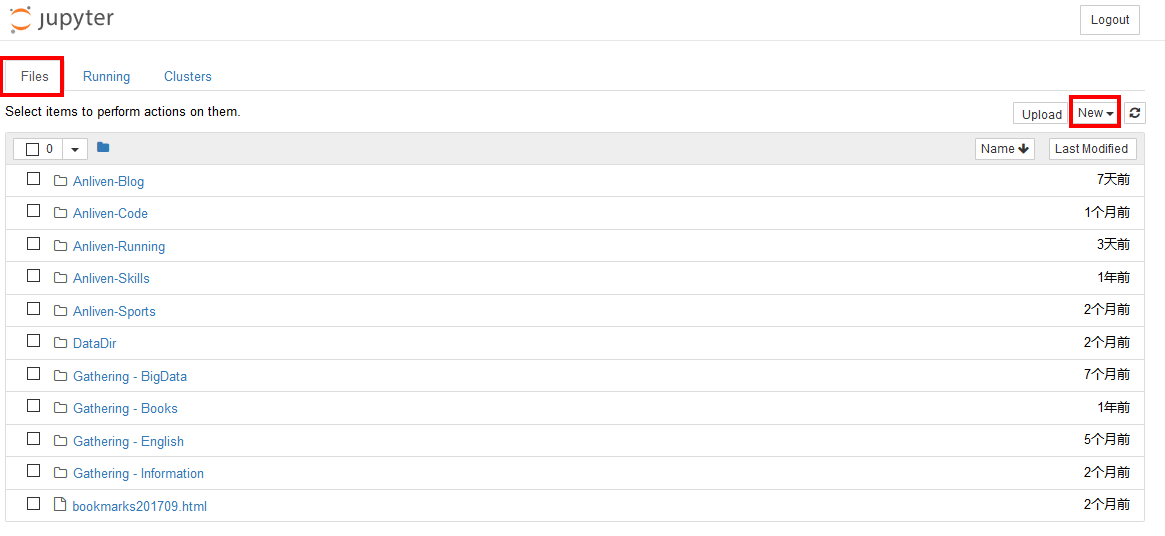
在Files标签中-->New-->选择对应的NoteBook,例如Python3,将出现交互式界面:

- In[数字]:表示已经执行的代码段,其中数字代表顺序编号
- In[*]:表示正在执行的代码段,括号里显示星号*
- In[]:表示未执行的代码段,括号里为空
点击Kernel中的“Restart & Run all”来执行全部代码。从上向下检查每一个框,找到错误代码并修改。
特别注意:如果下面已经运行出了执行结果,但是上面又修改了,并且出错了,那么重新执行的时候下面的执行结果还会保留,因为没有执行到这里来,程序在上面就已经出错退出了。
Cell的类型
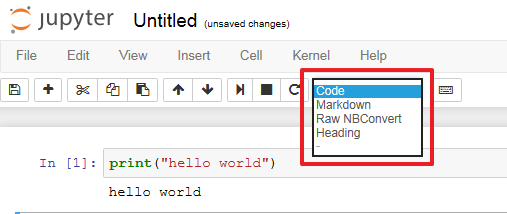
- Code cells:用于写代码;
- Markdown cells:写markdown文档,用来写说明,在Markdown单元中可以直接使用Html和Javascript;
- Raw NBConvert:代码或文档的输出信息,可将笔记本转换成另一种格式(比如 HTML)的命令行工具;
- Heading:添加标题,遵循Markdown格式;
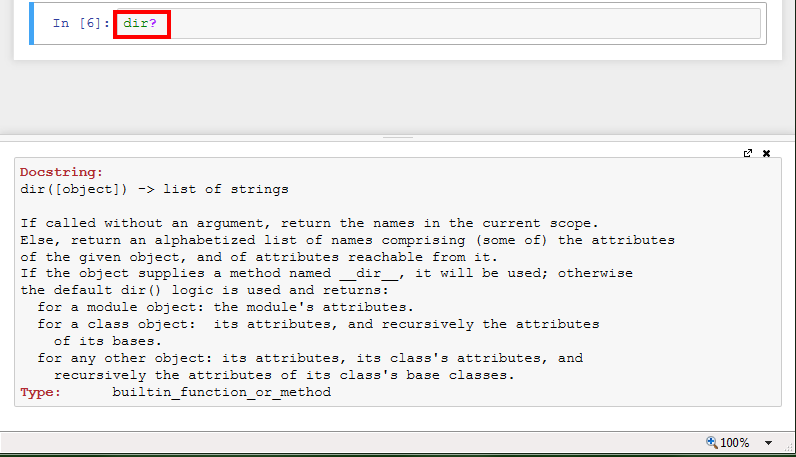
- 在函数、模块、类后面输入‘?’,按住Ctrl-Entry显示帮助文档,如果是两个‘??’则显示源代码;
- 以%开始的魔术命令只对单行有效;
- 以%%开头的魔术命令放在单元的第一行,对整个单元有效;
- %prun用于代码的执行性能分析,可以作为行命令和单元命令使用;
如果想关闭已经打开的终端和“ipynb”格式的笔记本,仅仅关闭其页面是无法彻底退出程序的,必须点击Running标签中对应的关闭按钮。

6-设置Jupyter Notebook远程访问
官网参考信息(Running a notebook server) :https://jupyter-notebook.readthedocs.io/en/stable/public_server.html
6.1- 生成配置文件
$ jupyter notebook --generate-config
Writing default config to: C:Usersanliven.jupyterjupyter_notebook_config.py
6.2- 生成一个密文密码
$ jupyter console
Jupyter console 5.2.0

Python 3.6.2 (v3.6.2:5fd33b5, Jul  8 2017, 04:57:36) [MSC v.1900 64 bit (AMD64)]
Type 'copyright', 'credits' or 'license' for more information
IPython 6.2.1 -- An enhanced Interactive Python. Type '?' for help.


In [1]: from IPython.lib import passwd

In [2]: passwd()
Enter password:
Verify password:
Out[2]: 'sha1:e16f8ee37c2d:32b310c2505bd268a408a703ada17b7c0181c5f7'

In [3]: exit
Shutting down kernel
6.3- 修改默认配置文件
c.NotebookApp.ip='*'
c.NotebookApp.password = u'sha1:e16f8ee37c2d:32b310c2505bd268a408a703ada17b7c0181c5f7'
c.NotebookApp.open_browser = False
c.NotebookApp.port = 12345
6.4- 启动Jupyter Notebook
日志信息包括笔记文件的存放目录、启动的IP地址和端口、关闭方法等;
$ jupyter notebook
[W 23:34:18.473 NotebookApp] WARNING: The notebook server is listening on all IP addresses and not using encryption.
This is not recommended.
[I 23:34:18.643 NotebookApp] Serving notebooks from local directory: D:Anliven
[I 23:34:18.644 NotebookApp] 0 active kernels
[I 23:34:18.644 NotebookApp] The Jupyter Notebook is running at:
[I 23:34:18.644 NotebookApp] http://[all ip addresses on your system]:12345/
[I 23:34:18.645 NotebookApp] Use Control-C to stop this server and shut down all kernels (twice to skip confirmation)
.
6.5- 远程访问

7- 一些设置
7.1- 更改Jupyter notebook的工作空间
默认显示用户目录下的非隐藏文件和目录,例如“C:Usersguowli”;
- 执行“jupyter notebook --generate-config”命令获取配置文件的位置;
- 修改jupyter_notebook_config.py中的c.NotebookApp.notebook_dir参数,将值更改为实际的工作空间目录即可;
例如:

注意:如果不想在配置文件中指定默认目录,可以尝试在Windows系统CMD窗口中进入到指定目录,执行“jupyter notebook”即可。
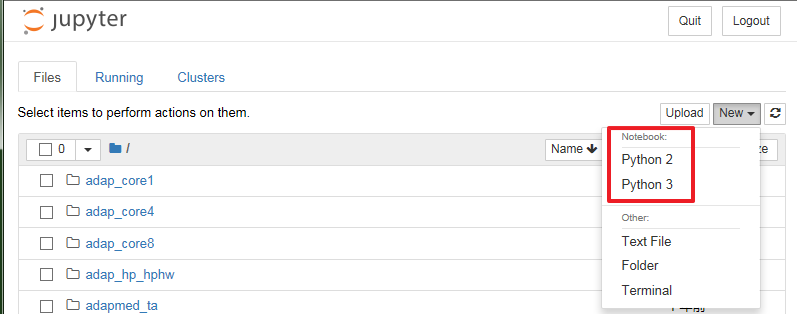
7.2- 实现同时支持Python2和Python3
# 假定已安装Python3(通过Anaconda3安装)
# $ conda env list
# # conda environments:
# #
# base                  *  D:DownLoadFilesanaconda3

conda create -n testpy2  python=2  # 建立一个Python2的虚拟环境
source activate testpy2  # 激活环境
conda install ipykernel  # 安装ipykernel
python -m ipykernel install --user
source activate  # 激活base环境
jupyter notebook  # 启动notebook,此时可以看到Python2和Python3内核
7.3- 修改默认浏览器
在配置文件jupyter_notebook_config.py的c.NotebookApp.browser参数下,添加如下内容并保存。
import webbrowser
webbrowser.register("chrome", None, webbrowser.GenericBrowser(u"C:\Program Files (x86)\Google\Chrome\Application\chrome.exe"))
c.NotebookApp.browser = 'chrome'
注意:与chrome.exe实际所在路径一致,并且使用“\”符号来分割路径地址。

7.4- 管理插件
使用Jupyter NbExtensions Configurator可以简易地在Jupyter notebook中添加、设置、启用、禁用插件。
安装NbExtensions之后重启Jupyter Notebook,导航栏将出现“Nbextensions”的类目,点击“Nbextensions”,将看到所有的插件列表。
# 通过conda安装Nbextensions:
conda install -c conda-forge jupyter_nbextensions_configurator

# 通过pip安装Nbextensions:
pip install jupyter_nbextensions_configurator
jupyter nbextensions_configurator enable --user
- Codefolding:折叠代码
- Code prettify:它能重新调整代码块内容的格式并进行美化
- Collapsible Headings:使得各级标题可缩进
- Notify:For long running task, the notify extension sends a notification when the notebook becomes idle.
- Table of Contents (2):生成Markdown内容的目录结构

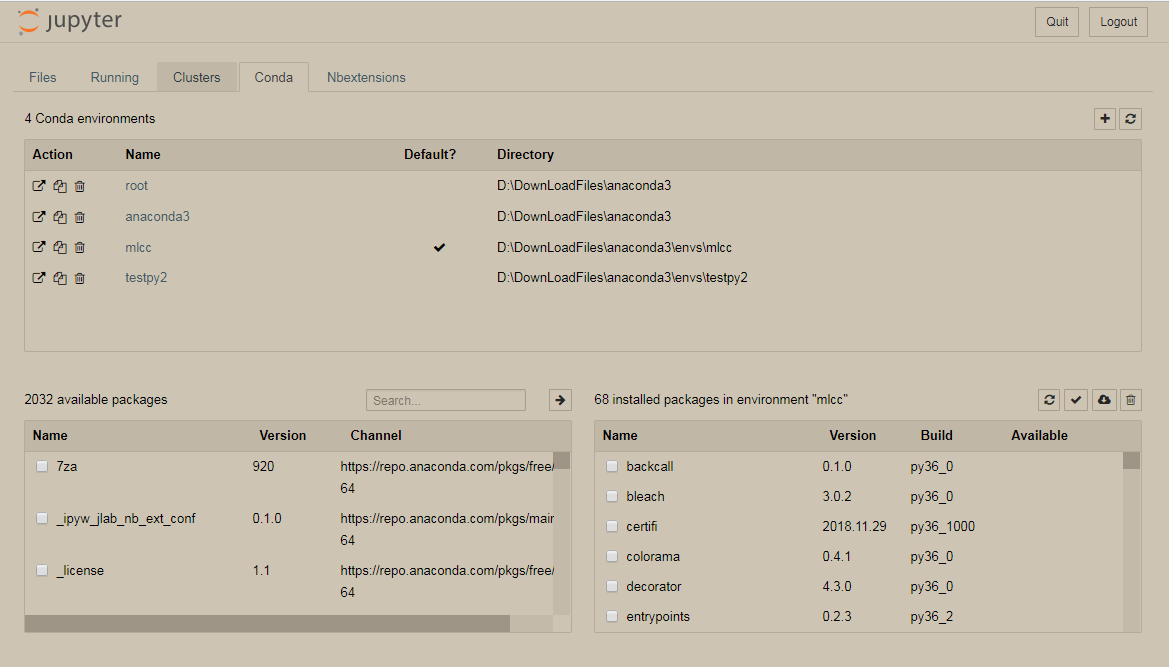
7.5- 安装nb_conda
nb_conda可以关联Jupyter Notebook与conda的环境和包
8- 通过nbviewer查看“.ipynb”文件
nbviewer:https://nbviewer.jupyter.org/
A simple way to share Jupyter Notebooks。
通过nbviewer可以方便地查看网络上的“.ipynb”格式文件。
操作十分简洁,只需要根据提示输入“URL”、“GitHub username”、“GitHub username/repo”或“Gist ID”,然后回车即可。

示例:
- 如果GitHub上的.ipynb文件链接为:https://github.com/anliven/Hello-Data/blob/master/test.ipynb
- 使用nbviewer打开此文件的地址为:https://nbviewer.jupyter.org/github/anliven/Hello-Data/tree/master/test.ipynb
9- 参考信息
- 必须会的Jupyter Notebook:http://python.jobbole.com/87527/
- 始于Jupyter Notebooks:一份全面的初学者实用指南 https://mp.weixin.qq.com/s/G5_vQQp2qIQZ7Qp_AF-f9g
- Jupyter Notebook介绍、安装及使用教程:https://zhuanlan.zhihu.com/p/33105153
10- 问题处理
Jupyter notebook的启动日志显示大量404
[W 23:35:49.743 NotebookApp] 404 GET /static/components/moment/locale/zh-cn.js?v=20171207233418 (127.0.0.1) 6.02ms referer=http://127.0.0.1:12345/tree?
[W 23:35:49.756 NotebookApp] 404 GET /i18n/zh-CN/LC_MESSAGES/nbjs.json?v=20171207233418 (127.0.0.1) 1.98ms referer=http://127.0.0.1:12345/tree?
[I 23:50:19.421 NotebookApp] 302 POST /login?next=%2F (10.172.192.178) 1.00ms
[I 23:50:19.429 NotebookApp] 302 GET / (10.172.192.178) 0.00ms
[W 23:50:19.724 NotebookApp] 404 GET /static/components/moment/locale/zh-cn.js?v=20171207233418 (10.172.192.178) 2.01ms referer=http://10.172.192.178:12345/tree?
[W 23:50:19.772 NotebookApp] 404 GET /i18n/zh-CN/LC_MESSAGES/nbjs.json?v=20171207233418 (10.172.192.178) 1.98ms referer=http://10.172.192.178:12345/tree?