概述
很久很久以前,有一只菜鸟正在美滋滋的撸着他的嵌入式C代码。然而有一天,老板对菜鸟说:“别撸C了,从现在开始你就写swift开发ios了。”菜鸟一脸懵逼,但还是照做了。
又有一天,菜蛋谄媚的对菜鸟说:“我的左脚小拇指突然发生了间歇性肌肉组织神经调控微紊乱,能不能帮忙拿个快递?”菜鸟不屑道:“没空!”
老板和菜鸟的关系叫做“调用”,菜蛋和菜鸟的关系叫做“通知”。
所谓“通知”,就是当对象A发生了状态变化时,它将该信息变化发送给对此感兴趣的其他对象,以便后者采取相应行为。
“通知”相对于“调用”的优点在于:在程序运行期间,被通知者可以选择性的接收甚至拒绝通知者的消息以及动态的修改相应的动作,而“调用”则不行。
iOS存在2种实现通知的方式,一是KVO,二是NSNotification。这节我们就先来说说NSNotification。
概念及流程
Notification:通知信号标志,以“name”作为其ID。
NotificationCenter:通知信号标志管理中心,负责维护和分发Notification及其携带的数据。
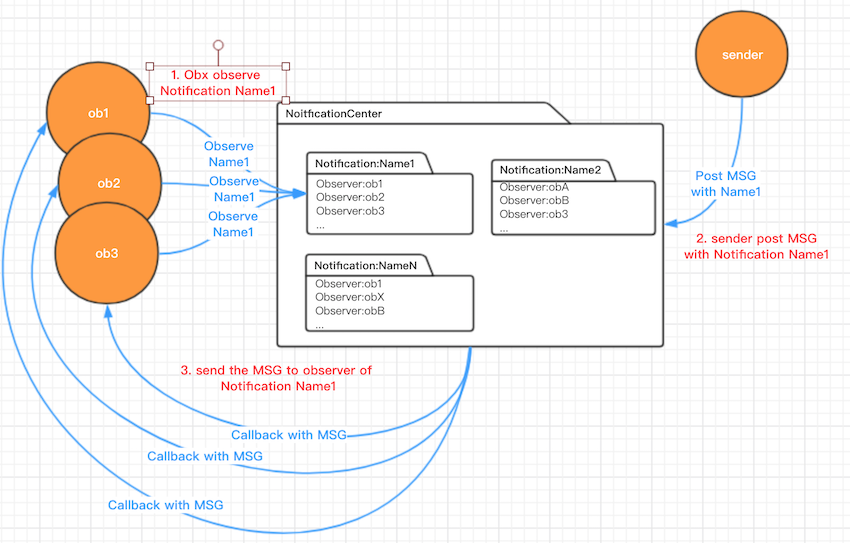
使用流程如下(如下图):
1. 首先创建1个NotificationCenter,然后使用该NotificationCenter的函数“addObserver”将Ob1、Ob2、Ob3和Notification:Name1进行绑定。
2. 当Sender想对Notification:Name1发送数据时,使用NotificationCenter的函数“post”将数据和Notification:Name1绑定发送。
3. NotificationCenter遍历之前所有和Notification:Name1绑定过得Observer,并连带Notification:Name1的数据调用各个Observer的回调函数。
举个例子
纸上得来终觉浅,我们先来实现个例子。
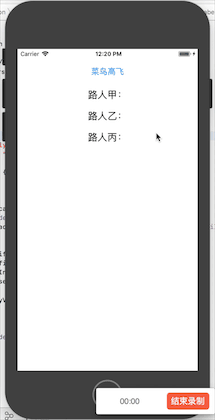
我们创建3个label作为Observer和1个button作为Sender,3个label会监听Notification消息,当接收到消息通知时,就打印收到的数据。button点击后会触发其发送消息。


 1 import UIKit
 2
 3 class MyUILabel: UILabel {
 4
 5     var say:String = "..."
 6     let userInfoKeyFly = "fly"
 7     let userInfoKeyHeight = "height"
 8
 9     func setSay(say:String) {
10         self.say = say
11     }
12
13     func addObserver(notificationName: Notification.Name) {
14         NotificationCenter.default.addObserver(self, selector: #selector(callback(notification: )), name: notificationName, object: nil)
15     }
16
17     @objc func callback(notification: Notification) {
18         let userInfo = notification.userInfo as! [String:AnyObject]
19         let flyValue = userInfo[userInfoKeyFly] as! String
20         let heightValue = userInfo[userInfoKeyHeight] as! Int32
21
22         text = "(say)((flyValue):(heightValue)米)"
23     }
24
25     deinit {
26         NotificationCenter.default.removeObserver(self)
27     }
28
29 }
首先,我们自定义了Label,addObserver是其对外监听消息的借口,callback为收到消息后的回调函数。此外还得添加析构函数deinit,以删除其对消息的监听,否则将发生内存泄漏。(注意:NotificationCenter.default是系统为APP创建的默认NotificationCenter)
 1 import UIKit
 2
 3
 4 class ViewController: UIViewController {
 5
 6     @IBOutlet weak var passerby1: MyUILabel!
 7     @IBOutlet weak var passerby2: MyUILabel!
 8     @IBOutlet weak var passerby3: MyUILabel!
 9
10     let notificationName = Notification.Name(rawValue: "noob")
11     let userInfoKeyFly = "fly"
12     let userInfoKeyFlyValue = "high"
13     let userInfoKeyHeight = "height"
14     let userInfoKeyHeightValue = 1
15
16     override func viewDidLoad() {
17         super.viewDidLoad()
18         passerby1!.setSay(say: passerby1.text! + "我不信")
19         passerby2!.setSay(say: passerby2.text! + "我会信?")
20         passerby3!.setSay(say: passerby3.text! + "差点信了")
21         passerby1!.addObserver(notificationName: notificationName)
22         passerby2!.addObserver(notificationName: notificationName)
23         passerby3!.addObserver(notificationName: notificationName)
24
25     }
26
27     override func didReceiveMemoryWarning() {
28         super.didReceiveMemoryWarning()
29         // Dispose of any resources that can be recreated.
30     }
31
32     @IBAction func flyHeighAction(_ sender: UIButton) {
33         NotificationCenter.default.post(name: notificationName, object: self, userInfo: [userInfoKeyFly:userInfoKeyFlyValue, userInfoKeyHeight:userInfoKeyHeightValue])
34
35     }
36
37 }
再ViewController中,我们声明了1个名为“noob”的Notification,在viewDidLoad时,我们使3个Label监听了该Notification。flyHeightAction为Button的触摸回调函数,它会使用NotificationCenter.default向“noob”Notification发送数据userInfo(1个字典数据)。
如果有管理上的需要,我们想创建自己的NotificationCenter,那么只需要调用“NoficationCenter.init()”就可以了,比如:
我们通过扩展NotificationCenter来添加自己的NotificationCenter
1 extension NotificationCenter {
2     static let myNotificationCenter = NotificationCenter.init()
3 }
然后我们就可以将上例中的“default”都改为“myNotificationCenter”,得到的结果是一样的。
源码下载:https://pan.baidu.com/s/1EdOhpwI-APUvedW5XlMrEw