一, UINavigationController 和 present view controller
在学习自定义页面跳转之前,我们可以先了解一下UIKit已经为我们实现的页面跳转方法。当然已经清楚的同学可以往下看了。
首先我们需要明白的一点是,UINavigationController其实是一种 Container View Controller
| Container view controllers are a way to combine the content from multiple view controllers into a single user interface. Container view controllers are most often used to facilitate navigation and to create new user interface types based on existing content. Examples of container view controllers in UIKit include UINavigationController, UITabBarController, and UISplitViewController, all of which facilitate navigation between different parts of your user interface. |
从上面的定义我们可以明白以下三点
一,Container view controller 是用来将多个view controller中的内容结合到同一个用户交互界面的。
二,Container view controller可以很方便的进行页面导航并且基于已有的内容创建新的页面交互类型。
三,UINavigationController, UITabBarController, and UISplitViewController这些在UIKit中的类都属于Container view controller。
接下来让我们看看UINavigationViewController的一般用法
##创建 UINavigationViewController并设置root view controller
UIViewController *vc = [[UIViewController alloc] init];
UINavigationController *nav = [[UINavigationController alloc] initWithRootViewController:vc];
self.window.rootViewController = nav;
##通过push跳转页面
UIViewController *viewController = [[UIViewController alloc] init];
[self.navigationController pushViewController:viewController animated:YES];
##通过pop跳转页面
[self.navigationController popViewControllerAnimated:YES];
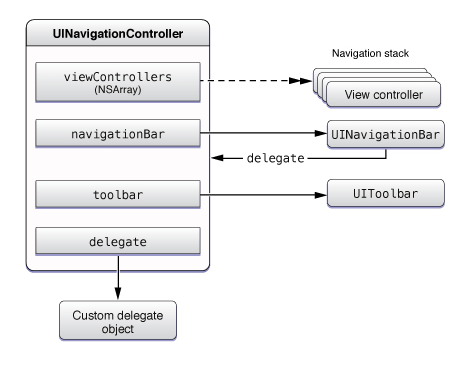
在这里我们大概应该明白,navigation controller通过一个数组来维护加入的view controller,并实现了栈的原理来push和pop已经在数组中的view controller。
以下两个实例方法属于UIViewController,通过以下两个实例方法可以很方便的实现跳转。
- (void)presentViewController:(UIViewController *)viewControllerToPresent
                     animated:(BOOL)flag
                   completion:(void (^)(void))completion;
- (void)dismissViewControllerAnimated:(BOOL)flag
                           completion:(void (^)(void))completion;
二,A Custom Present Transition & A Custom Dismiss Transition
对于一个自定义的跳转来说我们首先要明白跳转都做了些什么?
- 规范跳转发生所需的时间和跳转时所需的交互方法
- 提供具体的交互方法对象,也就是实现一个交互方法提供给系统跳转时调用
清楚了以上两点我们就比较好理解以下两个我们需要实现的协议了
UIViewControllerTransitioningDelegate的定义
An object that implements the UIViewControllerTransitioningDelegate protocol vends the objects used to manage a fixed-length or interactive transition between view controllers. When you want to present a view controller using a custom modal presentation type, set its modalPresentationStyle property to UIModalPresentationCustom and assign an object that conforms to this protocol to its transitioningDelegate property. When you present that view controller, UIKit queries your transitioning delegate for the objects to use when animating the view controller into position.
UIViewControllerAnimatedTransitioning的定义
Adopt the UIViewControllerAnimatedTransitioning protocol in objects that implement the animations for a custom view controller transition. The methods in this protocol let you define an animator object, which creates the animations for transitioning a view controller on or off screen in a fixed amount of time. The animations you create using this protocol must not be interactive. To create interactive transitions, you must combine your animator object with another object that controls the timing of your animations.
以上自个儿百度翻译。

从上面的关系图我们可以明白不同模块之间的关系,首先需要有一个UIViewController类去实现UIViewControllerTransitioningDelegate。UIViewControllerTransitioningDelegate会从Animation Controller获得一个交互对象,Animation Controller通过实现UIViewControllerAnimatedTransitioning协议来提供交互,Transitioning Context对象实现UIViewContextTransitioning协议,通过Transitioning Context我们可以获得有关view controller的上下文信息。
好了,上代码:
1, 实现一个PopPresentAnimation
#import <UIKit/UIKit.h>

@interface PopPresentAnimation : NSObject <UIViewControllerAnimatedTransitioning>

@end
#import "PopPresentAnimation.h"

@implementation PopPresentAnimation

- (NSTimeInterval)transitionDuration:(id<UIViewControllerContextTransitioning>)transitionContext {
    return 0.6;
}

- (void)animateTransition:(id<UIViewControllerContextTransitioning>)transitionContext {
    UIViewController * toVC =
    [transitionContext viewControllerForKey:UITransitionContextToViewControllerKey];

    UIViewController * fromVC =
    [transitionContext viewControllerForKey:UITransitionContextFromViewControllerKey];

    toVC.view.frame = CGRectMake(0, [UIScreen mainScreen].bounds.size.height, [UIScreen mainScreen].bounds.size.width, 280);//这里的280就是自定义的高度,可改为任意值

    [[transitionContext containerView] addSubview:toVC.view];

    CATransform3D t1 = CATransform3DIdentity;
    t1.m34 = 1.0/-900;//m34:透视效果,要操作的这个对象要有旋转的角度,否则没有效果。正直/负值都有意义
  t1 = CATransform3DScale(t1, 0.95, 0.95, 1);
  t1 = CATransform3DRotate(t1, 15.0 * M_PI/180.0, 1, 0, 0);//CATransform3D CATransform3DMakeRotation (CGFloat angle, CGFloat x, CGFloat y, CGFloat z);
// angle:旋转的弧度,所以要把角度转换成弧度:角度 * M_PI / 180。
// x:向X轴方向旋转。值范围-1 --- 1之间
// y:向Y轴方向旋转。值范围-1 --- 1之间
// z:向Z轴方向旋转。值范围-1 --- 1之间
  CATransform3D t2 = CATransform3DIdentity;
  t2.m34 = 1.0/-900;//m34:透视效果,要操作的这个对象要有旋转的角度,否则没有效果。正直/负值都有意义
  //向上移
  t2 = CATransform3DTranslate(t2, 0, fromVC.view.frame.size.height * (-0.08), 0);//tx:X轴偏移位置,向下为正数
                                                  //ty:Y轴偏移位置,向右为正数
                                                  //tz:Z轴偏移位置,向外为正数

  //第二次缩小
  t2 = CATransform3DScale(t2, 0.8, 0.8, 1);//sx:X轴缩放,代表一个缩放比例,一般都是 0 --- 1 之间的数字。sy:Y轴缩放。
// sz:整体比例变换时,也就是m11(sx)== m22(sy)时,
//若m33(sz)>1,图形整体缩小,若0<1,图形整体放大,若m33(sz)<0,发生
//关于原点的对称等比例变换
    [UIView animateWithDuration:0.3 delay:0 options:UIViewAnimationOptionCurveEaseInOut animations:^{

        [fromVC.view.layer setTransform:t1];

    } completion:^(BOOL finished) {

        [UIView animateWithDuration:0.3 delay:0 options:UIViewAnimationOptionCurveEaseInOut animations:^{
            fromVC.view.alpha = 0.5;//这里是控制底部视图的透明度的

            CGRect rect    = toVC.view.frame;
            rect.origin.y -= rect.size.height;
            toVC.view.frame = rect;

            [fromVC.view.layer setTransform:t2];

        } completion:^(BOOL finished) {
            [transitionContext completeTransition:YES];
        }];

    }];
}

@end
2, 实现一个PopDismissAnimation
#import <UIKit/UIKit.h>

@interface PopDismissAnimation : NSObject <UIViewControllerAnimatedTransitioning>

@end
#import "PopDismissAnimation.h"

@implementation PopDismissAnimation


- (NSTimeInterval)transitionDuration:(id<UIViewControllerContextTransitioning>)transitionContext {
    return 0.6;
}

- (void)animateTransition:(id<UIViewControllerContextTransitioning>)transitionContext {
    UIViewController * toVC =
    [transitionContext viewControllerForKey:UITransitionContextToViewControllerKey];

    UIViewController * fromVC =
    [transitionContext viewControllerForKey:UITransitionContextFromViewControllerKey];

    CATransform3D t1 = CATransform3DIdentity;
    t1.m34 = 1.0/-900;//m34:透视效果,要操作的这个对象要有旋转的角度,否则没有效果。正直/负值都有意义
    t1 = CATransform3DScale(t1, 0.95, 0.95, 1);
    t1 = CATransform3DRotate(t1, 15.0 * M_PI/180.0, 1, 0, 0);

    [UIView animateWithDuration:0.3 delay:0 options:UIViewAnimationOptionCurveEaseInOut animations:^{

        CGRect rect    = fromVC.view.frame;
        rect.origin.y += rect.size.height;
        fromVC.view.frame = rect;

        [toVC.view.layer setTransform:t1];

    } completion:^(BOOL finished) {

        [UIView animateWithDuration:0.3 delay:0 options:UIViewAnimationOptionCurveEaseInOut animations:^{
            toVC.view.alpha = 1;
            [toVC.view.layer setTransform:CATransform3DIdentity];

        } completion:^(BOOL finished) {
            [transitionContext completeTransition:YES];
        }];
    }];
}

@end
然后以从第一个视图FirstViewController跳转到第二个视图SecondViewController为例
FirstViewController
#import <UIKit/UIKit.h>

@interface FirstViewController : UIViewController

@end
#import "FirstViewController.h"
#import "SecondViewController.h"
#import "PopPresentAnimation.h"
#import "PopDismissAnimation.h"

@interface FirstViewController () <UIViewControllerTransitioningDelegate>

@end

@implementation FirstViewController

- (void)viewDidLoad {
    [super viewDidLoad];
}

- (void)touchesBegan:(NSSet<UITouch *> *)touches withEvent:(UIEvent *)event {
    SecondViewController * secondViewController = [SecondViewController new];
    secondViewController.modalPresentationStyle = UIModalPresentationCustom;
    secondViewController.transitioningDelegate = self;

    [self presentViewController:secondViewController animated:YES completion:nil];
}

- (id<UIViewControllerAnimatedTransitioning>)animationControllerForPresentedController:(UIViewController *)presented presentingController:(UIViewController *)presenting sourceController:(UIViewController *)source {
    return [PopPresentAnimation new];
}

- (id<UIViewControllerAnimatedTransitioning>)animationControllerForDismissedController:(UIViewController *)dismissed {
    return [PopDismissAnimation new];
}

- (void)didReceiveMemoryWarning {
    [super didReceiveMemoryWarning];
    // Dispose of any resources that can be recreated.
}

@end
SecondViewController
#import <UIKit/UIKit.h>

@interface SecondViewController : UIViewController

@end
#import "SecondViewController.h"

@interface SecondViewController ()

@end

@implementation SecondViewController

- (void)viewDidLoad {
    [super viewDidLoad];
    self.view.layer.shadowColor = [UIColor blackColor].CGColor;
    self.view.layer.shadowOffset = CGSizeMake(0.5, 0.5);
    self.view.layer.shadowOpacity = 0.8;
    self.view.layer.shadowRadius = 5;
    self.view.backgroundColor = [UIColor whiteColor];


    UIButton * closeBtn = [UIButton buttonWithType:UIButtonTypeCustom];
    closeBtn.frame = CGRectMake(15, 0, 50, 40);
    [closeBtn setTitle:@"关闭" forState:UIControlStateNormal];
    [closeBtn setTitleColor:[UIColor colorWithRed:217/255.0 green:110/255.0 blue:90/255.0 alpha:1] forState:UIControlStateNormal];
    [closeBtn addTarget:self action:@selector(close) forControlEvents:UIControlEventTouchUpInside];
    [self.view addSubview:closeBtn];
}

- (void)close {
    [self dismissViewControllerAnimated:YES completion:nil];
}

- (void)didReceiveMemoryWarning {
    [super didReceiveMemoryWarning];
    // Dispose of any resources that can be recreated.
}

@end
还有,在自己自定义跳转的时候,
[self presentViewController:secondViewController animated:YES completion:nil];
这里的animated:一定要为YES,不然的话就是普通的跳转,自定义效果是没有的
参考:
关于CATransform3D:http://www.jianshu.com/p/69ba0a4b2df9
iOS实现自定义页面跳转:http://www.jianshu.com/p/239c23e0666a