一:SpringAOP概念
面向切面编程(Aspect Oriented Programming)提高了另一种角度来思考程序的结构,通过预编译方式和运行期间的动态代理实现程序功能的统一维护的一种技术。它用这种结构方式来弥补了面向对象编程(Object Oriented Programming)的不足。除此以外,AOP还提供了切面,对关注点进行模块化,使用模块化对业务逻辑的各个部分隔离,从而使得各部分业务逻辑直接的耦合度降低,提高程序的可重用性。Spring AOP是是Spring的重要组件之一,但是Spring IOC并不依赖Spring AOP,这意味着我们可以自由选择是否使用AOP,AOP还提供了强大的中间件解决方案,这使得Spring IOC更加完善了,我们可以通过AOP完成对事务管理、权限控制、日志监听等。
1:Spring AOP介绍
①:切面(Aspect):
  一个关注点的模块化,这个关注点可能会横切多个对象。事务管理就是一个关于横切关注点很好的例子,在Spring中我们可以通过XML或者注解
  来实现对程序的切面。
②:连接点(Join point):
  程序执行过程中的某个特定的点,比如某个方法被调用的时候或者处理异常的时候。在Spring AOP中一个连接点总是代表一个方法的执行,其实
  AOP拦截的方法就是一个连接点。
③:通知(Advice):
  在切面的某个连接点上执行的动作,通知类型包括“before”、“after”、“around”等。许多AOP框架都是以拦截器作为通知的模型,并维护一个
  以连接点为中心的拦截器链,Spring也不例外。总之就是AOP对拦截点的处理通过通知来执行,所以说通知是指一个方法被AOP拦截到的时候要执
  行的代码。
④:切入点(Pointcut):
  匹配连接点的断言。通知和切入点表达式关联,并与切入点匹配的任何连接点上运行。切入点表达式如何跟连接点匹配是AOP的核心,Spring默认
  使用Aspectj作为切入点语法。说白了就是切面指定一个方法被AOP拦截到的时候要执行的代码。
⑤:引入(Introduction):
  声明额外的方法和字段。Spring AOP允许你向任何被通知对象引入一个新的接口(及其实现类)。说白了就是AOP允许在运行的时候动态的向
  代理对象实现新的接口来完成一些额外的功能,并不影响现有的对象功能
⑥:目标对象(Target Object):
  被一个或多个切面所通知的对象,也称作被通知对象。由于Spring AOP是通过运行时代理实现的,所以这个对象永远时被代理对象。说白了就是
  所以的对象在AOP中都会产生一个代理类,AOP整个过程都是针对代理类进行处理
⑦:AOP代理(AOP proxy):
  AOP框架创建的对象,用来实现切面(包括通知方法执行等功能),在Spring中AOP可以是JDK动态代理或Cglib代理。
⑧:织入(Weaving):
  把切面连接到其它应用程序类型或者对象上,并创建一个被通知对象。这些可以在编译时(例如使用AspectJ编译器),类加载时和运行时完成,
  Spring和其它纯AOP框架一样,在运行时完成织入,说白了就是把切面跟对象关联并创建该对象的代理对象的过程。

补充:通知(Advice)的类型:
①:前置通知(Before advice):
    在某个连接点(Join point)之前执行的通知,但这个通知不能阻止连接点的执行(除非它抛出一个异常)。
②:返回后通知(After returning advice):
    在某个连接点(Join point)正常完成后执行的通知。例如,一个方法没有抛出任何异常正常返回。
③:抛出异常后通知(After throwing advice):
    在方法抛出异常后执行的通知。
④:后置通知(After(finally)advice):
    当某个连接点(Join point)退出的时候执行的通知(不论是正常返回还是发生异常退出)。
⑤:环绕通知(Around advice):
    包围一个连接点(Join point)的通知,如方法调用。这是最强大的一种通知类型。环绕通知可以在方法前后完成自定义的行为。
    它也会选择是否继续执行连接点或直接返回它们自己的返回值或抛出异常来结束执行。
二:简单案例引入AOP概念及手动解决(了解)
1:转账问题代码
本案例我使用注解加xml两种方式的结合来完成案例的展示及问题所在 数据库建表语句


<dependencies>
        <!--mysql驱动坐标-->
        <dependency>
            <groupId>mysql</groupId>
            <artifactId>mysql-connector-java</artifactId>
            <version>5.1.32</version>
        </dependency>

        <!--c3p0连接池坐标-->
        <dependency>
            <groupId>c3p0</groupId>
            <artifactId>c3p0</artifactId>
            <version>0.9.1.2</version>
        </dependency>

        <!--dbutils工具类坐标-->
        <dependency>
            <groupId>commons-dbutils</groupId>
            <artifactId>commons-dbutils</artifactId>
            <version>1.7</version>
        </dependency>

        <!--junit单元测试坐标-->
        <dependency>
            <groupId>junit</groupId>
            <artifactId>junit</artifactId>
            <version>4.12</version>
        </dependency>

        <!--Spring-context主要坐标-->
        <dependency>
            <groupId>org.springframework</groupId>
            <artifactId>spring-context</artifactId>
            <version>5.2.6.RELEASE</version>
        </dependency>

        <!--Spring-test测试坐标-->
        <dependency>
            <groupId>org.springframework</groupId>
            <artifactId>spring-test</artifactId>
            <version>5.2.6.RELEASE</version>
        </dependency>

        <!--annotation坐标-->
        <dependency>
            <groupId>javax.annotation</groupId>
            <artifactId>javax.annotation-api</artifactId>
            <version>1.3.2</version>
        </dependency>
    </dependencies>
public class Student {
    private int sid;            //主键id
    private String sname;       //姓名
    private String ssex;        //性别
    private int sage;           //年龄
    private double scredit;     //学分
    private double smoney;      //零花钱
    private String saddress;    //住址
    private String senrol;      //入学时间
    //因为简单的单表CRUD就不涉及到外键
    //private int fid;            //外键 连接家庭表信息学生对家庭,一对一
    //private int tid;            //外键 连接老师信息 学生对老师,一对一
    //创建构造器/get/set/toString就不展示了
}
<?xml version="1.0" encoding="UTF-8"?>
<beans xmlns="http://www.springframework.org/schema/beans"
       xmlns:xsi="http://www.w3.org/2001/XMLSchema-instance"
       xmlns:context="http://www.springframework.org/schema/context"
       xsi:schemaLocation="http://www.springframework.org/schema/beans
        https://www.springframework.org/schema/beans/spring-beans.xsd
        http://www.springframework.org/schema/context
        https://www.springframework.org/schema/context/spring-context.xsd">

    <!--开启注解-->
    <context:component-scan base-package="cn.xw"></context:component-scan>

    <!--把C3P0连接池放入容器中-->
    <bean id="dataSource" class="com.mchange.v2.c3p0.ComboPooledDataSource">
        <property name="driverClass" value="com.mysql.jdbc.Driver"></property>
        <property name="jdbcUrl" value="jdbc:mysql://localhost:3306/demo_school"></property>
        <property name="user" value="root"></property>
        <property name="password" value="123"></property>
    </bean>

    <!--注册dbutils里面的QueryRunner对象-->
    <bean id="queryRunner" class="org.apache.commons.dbutils.QueryRunner">
        <constructor-arg name="ds" ref="dataSource"></constructor-arg>
    </bean>
</beans>
######StudentDao接口

/**
 * 学生数据操作Dao接口
 * @author ant
 */
public interface StudentDao {
    //根据姓名查询
    Student findByName(String name);
    //修改金额
    void update(Student student);
}

+++++++++++++++++++++++++++++++++++++++++

######StudentDaoImpl接口实现类

/**
 * 学生数据操作Dao实现类
 * @author ant
 */
@Repository("studentDao")
public class StudentDaoImpl implements StudentDao {
    //聚合dbutils工具类
    @Resource(name = "queryRunner")
    private QueryRunner query;

    //查询单个学生根据id
    public Student findByName(String name) {
        try {
            List<Student> students = query.query("select * from student where sname=?", new BeanListHandler<Student>(Student.class), name);
            //如果没数据返回null
            if (students == null || students.size() < 0) {
                return null;
            }
            //如果查询的数据只要一个就返回
            if (students.size() == 1) {
                return students.get(0);
            }
        } catch (SQLException e) {
            throw new RuntimeException("查询不到此学生 无法转账");
        }
        return null;
    }

    //更新学生
    public void update(Student student) {
        try {
            query.update("update student set smoney=? where sid=? ", student.getSmoney(), student.getSid());
        } catch (SQLException e) {
            e.printStackTrace();
        }
    }
}

+++++++++++++++++++++++++++++++++++++++++

######StudentService接口

/**
 * 学生业务层Service 接口
 *
 * @author ant
 */
public interface StudentService {
    //转账
    void transfer(String currentName, String targetName, double money);
}

+++++++++++++++++++++++++++++++++++++++++

######StudentServiceImpl实现类

/**
 * 业务接口实现类 学生ServiceStudent
 * @author ant
 */
@Service("studentService")
public class StudentServiceImpl implements StudentService {
    //聚合数据操作层
    @Autowired
    @Qualifier("studentDao")
    private StudentDao studentDao;
    /**
     * 转账
     * @param currentName 当前学生姓名
     * @param targetName  目标学生姓名
     * @param money       转账金额
     */
    public void transfer(String currentName, String targetName, double money) {
        /*为了演示 我就不做那么细致的数据判断等等操作*/
        //①:查询学生
        Student currentStudent = studentDao.findByName(currentName);
        Student targetStudent = studentDao.findByName(targetName);
        //打印最初结果
        System.out.println("转账前: 当前学生姓名和余额:" + currentStudent.getSname() + "  " + currentStudent.getSmoney());
        System.out.println("转账前: 目标学生姓名和余额:" + targetStudent.getSname() + "  " + targetStudent.getSmoney());
        //②:开始转账
        currentStudent.setSmoney(currentStudent.getSmoney() - money);
        targetStudent.setSmoney(targetStudent.getSmoney() + money);

        //③:调用更新
        studentDao.update(currentStudent);
        studentDao.update(targetStudent);

        //打印最终结果
        Student currentStudentEnd = studentDao.findByName(currentName);
        Student targetStudentEnd = studentDao.findByName(targetName);
        System.out.println("转账后: 当前学生姓名和余额:" + currentStudentEnd.getSname() + "  " + currentStudentEnd.getSmoney());
        System.out.println("转账后: 目标学生姓名和余额:" + targetStudentEnd.getSname() + "  " + targetStudentEnd.getSmoney());
    }
}
@RunWith(SpringJUnit4ClassRunner.class)
@ContextConfiguration(locations = "classpath:applicationContext.xml")
public class Client {

    @Autowired
    @Qualifier("studentService")
    private StudentService studentService;
    @Test
    public void transfer() {
        //调用转账方法
        studentService.transfer("王生安", "王霞", 10.0);
    }
}
在完成了代码的编辑,我们就来运行一下转账案例吧!
mysql> select * from student where sid in(1,5);   //转账前
+-----+--------+------+------+---------+--------+----------+------------+------+------+
| sid | sname  | ssex | sage | scredit | smoney | saddress | senrol     | fid  | tid  |
+-----+--------+------+------+---------+--------+----------+------------+------+------+
|   1 | 王生安 | 女   |   23 |    21.0 |  460.6 | 安徽六安   | 2019-03-15 |    1 |    4 |
|   5 | 王  霞 | 男   |   16 |    55.6 |  293.0 | 安徽六安   | 2012-08-08 |    5 |    3 |
+-----+--------+------+------+---------+--------+----------+------------+------+------+
mysql> select * from student where sid in(1,5);   //转账后
+-----+--------+------+------+---------+--------+----------+------------+------+------+
| sid | sname  | ssex | sage | scredit | smoney | saddress | senrol     | fid  | tid  |
+-----+--------+------+------+---------+--------+----------+------------+------+------+
|   1 | 王生安 | 女   |   23 |    21.0 |  450.6 | 安徽六安   | 2019-03-15 |    1 |    4 |
|   5 | 王  霞 | 男   |   16 |    55.6 |  303.0 | 安徽六安   | 2012-08-08 |    5 |    3 |
+-----+--------+------+------+---------+--------+----------+------------+------+------+

//程序运行结果
转账前: 当前学生姓名和余额:王生安  460.6
转账前: 目标学生姓名和余额:王  霞   293.0
转账后: 当前学生姓名和余额:王生安  450.6
转账后: 目标学生姓名和余额:王  霞  303.0
其实上面这个运行是正常操作,但是如果在转账的时候遇到问题的时候怎么办,比如我在StudentServiceImpl实现类里面的转账方法我来手动写个异常,接下来运行转账就好出现很可怕的问题
//③:调用更新
studentDao.update(currentStudent);
int a=1/0;//必抛异常
studentDao.update(targetStudent);
//程序运行的结果  在转账的中间发生的异常,所以后面是异常打印
转账前: 当前学生姓名和余额:王生安  450.6
转账前: 目标学生姓名和余额:王霞  303.0
java.lang.ArithmeticException: / by zero

//查看数据库
//转账前
mysql> select * from student where sid in(1,5);
+-----+--------+------+------+---------+--------+----------+------------+------+------+
| sid | sname  | ssex | sage | scredit | smoney | saddress | senrol     | fid  | tid  |
+-----+--------+------+------+---------+--------+----------+------------+------+------+
|   1 | 王生安 | 女   |   23 |    21.0 |  450.6  | 安徽六安 | 2019-03-15 |    1 |    4 |
|   5 | 王霞   | 男   |   16 |    55.6 |  303.0  | 安徽六安 | 2012-08-08 |    5 |    3 |
+-----+--------+------+------+---------+--------+----------+------------+------+------+
//转账后
mysql> select * from student where sid in(1,5);
+-----+--------+------+------+---------+--------+----------+------------+------+------+
| sid | sname  | ssex | sage | scredit | smoney | saddress | senrol     | fid  | tid  |
+-----+--------+------+------+---------+--------+----------+------------+------+------+
|   1 | 王生安 | 女   |   23 |    21.0 |  440.6  | 安徽六安 | 2019-03-15 |    1 |    4 |
|   5 | 王霞   | 男   |   16 |    55.6 |  303.0  | 安徽六安 | 2012-08-08 |    5 |    3 |
+-----+--------+------+------+---------+--------+----------+------------+------+------+

这里出现了一个问题,因为在转账的时候突然遇到问题,导致转出去的钱已经扣除了,而执行目标学生加钱的前一步遇到异常,所以就程序停止下来了,
后面就没执行了,因为每次更新的事务不一样,执行完自动提交事务,解决方法只有统一事务,等全部执行完才提交,遇到异常回滚事务
2:使用代码来解决前面的事务问题
使用代码来控制事务,其原理就是让当前线程下只开启一个Connection连接,然后开启事务,异常就回滚,上面的pom.xml、实体类、测试类没发生改变,下面就不再重复写了
<?xml version="1.0" encoding="UTF-8"?>
<beans xmlns="http://www.springframework.org/schema/beans"
       xmlns:xsi="http://www.w3.org/2001/XMLSchema-instance"
       xmlns:context="http://www.springframework.org/schema/context"
       xsi:schemaLocation="http://www.springframework.org/schema/beans
        https://www.springframework.org/schema/beans/spring-beans.xsd
        http://www.springframework.org/schema/context
        https://www.springframework.org/schema/context/spring-context.xsd">
    <!--开启注解-->
    <context:component-scan base-package="cn.xw"></context:component-scan>
    <!--把C3P0连接池放入容器中-->
    <bean id="dataSource" class="com.mchange.v2.c3p0.ComboPooledDataSource">
        <property name="driverClass" value="com.mysql.jdbc.Driver"></property>
        <property name="jdbcUrl" value="jdbc:mysql://localhost:3306/demo_school"></property>
        <property name="user" value="root"></property>
        <property name="password" value="123"></property>
    </bean>
    <!--注册dbutils里面的QueryRunner对象-->
    <!--因为要保证Connection在当前线程下是唯一的,QueryRunner就不依赖它了,后期传入当前线程下的Connection-->
    <bean id="queryRunner" class="org.apache.commons.dbutils.QueryRunner"></bean>
</beans>
##### StudentDao接口
/**
 * 学生数据操作Dao接口
 * @author ant
 */
public interface StudentDao {
    //根据姓名查询
    Student findByName(String name);
    //修改金额
    void update(Student student);
}

+++++++++++++++++++++++++++++++++++++++++

#####StudentDaoImpl实现类

/**
 * 学生数据操作Dao实现类
 * @author ant
 */
@Repository("studentDao")
public class StudentDaoImpl implements StudentDao {
    //聚合dbutils工具类
    @Resource(name = "queryRunner")
    private QueryRunner query;
    //聚合ConnectionUtils 返回一个线程安全的Connection连接,说白了就是当前线程下的Connection
    @Resource(name="connectionUtils")
    private ConnectionUtils connectionUtils;

    //查询单个学生根据id
    public Student findByName(String name) {
        try {
            List<Student> students = query.query(connectionUtils.getThreadConnection(),"select * from student where sname=?", new BeanListHandler<Student>(Student.class), name);
            //如果没数据返回null
            if (students == null || students.size() < 0) {
                return null;
            }
            //如果查询的数据只要一个就返回
            if (students.size() == 1) {
                return students.get(0);
            }
        } catch (SQLException e) {
            throw new RuntimeException("查询不到此学生 无法转账");
        }
        return null;
    }

    //更新学生
    public void update(Student student) {
        try {
            query.update(connectionUtils.getThreadConnection(),"update student set smoney=? where sid=? ", student.getSmoney(), student.getSid());
        } catch (SQLException e) {
            e.printStackTrace();
        }
    }
}

++++++++++++++++++++++++++++++++++++++++
##### StudentService接口

/**
 * 学生业务层Service 接口
 * @author ant
 */
public interface StudentService {
    //转账
    void transfer(String currentName, String targetName, double money);
}

+++++++++++++++++++++++++++++++++++++++++

##### StudentServiceImpl实现类

/**
 * 业务接口实现类 学生ServiceStudent
 *
 * @author ant
 */
@Service("studentService")
public class StudentServiceImpl implements StudentService {
    //聚合数据操作层
    @Autowired
    @Qualifier("studentDao")
    private StudentDao studentDao;

    //聚合 TransactionManger事务工具
    @Autowired
    @Qualifier("transactionManger")
    private TransactionManger manger;

    /**
     * 转账
     * @param currentName 当前学生姓名
     * @param targetName  目标学生姓名
     * @param money       转账金额
     */
    public void transfer(String currentName, String targetName, double money) {
        /**
         * 这里我使用了try catch,在里面写了对事务的每一步操作,都是调用工具类TransactionManger
         * 这样写的坏处 如果后期Service类里面有特别多方法 而且每个方法都要有try catch处理异常从而控制事务
         * 这样就会使代码变得臃肿,所以后面会使用代理方式来完成改造
         */
        try {
            manger.beginTransaction();      //开启事务
            /*为了演示 我就不做那么细致的数据判断等等操作*/
            //①:查询学生
            Student currentStudent = studentDao.findByName(currentName);
            Student targetStudent = studentDao.findByName(targetName);
            //打印最初结果
            System.out.println("转账前: 当前学生姓名和余额:" + currentStudent.getSname() + "  " + currentStudent.getSmoney());
            System.out.println("转账前: 目标学生姓名和余额:" + targetStudent.getSname() + "  " + targetStudent.getSmoney());
            //②:开始转账
            currentStudent.setSmoney(currentStudent.getSmoney() - money);
            targetStudent.setSmoney(targetStudent.getSmoney() + money);
            //③:调用更新
            studentDao.update(currentStudent);
            int a = 1 / 0;//必抛异常
            studentDao.update(targetStudent);
            //打印最终结果
            Student currentStudentEnd = studentDao.findByName(currentName);
            Student targetStudentEnd = studentDao.findByName(targetName);
            System.out.println("转账后: 当前学生姓名和余额:" + currentStudentEnd.getSname() + "  " + currentStudentEnd.getSmoney());
            System.out.println("转账后: 目标学生姓名和余额:" + targetStudentEnd.getSname() + "  " + targetStudentEnd.getSmoney());
            manger.commit();        //提交事务
        } catch (Exception e) {
            manger.rollback();      //回滚事务
        } finally {
            manger.close();         //关闭事务
        }
    }
}
/**
 * 工具类 保证Connection在多线程下安全
 * @author ant
 */
@Component(value = "connectionUtils")
public class ConnectionUtils {
    //创建一个ThreadLocal,其实这个是线程局部变量
    private ThreadLocal<Connection> tl = new ThreadLocal<Connection>();
    //注入DataSource数据连接池
    @Autowired
    @Qualifier(value = "dataSource")
    private DataSource dataSource;

    //从连接池获取保存到局部变量池后返回Connection连接
    public Connection getThreadConnection() {
        //判断tl里面如果没有连接则创建,反之返回连接
        if (tl.get() == null) {
            try {
                tl.set(dataSource.getConnection());
            } catch (SQLException e) {
                e.printStackTrace();
            }
        }
        return tl.get();
    }

    //移除常量池里的变量对象
    public void close() {
        tl.remove();
    }
}
/**
 * 用来处理事务的类
 * @author ant
 */
@Component("transactionManger")
public class TransactionManger {

    //注入 从线程局部变量类下获取Connection连接 方便统一事务
    @Resource(name="connectionUtils")
    private ConnectionUtils connectionUtils;

    //开启事务
    public void beginTransaction(){
        try {
            connectionUtils.getThreadConnection().setAutoCommit(false);
            System.out.println("设置事务提交方式为手动提交");
        } catch (SQLException e) {
            e.printStackTrace();
        }
    }

    //提交事务
    public void commit(){
        try {
            connectionUtils.getThreadConnection().commit();
            System.out.println("完成提交事务");
        } catch (SQLException e) {
            e.printStackTrace();
        }
    }

    //回滚事务
    public void rollback(){
        try {
            connectionUtils.getThreadConnection().rollback();
            System.out.println("回滚事务执行");
        } catch (SQLException e) {
            e.printStackTrace();
        }
    }

    //关闭连接 (还回池中 不是真正关闭)
    public void close(){
        try {
            //把Connection连接还回池中
            connectionUtils.getThreadConnection().close();
            //移除线程局部变量
            connectionUtils.close();
            System.out.println("关闭连接");
        } catch (SQLException e) {
            e.printStackTrace();
        }
    }
}
在完成上面的代码后我们来一个简答的测试,因为上一段代码的StudentServiceImpl实现类的转账方法我手动添加个异常了,看这次转账失败是否可以回滚!
//转账前
mysql> select * from student where sid in(1,5);
+-----+--------+------+------+---------+--------+----------+------------+------+------+
| sid | sname  | ssex | sage | scredit | smoney | saddress | senrol     | fid  | tid  |
+-----+--------+------+------+---------+--------+----------+------------+------+------+
|   1 | 王生安 | 女   |   23 |    21.0 |  440.6 | 安徽六安   | 2019-03-15 |    1 |    4 |
|   5 | 王霞   | 男   |   16 |    55.6 |  303.0 | 安徽六安   | 2012-08-08 |    5 |    3 |
+-----+--------+------+------+---------+--------+----------+------------+------+------+
//程序执行转账出现异常和程序打印信息
设置事务提交方式为手动提交
转账前: 当前学生姓名和余额:王生安  440.6
转账前: 目标学生姓名和余额:王霞  303.0
回滚事务执行
关闭连接
//异常出现后 我再次查询数据库
mysql> select * from student where sid in(1,5);
+-----+--------+------+------+---------+--------+----------+------------+------+------+
| sid | sname  | ssex | sage | scredit | smoney | saddress | senrol     | fid  | tid  |
+-----+--------+------+------+---------+--------+----------+------------+------+------+
|   1 | 王生安 | 女   |   23 |    21.0 |  440.6 | 安徽六安   | 2019-03-15 |    1 |    4 |
|   5 | 王霞   | 男   |   16 |    55.6 |  303.0 | 安徽六安   | 2012-08-08 |    5 |    3 |
+-----+--------+------+------+---------+--------+----------+------------+------+------+
我们通过代码改造,已经实现了事务控制,但是我们添加了事务也产生了一个新的问题业务层方法变得臃肿了,里面充斥着很多重复代码。并且业务层方法和事务控制方法耦合了。试想一下,如果我们此时提交,回滚,释放资源中任何一个方法名变更,都需要修改业务层的代码,况且这还只是一个业务层实现类,而实际的项目中这种业务层实现类可能有十几个甚至几十个。
3:使用JDK动态代理完成事务问题
在完成了使用普通代码控制线程当前的Connection连接唯一后对其事务操作后,发现代码特别臃肿,每次在写Service实现的方法后都要处理事务,发现方法一旦变多将是毁灭性打击,有什么方法可以使不在Service下写事务处理就可以达到想要的效果呢?大家肯定第一个就想到动态代理,没错,这就是一个好办法。
注:除了这下面3个地方要修改,其它全部和上一个案例一样
/**
 * 代理工厂类
 * @author ant
 */
public class ProxyFactory {

    //传入被代理对象StudentService
    private StudentService studentService;
    //传入事务
    private TransactionManger manger;
    //后面2个set方法方便XML注入数据
    public void setStudentService(StudentService studentService) {
        this.studentService = studentService;
    }
    public void setManger(TransactionManger manger) {
        this.manger = manger;
    }

    //返回一个StudentService 后期在xml通过工厂方式注入给测试类 使用工厂调用
    public StudentService getStudentService() {
        return (StudentService) Proxy.newProxyInstance(studentService.getClass().getClassLoader(), studentService.getClass().getInterfaces(),
                new InvocationHandler() {
                    public Object invoke(Object proxy, Method method, Object[] args) throws Throwable {
                        Object obj = null;
                        try {
                            manger.beginTransaction();//开启事务
                            obj = method.invoke(studentService, args);
                            manger.commit();         //提交事务
                        } catch (Exception e) {
                            manger.rollback();       //回滚事务
                            throw new RuntimeException("转账失败");
                        } finally {
                            manger.close();          //关闭事务
                        }
                        return obj;
                    }
                });
    }
}
<?xml version="1.0" encoding="UTF-8"?>
<beans xmlns="http://www.springframework.org/schema/beans"
       xmlns:xsi="http://www.w3.org/2001/XMLSchema-instance"
       xmlns:context="http://www.springframework.org/schema/context"
       xsi:schemaLocation="http://www.springframework.org/schema/beans
        https://www.springframework.org/schema/beans/spring-beans.xsd
        http://www.springframework.org/schema/context
        https://www.springframework.org/schema/context/spring-context.xsd">
    <!--开启注解-->
    <context:component-scan base-package="cn.xw"></context:component-scan>
    <!--把C3P0连接池放入容器中-->
    <bean id="dataSource" class="com.mchange.v2.c3p0.ComboPooledDataSource">
        <property name="driverClass" value="com.mysql.jdbc.Driver"></property>
        <property name="jdbcUrl" value="jdbc:mysql://localhost:3306/demo_school"></property>
        <property name="user" value="root"></property>
        <property name="password" value="123"></property>
    </bean>
    <!--注册dbutils里面的QueryRunner对象-->
    <bean id="queryRunner" class="org.apache.commons.dbutils.QueryRunner"></bean>

    <!--创建代理工厂类 分别注入对象-->
    <bean id="proxyFactory" class="cn.xw.utils.ProxyFactory">
        <property name="studentService" ref="studentService"></property>
        <property name="manger" ref="transactionManger"></property>
    </bean>
    <!--通过代理工厂类 来生成一个StudentService代理对象-->
    <bean id="studentServiceProxy" factory-bean="proxyFactory" factory-method="getStudentService"></bean>
</beans>
//更改测试类
@RunWith(SpringJUnit4ClassRunner.class)
@ContextConfiguration(locations = "classpath:applicationContext.xml")
public class Client {

    @Autowired
    @Qualifier("studentServiceProxy")  //注入代理对象的StudentService
    private StudentService studentService;
    @Test
    public void transfer() {
        //调用转账方法
        studentService.transfer("王生安", "王霞", 10.0);
     //其打印结果和上一个案例一样
    }
}
小总结:学完动态代理完成对事务的控制发现动态代理要方便简单,但是要注意的是JDK动态代理的类必须要有一个父类接口,否则无法代理,但是如果使用Cglib代理的话则不需要 详解代理模式
三:Spring AOP切面解决事务(非常重要)
第一节中我们介绍了AOP,但到这里才真正运用Spring AOP,它是Spring的第二核心,在程序运行期间,对已有的方法进行加强
准备:maven坐标导入
  <!--AOP核心功能 如代理工厂等等-->
        <dependency>
            <groupId>org.springframework</groupId>
            <artifactId>spring-aop</artifactId>
            <version>5.2.6.RELEASE</version>
        </dependency>

        <!--支持解析切入点表达式等等-->
        <dependency>
            <groupId>org.aspectj</groupId>
            <artifactId>aspectjweaver</artifactId>
            <version>1.9.5</version>
        </dependency>

        <!--支持AOP相关注解等等-->
        <dependency>
            <groupId>org.aspectj</groupId>
            <artifactId>aspectjrt</artifactId>
            <version>1.9.5</version>
        </dependency>
介绍:我们要想实现Spring AOP编程就必须导入上面的几个包,但是随着Spring版本的不断更新及maven的导包的更新,导致有些坐标不导入也是可行的!还有一个要说明的Spring的Aop本身就是通过AspectJ实现的,然而在Spring较高版本(大概在3.0)之后,就不再一起发布以来包了,而是将aspectjweaver作为可选依赖引入,所以说Spring Aop依赖aspectj来实现。
①:spring-aop:
当前的这个坐标在maven工程中可以不用手动导入,在maven中导入spring-context坐标后,其实maven就为我们默认导入了spring-aop坐标了
②:aspectjweaver:
这个坐标是我们在使用AOP切面编程的时候必须导入的,因为它可以解析切入点表达式,但是呢aspectjweaver包含了aspectirt
③:aspectjrt:
这个坐标说明开启AOP的注解功能,但是aspectjweaver已经包含了它,所以单单注解可以使用此坐标
1:基于XML配置完成Spring AOP(入门)
 <dependencies>
        <!--导入Spring核心包-->
        <dependency>
            <groupId>org.springframework</groupId>
            <artifactId>spring-context</artifactId>
            <version>5.2.6.RELEASE</version>
        </dependency>
        <!--导入Spring测试包-->
        <dependency>
            <groupId>org.springframework</groupId>
            <artifactId>spring-test</artifactId>
            <version>5.2.6.RELEASE</version>
        </dependency>
        <!--导入AOP切入点表达式解析包-->
        <dependency>
            <groupId>org.aspectj</groupId>
            <artifactId>aspectjweaver</artifactId>
            <version>1.9.5</version>
        </dependency>
        <!--junit单元测试-->
        <dependency>
            <groupId>junit</groupId>
            <artifactId>junit</artifactId>
            <version>4.12</version>
        </dependency>
        <!--annotation -->
        <dependency>
            <groupId>javax.annotation</groupId>
            <artifactId>javax.annotation-api</artifactId>
            <version>1.3.2</version>
        </dependency>
    </dependencies>
##### StudentDao接口

public interface StudentDao {
    //模拟查询全部
    void findAll();
    //模拟查询一个
    Object findById();
    //模拟添加数据
    void saveStudet(Object obj);
}

+++++++++++++++++++++++++++++++++++++++++

##### StudentDaoImpl实现类

@Repository(value="studentDao")
public class StudentDaoImpl implements StudentDao {
    //模拟查询全部
    public void findAll() {
        System.out.println("查询全部完成 现在打印");
    }
    //模拟查询一个
    public Object findById() {
        System.out.println("查询单个完成");
        return null;
    }
    //模拟添加数据
    public void saveStudet(Object obj) {
        System.out.println("添加数据完成");
    }
}

“++++++++++++++++++++++++++++++++++++++++

##### StudentService接口

public interface StudentService {
    //模拟查询全部
    void findAll();
    //模拟查询一个
    Object findById();
    //模拟添加数据
    void saveStudet(Object obj);
}

+++++++++++++++++++++++++++++++++++++++++

##### StudentServiceImpl实现类

@Service(value="studentService")
public class StudentServiceImpl implements StudentService {
    @Autowired
    @Qualifier(value="studentDao")
    private StudentDao studentDao;
    //模拟查询全部
    public void findAll() {
        studentDao.findAll();
    }
    //模拟查询一个
    public Object findById() {

        return studentDao.findById();
    }
    //模拟添加数据
    public void saveStudet(Object obj) {
        studentDao.saveStudet(obj);
    }
}
/**
 * 编写模拟事务类
 * @author ant
 */
public class TransactionManager {
    public void beforePrint() {
        System.out.println("前置通知");
    }
    public void afterPrint() {
        System.out.println("最终通知");
    }
    public void afterReturningPrint() {
        System.out.println("后置运行通知");
    }
    public void afterWarningPrint() {
        System.out.println("后置异常通知");
    }
}
<?xml version="1.0" encoding="UTF-8"?>
<beans xmlns="http://www.springframework.org/schema/beans"
       xmlns:xsi="http://www.w3.org/2001/XMLSchema-instance"
       xmlns:aop="http://www.springframework.org/schema/aop"
       xmlns:context="http://www.springframework.org/schema/context"
       xsi:schemaLocation="http://www.springframework.org/schema/beans
        https://www.springframework.org/schema/beans/spring-beans.xsd
        http://www.springframework.org/schema/aop
        https://www.springframework.org/schema/aop/spring-aop.xsd
        http://www.springframework.org/schema/context
        https://www.springframework.org/schema/context/spring-context.xsd">
    <!--开启注解扫描-->
    <context:component-scan base-package="cn.xw"></context:component-scan>
    <!--把事务类放入容器-->
    <bean id="transaction" class="cn.xw.utils.TransactionManager"></bean>
    <!--编写aop切面-->
    <aop:config>
        <aop:aspect id="aspects" ref="transaction">
            <!--编写前 后 异常和运行通知-->
            <aop:before method="beforePrint" pointcut="execution(public void cn.xw.service.impl.StudentServiceImpl.findAll())"></aop:before>
            <aop:after-returning method="afterReturningPrint" pointcut="execution(public void cn.xw.service.impl.StudentServiceImpl.findAll())"></aop:after-returning>
            <aop:after-throwing method="afterWarningPrint" pointcut="execution(public void cn.xw.service.impl.StudentServiceImpl.findAll())"></aop:after-throwing>
            <aop:after method="afterPrint" pointcut="execution(public void cn.xw.service.impl.StudentServiceImpl.findAll())"></aop:after>
        </aop:aspect>
    </aop:config>
</beans>
@RunWith(SpringJUnit4ClassRunner.class)
@ContextConfiguration(locations = "classpath:applicationContext.xml")
public class Client {
    @Autowired
    @Qualifier("studentService")
    private StudentService studentService;
    @Test
    public void fun() {
        studentService.findAll();
    }
}
###运行结果
前置通知
查询全部完成 现在打印
后置运行通知
最终通知
2:介绍导入的applicationContext.xml约束
<?xml version="1.0" encoding="UTF-8"?>
<beans xmlns="http://www.springframework.org/schema/beans"
       xmlns:xsi="http://www.w3.org/2001/XMLSchema-instance"
       xmlns:aop="http://www.springframework.org/schema/aop"
       xmlns:context="http://www.springframework.org/schema/context"
       xsi:schemaLocation="http://www.springframework.org/schema/beans
        https://www.springframework.org/schema/beans/spring-beans.xsd
        http://www.springframework.org/schema/aop
        https://www.springframework.org/schema/aop/spring-aop.xsd
        http://www.springframework.org/schema/context
        https://www.springframework.org/schema/context/spring-context.xsd">
     <!--导入上面的3条链接约束 代表开启AOP切面功能 -->
</beans>
3:通知类编写
public class TransactionManager {
    public void beforePrint() { System.out.println("前置通知");}
    public void afterPrint() { System.out.println("最终通知"); }
    public void afterReturningPrint() { System.out.println("后置运行通知");}
    public void afterWarningPrint() { System.out.println("后置异常通知"); }
}
上面这个是一个简单的通知类,和入门案例的一样,其实最重要的也就是这个类了,这4个通知类里面可以写像我们之前处理事务代码,也可以写各种增强事务代码,包括后期写打印日志、处理事务、代码增强、权限控制等等。但是仅仅一个通知类是无法运行的,必须要在XML里面配置AOP才可以指定通知
4:配置XML里的AOP
<!--把通知类放入容器-->
 <bean id="manger" class="cn.xw.utils.TransactionManager"></bean>

 <!--配置AOP切面-->
  <aop:config>
    <!--配置切面 说白了就是使用哪个通知类去增强那些要增强的方法-->
      <aop:aspect id="aspects" ref="manger">
        <!--配置前置通知:在切入点表达式执行前执行 说白了就是在增强的方法之前执行-->
        <aop:before method="beforePrint" pointcut="execution(public void cn.xw.service.impl.StudentServiceImpl.findAll())" />
        <!--配置后置运行通知:在切入点方法正常执行时执行-->
        <aop:after-returning method="afterReturningPrint" pointcut="execution(public void cn.xw.service.impl.StudentServiceImpl.findAll())" />
        <!--配置异常通知:在程序运行出异常执行-->
        <aop:after-throwing method="afterWarningPrint" pointcut="execution(public void cn.xw.service.impl.StudentServiceImpl.findAll())" />
        <!--配置最终通知:无论切入点表达式是否有异常,在执行完方法的前一步执行-->
        <aop:after method="afterPrint" pointcut="execution(public void cn.xw.service.impl.StudentServiceImpl.findAll())" />
      </aop:aspect>
  </aop:config>
通过上面的配置可以看出,我配置的切入点方法都是findAll,那如果我要对当前Service下的所有方法都要增强怎么办呢?是不是每个方法都要写前、后、异常、运行通知呢,肯定是不用的。而且现在的代码第一眼看上去不舒服,pointcut后面跟一大串切入点表达式,这个后面会慢慢简化
①:aop:config
开始声明AOP配置,把AOP的配置全部写在里面
②:aop:aspect
它里面有2个常用的属性,分别是id和ref
id:给切面起一个唯一标识,因为aop:aspect标签可以有多个
ref:引用配置好的通知类bean的id
③:常用的几种通知
aop:before:用于配置前置通知。指定增强的方法在切入点方法之前执行。切入点方法执行之前执行
aop:after-returning:用于配置后置通知。切入点方法正常执行之后。它和异常通知只能有一个执行
aop:after-throwing:用于配置异常通知。切入点方法执行产生异常后执行。它和后置通知只能执行一个
aop:after:用于配置最终通知。无论切入点方法执行时是否有异常,它都会在其后面执行。
aop:around:用于配置环绕通知。集成上面4种通知

属性介绍:
    method:指定通知中方法的名称。
    pointct:定义切入点表达式
    pointcut-ref:指定切入点表达式的引用
④:切入点表达式说明
在上面我们可以看到每个通知里面都要使用一个pointct属性,但是里面的属性该写什么呢?接下来我就和大家介绍一下,切入点表达式解析后可以准确找到要通知的方法,比如:
pointcut="execution( public void cn.xw.service.impl.StudentServiceImpl . findAll() )"
大家可以很清晰看出这一个切入点表达式,每个切入点表达式都要被execution包裹。
execution(表达式)
表达式语法:execution([修饰符] 返回值类型 包名.类名.方法名(参数))

写法说明:
①:全匹配方式
execution( public void cn.xw.StudentService.impl.StudentServiceImpl.saveStudent(cn.xw.domain.Student) )
②:访问修饰符可以省去
execution( void cn.xw.StudentService.impl.StudentServiceImpl.saveStudent(cn.xw.domain.Student) )
③:返回值类型可以省去  用*表示
execution( * cn.xw.StudentService.impl.StudentServiceImpl.saveStudent(cn.xw.domain.Student) )
④:包名可以使用*,表示任意包,但是有几级包,需要写几个 *
execution( * *.*.*.*.StudentServiceImpl.saveStudent(cn.xw.domain.Student) )
⑤:优化第④写法 使用..来表示当前包,及其子包
execution( * cn..StudentServiceImpl.saveStudent(cn.xw.domain.Student) )
⑥:类名可以使用*号 表示任意类
execution( * cn..*.saveStudent(cn.xw.domain.Student) )
⑦:方法名可以使用*号 表示任意方法
execution( * cn..*.*(cn.xw.domain.Student) )
⑧:参数列表可以使用*,表示参数可以是任意数据类型,但是必须有参数
execution( * cn..*.*(*) )
⑨:参数列表可以使用..表示有无参数均可,有参数可以是任意类型
execution( * cn..*.*(..) )
⑩:全通配 每个方法都会被拦截通知
execution( * *..*.*(..) )
注:通常情况下,我们都是对业务层的方法进行增强,所以切入点表达式都是切到业务层实现类。
execution(* cn.xw.service.impl.*.*(..))
⑤:配置切入点表达式并引入

大家看上面一副我画黄色底线的切入点表达式了吧,不是句子写错了,大家是否发现,我每写一个通知就要重复写一下切入点表达式,那有没有把这些表达式抽取出去的方法呢?显然是有的,接下来我就带大家来看一下
<!--配置AOP切面-->
    <aop:config>
        <!--切入点表达式抽取  配置在外边表示全局的,可以供多个配置切面使用-->
        <aop:pointcut id="pidOn" expression="execution(* cn.xw.service.impl.*.*(..))"/>
        <!--配置切面-->
        <aop:aspect id="aspects" ref="manger">
            <!--切入点表达式抽取 配置在里面表示局部的,可以供自己使用-->
            <aop:pointcut id="pidIn" expression="execution(* cn.xw.service.impl.*.*(..))"/>
            <!--配置前置通知-->
            <aop:before method="beforePrint" pointcut-ref="pidOn" />
            <!--配置后置运行通知-->
            <aop:after-returning method="afterReturningPrint" pointcut-ref="pidOn" />
            <!--配置异常通知-->
            <aop:after-throwing method="afterWarningPrint" pointcut-ref="pidOn"/>
            <!--配置最终通知-->
            <aop:after method="afterPrint" pointcut-ref="pidOn" />
        </aop:aspect>
    </aop:config>
外部使用 <aop:pointcut>标签来完成切入点表达式的抽取
内部使用 pointcut-ref=""属性来引用外部标签的id
所有种写法才是后期经常使用的,针对前面的繁琐步骤只是来个铺垫,大家只需要把后面的写法记住即可!
5:XML环绕通知
#####在TransactionManage类中添加环绕通知方法

 /**
     * 环绕通知
     * @param pp spring 框架为我们提供了一个接口:ProceedingJoinPoint,它可以作为环绕通知的方法参数。
     *           在环绕通知执行时,spring 框架会为我们提供该接口的实现类对象,我们直接使用就行。
     */
    public Object aroundPrint(ProceedingJoinPoint pp) {
        //定义返回值
        Object obj = null;
        try {
            //获取方法执行的参数
            Object[] args = pp.getArgs();
            beforePrint();      //调用前置通知
            //执行方法
            obj = pp.proceed(args);
            afterReturningPrint();    //调用后置运行通知
        } catch (Throwable e) {
            afterWarningPrint();     //调用异常通知
            //打印异常
            e.printStackTrace();
        } finally {
            afterPrint();     //调用最终通知
        }
        return obj;
    }
<!--配置AOP切面-->
    <aop:config>
        <!--切入点表达式抽取  配置在外边表示全局的,可以供多个配置切面使用-->
        <aop:pointcut id="pidOn" expression="execution(* cn.xw.service.impl.*.*(..))"/>
        <!--配置切面-->
        <aop:aspect id="aspects" ref="manger">
            <!--调用环绕通知-->
            <aop:around method="aroundPrint" pointcut-ref="pidOn"></aop:around>
        </aop:aspect>
    </aop:config>
6:使用XML实现AOP方式完成对学生转账功能
public class Student {

    private int sid;            //主键id
    private String sname;       //姓名
    private String ssex;        //性别
    private int sage;           //年龄
    private double scredit;     //学分
    private double smoney;      //零花钱
    private String saddress;    //住址
    private String senrol;      //入学时间
    //因为简单的单表CRUD就不涉及到外键
    //private int fid;            //外键 连接家庭表信息学生对家庭,一对一
    //private int tid;            //外键 连接老师信息 学生对老师,一对一
    //创建构造器/get/set/toString就不展示了
}
 <dependencies>
        <!--mysql驱动坐标-->
        <dependency>
            <groupId>mysql</groupId>
            <artifactId>mysql-connector-java</artifactId>
            <version>5.1.32</version>
        </dependency>

        <!--c3p0连接池坐标-->
        <dependency>
            <groupId>c3p0</groupId>
            <artifactId>c3p0</artifactId>
            <version>0.9.1.2</version>
        </dependency>

        <!--dbutils工具类坐标-->
        <dependency>
            <groupId>commons-dbutils</groupId>
            <artifactId>commons-dbutils</artifactId>
            <version>1.7</version>
        </dependency>

        <!--junit单元测试坐标-->
        <dependency>
            <groupId>junit</groupId>
            <artifactId>junit</artifactId>
            <version>4.12</version>
        </dependency>

        <!--Spring-context主要坐标-->
        <dependency>
            <groupId>org.springframework</groupId>
            <artifactId>spring-context</artifactId>
            <version>5.2.6.RELEASE</version>
        </dependency>

        <!--Spring-test测试坐标-->
        <dependency>
            <groupId>org.springframework</groupId>
            <artifactId>spring-test</artifactId>
            <version>5.2.6.RELEASE</version>
        </dependency>

        <!--导入解析切入点表达式坐标-->
        <dependency>
            <groupId>org.aspectj</groupId>
            <artifactId>aspectjweaver</artifactId>
            <version>1.9.5</version>
        </dependency>

        <!--annotation坐标-->
        <dependency>
            <groupId>javax.annotation</groupId>
            <artifactId>javax.annotation-api</artifactId>
            <version>1.3.2</version>
        </dependency>
    </dependencies>
#####StudentDao接口
/**
 * 学生数据操作Dao接口
 * @author ant
 */
public interface StudentDao {
    //根据姓名查询
    Student findByName(String name);
    //修改金额
    void update(Student student);
}
++++++++++++++++++++++++++++++++++++++++++

#####StudentDaoImpl实现类
/**
 * 学生数据操作Dao实现类
 * @author ant
 */
@Repository("studentDao")
public class StudentDaoImpl implements StudentDao {
    //聚合dbutils工具类
    @Resource(name = "queryRunner")
    private QueryRunner query;

    @Resource(name="connectionUtils")
    private ConnectionUtils connectionUtils;

    //查询单个学生根据id
    public Student findByName(String name) {
        try {
            List<Student> students = query.query(connectionUtils.getThreadConnection(),"select * from student where sname=?", new BeanListHandler<Student>(Student.class), name);
            //如果没数据返回null
            if (students == null || students.size() < 0) {
                return null;
            }
            //如果查询的数据只要一个就返回
            if (students.size() == 1) {
                return students.get(0);
            }
        } catch (SQLException e) {
            throw new RuntimeException("查询不到此学生 无法转账");
        }
        return null;
    }
    //更新学生
    public void update(Student student) {
        try {
            query.update(connectionUtils.getThreadConnection(),"update student set smoney=? where sid=? ", student.getSmoney(), student.getSid());
        } catch (SQLException e) {
            e.printStackTrace();
        }
    }
}

+++++++++++++++++++++++++++++++++++++++++

#####StudentService接口

/**
 * 学生业务层Service 接口
 * @author ant
 */
public interface StudentService {
    //转账
    void transfer(String currentName, String targetName, double money);
}

+++++++++++++++++++++++++++++++++++++++++

#####StudentServiceImpl实现类

/**
 * 业务接口实现类 学生ServiceStudent
 * @author ant
 */
@Service("studentService")
public class StudentServiceImpl implements StudentService {
    //聚合数据操作层
    @Autowired
    @Qualifier("studentDao")
    private StudentDao studentDao;
    /**
     * 转账
     * @param currentName 当前学生姓名
     * @param targetName  目标学生姓名
     * @param money       转账金额
     */
    public void transfer(String currentName, String targetName, double money) {
        /*为了演示 我就不做那么细致的数据判断等等操作*/
        //①:查询学生
        Student currentStudent = studentDao.findByName(currentName);
        Student targetStudent = studentDao.findByName(targetName);
        //打印最初结果
        System.out.println("转账前: 当前学生姓名和余额:" + currentStudent.getSname() + "  " + currentStudent.getSmoney());
        System.out.println("转账前: 目标学生姓名和余额:" + targetStudent.getSname() + "  " + targetStudent.getSmoney());
        //②:开始转账
        currentStudent.setSmoney(currentStudent.getSmoney() - money);
        targetStudent.setSmoney(targetStudent.getSmoney() + money);

        //③:调用更新
        studentDao.update(currentStudent);
        studentDao.update(targetStudent);

        //打印最终结果
        Student currentStudentEnd = studentDao.findByName(currentName);
        Student targetStudentEnd = studentDao.findByName(targetName);
        System.out.println("转账后: 当前学生姓名和余额:" + currentStudentEnd.getSname() + "  " + currentStudentEnd.getSmoney());
        System.out.println("转账后: 目标学生姓名和余额:" + targetStudentEnd.getSname() + "  " + targetStudentEnd.getSmoney());
    }
}
/**
 * 工具类 保证Connection在多线程下安全
 * @author ant
 */
@Component(value="connectionUtils")
public class ConnectionUtils {

    //创建一个ThreadLocal,其实这个是线程局部变量
    private ThreadLocal<Connection> local = new ThreadLocal<Connection>();
    //数据连接池属性
    @Resource(name="dataSource")
    private DataSource dataSource;

    //从连接池获取保存到局部变量池后返回Connection连接
    public Connection getThreadConnection() {
        //判断tl里面如果没有连接则创建,反之返回连接
        if (local.get() == null) {
            try {
                local.set(dataSource.getConnection());
            } catch (SQLException e) {
                e.printStackTrace();
            }
        }
        return local.get();
    }
    //移除常量池里的变量对象
    public void close() {
        local.remove();
    }
}
@Component(value = "transactionManger")
public class TransactionManger {

    //ConnectionUtils属性,保证获取当前线程下唯一的Connection连接
    @Resource(name = "connectionUtils")
    private ConnectionUtils connectionUtils;

    //前置通知
    public void beforeMessage() {
        System.out.println("前置通知  执行");
        try {
            connectionUtils.getThreadConnection().setAutoCommit(false);
        } catch (SQLException e) {
            e.printStackTrace();
        }
    }

    //后置运行通知
    public void afterReturningMessage() {
        System.out.println("后置运行通知  执行");
        try {
            connectionUtils.getThreadConnection().commit();
        } catch (SQLException e) {
            e.printStackTrace();
        }
    }

    //后置运行异常通知
    public void afterThrowingMessage() {
        System.out.println("后置运行异常通知  执行");
        try {
            connectionUtils.getThreadConnection().rollback();
        } catch (SQLException e) {
            e.printStackTrace();
        }
    }

    //最终通知 开始关闭资源的和还回连接
    public void afterMessage() {
        System.out.println("最终通知  执行");
        try {
            connectionUtils.getThreadConnection().close();
            connectionUtils.close();
        } catch (SQLException e) {
            e.printStackTrace();
        }
    }

    //环绕通知
    public void aroundMessage(ProceedingJoinPoint pp) {
        System.out.println("==》环绕通知开始《==");
        Object obj = null;
        try {
            Object[] args = pp.getArgs();
            beforeMessage();
            obj = pp.proceed(args);
            afterReturningMessage();
        } catch (Throwable e) {
            afterThrowingMessage();
            e.printStackTrace();
        } finally {
            afterMessage();
        }
    }
}
<?xml version="1.0" encoding="UTF-8"?>
<beans xmlns="http://www.springframework.org/schema/beans"
       xmlns:xsi="http://www.w3.org/2001/XMLSchema-instance"
       xmlns:context="http://www.springframework.org/schema/context"
       xmlns:aop="http://www.springframework.org/schema/aop"
       xsi:schemaLocation="http://www.springframework.org/schema/beans
        https://www.springframework.org/schema/beans/spring-beans.xsd
        http://www.springframework.org/schema/context
        https://www.springframework.org/schema/context/spring-context.xsd
        http://www.springframework.org/schema/aop
        https://www.springframework.org/schema/aop/spring-aop.xsd">
    <!--开启注解扫描-->
    <context:component-scan base-package="cn.xw"></context:component-scan>
    <!--把QueryRunner工具类放入容器中-->
    <bean id="queryRunner" class="org.apache.commons.dbutils.QueryRunner"></bean>
    <!--把C3P0连接池放入容器中-->
    <bean id="dataSource" class="com.mchange.v2.c3p0.ComboPooledDataSource">
        <property name="driverClass" value="com.mysql.jdbc.Driver"></property>
        <property name="jdbcUrl" value="jdbc:mysql://localhost:3306/demo_school"></property>
        <property name="user" value="root"></property>
        <property name="password" value="123"></property>
    </bean>
    <!--编写AOP配置-->
    <aop:config>
        <!--编写切入点表达式-->
        <aop:pointcut id="pid" expression="execution(* cn.xw.service.impl.*.*(..))"/>
        <!--TransactionManger引用  在类上使用注解放入容器的-->
        <aop:aspect id="aspect" ref="transactionManger">
            <!--四种通知-->
            <!--<aop:before method="beforeMessage" pointcut-ref="pid"></aop:before>-->
            <!--<aop:after-returning method="afterReturningMessage" pointcut-ref="pid"></aop:after-returning>-->
            <!--<aop:after-throwing method="afterThrowingMessage" pointcut-ref="pid"></aop:after-throwing>-->
            <!--<aop:after method="afterMessage" pointcut-ref="pid"></aop:after>-->
            <!--环绕通知-->
            <aop:around method="aroundMessage" pointcut-ref="pid"></aop:around>
        </aop:aspect>
    </aop:config>
</beans>
@RunWith(SpringJUnit4ClassRunner.class)
@ContextConfiguration(locations = "classpath:applicationContext.xml")
public class Client {
    @Autowired
    @Qualifier(value="studentService")
    private StudentService ss;
    @Test
    public void fun(){
        ss.transfer("王生安","王霞",10);
    }
}
7:使用注解完成AOP方式操作学生转账
注解和xml方式大同小异,都差不多,但是不推荐使用注解方式完成事务问题,后面会说明,下面的案例根据上一个XML完成aop的代码上进行简单更改
<?xml version="1.0" encoding="UTF-8"?>
<beans xmlns="http://www.springframework.org/schema/beans"
       xmlns:xsi="http://www.w3.org/2001/XMLSchema-instance"
       xmlns:context="http://www.springframework.org/schema/context"
       xmlns:aop="http://www.springframework.org/schema/aop"
       xsi:schemaLocation="http://www.springframework.org/schema/beans
        https://www.springframework.org/schema/beans/spring-beans.xsd
        http://www.springframework.org/schema/context
        https://www.springframework.org/schema/context/spring-context.xsd
        http://www.springframework.org/schema/aop
        https://www.springframework.org/schema/aop/spring-aop.xsd">
    <!--开启注解扫描-->
    <context:component-scan base-package="cn.xw"></context:component-scan>
    <!--把QueryRunner工具类放入容器中-->
    <bean id="queryRunner" class="org.apache.commons.dbutils.QueryRunner"></bean>
    <!--把C3P0连接池放入容器中-->
    <bean id="dataSource" class="com.mchange.v2.c3p0.ComboPooledDataSource">
        <property name="driverClass" value="com.mysql.jdbc.Driver"></property>
        <property name="jdbcUrl" value="jdbc:mysql://localhost:3306/demo_school"></property>
        <property name="user" value="root"></property>
        <property name="password" value="123"></property>
    </bean>

    <!--去除其它手动设置AOP 加上下面标签即可-->
    <!--配置开启允许使用注解方式完成AOP-->
    <aop:aspectj-autoproxy></aop:aspectj-autoproxy>
</beans>
//设置到IOC容器上
@Component(value = "transactionManger")
//此注解表示当前是个通知类(切面类)
@Aspect
public class TransactionManger {

    //ConnectionUtils属性,保证获取当前线程下唯一的Connection连接
    @Resource(name = "connectionUtils")
    private ConnectionUtils connectionUtils;

    //配置切面表达式 注意下面的是方法不是属性
    @Pointcut(value = "execution(* cn.xw.service.impl.*.*(..))")
    private void pointcut(){}

    //前置通知
    @Before(value = "pointcut()")   //和XML配置的aop:before一样 注意这里是要导入annotation.Before;别和Junit混淆
    public void beforeMessage() {
        System.out.println("前置通知  执行");
        try {
            connectionUtils.getThreadConnection().setAutoCommit(false);
        } catch (SQLException e) {
            e.printStackTrace();
        }
    }

    //后置运行通知
    @AfterReturning("pointcut()") //和XML配置的aop:after-returning一样
    public void afterReturningMessage() {
        System.out.println("后置运行通知  执行");
        try {
            connectionUtils.getThreadConnection().commit();
        } catch (SQLException e) {
            e.printStackTrace();
        }
    }

    //后置运行异常通知
    @AfterThrowing("pointcut()") //和XML配置的aop:after-throwing一样
    public void afterThrowingMessage() {
        System.out.println("后置运行异常通知  执行");
        try {
            connectionUtils.getThreadConnection().rollback();
        } catch (SQLException e) {
            e.printStackTrace();
        }
    }

    //最终通知 开始关闭资源的和还回连接
    @After("pointcut()") //和XML配置的aop:after一样 注意这里是要导入annotation.After;别和Junit混淆
    public void afterMessage() {
        System.out.println("最终通知  执行");
        try {
            connectionUtils.getThreadConnection().close();
            connectionUtils.close();
        } catch (SQLException e) {
            e.printStackTrace();
        }
    }

    //环绕通知
    /*@Around("pointcut()")*/ //和XML配置的aop:around一样
    public void aroundMessage(ProceedingJoinPoint pp) {
        System.out.println("==》环绕通知开始《==");
        Object obj = null;
        try {
            Object[] args = pp.getArgs();
            beforeMessage();
            obj = pp.proceed(args);
            afterReturningMessage();
        } catch (Throwable e) {
            afterThrowingMessage();
            e.printStackTrace();
        } finally {
            afterMessage();
        }
    }
}

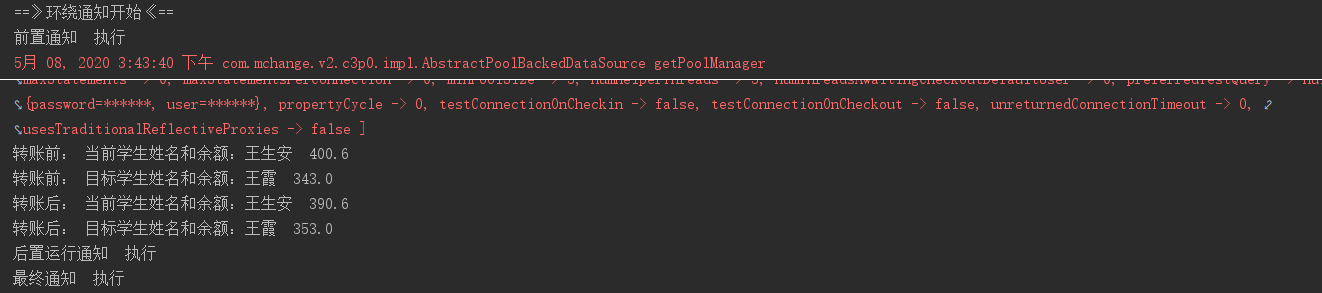
大家会发现我允许后,报了异常了,这是为什么呢?先从使用注解完成AOP通知,我上面用的是单独前、后、异常、运行通知,但是这个要在注解里面这么写会出现顺序问题,其实从上面的图就可以看出,它先执行后置运行通知后再调用最终通知的呀,大家想想,我在最终通知的方法中都释放了资源,还回连接到池中了,那么执行完直接就什么连接都没了呀,可是上图执行完最终通知后再执行后置运行通知,我们可以看看后置运行通知里面代码都是提交事务的逻辑,连接都没了,怎么提交,所以数据库数据也回滚之前的模样,在注解中使用环绕通知可以避免此情况。
补充:如果连xml文件都没有的话,开启注解AOP的话需要在配置类上配置@EnableAspectJAutoProxy
@Configuration
@ComponentScan(basePackages="cn.xw")
@EnableAspectJAutoProxy
public class SpringConfiguration {
}
.