第一种方法,以发送短信功能为例:
1.application.properties文件:
sms.host=http://dingxin.market.alicloudapi.com
sms.path=/dx/sendSms
sms.method=POST
sms.appcode=xxxxxxx
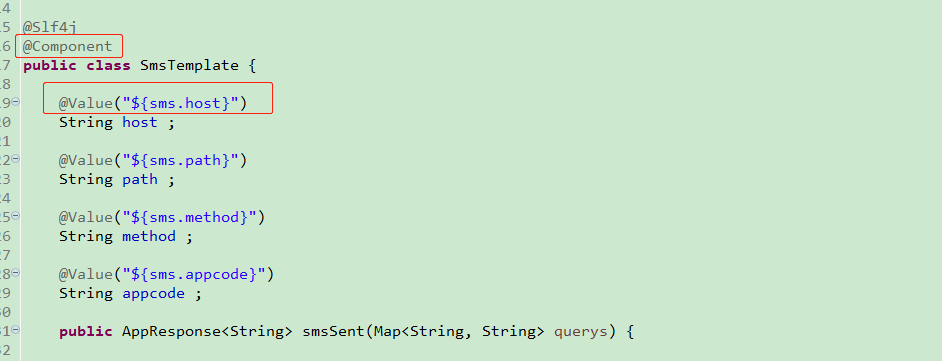
2.需要注入的类,在类的上面加上@Component,在类属性上加上@Value("${sms.host}")
完整代码:
import java.util.HashMap;
import java.util.Map;

import org.apache.http.HttpResponse;
import org.apache.http.util.EntityUtils;
import org.springframework.beans.factory.annotation.Value;
import org.springframework.stereotype.Component;

import com.atguigu.scw.vo.resp.AppResponse;

import lombok.extern.slf4j.Slf4j;

@Slf4j
@Component
public class SmsTemplate {

    @Value("${sms.host}")
    String host ;

    @Value("${sms.path}")
    String path ;

    @Value("${sms.method}")
    String method ;

    @Value("${sms.appcode}")
    String appcode ;

    public AppResponse<String> smsSent(Map<String, String> querys) {

        Map<String, String> headers = new HashMap<String, String>();
        //最后在header中的格式(中间是英文空格)为Authorization:APPCODE xxxxxxx
        headers.put("Authorization", "APPCODE " + appcode);

        Map<String, String> bodys = new HashMap<String, String>();


        try {

            HttpResponse response = HttpUtils.doPost(host, path, method, headers, querys, bodys);
            log.debug("短信发送结果-----------:{}",EntityUtils.toString(response.getEntity()));
            //获取response的body
            //System.out.println(EntityUtils.toString(response.getEntity()));
            return AppResponse.ok(response.toString());
        } catch (Exception e) {
            e.printStackTrace();
            return AppResponse.fail(null);
        }

    }

}
第二种方法,以上传文件功能为例:
1.application.properties文件:
#单个文件大小
spring.servlet.multipart.max-file-size=10MB
#总文件大小
spring.servlet.multipart.max-request-size=10MB

oss.endpoint=oss-cn-beijing.aliyuncs.com
oss.accessKeyId=xxxxxxx
oss.accessKeySecret=xxxxxxx
oss.bucket=xxxxxx
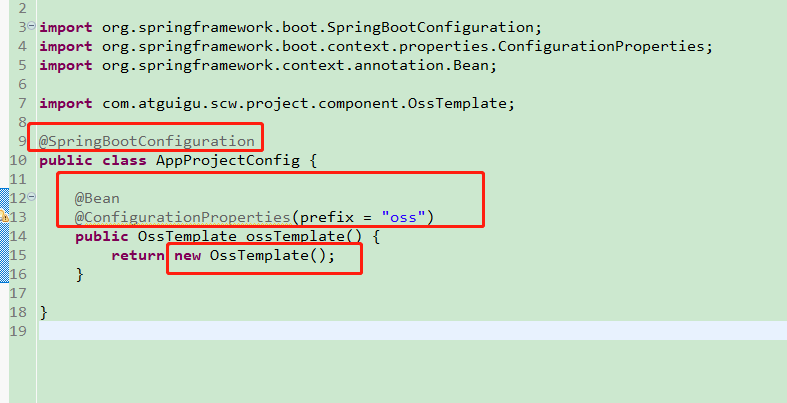
2.在类上加上@SpringBootConfiguration,把类设置为springboot的配置类,在方法上面加上@Bean和@ConfigurationProperties(prefix = "oss"),赋值后注入到springboot框架,并把类的对象返回
注意:类要加上get和set方法,用lombok的@data注解也行
配置文件的代码:
package com.atguigu.scw.project.config;

import org.springframework.boot.SpringBootConfiguration;
import org.springframework.boot.context.properties.ConfigurationProperties;
import org.springframework.context.annotation.Bean;

import com.atguigu.scw.project.component.OssTemplate;

@SpringBootConfiguration
public class AppProjectConfig {

    @Bean
    @ConfigurationProperties(prefix = "oss")
    public OssTemplate ossTemplate() {
        return new OssTemplate();
    }

}
上传文件的代码:
import java.io.InputStream;
import java.util.UUID;

import org.springframework.stereotype.Component;

import com.aliyun.oss.OSS;
import com.aliyun.oss.OSSClientBuilder;

import lombok.Data;
import lombok.ToString;
import lombok.extern.slf4j.Slf4j;

@ToString
@Data
@Slf4j
//@Component
public class OssTemplate {
//    @Value("${oss.endpoint}")
    String endpoint;
    // 云账号AccessKey有所有API访问权限
    String accessKeyId;
    String accessKeySecret;
    String bucket;

    public String upload(String fileName, InputStream inputStream) {

        log.debug("endpoint={}", endpoint);
        log.debug("accessKeyId={}", accessKeyId);
        log.debug("accessKeySecret={}", accessKeySecret);
        log.debug("bucket={}", bucket);
        String tempFileName = null;

        try {

            // 创建OSSClient实例。
            OSS ossClient = new OSSClientBuilder().build(endpoint, accessKeyId, accessKeySecret);

            // 上传文件流。
            tempFileName = UUID.randomUUID().toString().replace("-", "") + "_" + fileName;
            ossClient.putObject(bucket, "pic/" + tempFileName, inputStream);

            // 关闭OSSClient。
            ossClient.shutdown();

            // https://bucket.oss-cn-beijing.aliyuncs.com/pic/test.jpg
            String filepath = "https://" + bucket + "." + endpoint + "/pic/" + tempFileName;
            log.debug("文件上传后的路径:{}",filepath);
            return filepath;
        } catch (Exception e) {
            e.printStackTrace();
            log.debug("文件上传失败-{}", tempFileName);
            return null;
        }

    }
}