PyQt5中的布局管理
布局管理是GUI编程中的一个重要方面。布局管理是一种如何在应用窗口上防止组件的一种方法。我们可以通过两种基础方式来管理布局。我们可以使用绝对定位和布局类。
绝对定位
程序指定了组件的位置并且每个组件的大小用像素作为单位来丈量。当你使用了绝对定位,我们需要知道下面的几点限制:
- 如果我们改变了窗口大小,组件的位置和大小并不会发生改变。
- 在不同平台上,应用的外观可能不同
- 改变我们应用中的字体的话可能会把应用弄得一团糟。
- 如果我们决定改变我们的布局,我们必须完全重写我们的布局,这样非常乏味和浪费时间。
下面的例子中,使用了绝对坐标来定位组件
#!/usr/bin/python3
# -*- coding: utf-8 -*-

"""
ZetCode PyQt5 tutorial

This example shows three labels on a window
using absolute positioning.

author: Jan Bodnar
website: zetcode.com
last edited: January 2015
"""

import sys
from PyQt5.QtWidgets import QWidget, QLabel, QApplication


class Example(QWidget):

    def __init__(self):
        super().__init__()

        self.initUI()


    def initUI(self):

        lbl1 = QLabel('Zetcode', self)
        lbl1.move(15, 10)

        lbl2 = QLabel('tutorials', self)
        lbl2.move(35, 40)

        lbl3 = QLabel('for programmers', self)
        lbl3.move(55, 70)

        self.setGeometry(300, 300, 250, 150)
        self.setWindowTitle('Absolute')
        self.show()


if __name__ == '__main__':

    app = QApplication(sys.argv)
    ex = Example()
    sys.exit(app.exec_())
我们使用move()方法来定位我们的组件。在上面的例子中我们使用move()方法定位了一些标签组件。在使用move()方法时,我们给move()方法提供了x和y坐标作为参数。move()使用的坐标系统是从左上角开始计算的。x值从左到右增长。y值从上到下增长。
lbl1 = QLabel('Zetcode', self)
lbl1.move(15, 10)
将标签组件定位在x=15,y=10的坐标位置。
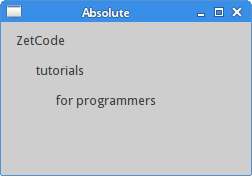 Figure: Absolute positioning
箱布局
布局管理器的布局管理类非常灵活,实用。它是将组件定位在窗口上的首选方式。QHBoxLayout和QVBoxLayout是两个基础布局管理类,他们水平或垂直的线性排列组件。想象一下我们需要在右下角排列两个按钮。为了使用箱布局,我们将使用一个水平箱布局和垂直箱布局来实现。同样为了使用一些必要的空白,我们将添加一些拉伸因子。
#!/usr/bin/python3
# -*- coding: utf-8 -*-

"""
ZetCode PyQt5 tutorial

In this example, we position two push
buttons in the bottom-right corner
of the window.

author: Jan Bodnar
website: zetcode.com
last edited: January 2015
"""

import sys
from PyQt5.QtWidgets import (QWidget, QPushButton,
    QHBoxLayout, QVBoxLayout, QApplication)


class Example(QWidget):

    def __init__(self):
        super().__init__()

        self.initUI()


    def initUI(self):

        okButton = QPushButton("OK")
        cancelButton = QPushButton("Cancel")

        hbox = QHBoxLayout()
        hbox.addStretch(1)
        hbox.addWidget(okButton)
        hbox.addWidget(cancelButton)

        vbox = QVBoxLayout()
        vbox.addStretch(1)
        vbox.addLayout(hbox)

        self.setLayout(vbox)

        self.setGeometry(300, 300, 300, 150)
        self.setWindowTitle('Buttons')
        self.show()


if __name__ == '__main__':

    app = QApplication(sys.argv)
    ex = Example()
    sys.exit(app.exec_())
例子在右下角放置了两个按钮。当我们改变应用窗口大小时,它们会相对于应用窗口不改变位置。在这个例子中我们使用了QHBoxLayout和QVBoxLayout两个布局类。
okButton = QPushButton("OK")
cancelButton = QPushButton("Cancel")
在这里我们创建了两个按钮。
hbox = QHBoxLayout()
hbox.addStretch(1)
hbox.addWidget(okButton)
hbox.addWidget(cancelButton)
这里我们创建了一个水平箱布局,并且增加了一个拉伸因子和两个按钮。拉伸因子在两个按钮之前增加了一个可伸缩空间。这会将按钮推到窗口的右边。
vbox = QVBoxLayout()
vbox.addStretch(1)
vbox.addLayout(hbox)
为了创建必要的布局,我们把水平布局放置在垂直布局内。拉伸因子将把包含两个按钮的水平箱布局推到窗口的底边。
self.setLayout(vbox)
最后,我们设置一下窗口的主布局。
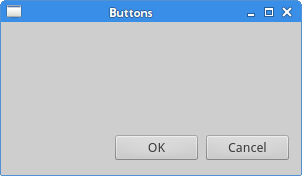 Figure: Buttons
网格布局
最常用的布局类是网格布局。这个布局使用行了列分割空间。要创建一个网格布局,我们需要使用QGridLayout类。
#!/usr/bin/python3
# -*- coding: utf-8 -*-

"""
ZetCode PyQt5 tutorial

In this example, we create a skeleton
of a calculator using a QGridLayout.

author: Jan Bodnar
website: zetcode.com
last edited: January 2015
"""

import sys
from PyQt5.QtWidgets import (QWidget, QGridLayout,
    QPushButton, QApplication)


class Example(QWidget):

    def __init__(self):
        super().__init__()

        self.initUI()


    def initUI(self):

        grid = QGridLayout()
        self.setLayout(grid)

        names = ['Cls', 'Bck', '', 'Close',
                 '7', '8', '9', '/',
                '4', '5', '6', '*',
                 '1', '2', '3', '-',
                '0', '.', '=', '+']

        positions = [(i,j) for i in range(5) for j in range(4)]

        for position, name in zip(positions, names):

            if name == '':
                continue
            button = QPushButton(name)
            grid.addWidget(button, *position)

        self.move(300, 150)
        self.setWindowTitle('Calculator')
        self.show()


if __name__ == '__main__':

    app = QApplication(sys.argv)
    ex = Example()
    sys.exit(app.exec_())
在我们的例子中,我们创建了一个全是按钮的网格布局。
grid = QGridLayout()
self.setLayout(grid)
实例化QGridLayout类,并且把这个类设为应用窗口的布局。
names = ['Cls', 'Bck', '', 'Close',
            '7', '8', '9', '/',
        '4', '5', '6', '*',
            '1', '2', '3', '-',
        '0', '.', '=', '+']
这些标签会在之后的按钮中使用。
positions = [(i,j) for i in range(5) for j in range(4)]
我们创建了一个网格的定位列表。
for position, name in zip(positions, names):

    if name == '':
        continue
    button = QPushButton(name)
    grid.addWidget(button, *position)
创建出按钮组件,并使用addWidget()方法向布局中添加按钮。
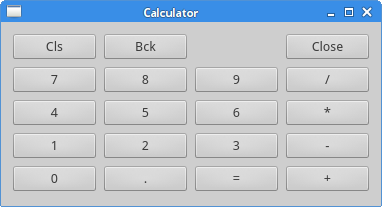 Figure: Calculator skeleton
文本审阅窗口示例
在网格中,组件可以跨多列或多行。在这个例子中,我们对它进行一下说明。
#!/usr/bin/python3
# -*- coding: utf-8 -*-

"""
ZetCode PyQt5 tutorial

In this example, we create a bit
more complicated window layout using
the QGridLayout manager.

author: Jan Bodnar
website: zetcode.com
last edited: January 2015
"""

import sys
from PyQt5.QtWidgets import (QWidget, QLabel, QLineEdit,
    QTextEdit, QGridLayout, QApplication)


class Example(QWidget):

    def __init__(self):
        super().__init__()

        self.initUI()


    def initUI(self):

        title = QLabel('Title')
        author = QLabel('Author')
        review = QLabel('Review')

        titleEdit = QLineEdit()
        authorEdit = QLineEdit()
        reviewEdit = QTextEdit()

        grid = QGridLayout()
        grid.setSpacing(10)

        grid.addWidget(title, 1, 0)
        grid.addWidget(titleEdit, 1, 1)

        grid.addWidget(author, 2, 0)
        grid.addWidget(authorEdit, 2, 1)

        grid.addWidget(review, 3, 0)
        grid.addWidget(reviewEdit, 3, 1, 5, 1)

        self.setLayout(grid)

        self.setGeometry(300, 300, 350, 300)
        self.setWindowTitle('Review')
        self.show()


if __name__ == '__main__':

    app = QApplication(sys.argv)
    ex = Example()
    sys.exit(app.exec_())
我们创建了包含三个标签,两个单行编辑框和一个文本编辑框组件的窗口。布局使用了QGridLayout布局。
grid = QGridLayout()
grid.setSpacing(10)
我们创建了一个网格布局并且设置了组件之间的间距。
grid.addWidget(reviewEdit, 3, 1, 5, 1)
如果我们向网格布局中增加一个组件,我们可以提供组件的跨行和跨列参数。在这个例子中,我们让reviewEdit组件跨了5行。
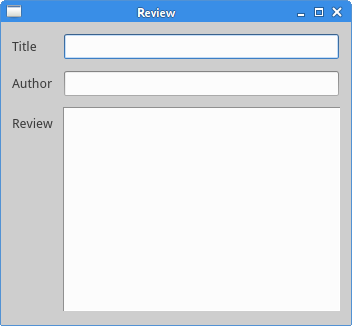 Figure: Review example
这部分的PyQt5教程专门用于讲述布局管理。