一,actuator有哪些环节要做安全配置?
actuator是应用广泛的监控工具,
但在生产环境中使用时,需要做严格的安全保障,
避免造成信息泄露等严重的安全问题
actuator可以采取的安全措施包括以下:
ip地址: 只允许来自ip地址白名单上的访问(用security)
路径:使用自定义的访问路径,不要使用默认的actuator路径
用户的权限:只有登录用户有相应的权限才可以访问(用security)
内容:只打开自己需要的endpoint,
只暴露自己需要的endpoint
说明:刘宏缔的架构森林是一个专注架构的博客,地址:https://www.cnblogs.com/architectforest
对应的源码可以访问这里获取: https://github.com/liuhongdi/
说明:作者:刘宏缔 邮箱: 371125307@qq.com
二,演示项目的相关信息
1,项目地址
https://github.com/liuhongdi/actuator
2, 项目功能说明:
演示了actuator+spring security的安全配置
3,项目结构;如图:

三,配置文件说明
1,pom.xml
        <dependency>
            <groupId>org.springframework.boot</groupId>
            <artifactId>spring-boot-starter-web</artifactId>
        </dependency>

        <!--actuator begin-->
        <dependency>
            <groupId>org.springframework.boot</groupId>
            <artifactId>spring-boot-starter-actuator</artifactId>
        </dependency>

        <!-- spring security -->
        <dependency>
            <groupId>org.springframework.boot</groupId>
            <artifactId>spring-boot-starter-security</artifactId>
        </dependency>
说明:ip地址的限制需要用到spring security
2,application.properties
#路径映射
management.endpoints.web.base-path=/lhdmon
#允许访问的ip列表
management.access.iplist = 127.0.0.1,192.168.1.100,192.168.2.3/24,192.168.1.6
#指定端口
#management.server.port=8081
#关闭默认打开的endpoint
management.endpoints.enabled-by-default=false
#需要访问的endpoint在这里打开
management.endpoint.info.enabled=true
management.endpoint.health.enabled=true
management.endpoint.env.enabled=true
management.endpoint.metrics.enabled=true
management.endpoint.mappings.enabled=true
#sessions需要spring-session包的支持
#management.endpoint.sessions.enabled=true

#允许查询所有列出的endpoint
management.endpoints.web.exposure.include=info,health,env,metrics,mappings
#显示所有健康状态
management.endpoint.health.show-details=always
四,java代码说明
1,SecurityConfig.java
@Configuration
@EnableWebSecurity
 public class SecurityConfig extends WebSecurityConfigurerAdapter {


     @Value("${management.access.iplist}")
     private String iplist;

    @Override
    protected void configure(HttpSecurity http) throws Exception {
        //得到iplist列表
        String iprule = "";
        //hasIpAddress('10.0.0.0/16') or hasIpAddress('127.0.0.1/32')
        String[] splitAddress=iplist.split(",");
        for(String ip : splitAddress){
            if (iprule.equals("")) {
                iprule = "hasIpAddress('"+ip+"')";
            } else {
                iprule += " or hasIpAddress('"+ip+"')";
            }
        }
        String actuatorRule = "hasAnyRole('ADMIN','DEV') and ("+iprule+")";

        //login和logout
        http.formLogin()
                .defaultSuccessUrl("/home/session")
                .failureUrl("/login-error.html")
                .permitAll()
                .and()
                .logout();

        //匹配的页面,符合限制才可访问
        http.authorizeRequests()
                .antMatchers("/lhdmon/**").access(actuatorRule)
                .antMatchers("/goods/**").hasAnyRole("ADMIN","DEV");

        //剩下的页面,允许访问
        http.authorizeRequests().anyRequest().permitAll();
    }

    @Autowired
    public  void configureGlobal(AuthenticationManagerBuilder auth) throws Exception {
        //添加两个账号用来做测试
        auth.inMemoryAuthentication().passwordEncoder(new BCryptPasswordEncoder())
                .withUser("lhdadmin")
                .password(new BCryptPasswordEncoder().encode("123456"))
                .roles("ADMIN","USER")
                .and()
                .withUser("lhduser")
                .password(new BCryptPasswordEncoder().encode("123456"))
                .roles("USER");
    }
 }
说明:配置文件中的ip需要我们用代码解析后添加到访问限制
另外添加了两个不同role的账号供测试用
2,HomeController.java
@RestController
@RequestMapping("/home")
public class HomeController {

    //查看ip地址
    @GetMapping("/ip")
    public String ip(HttpServletRequest request) {
       String ip = request.getRemoteAddr();
       return ip;
    }

    //session详情
    @GetMapping("/session")
    @ResponseBody
    public String session() {
        HttpSession session = ((ServletRequestAttributes) RequestContextHolder.getRequestAttributes()).getRequest().getSession();
        Enumeration e   =   session.getAttributeNames();
        String s = "";
        while( e.hasMoreElements())   {
            String sessionName=(String)e.nextElement();
            s += "name="+sessionName+";<br/>";
            s += "value="+session.getAttribute(sessionName)+";";
        }
        return s;
    }
}
说明:打印session,为的是能看到当前登录用户的role信息
五,测试效果
1,用有权限用户访问:
http://127.0.0.1:8080/lhdmon
跳转到:

用lhdadmin 123456登录
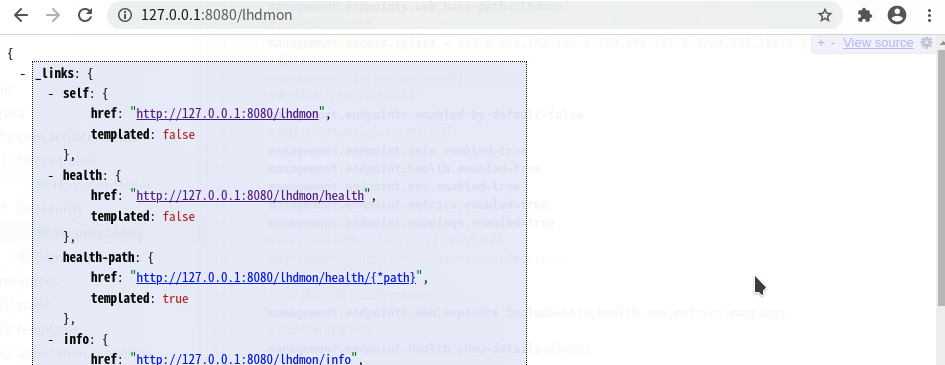
登录后可以看到actuator的endpoints
查看session:

2,用无权限的账号访问:
用lhduser 123456登录:session信息中可以看到

可以看到角色信息,不包含被授权访问的'ADMIN','DEV'

3,测试切换到ip地址列表之外的ip访问:
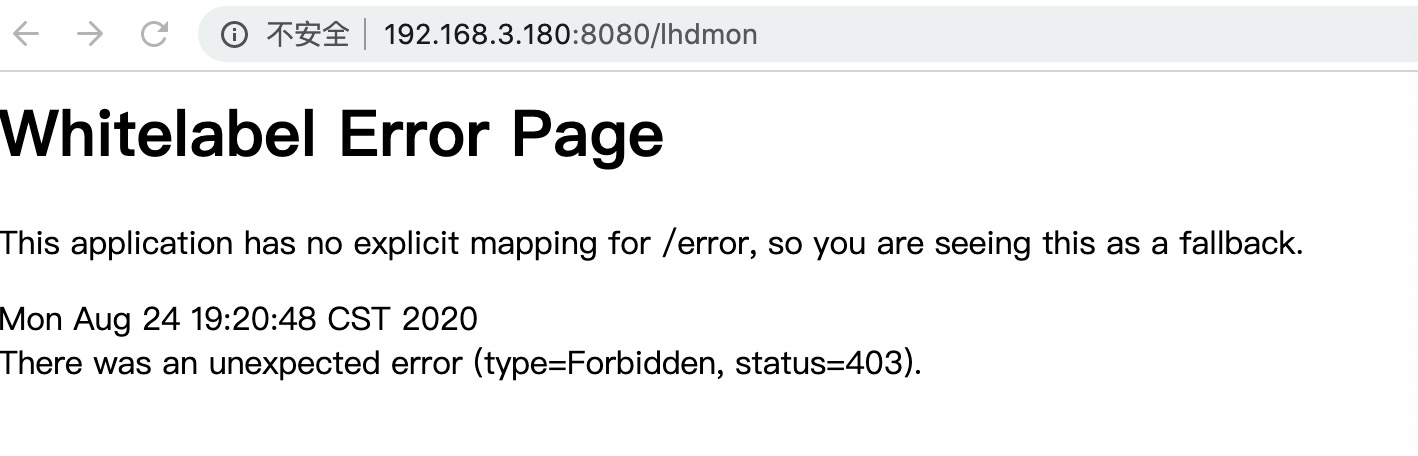
即使用正确有权限的账号登录后也无法访问
六,查看spring boot的版本
  .   ____          _            __ _ _
 /\ / ___'_ __ _ _(_)_ __  __ _
( ( )\___ | '_ | '_| | '_ / _` |
 \/  ___)| |_)| | | | | || (_| |  ) ) ) )
  '  |____| .__|_| |_|_| |_\__, | / / / /
 =========|_|==============|___/=/_/_/_/
 :: Spring Boot ::        (v2.3.2.RELEASE)