一,为什么oauth2要整合jwt?
1,OAuth2的token技术有一个最大的问题是不携带用户信息,所以资源服务器不能进行本地验证,
以致每次对于资源的访问,资源服务器都需要向认证服务器的token存储发起请求,
一是验证token的有效性,二是获取token对应的用户信息。
有大量的请求时会导致处理效率降低,
而且认证服务器作为一个中心节点,
对于SLA和处理性能等均有很高的要求
对于分布式架构都是可能引发问题的隐患
2,jwt技术的两个优势:
token的签名验证可以直接在资源服务器本地完成,不需要再次连接认证服务器
jwt的payload部分可以保存用户相关信息,这样直接有了token和用户信息的绑定
3,spring security oauth2生成token时的输出默认格式不能直接修改,
演示例子中通过增加一个controller实现了输出的格式化
说明:刘宏缔的架构森林是一个专注架构的博客,地址:https://www.cnblogs.com/architectforest
对应的源码可以访问这里获取: https://github.com/liuhongdi/
说明:作者:刘宏缔 邮箱: 371125307@qq.com
二,演示项目的相关信息
1,项目地址:
https://github.com/liuhongdi/securityoauth2jwt
2,项目功能说明:
演示了使用jwt存储oauth2的token
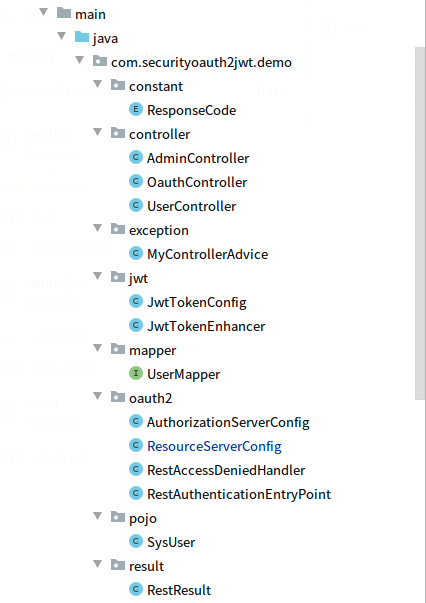
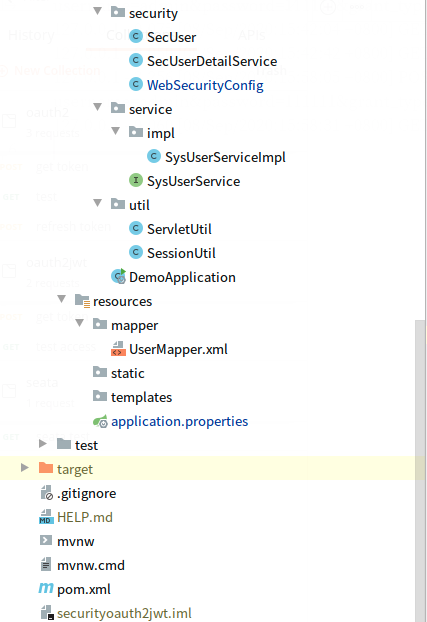
3,项目结构:如图:
三,配置文件说明
1,pom.xml
       <dependency>
            <groupId>org.springframework.boot</groupId>
            <artifactId>spring-boot-starter-web</artifactId>
        </dependency>
        <!--security begin-->
        <dependency>
            <groupId>org.springframework.boot</groupId>
            <artifactId>spring-boot-starter-security</artifactId>
        </dependency>
        <!--oauth2 begin-->
        <dependency>
<groupId>org.springframework.security.oauth</groupId>
            <artifactId>spring-security-oauth2</artifactId>
            <version>2.5.0.RELEASE</version>
        </dependency>
        <!--jwt begin-->
        <dependency>
            <groupId>org.springframework.security</groupId>
            <artifactId>spring-security-jwt</artifactId>
            <version>1.1.1.RELEASE</version>
        </dependency>
        <!--mysql mybatis begin-->
        <dependency>
            <groupId>org.mybatis.spring.boot</groupId>
            <artifactId>mybatis-spring-boot-starter</artifactId>
            <version>2.1.3</version>
        </dependency>
        <dependency>
            <groupId>mysql</groupId>
            <artifactId>mysql-connector-java</artifactId>
            <scope>runtime</scope>
        </dependency>
        <!--fastjson begin-->
        <dependency>
            <groupId>com.alibaba</groupId>
            <artifactId>fastjson</artifactId>
            <version>1.2.73</version>
        </dependency>
        <!--jaxb-->
        <dependency>
            <groupId>javax.xml.bind</groupId>
            <artifactId>jaxb-api</artifactId>
            <version>2.3.0</version>
        </dependency>
        <dependency>
            <groupId>com.sun.xml.bind</groupId>
            <artifactId>jaxb-impl</artifactId>
            <version>2.3.0</version>
        </dependency>
        <dependency>
            <groupId>com.sun.xml.bind</groupId>
            <artifactId>jaxb-core</artifactId>
            <version>2.3.0</version>
        </dependency>
        <dependency>
            <groupId>javax.activation</groupId>
            <artifactId>activation</artifactId>
            <version>1.1.1</version>
        </dependency>
        <!--jjwt begin-->
        <dependency>
            <groupId>io.jsonwebtoken</groupId>
            <artifactId>jjwt</artifactId>
            <version>0.9.1</version>
        </dependency>
        <!--validation begin-->
        <dependency>
            <groupId>org.springframework.boot</groupId>
            <artifactId>spring-boot-starter-validation</artifactId>
        </dependency>
2,application.properties
#mysql
spring.datasource.url=jdbc:mysql://localhost:3306/security?characterEncoding=utf8&useSSL=false
spring.datasource.username=root
spring.datasource.password=lhddemo
spring.datasource.driver-class-name=com.mysql.cj.jdbc.Driver

#mybatis
mybatis.mapper-locations=classpath:/mapper/*Mapper.xml
mybatis.type-aliases-package=com.example.demo.mapper

#error
server.error.include-stacktrace=always
#log
logging.level.org.springframework.web=trace
3,数据库:
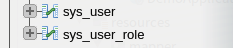
建表sql:
CREATE TABLE `sys_user` (
 `userId` int(11) NOT NULL AUTO_INCREMENT COMMENT 'id',
 `userName` varchar(100) NOT NULL DEFAULT '' COMMENT '用户名',
 `password` varchar(100) NOT NULL DEFAULT '' COMMENT '密码',
 `nickName` varchar(100) CHARACTER SET utf8mb4 COLLATE utf8mb4_0900_ai_ci NOT NULL DEFAULT '' COMMENT '昵称',
 PRIMARY KEY (`userId`),
 UNIQUE KEY `userName` (`userName`)
) ENGINE=InnoDB AUTO_INCREMENT=0 DEFAULT CHARSET=utf8mb4 COLLATE=utf8mb4_0900_ai_ci COMMENT='用户表'
INSERT INTO `sys_user` (`userId`, `userName`, `password`, `nickName`) VALUES
(1, 'lhd', '$2a$10$yGcOz3ekNI6Ya67tqQueS.raxyTOedGsv5jh2BwtRrI5/K9QEIPGq', '老刘'),
(2, 'admin', '$2a$10$yGcOz3ekNI6Ya67tqQueS.raxyTOedGsv5jh2BwtRrI5/K9QEIPGq', '管理员'),
(3, 'merchant', '$2a$10$yGcOz3ekNI6Ya67tqQueS.raxyTOedGsv5jh2BwtRrI5/K9QEIPGq', '商户老张');
说明:3个密码都是111111,仅供演示使用
CREATE TABLE `sys_user_role` (
 `urId` int(11) NOT NULL AUTO_INCREMENT COMMENT 'id',
 `userId` int(11) NOT NULL DEFAULT '0' COMMENT '用户id',
 `roleName` varchar(20) CHARACTER SET utf8mb4 COLLATE utf8mb4_0900_ai_ci NOT NULL DEFAULT '' COMMENT '角色id',
 PRIMARY KEY (`urId`),
 UNIQUE KEY `userId` (`userId`,`roleName`)
) ENGINE=InnoDB AUTO_INCREMENT=0 DEFAULT CHARSET=utf8mb4 COLLATE=utf8mb4_0900_ai_ci COMMENT='用户角色关联表'
INSERT INTO `sys_user_role` (`urId`, `userId`, `roleName`) VALUES
(1, 2, 'ADMIN'),
(2, 3, 'MERCHANT');
四,java代码说明
1,WebSecurityConfig.java
@Configuration
@EnableWebSecurity
@EnableGlobalMethodSecurity(prePostEnabled = true)
public class WebSecurityConfig extends WebSecurityConfigurerAdapter {
    private final static BCryptPasswordEncoder ENCODER = new BCryptPasswordEncoder();
    @Resource
    private SecUserDetailService secUserDetailService;     //用户信息类,用来得到UserDetails

    @Bean
    @Override
    protected AuthenticationManager authenticationManager() throws Exception {
        return super.authenticationManager();
    }
    @Bean
    @Override
    protected UserDetailsService userDetailsService() {
        return super.userDetailsService();
    }

    @Bean
    PasswordEncoder passwordEncoder() {
        return new BCryptPasswordEncoder();
    }

    @Override
    protected void configure(HttpSecurity http) throws Exception {
        http.csrf().disable();
        http.antMatcher("/oauth/**")
                .authorizeRequests()
                .antMatchers("/oauth/**").permitAll()
                .and().csrf().disable();
    }

    @Resource
    public void configureGlobal(AuthenticationManagerBuilder auth) throws Exception {
        auth.userDetailsService(secUserDetailService).passwordEncoder(new PasswordEncoder() {
            @Override
            public String encode(CharSequence charSequence) {
                return ENCODER.encode(charSequence);
            }
            //密码匹配,看输入的密码经过加密与数据库中存放的是否一样
            @Override
            public boolean matches(CharSequence charSequence, String s) {
                return ENCODER.matches(charSequence,s);
            }
        });
    }
}
2,AuthorizationServerConfig.java
@Configuration
@EnableAuthorizationServer
public class AuthorizationServerConfig extends AuthorizationServerConfigurerAdapter {
    @Resource
    AuthenticationManager authenticationManager;

    @Resource
    UserDetailsService userDetailsService;

    @Resource
    TokenStore jwtTokenStore;

    @Resource
    JwtAccessTokenConverter jwtAccessTokenConverter;

    @Override
    public void configure(ClientDetailsServiceConfigurer clients) throws Exception {
        String clientId = "client_id";
        String clientSecret = "123";
        clients.inMemory()
                //这个好比账号
                .withClient(clientId)
                //授权同意的类型
                .authorizedGrantTypes("password", "refresh_token")
                //有效时间
                .accessTokenValiditySeconds(1800)
                .refreshTokenValiditySeconds(60 * 60 * 2)
                .resourceIds("rid")
                //作用域,范围
                .scopes("all")
                //密码
                .secret(new BCryptPasswordEncoder().encode(clientSecret));
    }

    @Override
    public void configure(AuthorizationServerEndpointsConfigurer endpoints) throws Exception {
        endpoints.tokenStore(jwtTokenStore)
                .authenticationManager(authenticationManager)
                .userDetailsService(userDetailsService)
                .accessTokenConverter(jwtAccessTokenConverter);
    }

    @Override
    public void configure(AuthorizationServerSecurityConfigurer security) throws Exception {
        //允许客户端表单身份验证
        security.allowFormAuthenticationForClients();
    }
}
授权服务器的配置
3,ResourceServerConfig.java
@Configuration
@EnableResourceServer
public class ResourceServerConfig extends ResourceServerConfigurerAdapter {
    private static final String RESOURCE_ID = "rid";

    @Resource
    private RestAuthenticationEntryPoint restAuthenticationEntryPoint;

    @Resource
    private RestAccessDeniedHandler restAccessDeniedHandler;

    @Override
    public void configure(ResourceServerSecurityConfigurer resources) {
        resources.resourceId(RESOURCE_ID).stateless(false)
                .authenticationEntryPoint(restAuthenticationEntryPoint);
    }

    @Override
    public void configure(HttpSecurity http) throws Exception {
        http.authorizeRequests()
                .antMatchers("/admin/**").hasAnyRole("admin","ADMIN");
        http.
                anonymous().disable()
                .authorizeRequests()
                .antMatchers("/users/**").access("hasRole('ADMIN')")
                .and().exceptionHandling().accessDeniedHandler(new OAuth2AccessDeniedHandler());

        //http.exceptionHandling().authenticationEntryPoint(restAuthenticationEntryPoint);
        http.exceptionHandling().accessDeniedHandler(restAccessDeniedHandler);
    }
}
资源服务器的配置
4,RestAccessDeniedHandler.java
@Component("restAccessDeniedHandler")
public class RestAccessDeniedHandler implements AccessDeniedHandler {
    //处理权限不足的情况:403,对应:access_denied
    @Override
    public void handle(HttpServletRequest request, HttpServletResponse response,
                       AccessDeniedException accessDeniedException)
            throws IOException, ServletException {
        System.out.println("-------RestAccessDeniedHandler");
        ServletUtil.printRestResult(RestResult.error(403,"权限不够访问当前资源,被拒绝"));
    }
}
遇到access deny情况的处理
5,RestAuthenticationEntryPoint.java
@Component("restAuthenticationEntryPoint")
public class RestAuthenticationEntryPoint implements AuthenticationEntryPoint {
    //返回未得到授权时的报错:对应:invalid_token
    @Override
    public void commence(
            HttpServletRequest request,
            HttpServletResponse response,
            AuthenticationException authException) throws IOException {
        //System.out.println("commence");
        ServletUtil.printRestResult(RestResult.error(401,"未得到授权"));
    }
}
匿名用户无权访问时的处理
6,JwtTokenConfig.java
@Configuration
public class JwtTokenConfig {
    @Bean
    public TokenStore jwtTokenStore(){
        return new JwtTokenStore(jwtAccessTokenConverter());
    }

    //使用Jwt来作为token的生成
    @Bean
    public JwtAccessTokenConverter jwtAccessTokenConverter(){
        JwtAccessTokenConverter accessTokenConverter = new JwtAccessTokenConverter();
        accessTokenConverter.setSigningKey("internet_plus");
        return accessTokenConverter;
    }

    @Bean
    public TokenEnhancer jwtTokenEnhancer(){
        return new JwtTokenEnhancer ();
    }
}
配置jwttoken,指定了signkey
7,JwtTokenEnhancer.java
public class JwtTokenEnhancer implements TokenEnhancer {

    @Override
    public OAuth2AccessToken enhance(OAuth2AccessToken accessToken, OAuth2Authentication authentication) {
        Map<String,Object> info = new HashMap<>();
        info.put("provider","haolarn");
        //设置附加信息
        ((DefaultOAuth2AccessToken)accessToken).setAdditionalInformation(info);
        return null;
    }
}
返回token信息中的附加信息
8,OauthController.java
@RestController
@RequestMapping("/oauth")
public class OauthController {

    @Autowired
    private TokenEndpoint tokenEndpoint;

   //自定义返回信息添加基本信息
    @PostMapping("/token")
    public RestResult postAccessTokenWithUserInfo(Principal principal, @RequestParam Map<String, String> parameters) throws HttpRequestMethodNotSupportedException {
        OAuth2AccessToken accessToken = tokenEndpoint.postAccessToken(principal, parameters).getBody();
        Map<String, Object> data = new LinkedHashMap();
        data.put("accessToken", accessToken.getValue());
        data.put("token_type", accessToken.getTokenType());
        data.put("refreshToken", accessToken.getRefreshToken().getValue());
        data.put("scope", accessToken.getScope());
        data.put("expires_in", accessToken.getExpiresIn());
        data.put("jti", accessToken.getAdditionalInformation().get("jti"));
        return RestResult.success(data);
    }

}
格式化生成token时的返回json信息
9,其他非关键代码可以访问github查看,不再一一贴出
五,测试效果
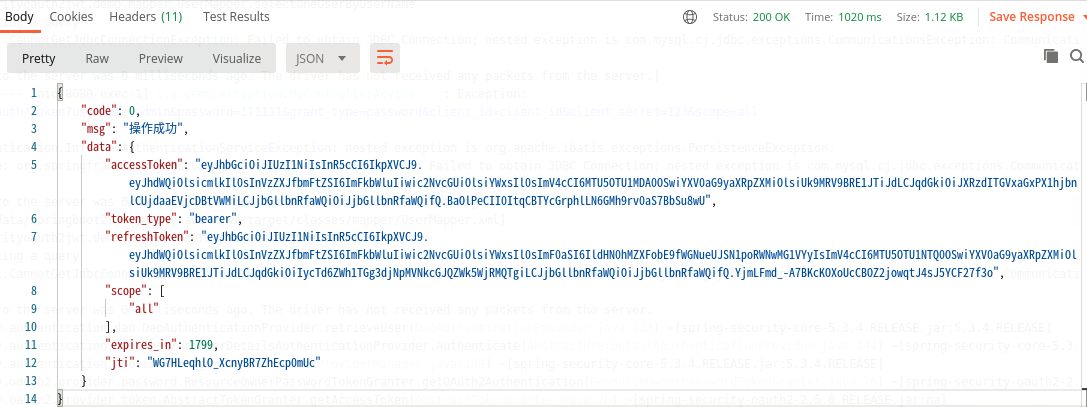
1,得到基于jwt的token
访问:http://127.0.0.1:8080/oauth/token
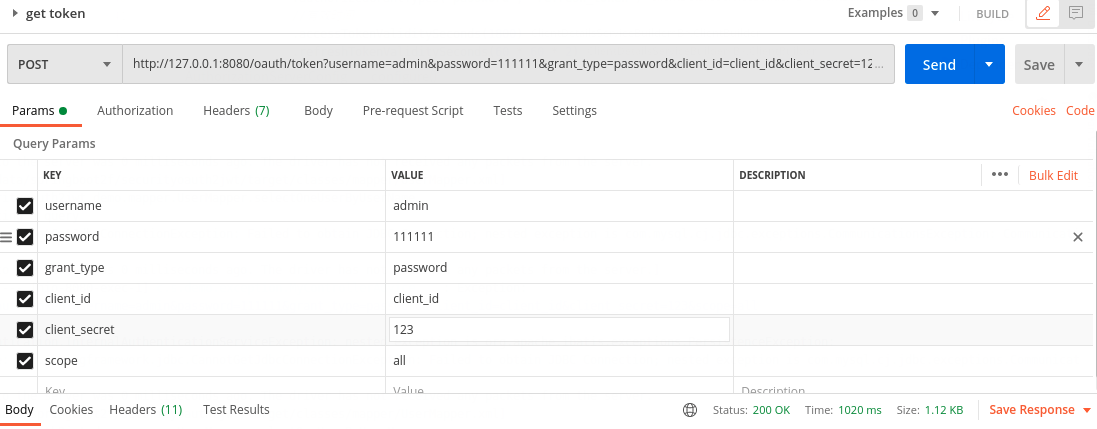
返回结果:
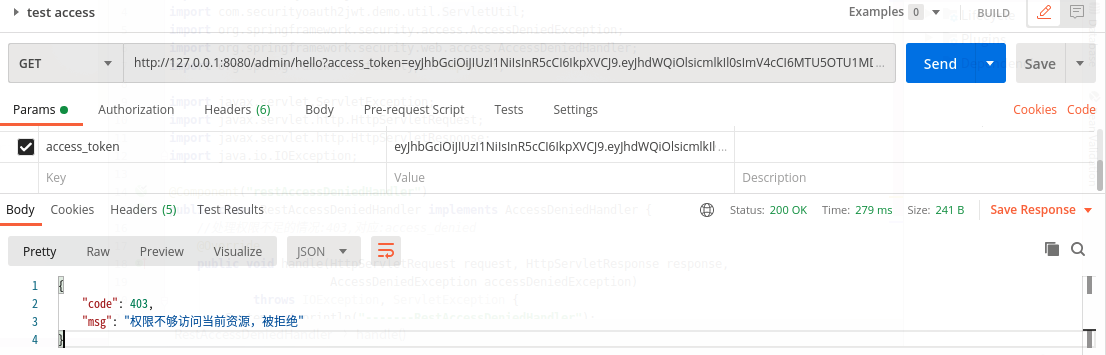
2,用得到的access_token访问admin/hello:查看当前用户和role:
http://127.0.0.1:8080/admin/hello
返回:

3,换一个无权限的账号登录:

访问admin/hello时会提示无权限
六,查看spring boot的版本:
  .   ____          _            __ _ _
 /\ / ___'_ __ _ _(_)_ __  __ _
( ( )\___ | '_ | '_| | '_ / _` |
 \/  ___)| |_)| | | | | || (_| |  ) ) ) )
  '  |____| .__|_| |_|_| |_\__, | / / / /
 =========|_|==============|___/=/_/_/_/
 :: Spring Boot ::        (v2.3.3.RELEASE)