一,sso的用途 ?
1,如果有多个应用系统,用户只需要登录一次就可以访问所有相互信任的应用系统。
不需要每次输入用户名称和用户密码,
也不需要创建并记忆多套用户名称和用户密码。
2,系统管理员只需维护一套统一的用户账号,方便、简单。
而不必管理很多套的用户账号。
3, 如果需要开发新的应用系统,可以直接使用单点登录平台的用户认证服务,简化开发流程。
4,oauth和sso的区别:
oauth2解决的是服务提供方(微信等)给第三方应用授权的问题,
sso解决的是大型系统中各个子系统如何共享登陆状态的问题
说明:刘宏缔的架构森林是一个专注架构的博客,地址:https://www.cnblogs.com/architectforest
对应的源码可以访问这里获取: https://github.com/liuhongdi/
说明:作者:刘宏缔 邮箱: 371125307@qq.com
二,演示项目的相关信息
1,项目地址:
https://github.com/liuhongdi/securityssojwt
2,功能说明:
演示了基于oauth2实现sso
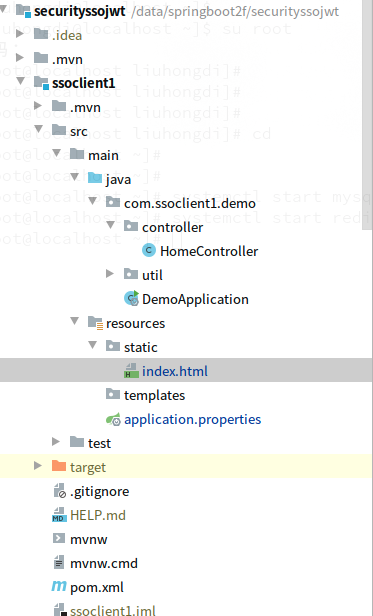
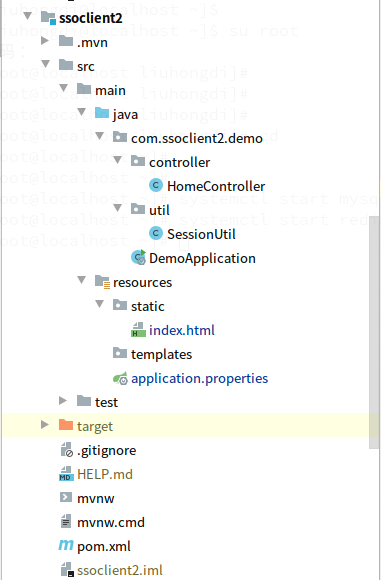
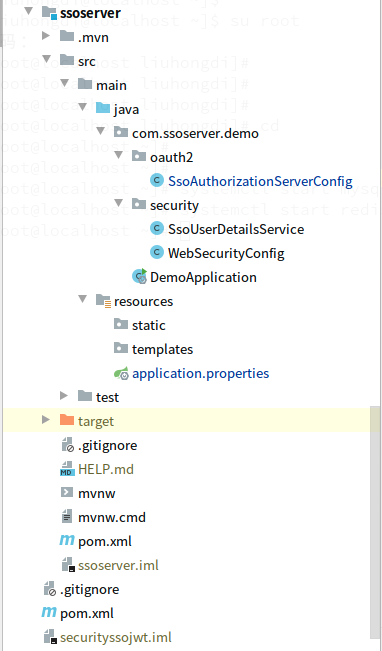
3,项目结构:如图:
三,配置文件说明
1,ssoserver的 pom.xml
        <dependency>
            <groupId>org.springframework.boot</groupId>
            <artifactId>spring-boot-starter-web</artifactId>
        </dependency>
       <!--security-->
        <dependency>
            <groupId>org.springframework.boot</groupId>
            <artifactId>spring-boot-starter-security</artifactId>
        </dependency>
        <!--oauth2-->
        <dependency>
<groupId>org.springframework.security.oauth</groupId>
            <artifactId>spring-security-oauth2</artifactId>
            <version>2.5.0.RELEASE</version>
        </dependency>
        <!--jwt-->
        <dependency>
            <groupId>org.springframework.security</groupId>
            <artifactId>spring-security-jwt</artifactId>
            <version>1.1.1.RELEASE</version>
        </dependency>

        <!--jaxb-->
        <dependency>
            <groupId>javax.xml.bind</groupId>
            <artifactId>jaxb-api</artifactId>
            <version>2.3.0</version>
        </dependency>
        <dependency>
            <groupId>com.sun.xml.bind</groupId>
            <artifactId>jaxb-impl</artifactId>
            <version>2.3.0</version>
        </dependency>
        <dependency>
            <groupId>com.sun.xml.bind</groupId>
            <artifactId>jaxb-core</artifactId>
            <version>2.3.0</version>
        </dependency>
        <dependency>
            <groupId>javax.activation</groupId>
            <artifactId>activation</artifactId>
            <version>1.1.1</version>
        </dependency>
2,ssoclient1的 pom.xml
        <dependency>
            <groupId>org.springframework.boot</groupId>
            <artifactId>spring-boot-starter-web</artifactId>
        </dependency>
        <!--security-->
        <dependency>
            <groupId>org.springframework.boot</groupId>
            <artifactId>spring-boot-starter-security</artifactId>
        </dependency>
        <!--oauth2-->
        <dependency><groupId>org.springframework.security.oauth</groupId>
            <artifactId>spring-security-oauth2</artifactId>
            <version>2.5.0.RELEASE</version>
        </dependency>
        <!--jwt-->
        <dependency>
            <groupId>org.springframework.security</groupId>
            <artifactId>spring-security-jwt</artifactId>
            <version>1.1.1.RELEASE</version>
        </dependency>
        <!--oauth2 autoconfigure-->
        <dependency>
<groupId>org.springframework.security.oauth.boot</groupId>
            <artifactId>spring-security-oauth2-autoconfigure</artifactId>
            <version>2.3.3.RELEASE</version>
        </dependency>
3,ssoclient2的 pom.xml
        <dependency>
            <groupId>org.springframework.boot</groupId>
            <artifactId>spring-boot-starter-web</artifactId>
        </dependency>
        <!--security-->
        <dependency>
            <groupId>org.springframework.boot</groupId>
            <artifactId>spring-boot-starter-security</artifactId>
        </dependency>
        <!--oauth2-->
        <dependency><groupId>org.springframework.security.oauth</groupId>
            <artifactId>spring-security-oauth2</artifactId>
            <version>2.5.0.RELEASE</version>
        </dependency>
        <!--jwt-->
        <dependency>
            <groupId>org.springframework.security</groupId>
            <artifactId>spring-security-jwt</artifactId>
            <version>1.1.1.RELEASE</version>
        </dependency>
        <!--oauth2 autoconfigure-->
        <dependency>
<groupId>org.springframework.security.oauth.boot</groupId>
            <artifactId>spring-security-oauth2-autoconfigure</artifactId>
            <version>2.3.3.RELEASE</version>
        </dependency>
4,ssoserver的application.properties
server.port = 8080
server.servlet.context-path = /server
spring.security.user.password=123456

#error
server.error.include-stacktrace=always
#log
logging.level.org.springframework.web=trace
logging.level.org.springframework.security=debug
5,ssoclient1的application.properties
security.oauth2.client.client-id=client1
security.oauth2.client.client-secret=client1secrect
#需要认证时候跳转的地址
security.oauth2.client.user-authorization-uri=http://127.0.0.1:8080/server/oauth/authorize
#请求令牌地址
security.oauth2.client.access-token-uri=http://127.0.0.1:8080/server/oauth/token
#解析
security.oauth2.resource.jwt.key-uri=http://127.0.0.1:8080/server/oauth/token_key
#security.oauth2.resource.jwt.key-value=imooc
#sso
server.port=8081
server.servlet.context-path=/client1
6,ssoclient2的application.properties
security.oauth2.client.client-id=client2
security.oauth2.client.client-secret=client2secrect
#需要认证时候跳转的地址
security.oauth2.client.user-authorization-uri=http://127.0.0.1:8080/server/oauth/authorize
#请求令牌地址
security.oauth2.client.access-token-uri=http://127.0.0.1:8080/server/oauth/token
#解析
security.oauth2.resource.jwt.key-uri=http://127.0.0.1:8080/server/oauth/token_key
#sso
server.port=8082
server.servlet.context-path=/client2
四,java代码说明:
1,ssoserver的WebSecurityConfig.java
@Configuration
public class WebSecurityConfig extends WebSecurityConfigurerAdapter {

    @Resource
    private SsoUserDetailsService ssoUserDetailsService;

    @Bean
    public PasswordEncoder passwordEncoder()    {
        return new BCryptPasswordEncoder();
    }

    @Override
    protected void configure(AuthenticationManagerBuilder auth) throws Exception {
        auth.userDetailsService(ssoUserDetailsService).passwordEncoder(passwordEncoder());
    }

    @Override
    protected void configure(HttpSecurity http) throws Exception {
        http.formLogin().and().authorizeRequests().anyRequest().authenticated();
    }
}
2,ssoserver的SsoUserDetailsService.java:
@Component
public class SsoUserDetailsService implements UserDetailsService {

    @Autowired
    private PasswordEncoder passwordEncoder;

    //本来应该从数据库加载数据,此处供仅演示
    @Override
    public UserDetails loadUserByUsername(String username) throws UsernameNotFoundException {
        System.out.println("----------------------loadUserByUsername");
        if (username.equals("laoliu") == false) {
           throw new UsernameNotFoundException("用户名不存在");
        }
        return new User(username, passwordEncoder.encode("123456"),
                AuthorityUtils.commaSeparatedStringToAuthorityList("ROLE_USER"));
    }
}
3,ssoserver的SsoAuthorizationServerConfig.java:
@Configuration
@EnableAuthorizationServer
public class SsoAuthorizationServerConfig extends AuthorizationServerConfigurerAdapter {

    //配置供访问的客户端的账户
    @Override
    public void configure(ClientDetailsServiceConfigurer clients) throws Exception {
        clients.inMemory()
                // 注册一个客户端,设置名称
                .withClient("client1")
                // 设置客户端阴匙
                .secret(new BCryptPasswordEncoder().encode("client1secrect"))
                // 对应客户端登录请求URI
                .redirectUris("http://127.0.0.1:8081/client1/login")
                // 授权方式
                .authorizedGrantTypes("authorization_code", "password", "refresh_token")
                // 授权范围
                .scopes("all")
                // 是否自动同意,如果采用非自动同意,则需要用户手动授权
                .autoApprove(true)
                .and().
                withClient("client2")
                .redirectUris("http://127.0.0.1:8082/client2/login")
                .secret(new BCryptPasswordEncoder().encode("client2secrect"))
                .authorizedGrantTypes("authorization_code", "password", "refresh_token")
                .scopes("all")
                .autoApprove(true);
    }

    @Override
    public void configure(AuthorizationServerEndpointsConfigurer endpoints) throws Exception {
        endpoints.tokenStore(jwtTokenStore()).accessTokenConverter(jwtAccessTokenConverter());
    }

    @Override
    public void configure(AuthorizationServerSecurityConfigurer security) throws Exception {
        security.tokenKeyAccess("isAuthenticated()");
    }

    @Bean
    public TokenStore jwtTokenStore() {
        return new JwtTokenStore(jwtAccessTokenConverter());
    }

    @Bean
    public JwtAccessTokenConverter jwtAccessTokenConverter(){
        JwtAccessTokenConverter converter = new JwtAccessTokenConverter();
        //指定signkey
        converter.setSigningKey("liuhongdi");
        return converter;
    }
}
4,ssoclient1的HomeController.java
@Controller
@RequestMapping("/home")
public class HomeController {
    //查看登录后的用户信息
    @RequestMapping("/session")
    @ResponseBody
    public String getsession(){
        //session
        String userone = SessionUtil.getCurrentUserName();
        System.out.println("user:"+userone);
        if (userone == null) {
            return "not login";
        } else {
            return userone;
        }
    }
}
5,ssoclient1的SessionUtil.java
public class SessionUtil {
    //得到security所保存的用户
    public static String getCurrentUserName(){
        Authentication authentication = SecurityContextHolder.getContext().getAuthentication();
        if (authentication.isAuthenticated() && !(authentication instanceof AnonymousAuthenticationToken)) {
            Object principal = authentication.getPrincipal();
            //System.out.println(principal);
            if (principal instanceof String) {
                return (String)principal;
            } else if (principal instanceof UserDetails) {
                String currentuser = ((UserDetails) principal).getUsername();
                return currentuser;
            } else {
                //System.out.println("not instanceof UserDetails");
            }
            return null;
        }
        return null;
    }
}
6,其他非关键代码可访问github查看
五,测试效果
1,按以下顺序启动三个模块:
ssoserver
ssoclient1
ssoclient2
2,先访问client1,
http://127.0.0.1:8081/client1/home/session
会跳转到:
http://127.0.0.1:8080/server/login
如图:

我们输入用户名 laoliu,密码 123456
这个是写死在代码中的演示账号
登录后会跳转到:

这个url会打印当前登录用户的用户名
我们新打开一个标签页:
http://127.0.0.1:8082/client2/home/session
我们之前并未从client2登录,查看效果:

可以看到也已经登录
3,通过html页面跳转访问:
http://127.0.0.1:8081/client1/index.html
返回:
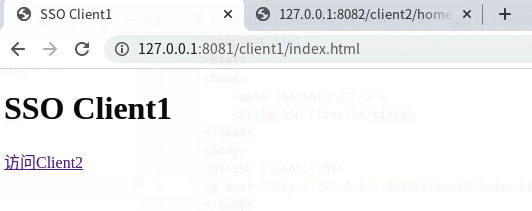
点击 访问client2 的链接
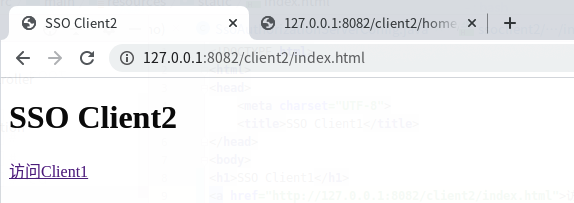
可正常访问
六,查看spring boot版本
  .   ____          _            __ _ _
 /\ / ___'_ __ _ _(_)_ __  __ _
( ( )\___ | '_ | '_| | '_ / _` |
 \/  ___)| |_)| | | | | || (_| |  ) ) ) )
  '  |____| .__|_| |_|_| |_\__, | / / / /
 =========|_|==============|___/=/_/_/_/
 :: Spring Boot ::        (v2.3.3.RELEASE)