Host在Server端注册Client可能会用到的一到多个Channel用于传输Client发出的调用请求(这个调用请求最终被序列化成一Message)——Channel Registration。然后把Remote Object的相关Metadata信息和remote Object Uri(Remote Object Type的信息)注册到Host进程中——Object Registration。完成了Object Registration之后,Remoting Framework分析注册的信息Load相应的Assembly,利用Reflection的机制为相应的Remote Type生成一个可序列化ObjRef(可序列化以为着ObjRef对象可以穿梭Application Domain),并将它保存到一个Internal Table 之中(这个Internal Table用于Track Remote Object)。
Remoting有两种Activation 方式——Server Activation 和Client Activation。而Server Activation有具有两种不同的Mode——SingCall和Singleton(SingleCall和Singleton严格地说是关于Instance Management的概念——这个概念在WCF中被引入)。对于Server Activation,Client端根据注册在Client端的Remote Object的Metadata创建Real Proxy和Transparent Proxy。在创建Proxy的时候,不曾有任何访问请求发送到Server端,与此同时,也不可能有相应的Remote Object在Server 端被创建。而真正第一次网络访问发生在第一次通过Transparent Proxy调用某个方法。当这个方法请求从某个注册在Server段的某个Channel抵达Server端的时候,Server 端的Remoting Framework提取请求Message 的Remote Object 的ObjRef,同上面提到的Internal Table的相关Entry进行比较,获得所需的Metadata信息,通过Reflection创建Remote Object。这就是Server Activation的简单过程。
Client Activation采用了不同的Activation 方式——Client端的Proxy(Both Transparent Proxy和Real Proxy )和Remote Object几乎在同时创建(当然在不考虑远程调用时延的因素)。当Client通过New或者Activator.CreateInstance在Client创建Proxy的时候实际上是经历了以下一个过程:一个Activator Proxy首先在Client端创建,借助这个Activator Proxy Remoting Framework发送一个Activation请求到Server端,Server端的Remoting Framework根据Activation Request的Metadata信息和已经注册的Remote Type做一个匹配,提取所需的Metadata通过Reflection的机制创建Remote Object。同时创建这个Remote Object的ObjRef并通过相应的ChannelForward到Client端,随之生成RealProxy 和Transparent Proxy,Transparent Proxy被Client调用。
上面基本上就是我在上一篇Blog的中心。可能看过我Blog的人都知道,我几乎在每篇文章中都会有一个Sample,我不太相信流于文字的理论,我喜欢用实践来证明。所以下面我们将用Sample来证明。这个Sample中将沿用简单的Calculator的应用。Source Code可以从这里下载(Artech.MyRemoting.zip)
1. 整个Solution的结构。
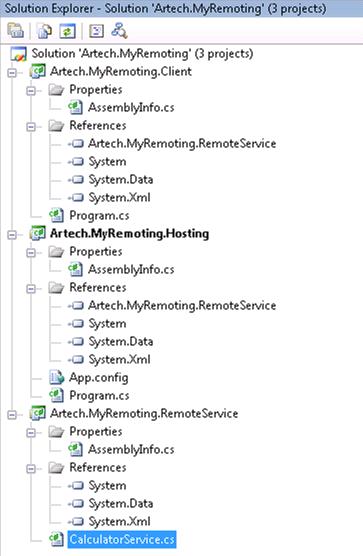
这个结构其实是我比较鄙视的分布式结构——Client端和Server通过Share一个Type System来共享整个Service(包括Interface和Implementation ,在WCF中我们这两部分称为Service Contract和Service Implementation)。但是由于Client Activated Object在创建Proxy的时候需要制定MarshalByRefObject的Type,所以我们不得不用这种结构——Client和Server共享定义在Artech.MyRemoting.RemoteService中定义的MarshalByRefObject Class:CalculatorService。大家可以可以看到Artech.MyRemoting.Hosting和Artech.MyRemoting.Client都有Artech.MyRemoting.RemoteService的Reference。话又说回来,我们可以应用某些策略使只把Service的Interface公开给Client——即使是SAO对象,相关的内容超出了这篇文章范畴,我会相关的讨论放到后续的Remoting相关的Blog中,如有兴趣可以留意。
2. 在Artech.MyRemoting.RemotingService 定义我们的Service——尽管Remoting算不上是完全基于SOA的Distributed Technology,但我还是会不自觉地使用SOA相关的术语,不当的之处,还往见谅。
 using System;using System.Collections.Generic;using System.Text;using System.Runtime.Remoting;namespace Artech.MyRemoting.RemoteService
 {
{
 public class CalculatorService:MarshalByRefObject
 {
{ private int _callCount; public CalculatorService() { Console.WriteLine("Remote object is activated at {0}\n", DateTime.Now.ToString("hh:mm:ss"));
 } public double Add(double x, double y) { this._callCount++; return x + y; } public int GetCallCount() { return this._callCount; } }
 }
}Code 很简单——一个Constructor用于确定Remote Object到底在什么时候创建或者说的专业一点,真正的Remote Object什么时候被Activated。一个GetCallCount用所Add方法调用次数的计数器,这个计数器用来验证Remoting 的Instance Management。和一个执行加法运算的方法,注意执行一次我们的保存调用次数的变量就是加1。
3. Host CalculatorService
App.Config
<?xml version="1.0" encoding="utf-8" ?><configuration> <system.runtime.remoting> <application name="Artech.MyRemoting"> <service> <wellknown type="Artech.MyRemoting.RemoteService.CalculatorService,Artech.MyRemoting.RemoteService" mode ="SingleCall" objectUri="SingleCall.Calculator.rem"></wellknown> <wellknown type="Artech.MyRemoting.RemoteService.CalculatorService,Artech.MyRemoting.RemoteService" mode ="Singleton" objectUri="Singleton.Calculator.rem"></wellknown> <activated type="Artech.MyRemoting.RemoteService.CalculatorService,Artech.MyRemoting.RemoteService"></activated> </service> <channels> <channel type="System.Runtime.Remoting.Channels.Http.HttpChannel,System.Runtime.Remoting, Version=2.0.0.0, Culture=neutral, PublicKeyToken=b77a5c561934e089" port="1234"></channel> </channels> </application> </system.runtime.remoting></configuration>
从这个config文件可以看到,我们为同一个CalculatorService以不同的方式注册了3此——SingleCall,Singleton和CAO。
using System;using System.Collections.Generic;using System.Text;using System.Runtime.Remoting;namespace Artech.MyRemoting.Hosting{ class Program { static void Main(string[] args) { RemotingConfiguration.Configure("Artech.MyRemoting.Hosting.exe.config", false); Console.WriteLine("The Calculator services have begun to listen "); Console.Read(); } }}
很简单,无需赘言。
4. 编写客户端
using System;using System.Collections.Generic;using System.Text;using Artech.MyRemoting.RemoteService;using System.Runtime.Remoting;using System.Threading;namespace Artech.MyRemoting.Client{ class Program { static void Main(string[] args) { string singelCallAddress = "http://localhost:1234/artech.myremoting/singlecall.calculator.rem"; string singletonAddress = "http://localhost:1234/artech.myremoting/singleton.calculator.rem"; string caoAddress = "http://localhost:1234/artech.myremoting"; RemotingConfiguration.RegisterActivatedClientType(typeof(CalculatorService), caoAddress); Console.WriteLine("Create server SingleCall proxy at {0}", DateTime.Now.ToString("hh:mm:ss")); CalculatorService singleCallCalculator = Activator.GetObject(typeof(CalculatorService), singelCallAddress) as CalculatorService; Thread.Sleep(10000); Console.WriteLine("Create server Singleton proxy at {0}", DateTime.Now.ToString("hh:mm:ss")); CalculatorService singletonCalculator = Activator.GetObject(typeof(CalculatorService), singletonAddress) as CalculatorService; Thread.Sleep(10000); Console.WriteLine("\nCreate client activated object proxy at {0}", DateTime.Now.ToString("hh:mm:ss")); CalculatorService caoCalculator = new CalculatorService(); Thread.Sleep(10000); Console.WriteLine("\nCall the method of SingleCall object at {0}", DateTime.Now.ToString("hh:mm:ss")); InvocateCalculator(singleCallCalculator); Thread.Sleep(10000); Console.WriteLine("\nCall the method of Singleton object at {0}", DateTime.Now.ToString("hh:mm:ss")); InvocateCalculator(singletonCalculator); Thread.Sleep(10000); Console.WriteLine("\nCall the method of CAO object at {0}", DateTime.Now.ToString("hh:mm:ss")); InvocateCalculator(caoCalculator); Console.WriteLine("The times to invovate the current SingleCall remote object is {0}", singleCallCalculator.GetCallCount()); Console.WriteLine("The times to invovate the current Singleton remote object is {0}", singletonCalculator.GetCallCount()); Console.WriteLine("The times to invovate the current CAO remote object is {0}", caoCalculator.GetCallCount()); Console.Read(); } static void InvocateCalculator(CalculatorService calculator) { Console.WriteLine("x + y = {2} where x = {0} and y = {1}",1,2,calculator.Add(1,2)); } }}
这里有必要多说几句:
我们首先创建基于3种不模式的Proxy,为了弄清楚整个Activation的流程,对于每个操作都为它显示出具体的执行时间,通过操作的执行会间隔一段时间(我给它指定的是10s)
string singelCallAddress = "http://localhost:1234/artech.myremoting/singlecall.calculator.rem"; string singletonAddress = "http://localhost:1234/artech.myremoting/singleton.calculator.rem"; string caoAddress = "http://localhost:1234/artech.myremoting"; RemotingConfiguration.RegisterActivatedClientType(typeof(CalculatorService), caoAddress); Console.WriteLine("Create server SingleCall proxy at {0}", DateTime.Now.ToString("hh:mm:ss")); CalculatorService singleCallCalculator = Activator.GetObject(typeof(CalculatorService), singelCallAddress) as CalculatorService; Thread.Sleep(10000); Console.WriteLine("Create server Singleton proxy at {0}", DateTime.Now.ToString("hh:mm:ss")); CalculatorService singletonCalculator = Activator.GetObject(typeof(CalculatorService), singletonAddress) as CalculatorService; Thread.Sleep(10000); Console.WriteLine("\nCreate client activated object proxy at {0}", DateTime.Now.ToString("hh:mm:ss")); CalculatorService caoCalculator = new CalculatorService();依次调用三个Proxy的Add方法显示调用的准确时间
Thread.Sleep(10000); Console.WriteLine("\nCall the method of SingleCall object at {0}", DateTime.Now.ToString("hh:mm:ss")); InvocateCalculator(singleCallCalculator); Thread.Sleep(10000); Console.WriteLine("\nCall the method of Singleton object at {0}", DateTime.Now.ToString("hh:mm:ss")); InvocateCalculator(singletonCalculator); Thread.Sleep(10000); Console.WriteLine("\nCall the method of CAO object at {0}", DateTime.Now.ToString("hh:mm:ss")); InvocateCalculator(caoCalculator);获得他们的计数器,看看调用次数有何不同。
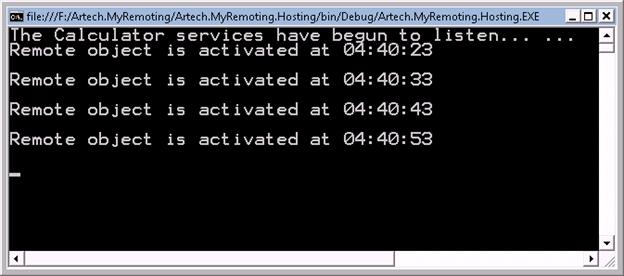
Console.WriteLine("The times to invovate the current SingleCall remote object is {0}", singleCallCalculator.GetCallCount()); Console.WriteLine("The times to invovate the current Singleton remote object is {0}", singletonCalculator.GetCallCount()); Console.WriteLine("The times to invovate the current CAO remote object is {0}", caoCalculator.GetCallCount());现在我们首先启动Hosting,输出表明Server端正常监听。

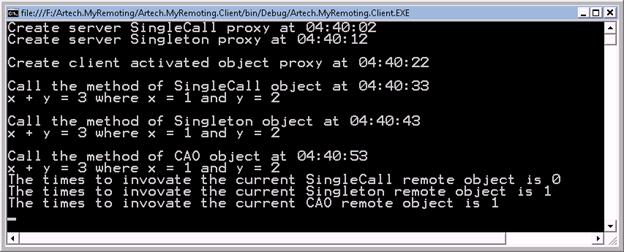
启动Client,产生如下的输出:
然后我们再看看现在Hosting的输出:
我们现在来分析一下为什么会有如此输出结果:
-
我们在04:40:02和04:40:12创建了一个SingleCall Proxy,Server端没有反应,这就充分验证了对于Server Activation来说,在Client端创建Proxy的时候,并没有Remote Object在Server端被Activated。
-
接着我们在04:40:22创建一个CAO Proxy,Remote Object 对象在一分钟后便被Activated。表明Proxy和Remote Object 几乎是同时创建的。
-
10s后,我们分别调用SingleCall和Singleton Proxy的方法,Server端也在同一时间给出反应,这就说明了,对于Server Activation 来说,第一次调用才会导致Remote Object的Activation。
-
随后,我们在04:40:53调用CAO Proxy的方法,Server端没有任何输出,因为这个Proxy对应的Remote在Proxy创建的时候就已经被创建了。(Server端的最后一行输出实际上是调用SingleCall Proxy的GetCallCount方法时输出的——对于SingleCall来说,对于Proxy的每次调用都会创建一个Remote Object,调用完毕被Garbage Collected。看来这个Sample 还是不够好,不过相信大家能够理解了)。
-
接下来,我们分别获取3个对象的调用计数 。对于SingleCalll Proxy 来说,每次调用都会创建一个新的Remote Object,所以Add方法的调用次数永远为零,而对于Singleton来说,所有的Client共享一个Remote Object, 所以它能保持上次来自任意一个Client调用时的State,对于CAO来说,一个Client和一个Remote Object,所以他能够保持自己的调用的State。所以我们不然想象,当我们在开启一个Client,会有什么样的输出:
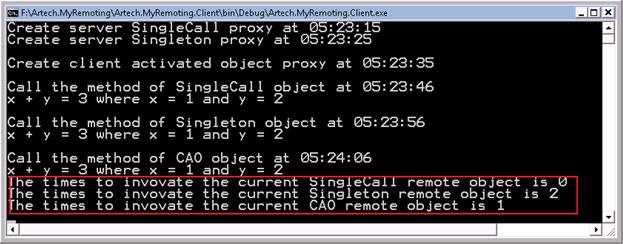
注: 以上的输出都应该基于这样的前提:创建的Remote Object没有被回收。相关的原理相对比较复杂,它将会出现在的后续的关于Remote Object Lifetime Management的Blog中,有兴趣的网友可以关注。
相关内容:
[原创]我所理解的Remoting(1):Marshaling & Activation - Part I
[原创]我所理解的Remoting(1):Marshaling & Activation - Part II
[原创]我所理解的Remoting(2):远程对象生命周期的管理—Part I
[原创]我所理解的Remoting (2) :远程对象的生命周期管理-Part II
[原创]我所理解的Remoting(3):创建CAO Service Factory使接口和实现相互分离
[原创].NET Remoting: 如何通过Remoting实现双向通信(Bidirectional Communication)