一、 画面闪烁问题与双缓冲技术
1.1 导致画面闪烁的关键原因分析:
1 绘制窗口由于大小位置状态改变进行重绘操作时
绘图窗口内容或大小每改变一次,都要调用Paint事件进行重绘操作,该操作会使画面重新刷新一次以维持窗口正常显示。刷新过程中会导致所有图元重新绘制,
而各个图元的重绘操作并不会导致Paint事件发生,因此窗口的每一次刷新只会调用Paint事件一次。窗口刷新一次的过程中,每一个图元的重绘都会立即显示到窗口,
因此整个窗口中,只要是图元所在的位置,都在刷新,而刷新的时间是有差别的,闪烁现象自然会出现。
所以说,此时导致窗口闪烁现象的关键因素并不在于Paint事件调用的次数多少,而在于各个图元的重绘。
根据以上分析可知,当图数目不多时,窗口刷新的位置也不多,窗口闪烁效果并不严重;当图元数目较多时,绘图窗口进行重绘的图元数量增加,绘图窗口每一次刷新
都会导致较多的图元重新绘制,窗口的较多位置都在刷新,闪烁现象自然就会越来越严重。特别是图元比较大绘制时间比较长时,闪烁问题会更加严重,因为时间延迟会更长。
解决上述问题的关键在于:窗口刷新一次的过程中,让所有图元同时显示到窗口。
2、进行鼠标跟踪绘制操作或者对图元进行变形操作时
当进行鼠标跟踪绘制操作或者对图元进行变形操作时,Paint事件会频繁发生,这会使窗口的刷新次数大大增加。虽然窗口刷新一次的过程中所有图元同时显示到窗口,但
也会有时间延迟,因为此时窗口刷新的时间间隔远小于图元每一次显示到窗口所用的时间。因此闪烁现象并不能完全消除!
所以说,此时导致窗口闪烁现象的关键因素在于Paint事件发生的次数多少。
解决此问题的关键在于:设置窗体或控件的几个关键属性。
1.2 双缓冲的关键技术
1、设置显示图元控件的几个属性,这样可以使效果更加明显。
this.SetStyle(ControlStyles.OptimizedDoubleBuffer|ControlStyles.ResizeRedraw|ControlStyles.AllPaintingInWmPaint,true);
2、窗口刷新一次的过程中,让所有图元同时显示到窗口。
Bitmap bmp=null;
Graphics g_bmp=null;
bmp=new Bitmap(this.Width,this.Height);
g_bmp=Graphics.FromImage(bmp);
g_bmp.Clear(this.BackColor);
g_bmp.DrawString("重绘",this.Font,new SolidBrush(this.ForeColor),this.Location.X+1,this.Location.Y+1);
this.Refresh();

//在OnPaint方法中实现下面代码
private void this_Paint(object sender,PaintEventArgs e)
{
    Graphics g=e.Graphics;
    if(g==null) return;
    if(g_bmp!=null)
    {
        g.DrawImage((Image)bmp,0,0);
    }
}
1.3 窗口刷新一次的过程中,让所有图元同时显示到窗口
可以通过以下几种方式实现,这几种方式都涉及到Graphics对象的创建方式。具体实现:
1、 利用默认双缓冲
(1)在应用程序中使用双缓冲的最简便的方法是使用 .NET Framework 为窗体和控件提供的默认双缓冲。通过将 DoubleBuffered 属性设置为 true。
this.DoubleBuffered=true;
(2)使用 SetStyle 方法可以为 Windows 窗体和所创作的 Windows 控件启用默认双缓冲。
SetStyle(ControlStyles.OptimizedDoubleBuffer, true);
2、 手工设置双缓冲
.netframework提供了一个类BufferedGraphicsContext负责单独分配和管理图形缓冲区。每个应用程序域都有自己的默认
BufferedGraphicsContext
实例来管理此应用程序的所有默认双缓冲。大多数情况下,每个应用程序只有一个应用程序域,所以每个应用程序通常只有一个默认
BufferedGraphicsContext。默认 BufferedGraphicsContext 实例由
BufferedGraphicsManager 类管理。通过管理BufferedGraphicsContext实现双缓冲的步骤如下:
(1)获得对 BufferedGraphicsContext 类的实例的引用。
(2)通过调用 BufferedGraphicsContext.Allocate 方法创建 BufferedGraphics 类的实例。
(3)通过设置 BufferedGraphics.Graphics 属性将图形绘制到图形缓冲区。
(4)当完成所有图形缓冲区中的绘制操作时,可调用 BufferedGraphics.Render 方法将缓冲区的内容呈现到与该缓冲区关联的绘图图面或者指定的绘图图面。
(5)完成呈现图形之后,对 BufferedGraphics 实例调用释放系统资源的 Dispose 方法。
完整的例子,在一个400*400的矩形框内绘制10000个随机生成的小圆。
BufferedGraphicsContext current = BufferedGraphicsManager.Current; //(1)
BufferedGraphics bg;
bg = current.Allocate(this.CreateGraphics(),this.DisplayRectangle); //(2)
Graphics g = bg.Graphics;//(3)
//随机 宽400 高400

System.Random rnd = new Random();
int x,y,w,h,r,i;
for (i = 0; i < 10000; i++)
{
    x = rnd.Next(400);
    y = rnd.Next(400);
    r = rnd.Next(20);
    w = rnd.Next(10);
    h = rnd.Next(10);
    g.DrawEllipse(Pens.Blue, x, y, w, h);
}
bg.Render();//(4)
//bg.Render(this.CreateGraphics());
bg.Dispose();//(5)
3、 自己开辟一个缓冲区
如一个不显示的Bitmap对象,在其中绘制完成后,再一次性显示。
完整代码如下:
Bitmap bt = new Bitmap(400, 400);
Graphics bg = Graphics.FromImage(bt);
System.Random rnd = new Random();
int x, y, w, h, r, i;
for (i = 0; i < 10000; i++)
{
    x = rnd.Next(400);
    y = rnd.Next(400);
    r = rnd.Next(20);
    w = rnd.Next(10);
    h = rnd.Next(10);
    bg.DrawEllipse(Pens.Blue, x, y, w, h);

}
this.CreateGraphics().DrawImage(bt, new Point(0, 0));
另外一个例子,差不多
Graphics对象的创建方式:
a、在内存上创建一块和显示控件相同大小的画布,在这块画布上创建Graphics对象。
接着所有的图元都在这块画布上绘制,绘制完成以后再使用该画布覆盖显示控件的背景,从而达到“显示一次仅刷新一次”的效果!
实现代码(在OnPaint方法中):
Rectangle rect = e.ClipRectangle;
Bitmap bufferimage = new Bitmap(this.Width, this.Height);
Graphics g = Graphics.FromImage(bufferimage);
g.Clear(this.BackColor);
g.SmoothingMode = SmoothingMode.HighQuality; //高质量
g.PixelOffsetMode = PixelOffsetMode.HighQuality; //高像素偏移质量
foreach (IShape drawobject in doc.drawObjectList)
 {
            if (rect.IntersectsWith(drawobject.Rect))
           {
               drawobject.Draw(g);
               if (drawobject.TrackerState == config.Module.Core.TrackerState.Selected
                   && this.CurrentOperator == Enum.Operator.Transfrom)//仅当编辑节点操作时显示图元热点
               {
                   drawobject.DrawTracker(g);
               }
           }
  }
using (Graphics tg = e.Graphics)
{
       tg.DrawImage(bufferimage, 0, 0);//把画布贴到画面上
}
b、直接在内存上创建Graphics对象。
Rectangle rect = e.ClipRectangle;
BufferedGraphicsContext currentContext = BufferedGraphicsManager.Current;
BufferedGraphics myBuffer = currentContext.Allocate(e.Graphics, e.ClipRectangle);
Graphics g = myBuffer.Graphics;
g.SmoothingMode = SmoothingMode.HighQuality;
g.PixelOffsetMode = PixelOffsetMode.HighSpeed;
g.Clear(this.BackColor);
foreach (IShape drawobject in doc.drawObjectList)
{
    if (rect.IntersectsWith(drawobject.Rect))
    {
        drawobject.Draw(g);
        if (drawobject.TrackerState == config.Module.Core.TrackerState.Selected
            && this.CurrentOperator == Enum.Operator.Transfrom)//仅当编辑节点操作时显示图元热点
        {
            drawobject.DrawTracker(g);
        }
    }
}
myBuffer.Render(e.Graphics);
myBuffer.Dispose();//释放资源
至此,双缓冲问题解决,两种方式的实现效果都一样,但最后一种方式的占有的内存很少,不会出现内存泄露!
1.4 对acdsee拖动图片效果的实现
开始不懂双缓冲,以为双缓冲可以解决这个问题,结果发现使用了双缓冲没啥效果,请教了高人,然后修改了些代码,完成这个效果。
图片是在pictureBox1里。
Bitmap currentMap;
bool first = true;
private void pictureBox1_MouseDown(object sender, MouseEventArgs e)
{
    if (zoom == 0)
    {
        if (e.Button == MouseButtons.Left) //dragging
            mousedrag = e.Location;
        Image myImage = myMap.GetMap();
        currentMap = new Bitmap(myImage);
        first = false;
    }
}
private void pictureBox1_MouseMove(object sender, MouseEventArgs e)
{
    if (zoom == 0&&!first)
    {
            Image img = new Bitmap(Size.Width, Size.Height);
            Graphics g = Graphics.FromImage(img);
            g.Clear(Color.Transparent);//图片移动后显示的底色
            g.SmoothingMode = SmoothingMode.HighQuality; //高质量
            g.PixelOffsetMode = PixelOffsetMode.HighQuality; //高像素偏移质量
            g.DrawImageUnscaled(currentMap, new System.Drawing.Point(e.Location.X - mousedrag.X, e.Location.Y - mousedrag.Y));//在g中移动图片,原图在(0,0)画的,所以直接用new System.Drawing.Point(e.Location.X - mousedrag.X, e.Location.Y - mousedrag.Y)就好。
            g.Dispose();
            pictureBox1.Image = img;//img是在鼠标这个位置时生成被移动后的暂时的图片
    }
}
private void pictureBox1_MouseUp(object sender, MouseEventArgs e)
{
    if (zoom == 0)
    {
        System.Drawing.Point pnt = new System.Drawing.Point(Width / 2 + (mousedrag.X - e.Location.X),
                                                                        Height / 2 + (mousedrag.Y - e.Location.Y));
         myMap.Center = myMap.ImageToWorld(pnt);
        pictureBox1.Image = myMap.GetMap();
        first = true;
    }
}
说说思路,在鼠标点下时创建一个bitmap,currentMap,用它来存放当前图像。鼠标移动时,根据鼠标位置画图,最后,鼠标up时,重新画图。
二、示例1
在使用gdi技术绘图时,有时会发现图形线条不够流畅,或者在改变窗体大小时会闪烁不断的现象.(Use DoubleBuffer to solve it!)
1.线条不流畅:窗体在重绘时自身重绘与图形重绘之间存在时间差,导致二者图像显示不协调
2.改变窗体大小不流畅:重绘时自身背景颜色与图形颜色频繁交替,造成视觉上的闪烁
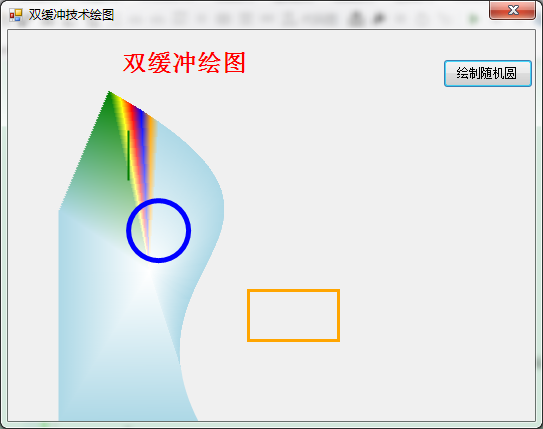
下面,用四个图形例子解决这个问题 :贝塞尔曲线,圆形,矩形,不规则图形
思路:首先用 width 定义位图的宽度; height 定义位图的高度
//创建一个与窗体工作区大小相同的位图实例
// image:Image类的子类的实例引用
Bitmap localBitmap=new Bitmap(CilentRectangle.Width,CilentRectangle.Height) //创建位图实例

// image:要绘制的图像  x:绘制的图像的左上角 x坐标 y:左上角y坐标
Graphics g=e.Graphics;//获取窗体画布
g.DrawImage(localBitmap,0,0);  //在窗体中绘制出内存中的图像
实现:由于Paint被 .net隐藏,我们需要在窗体代码中加上自己的Paint事件中绘制窗口
this.Paint += new System.Windows.Forms.PaintEventHandler(this.Form1_Paint);
private void InitializeComponent()
{
    this.SuspendLayout();
    //
    // Form1
    //
    this.AutoScaleDimensions = new System.Drawing.SizeF(6F, 12F);
    this.AutoScaleMode = System.Windows.Forms.AutoScaleMode.Font;
    this.ClientSize = new System.Drawing.Size(388, 325);
    this.MaximizeBox = false;
    this.MinimizeBox = false;
    this.Name = "Form1";
    this.Text = "双缓冲技术绘图";
    this.Paint += new System.Windows.Forms.PaintEventHandler(this.Form1_Paint);

    this.ResumeLayout(false);
}
源代码:
using System;
using System.Collections.Generic;
using System.ComponentModel;
using System.Data;
using System.Drawing;
using System.Linq;
using System.Text;
using System.Windows.Forms;
using System.Drawing.Drawing2D;

namespace DoubleBuffer
{
    public partial class Form1 : Form
    {
        public Form1()
        {
            InitializeComponent();
        }

        private void Form1_Paint(object sender, PaintEventArgs e)
        {
            Bitmap localBitmap = new Bitmap(ClientRectangle.Width, ClientRectangle.Height);
            //创建位图实例
            Graphics g_bmp= Graphics.FromImage(localBitmap);
            g_bmp.Clear(BackColor);
            g_bmp.SmoothingMode = SmoothingMode.AntiAlias;
            PaintImage(g_bmp);

            Graphics g = e.Graphics;//获取窗体画布
            g.DrawImage(localBitmap, 0, 0); //在窗体的画布中绘画出内存中的图像
            g_bmp.Dispose();
            localBitmap.Dispose();
            g.Dispose();
        }
        private void PaintImage(Graphics g)
        {
            //绘图
            GraphicsPath path = new GraphicsPath(new Point[]{ new Point(100,60),new Point(350,200),new Point(105,225),new Point(190,ClientRectangle.Bottom),
                new Point(50,ClientRectangle.Bottom),new Point(50,180)}, new byte[]{
                    (byte)PathPointType.Start,
                    (byte)PathPointType.Bezier,
                    (byte)PathPointType.Bezier,
                    (byte)PathPointType.Bezier,
                    (byte)PathPointType.Line,
                    (byte)PathPointType.Line});
            PathGradientBrush pgb = new PathGradientBrush(path);
            pgb.SurroundColors = new Color[] { Color.Green, Color.Yellow, Color.Red, Color.Blue, Color.Orange, Color.LightBlue };
            g.FillPath(pgb, path);
            g.DrawString("双缓冲绘图", new Font("宋体", 18, FontStyle.Bold), new SolidBrush(Color.Red), new PointF(110, 20));
            g.DrawBeziers(new Pen(new SolidBrush(Color.Green),2),new Point[] {new Point(120,100),new Point(120,120),new Point(120,100),new Point(120,150)});
            g.DrawArc(new Pen(new SolidBrush(Color.Blue), 5), new Rectangle(new Point(120, 170), new Size(60, 60)), 0, 360);
            g.DrawRectangle(new Pen(new SolidBrush(Color.Orange), 3), new Rectangle(new Point(240, 260), new Size(90, 50)));
        }


    }
}
// Form 设计
namespace DoubleBuffer
{
    partial class Form1
    {
        /// <summary>
        /// 必需的设计器变量。
        /// </summary>
        private System.ComponentModel.IContainer components = null;

        /// <summary>
        /// 清理所有正在使用的资源。
        /// </summary>
        /// <param name="disposing">如果应释放托管资源,为 true;否则为 false。</param>
        protected override void Dispose(bool disposing)
        {
            if (disposing && (components != null))
            {
                components.Dispose();
            }
            base.Dispose(disposing);
        }

        #region Windows 窗体设计器生成的代码

        /// <summary>
        /// 设计器支持所需的方法 - 不要
        /// 使用代码编辑器修改此方法的内容。
        /// </summary>
        private void InitializeComponent()
        {
            this.SuspendLayout();
            //
            // Form1
            //
            this.AutoScaleDimensions = new System.Drawing.SizeF(6F, 12F);
            this.AutoScaleMode = System.Windows.Forms.AutoScaleMode.Font;
            this.ClientSize = new System.Drawing.Size(388, 325);
            this.MaximizeBox = false;
            this.MinimizeBox = false;
            this.Name = "Form1";
            this.Text = "双缓冲技术绘图";
            this.Paint += new System.Windows.Forms.PaintEventHandler(this.Form1_Paint);
            this.ResumeLayout(false);

        }

        #endregion
    }
}
当变化窗体时,会导致图像出现变形,可把窗体属性中的ResizeRedraw 设置为 true
增加绘制随机图形功能的动画效果如下:
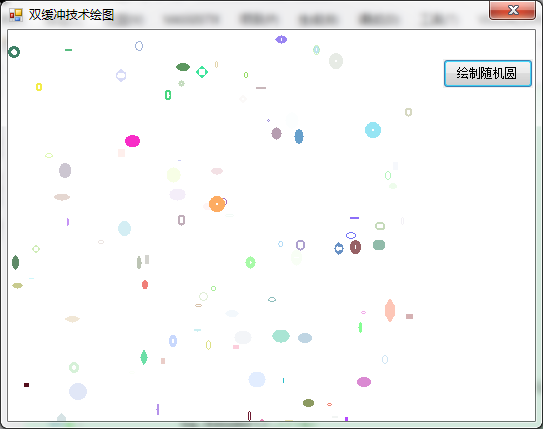
现在将源码贡献自此,让不太懂双缓冲绘图的有一个大致的了解,以便少走笔者学习的弯路。如有问题,欢迎询问评论。
参考文章