PySide——Python图形化界面入门教程(五)
——QListWidget
翻译自:http://pythoncentral.io/pyside-pyqt-tutorial-the-qlistwidget/
Qt具有简洁和方便的几个部件,用来作单列表选择,我们称之为列表框。最灵活的方法是使用一个是Qlistview,它提供了一个必须由程序员定义UI视图、高度灵活的列表模式;一个简单的方法是使用QListWidget,它具有一个预先定义的基于项目的模型,用来处理常见的列表框。我们本节从简单的QListWidget开始。
QListWidget
QListWidget的构造器同许多QWidget的子类一样,拥有一个可选的parent参数:
self.list = QListWidget(self)
填充QListWidget
为QListWidget添加项目非常容易。如果项目是纯文本,你可以单独的添加他们:
1 for i in range(10):
2     self.list.addItem('Item %s' % (i + 1))
或者一起添加他们:
1 items = ['Item %s' % (i + 1)
2          for i in range(10)]
3 self.list.addItems(items)
你还可以使用QListWidgetItem类更复杂的列表项目。QListWidgetItem可以被单独的创建,然后再使用列表的addItem方法添加。
item = QListWidgetItem()
list.addItem(item)
更复杂的QListWidget项目
或者,它还可以直接使用list参数来创建,这样他会自动的被添加到list。
item = QListWidgetItem(list)
项目可以使用setText方法来添加文本,使用setIcon方法添加图标QIcon:
item.setText('I am an item')
item.setIcon(some_QIcon)
同样也可以在构造器中写明文本或图标:
item = QListWidgetItem('A Text-Only Item')
item = QListWidgetItem(some_QIcon, 'An item with text and an icon')
当然, 上面的每个构造器也可选的接受parent参数。
使用QListWidget
QListWidget提供一些方便的信号来响应用户输入。最重要的是currentItemChanged信号,它是当用户改变选择的项目时发出;它连接的槽接收两个参数,current和previous,表示现在和之前选择的QListWidgetItem项。同样它也有对应的信号,当用户单击、双击、激活或按下一个项、改变选择的项目集时。
为获得当前选择的项,你也可以使用currentItemChanged信号传来的参数,或使用QListWidget的currentItem方法。
对QIcon的注解
你可以通过添加一个图标来改变QListWidgetItem,所以有必要了解一下QIcon了。这有许多构造QIcon的方法,如:
- 提供文件名:
icon = QIcon('/some/path/to/icon.png'). - 使用主题图标:
icon = QIcon.fromTheme('document-open'). - 通过
QPixMap:icon = QIcon(some_pixmap)
还有许多其他的。注意:基于文件的创建方法支持许多类型,但并不是所有类型,你可以通过使用QImageReader().supportedImageFormats()来查看你的平台和版本支持哪些。在作者的系统上,它返回了:


 1 [PySide.QtCore.QByteArray('bmp'),
 2  PySide.QtCore.QByteArray('gif'),
 3  PySide.QtCore.QByteArray('ico'),
 4  PySide.QtCore.QByteArray('jpeg'),
 5  PySide.QtCore.QByteArray('jpg'),
 6  PySide.QtCore.QByteArray('mng'),
 7  PySide.QtCore.QByteArray('pbm'),
 8  PySide.QtCore.QByteArray('pgm'),
 9  PySide.QtCore.QByteArray('png'),
10  PySide.QtCore.QByteArray('ppm'),
11  PySide.QtCore.QByteArray('svg'),
12  PySide.QtCore.QByteArray('svgz'),
13  PySide.QtCore.QByteArray('tga'),
14  PySide.QtCore.QByteArray('tif'),
15  PySide.QtCore.QByteArray('tiff'),
16  PySide.QtCore.QByteArray('xbm'),
基于主题的创建方法有时候会出问题,当在Windows和OS X还有使用Gnome或KDE的Linux应该没问题,但是如果使用不太常见的桌面环境,像OpenBox或XFCE,Qt或许不能找到你的图标,所以会只有文本。
一个QListWidget例子
我们来创建一个简单的列表widget来显示文件夹中的文件名和为图片显示一个极小的图标。因为这里的项非常简单,足以用QListWidgetItem来创建,我们将从QListWidget继承。
第一步,我们需要知道安装的版本都支持什么类型的图片,这样我们的列表控件才能辨别什么是合法的图片。我们可以使用上面提到的方法,QImageReader().supportedImageFormats()。我们将他们返回前全部转化成字符串:
1 def supported_image_extensions():
2     ''' Get the image file extensions that can be read. '''
3     formats = QImageReader().supportedImageFormats()
4     # Convert the QByteArrays to strings
5     return [str(fmt) for fmt in formats]
现在我们可以创建我们的图片列表widget了,起一个望名知义的名字——ImageFileWidget。它将继承自QListWidget,还像所有的QWidget一样有一个可选的parent参数,此外,它要求一个dirpath参数:
1 class ImageFileList(QListWidget):
2     ''' A specialized QListWidget that displays the list
3         of all image files in a given directory. '''
4     def __init__(self, dirpath, parent=None):
5         QListWidget.__init__(self, parent)
我们需要知道给出的文件夹中都有哪些图片。这里给出一个_images方法,这个方法会返回指定目录中所有合法图片的文件名。它利用了glob模块的glob函数,它允许对文件和路径进行shell风格的模式匹配。
 1 def _images(self):
 2     ''' Return a list of file-names of all
 3         supported images in self._dirpath. '''
 4
 5     # Start with an empty list
 6     images = []
 7
 8     # Find the matching files for each valid
 9     # extension and add them to the images list.
10     for extension in supported_image_extensions():
11         pattern = os.path.join(self._dirpath,
12                                '*.%s' % extension)
13         images.extend(glob(pattern))
14
15     return images
现在我们获得了文件夹中的图片文件,再将他们添加到QListWidget就简单了。每一个文件名,我们创建一个以列表为其parent的QListWidgetItem,并将其文件名设置成本文,用图片创建的QIcon设置其图标。
 1 def _populate(self):
 2     ''' Fill the list with images from the
 3         current directory in self._dirpath. '''
 4
 5     # In case we're repopulating, clear the list
 6     self.clear()
 7
 8     # Create a list item for each image file,
 9     # setting the text and icon appropriately
10     for image in self._images():
11         item = QListWidgetItem(self)
12         item.setText(image)
13         item.setIcon(QIcon(image))
最后,我们添加一个方法来设置目录,它每次调用都会重新填充列表。
1 def setDirpath(self, dirpath):
2     ''' Set the current image directory and refresh the list. '''
3     self._dirpath = dirpath
4     self._populate()
ImageFileList类的代码如下:
 1 class ImageFileList(QListWidget):
 2     ''' A specialized QListWidget that displays the
 3         list of all image files in a given directory. '''
 4
 5     def __init__(self, dirpath, parent=None):
 6         QListWidget.__init__(self, parent)
 7         self.setDirpath(dirpath)
 8
 9
10     def setDirpath(self, dirpath):
11         ''' Set the current image directory and refresh the list. '''
12         self._dirpath = dirpath
13         self._populate()
14
15
16     def _images(self):
17         ''' Return a list of filenames of all
18             supported images in self._dirpath. '''
19
20         # Start with an empty list
21         images = []
22
23         # Find the matching files for each valid
24         # extension and add them to the images list
25         for extension in supported_image_extensions():
26             pattern = os.path.join(self._dirpath,
27                                    '*.%s' % extension)
28             images.extend(glob(pattern))
29
30         return images
31
32
33     def _populate(self):
34         ''' Fill the list with images from the
35             current directory in self._dirpath. '''
36
37         # In case we're repopulating, clear the list
38         self.clear()
39
40         # Create a list item for each image file,
41         # setting the text and icon appropriately
42         for image in self._images():
43             item = QListWidgetItem(self)
44             item.setText(image)
45             item.setIcon(QIcon(image))
现在把我们的ImageFileList放到一个简单窗口里来看看它是否工作。我们将创建一个QWidget来作为窗口,使用QVBoxLayout布局,添加ImageFileList,并且包含一个可以显示当前选定项的记录widget。我们将使用ImageFileList的currentItemChanged信号来保持他们同步。
我们将创建一个QApplication对象,使用sys.argv[1],以列表形式传递图片文件路径给它。
app = QApplication([])
然后,创建我们的窗口,设置尺寸并添加布局:
1 win = QWidget()
2 win.setWindowTitle('Image List')
3 win.setMinimumSize(600, 400)
4 layout = QVBoxLayout()
5 win.setLayout(layout)
接下来,传递给ImageFileList图片文件夹路径和我们的窗口。
first = ImageFileList(sys.argv[1], win)
添加记录widget
entry = QLineEdit(win)
将widget添加到布局中去:
layout.addWidget(first)
layout.addWidget(entry)
接下来,我们需要创建一个在当前项被改变时会调用的槽函数。它有两个参数,curr和prev,分别表示当前选定的项和上一个选定的项。它还需要设置记录当前选定的项:
def on_item_changed(curr, prev):
    entry.setText(curr.text())
别忘了和信号连接起来:
lst.currentItemChanged.connect(on_item_changed)
剩下的就是显示窗口和运行app了,最后代码如下:
 1 if __name__ == '__main__':
 2     # The app doesn't receive sys.argv, because we're using
 3     # sys.argv[1] to receive the image directory
 4     app = QApplication([])
 5
 6     # Create a window, set its size, and give it a layout
 7     win = QWidget()
 8     win.setWindowTitle('Image List')
 9     win.setMinimumSize(600, 400)
10     layout = QVBoxLayout()
11     win.setLayout(layout)
12
13     # Create one of our ImageFileList objects using the image
14     # directory passed in from the command line
15     lst = ImageFileList(sys.argv[1], win)
16
17     layout.addWidget(lst)
18
19     entry = QLineEdit(win)
20
21     layout.addWidget(entry)
22
23     def on_item_changed(curr, prev):
24         entry.setText(curr.text())
25
26     lst.currentItemChanged.connect(on_item_changed)
27
28     win.show()
29     app.exec_()
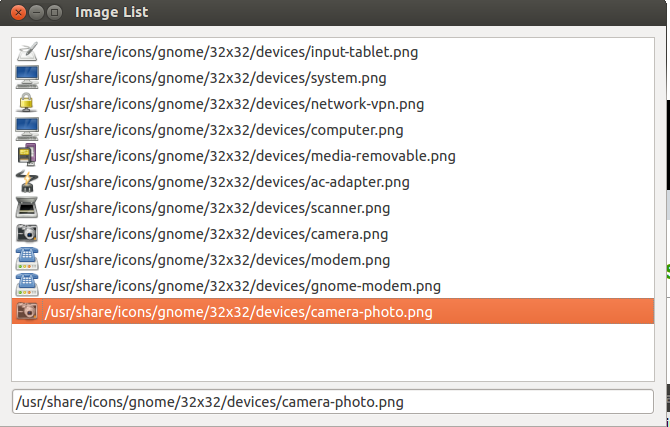
运行这个例子需要你有一个具有图片的文件夹;原文作者使用了/usr/share/icons作为例子,你需要选择自己的文件夹。
python imagelist.py /usr/share/icons/nuoveXT2/48x48/devices
应有些朋友的要求,给出一个运行的截图。另外需要注意自行import一些库才可以运行。
显然,QListWidget是非常简单的widget,不需要提供更多的选项;这就会有许多它不能适应的应用场景。对于难以适应的场景,你或许需要使用QListView,我们在下节讨论它。
By Ascii0x03
转载请注明出处:http://www.cnblogs.com/ascii0x03/p/5502286.html