Eureka的功能:云端服务发现,一个基于 REST 的服务,用于定位服务,以实现云端中间层服务发现和故障转移。
在微服务框架中,是一个用于“服务注册与发现”的工具。在Spring Cloud的H版(Hoxton)已经不再推荐使用此工具,而是建议使用Nacos或者Consul来代替。
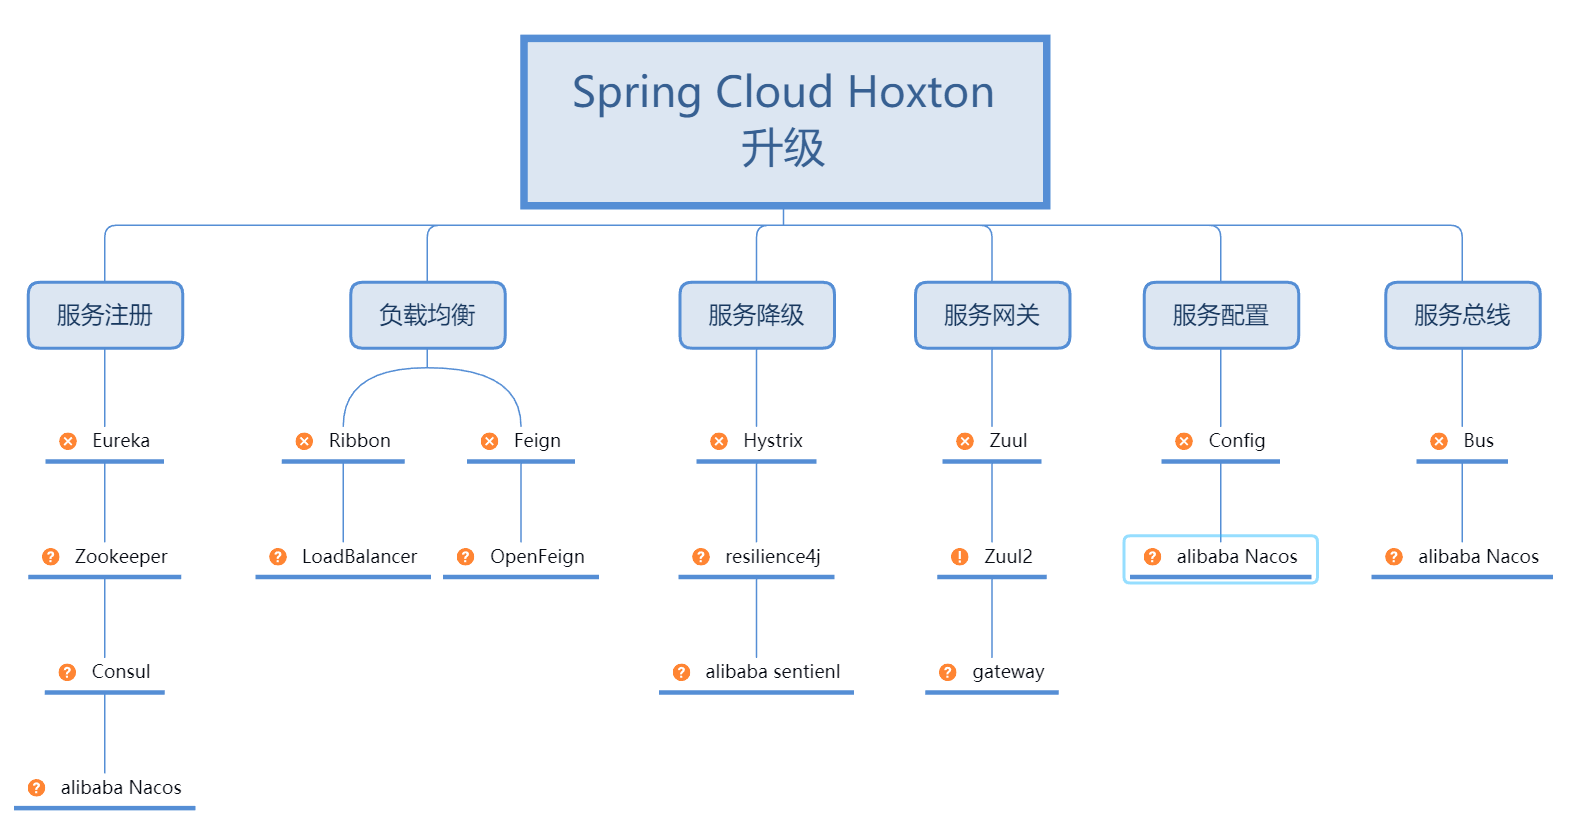
因此本文属于@Deprecated,已经过时的知识。当然官方的推荐只是建议而已,实际项目仍然可以继续使用这个工具。下面通过一个项目演示此工具的基本使用。
本文包含1个主项目,4个子模块:
主项目:srpingclouddemo,用于承载各个模块,以及Eureka的版本配置。
01-eureka:用于提供eureka服务
02-customer:用于模拟服务的实际使用者
03-search:用国语模拟服务的实际提供者
04-eureka:用于提供eureka的高可用(eureka集群)
1.创建主体项目:
使用IDEA创建一个Spring Boot的项目,取名为springclouddemo。修改pom文件,添加如下节点:
 1 <properties>
 2     <java.version>1.8</java.version>
 3     <spring.cloud-version>Hoxton.SR8</spring.cloud-version>
 4 </properties>
 5
 6 <dependencyManagement>
 7     <dependencies>
 8         <dependency>
 9             <groupId>org.springframework.cloud</groupId>
10             <artifactId>spring-cloud-dependencies</artifactId>
11             <version>${spring.cloud-version}</version>
12             <type>pom</type>
13             <scope>import</scope>
14         </dependency>
15     </dependencies>
16 </dependencyManagement>
2.创建Eureka服务子项目一:
在第1步创建的项目中,新建一个Module,创建一个Maven项目,取名为01-eureka。
并在pom文件中添加以下引用:
 1 <dependencies>
 2     <dependency>
 3         <groupId>org.springframework.boot</groupId>
 4         <artifactId>spring-boot-starter-security</artifactId>
 5     </dependency>
 6     <dependency>
 7         <groupId>org.springframework.cloud</groupId>
 8         <artifactId>spring-cloud-starter-netflix-eureka-server</artifactId>
 9     </dependency>
10     <dependency>
11         <groupId>org.springframework.boot</groupId>
12         <artifactId>spring-boot-starter-web</artifactId>
13     </dependency>
14 </dependencies>
第4行配置是引入spring boot的安全控制。
第8行配置是引入Eureka的服务端。
第12行配置是引入spring mvc开启web站点功能。
新建一个SpringBoot启动类,并添加相关注解:
 1 package com.yangasen;
 2
 3 import org.springframework.boot.SpringApplication;
 4 import org.springframework.boot.autoconfigure.SpringBootApplication;
 5 import org.springframework.cloud.netflix.eureka.server.EnableEurekaServer;
 6
 7 @SpringBootApplication
 8 @EnableEurekaServer
 9 public class EurekaApplication {
10
11     public static void main(String[] args) {
12         SpringApplication.run(EurekaApplication.class,args);
13     }
14 }
添加配置文件,application.yml:
 1 server:
 2   port: 8761
 3
 4 eureka:
 5   instance:
 6     hostname: localhost
 7   client:
 8     registerWithEureka: true
 9     fetchRegistry: true
10     serviceUrl:
11       defaultZone: http://root:root@localhost:8762/eureka/
12
13 spring:
14   security:
15     user:
16       name: root
17       password: root
18   application:
19     name: EUREKA
添加配置类,WebSecurityConfig,开启安全控制:
 1 package com.yangasen.config;
 2
 3 import org.springframework.security.config.annotation.web.builders.HttpSecurity;
 4 import org.springframework.security.config.annotation.web.configuration.EnableWebSecurity;
 5 import org.springframework.security.config.annotation.web.configuration.WebSecurityConfigurerAdapter;
 6
 7 @EnableWebSecurity
 8 public class WebSecurityConfig extends WebSecurityConfigurerAdapter {
 9     @Override
10     protected void configure(HttpSecurity http) throws Exception {
11         http.csrf().ignoringAntMatchers("/eureka/**");
12         super.configure(http);
13     }
14 }
3.创建Eureka服务子项目二:
在第1步创建的项目中,新建一个Module,创建一个Maven项目,取名为04-eureka。
配置均与第2步相同,只是application.yml配置修改如下:
 1 server:
 2   port: 8762
 3
 4 eureka:
 5   instance:
 6     hostname: localhost
 7   client:
 8     registerWithEureka: true
 9     fetchRegistry: true
10     serviceUrl:
11       defaultZone: http://root:root@localhost:8761/eureka/
12
13 spring:
14   security:
15     user:
16       name: root
17       password: root
18   application:
19     name: EUREKA
4.创建Eureka客户端子项目,用于调用服务:
在第1步创建的项目中,新建一个Module,创建一个Maven项目,取名为02-customer。
pom文件配置如下:
 1 <dependencies>
 2     <dependency>
 3         <groupId>org.springframework.cloud</groupId>
 4         <artifactId>spring-cloud-starter-netflix-eureka-client</artifactId>
 5     </dependency>
 6     <dependency>
 7         <groupId>org.springframework.boot</groupId>
 8         <artifactId>spring-boot-starter-web</artifactId>
 9     </dependency>
10 </dependencies>
添加一个spirngboot启动类:
 1 package com.yangasen;
 2
 3 import org.springframework.boot.SpringApplication;
 4 import org.springframework.boot.autoconfigure.SpringBootApplication;
 5 import org.springframework.cloud.netflix.eureka.EnableEurekaClient;
 6 import org.springframework.context.annotation.Bean;
 7 import org.springframework.web.client.RestTemplate;
 8
 9
10 @SpringBootApplication
11 @EnableEurekaClient
12 public class CustomerApplication {
13     public static void main(String[] args) {
14         SpringApplication.run(CustomerApplication.class,args);
15     }
16     @Bean
17     public RestTemplate restTemplate(){
18         return new RestTemplate();
19     }
20 }
添加配置文件application.yml:
1 eureka:
2   client:
3     serviceUrl:
4       defaultZone: http://root:root@localhost:8761/eureka,http://root:root@localhost:8762/eureka
5
6 spring:
7   application:
8     name: CUSTOMER
添加用于测试的Controller:
 1 package com.yangasen.controller;
 2
 3 import com.netflix.appinfo.InstanceInfo;
 4 import com.netflix.discovery.EurekaClient;
 5 import org.springframework.beans.factory.annotation.Autowired;
 6 import org.springframework.web.bind.annotation.GetMapping;
 7 import org.springframework.web.bind.annotation.RestController;
 8 import org.springframework.web.client.RestTemplate;
 9
10 @RestController
11 public class CustomerController {
12
13     @Autowired
14     private RestTemplate restTemplate;
15
16     @Autowired
17     private EurekaClient eurekaClient;
18
19     @GetMapping("/customer")
20     public String customer(){
21         InstanceInfo instanceInfo = eurekaClient.getNextServerFromEureka("SEARCH",false);
22         String url = instanceInfo.getHomePageUrl();
23         System.out.println(url);
24         String result = restTemplate.getForObject(url+"/search",String.class);
25         return result;
26     }
27 }
5.创建Eureka客户端子项目,用于提供服务:
在第1步创建的项目中,新建一个Module,创建一个Maven项目,取名为03-search。
pom文件配置如下:与02项目相同。
 1 <dependencies>
 2     <dependency>
 3         <groupId>org.springframework.cloud</groupId>
 4         <artifactId>spring-cloud-starter-netflix-eureka-client</artifactId>
 5     </dependency>
 6     <dependency>
 7         <groupId>org.springframework.boot</groupId>
 8         <artifactId>spring-boot-starter-web</artifactId>
 9     </dependency>
10 </dependencies>
添加springboot启动类,与03项目相同。
 1 package com.yangasen;
 2
 3 import org.springframework.boot.SpringApplication;
 4 import org.springframework.boot.autoconfigure.SpringBootApplication;
 5 import org.springframework.cloud.netflix.eureka.EnableEurekaClient;
 6
 7 @SpringBootApplication
 8 @EnableEurekaClient
 9 public class SearchApplication {
10     public static void main(String[] args) {
11         SpringApplication.run(SearchApplication.class,args);
12     }
13 }
添加配置文件application.yml,注意端口与02项目不同:
 1 eureka:
 2   client:
 3     serviceUrl:
 4       defaultZone: http://root:root@localhost:8761/eureka,http://root:root@localhost:8762/eureka
 5
 6 spring:
 7   application:
 8     name: SEARCH
 9
10 server:
11   port: 8081
添加用于测试的Controller文件:
 1 package com.yangasen.controller;
 2
 3 import org.springframework.web.bind.annotation.GetMapping;
 4 import org.springframework.web.bind.annotation.RestController;
 5
 6 @RestController
 7 public class SearchController {
 8
 9     @GetMapping("/search")
10     public String search(){
11         return "search";
12     }
13 }
6.测试效果:
将以上四个模块都启动,在浏览器中访问如下地址:http://localhost:8080/customer
浏览器中会显示“search”字样,测表示Eureka服务运行正常。

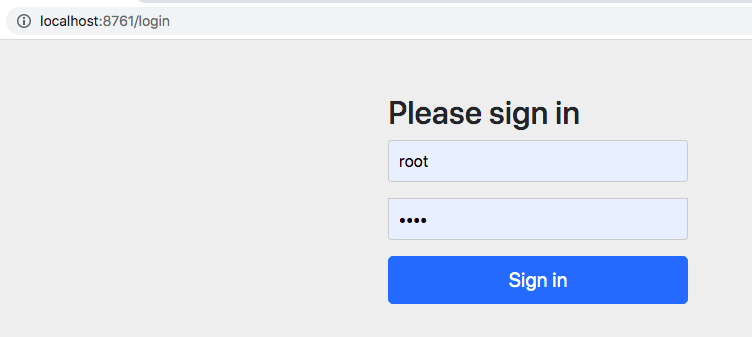
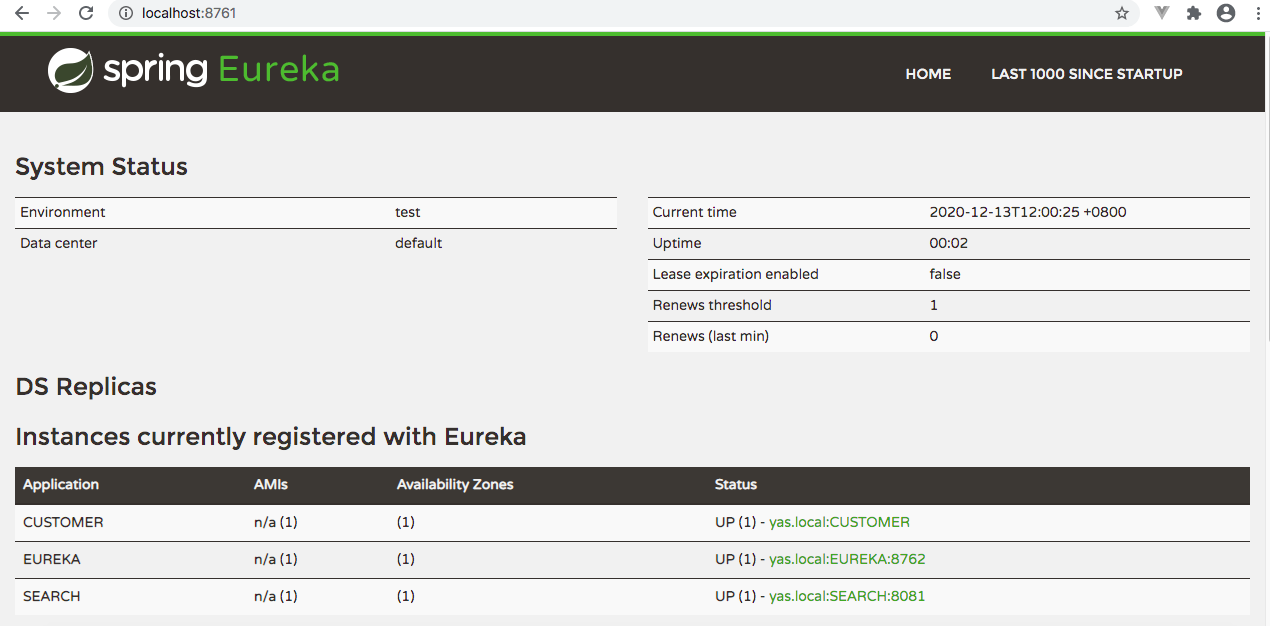
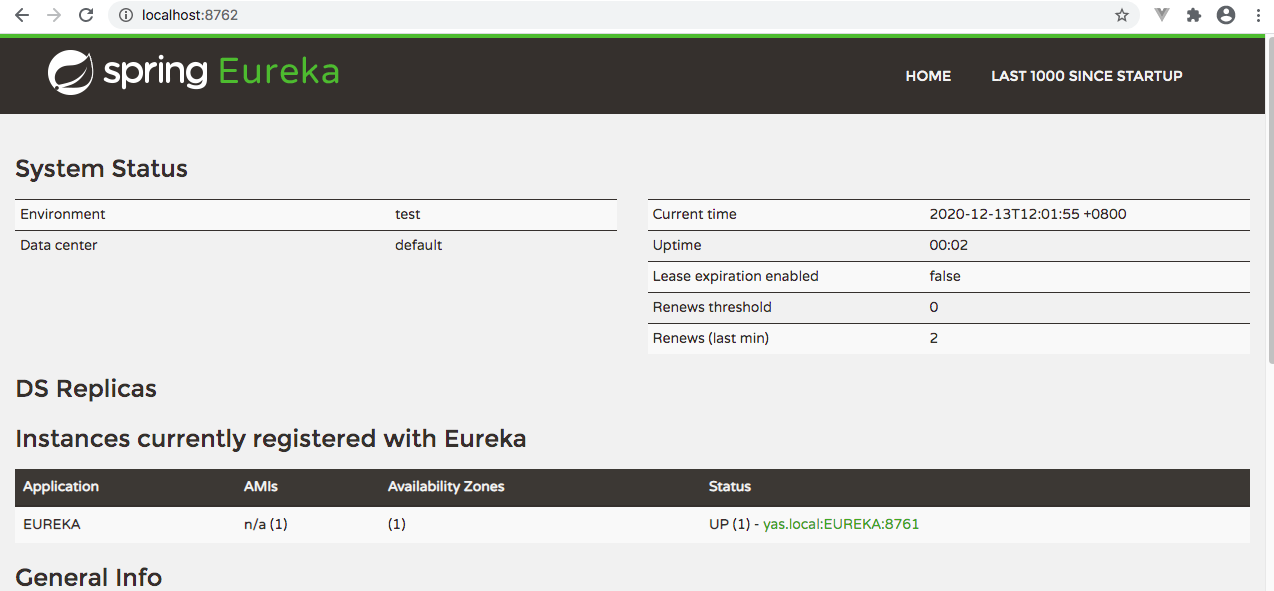
同时,可以通过http://localhost:8761以及http://localhost:8762这两个地址(账户:root,密码:root)登录,查看Eureka服务的信息。如图所示:
登录界面
8761端口管理界面:
8762端口管理界面:
两个子项目启动了eureka的高可用,假如其中某一台eureka服务出现问题,整个服务仍然可以使用。
即停掉01或者04任意一个项目,仍然可以通过02项目的controller中的action,访问到03项目的controller的action。