1、从官网链接下载插件:
Releases · rabbitmq/rabbitmq-delayed-message-exchange (github.com)
本文下载的是3.9.0版本。
2、安装插件
将下载的文件rabbitmq_delayed_message_exchange-3.9.0.ez,上传到服务器rabbitmq的安装目录下,执行如下命令:
cd /usr/lib/rabbitmq/lib/rabbitmq_server-3.9.8/plugins/
rabbitmq-plugins enable rabbitmq_delayed_message_exchange

3、重启rabbitmq
service rabbitmq-server restart
4、验证插件是否已安装
重新刷新15672端口的管理界面,在交换机页面,可以看到,增加了一种x-delayed-message的消息类型:
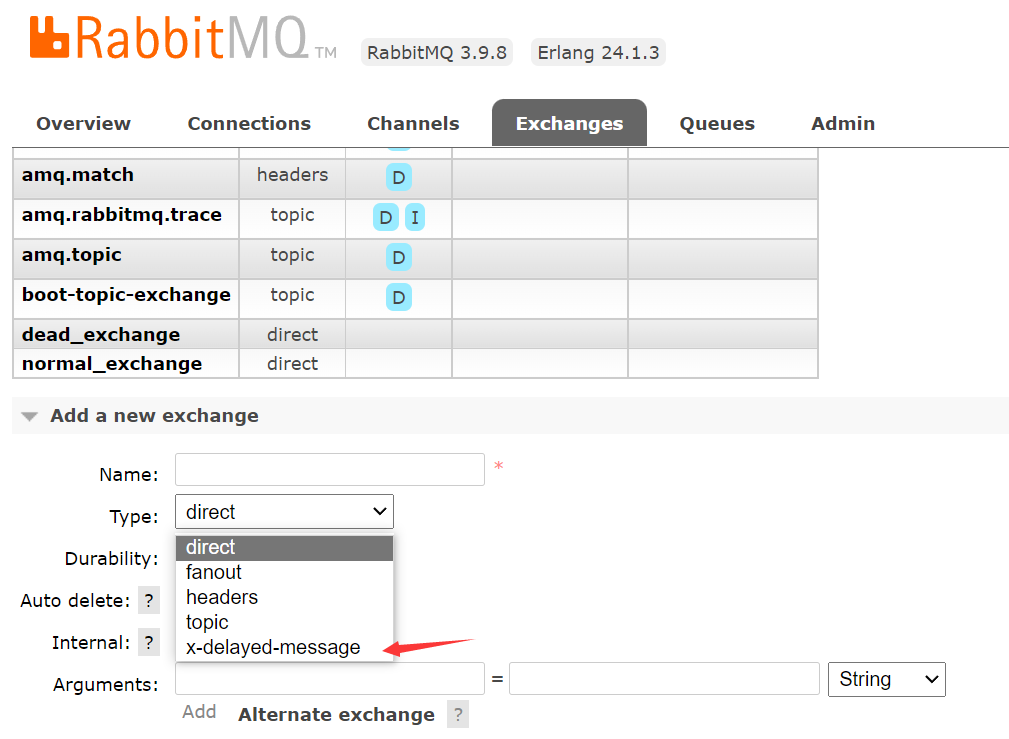
5、使用SpringBoot实现延迟队列
先使用idea建立一个spring boot 的项目,并在pom中添加如下依赖:
<dependencies>
<!--RabbitMQ 依赖-->
    <dependency>
        <groupId>org.springframework.boot</groupId>
        <artifactId>spring-boot-starter-amqp</artifactId>
    </dependency>
    <dependency>
        <groupId>org.springframework.boot</groupId>
        <artifactId>spring-boot-starter-web</artifactId>
    </dependency>
    <dependency>
        <groupId>org.springframework.boot</groupId>
        <artifactId>spring-boot-starter-test</artifactId>
        <scope>test</scope>
    </dependency>
    <dependency>
        <groupId>com.alibaba</groupId>
        <artifactId>fastjson</artifactId>
        <version>1.2.47</version>
    </dependency>
    <dependency>
        <groupId>org.projectlombok</groupId>
        <artifactId>lombok</artifactId>
    </dependency>
    <!--swagger-->
    <dependency>
        <groupId>io.springfox</groupId>
        <artifactId>springfox-swagger2</artifactId>
        <version>2.9.2</version>
    </dependency>
    <dependency>
        <groupId>io.springfox</groupId>
        <artifactId>springfox-swagger-ui</artifactId>
    <version>2.9.2</version>
    </dependency>
    <!--RabbitMQ 测试依赖-->
    <dependency>
        <groupId>org.springframework.amqp</groupId>
        <artifactId>spring-rabbit-test</artifactId>
        <scope>test</scope>
    </dependency>
</dependencies>
application.yml文件配置:
spring:
  rabbitmq:
    host: ubu
    port: 5672
    username: admin
    password: 123456
    virtual-host: /
swagger配置类:
 1 package com.yas.rabbitmqboot.config;
 2
 3 import org.springframework.context.annotation.Bean;
 4 import org.springframework.context.annotation.Configuration;
 5 import springfox.documentation.builders.ApiInfoBuilder;
 6 import springfox.documentation.service.ApiInfo;
 7 import springfox.documentation.service.Contact;
 8 import springfox.documentation.spi.DocumentationType;
 9 import springfox.documentation.spring.web.plugins.Docket;
10 import springfox.documentation.swagger2.annotations.EnableSwagger2;
11
12 @Configuration
13 @EnableSwagger2
14 public class SwaggerConfig {
15     @Bean
16     public Docket webApiConfig() {
17         return new Docket(DocumentationType.SWAGGER_2)
18                 .groupName("webApi")
19                 .apiInfo(webApiInfo())
20                 .select()
21                 .build();
22     }
23
24     private ApiInfo webApiInfo() {
25         return new ApiInfoBuilder()
26                 .title("rabbitmq 接口文档")
27                 .description("本文档描述了 rabbitmq 微服务接口定义")
28                 .version("1.0")
29                 .contact(new Contact("asenyang", "http://asenyang.com", "123456@qq.com")).build();
30     }
31 }
生产者代码:
 1 package com.yas.rabbitmqboot.listen;
 2
 3 import com.rabbitmq.client.Channel;
 4 import lombok.extern.slf4j.Slf4j;
 5 import org.springframework.amqp.core.Message;
 6 import org.springframework.amqp.rabbit.annotation.RabbitListener;
 7 import org.springframework.amqp.rabbit.core.RabbitTemplate;
 8 import org.springframework.beans.factory.annotation.Autowired;
 9 import org.springframework.stereotype.Component;
10 import org.springframework.web.bind.annotation.GetMapping;
11 import org.springframework.web.bind.annotation.PathVariable;
12 import org.springframework.web.bind.annotation.RequestMapping;
13 import org.springframework.web.bind.annotation.RestController;
14
15 import java.io.IOException;
16 import java.util.Date;
17 import java.util.concurrent.TimeUnit;
18
19 @RestController
20 @Slf4j
21 @RequestMapping("/ttl")
22 public class DelayedController {
23
24     public static final String DELAYED_EXCHANGE_NAME = "delayed.exchange";
25     public static final String DELAYED_ROUTING_KEY = "delayed.routingkey";
26
27     @Autowired
28     RabbitTemplate rabbitTemplate;
29
30     @GetMapping("/sendDelayMsg/{message}/{delayTime}")
31     public void sendMsg(@PathVariable String message, @PathVariable Integer delayTime) {
32         rabbitTemplate.convertAndSend(DELAYED_EXCHANGE_NAME, DELAYED_ROUTING_KEY, message,
33                 correlationData -> {
34                     correlationData.getMessageProperties().setDelay(delayTime);
35                     return correlationData;
36                 });
37         log.info(" 当 前 时 间 : {}, 发 送 一 条 延 迟 {} 毫秒的信息给队列 delayed.queue:{}", new Date(), delayTime, message);
38     }
39 }
消费者代码:
 1 package com.yas.rabbitmqboot.listen;
 2
 3 import com.rabbitmq.client.Channel;
 4 import lombok.extern.slf4j.Slf4j;
 5 import org.springframework.amqp.core.Message;
 6 import org.springframework.amqp.rabbit.annotation.RabbitListener;
 7 import org.springframework.beans.factory.annotation.Autowired;
 8 import org.springframework.data.redis.core.StringRedisTemplate;
 9 import org.springframework.stereotype.Component;
10
11 import java.io.IOException;
12 import java.util.Date;
13 import java.util.concurrent.TimeUnit;
14
15 @Component
16 @Slf4j
17 public class DelayedConsumer {
18
19     public static final String DELAYED_QUEUE_NAME = "delayed.queue";
20
21     @RabbitListener(queues = DELAYED_QUEUE_NAME)
22     public void receiveDelayedQueue(Message message) {
23         String msg = new String(message.getBody());
24         log.info("当前时间:{},收到延时队列的消息:{}", new Date().toString(), msg);
25     }
26 }
测试:
使用postman请求如下地址:
http://localhost:8080/ttl/sendDelayMsg/hello1/20000
http://localhost:8080/ttl/sendDelayMsg/hello2/2000
在控制台查看效果:
