1、从ISO镜像安装,Apache 服务的软件包名称为 httpd
#检查源配置
[root@localhost media]# cat /etc/yum.repos.d/CentOS-Media.repo
# CentOS-Media.repo
#
#  This repo can be used with mounted DVD media, verify the mount point for
#  CentOS-7.  You can use this repo and yum to install items directly off the
#  DVD ISO that we release.
#
# To use this repo, put in your DVD and use it with the other repos too:
#  yum --enablerepo=c7-media [command]
#
# or for ONLY the media repo, do this:
#
#  yum --disablerepo=* --enablerepo=c7-media [command]

[c7-media]
name=CentOS-$releasever - Media
baseurl=file:///media/CentOS/
        file:///media/cdrom/
        file:///media/cdrecorder/
gpgcheck=1
enabled=0
gpgkey=file:///etc/pki/rpm-gpg/RPM-GPG-KEY-CentOS-7
#挂载cdrom,挂载点和repo配置相同
mount /dev/cdrom /media/cdrom
#安装httpd
[root@localhost media]# yum install httpd

#启动服务
[root@localhost media]# systemctl start httpd
[root@localhost media]# systemctl status httpd
● httpd.service - The Apache HTTP Server
   Loaded: loaded (/usr/lib/systemd/system/httpd.service; disabled; vendor preset: disabled)
   Active: active (running) since 一 2019-01-21 16:11:38 CST; 5s ago
     Docs: man:httpd(8)
           man:apachectl(8)
 Main PID: 6702 (httpd)
。。。 。。。

#设置自动启动
systemctl enable httpd
#永久打开80端口
[root@localhost media]# firewall-cmd --zone=public --add-port=80/tcp --permanent

#也可以打开防火墙的http服务,打开http服务后,默认会打开80端口,当时在firewall-cmd --list-ports里看不到
#可以在/etc/services里查看所有服务注册的端口
[root@bigdata-senior01 etc]# firewall-cmd --zone=public --add-service=http --permanent
至此,从浏览器可以访问缺省页面。
2、配置
缺省配置目录:
服务目录       /etc/httpd
主配置文件     /etc/httpd/conf/httpd.conf
网站数据目录   /var/www/html
访问日志      /var/log/httpd/access_log
错误日志     /var/log/httpd/error_log
2.1、配置文件主要参数/etc/httpd/conf/httpd.conf
ServerRoot  服务目录
ServerAdmin  管理员邮箱
User  运行服务的用户
Group  运行服务的用户组
ServerName  网站服务器的域名
DocumentRoot  网站数据目录
Directory 网站数据目录的权限
Listen  监听的 IP 地址与端口号
DirectoryIndex  默认的索引页页面
ErrorLog  错误日志文件
CustomLog  访问日志文件
Timeout  网页超时时间,默认为 300 秒
2.2、替换网站缺省的页面
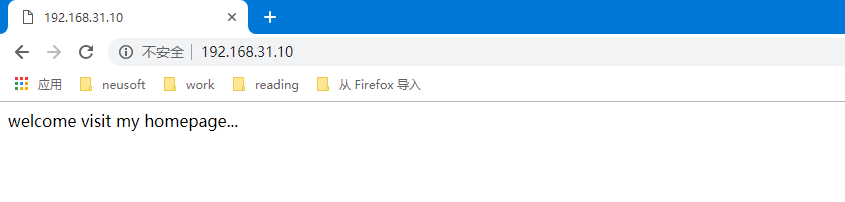
#静态网站一般以index.html为启动页面,在网络目录里放入一个index.html页面替换apache的缺省页面
[root@localhost html]# pwd
/var/www/html
[root@localhost html]# echo "welcome visit my homepage..." > index.html
[root@localhost html]# ls
index.html
生产环境网站的数据文件整体放入/var/www/html即可
2.3、重新设定网站的数据目录
[root@localhost html]# mkdir /home/wwwroot
[root@localhost html]# cd /home/wwwroot/
[root@localhost wwwroot]# echo "welcome my new page..." > index.html
[root@localhost wwwroot]# ls
index.html

#修改DocumentRoot和<Directory "">
[root@localhost conf]# vi /etc/httpd/conf/httpd.conf

#
# DocumentRoot: The directory out of which you will serve your
# documents. By default, all requests are taken from this directory, but
# symbolic links and aliases may be used to point to other locations.
#
# DocumentRoot "/var/www/html"
DocumentRoot "/home/wwwroot"

#
# Relax access to content within /var/www.
#
<Directory "/home/wwwroot">
    AllowOverride None
    # Allow open access:
    Require all granted
</Directory>


。。。。。。
#重启httpd服务
[root@localhost conf]# systemctl restart httpd
重新访问:
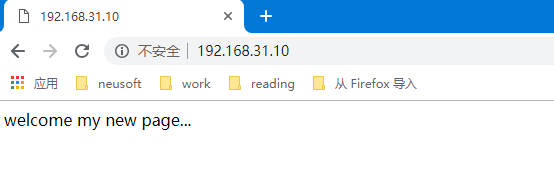
页面已经变化。
如果出现“Forbidden,You don't have permission to access /index.html on this server.”,则可能是SELinux的权限导致的。
这要重新配置SELinux权限,或者直接关闭SELinux权限。
#权限disabled
[root@localhost conf]# cat /etc/selinux/config

# This file controls the state of SELinux on the system.
# SELINUX= can take one of these three values:
#     enforcing - SELinux security policy is enforced.
#     permissive - SELinux prints warnings instead of enforcing.
#     disabled - No SELinux policy is loaded.
#SELINUX=enforcing
SELINUX=disabled
# SELINUXTYPE= can take one of three two values:
#     targeted - Targeted processes are protected,
#     minimum - Modification of targeted policy. Only selected processes are protected.
#     mls - Multi Level Security protection.
SELINUXTYPE=targeted
3、开启个人用户主页
#编辑配置文件
[root@localhost conf.d]# vi /etc/httpd/conf.d/userdir.conf

#
# UserDir: The name of the directory that is appended onto a user's home
# directory if a ~user request is received.
#
# The path to the end user account 'public_html' directory must be
# accessible to the webserver userid.  This usually means that ~userid
# must have permissions of 711, ~userid/public_html must have permissions
# of 755, and documents contained therein must be world-readable.
# Otherwise, the client will only receive a "403 Forbidden" message.
#
<IfModule mod_userdir.c>
    #
    # UserDir is disabled by default since it can confirm the presence
    # of a username on the system (depending on home directory
    # permissions).
    #
    #UserDir disabled  #是否允许个人主页

    #
    # To enable requests to /~user/ to serve the user's public_html
    # directory, remove the "UserDir disabled" line above, and uncomment
    # the following line instead:
    #
    UserDir public_html #主页目录
</IfModule>

#
# Control access to UserDir directories.  The following is an example
# for a site where these directories are restricted to read-only.
#
<Directory "/home/*/public_html">
家目录的权限修改为 755,保证其他人也有权限读取
mkdir public_html
chmod -R 755 /home/es
[es@localhost public_html]$ echo "this is a homepage of es" > index.html
然后使用“网址/~用户名”(其中的波浪号是必需的,而且网址、波浪号、用户名之间没有空格),确保Selinux权限是关闭的。

4、给主页加上用户和密码认证
#生成两个用户es和xu.dm
[root@localhost httpd]# htpasswd -c /etc/httpd/.htpasswd es
New password:
Re-type new password:
Adding password for user es
[root@localhost httpd]# htpasswd /etc/httpd/.htpasswd xu.dm
New password:
Re-type new password:
Adding password for user xu.dm


[root@localhost httpd]# vi conf.d/userdir.conf
#
# Control access to UserDir directories.  The following is an example
# for a site where these directories are restricted to read-only.
#
<Directory "/home/*/public_html">
   # AllowOverride FileInfo AuthConfig Limit Indexes
   # Options MultiViews Indexes SymLinksIfOwnerMatch IncludesNoExec
   #  Require method GET POST OPTIONS
   AllowOverride all
   #刚刚生成出来的密码验证文件保存路径
   authuserfile "/etc/httpd/.htpasswd"
   #当用户尝试访问个人用户网站时的提示信息
   authname "need user&password privately website"
   authtype basic
   #用户进行账户密码登录时需要验证的用户名称,valid-user表示authuserfile里的用户
   require valid-user
</Directory>


[root@localhost httpd]# systemctl restart httpd
参数:

AuthName:认证描述,填写的内容会出现在认证窗口的提示信息中。

AuthType:认证类型,在HTTP1.0中,只有一种认证类型:basic。在HTTP1.1中有几种认证类型,如:MD5。

AuthUserFile:指定一个包含用户名和密码的文本文件,每行对应一个用户。

AuthGroupFile:指定包含用户组清单和这些组的成员清单的文本文件。组的成员之间用空格分开,如:managers:user1 user2。

require:指定哪些用户或组才能被授权访问,如:

require user user1 user2 (只有用户user1和user2可以访问)

require group managers (只有组managers中成员可以访问)

require valid-user (在AuthUserFile指定的文件中任何用户都可以访问)
另外一种方式:
在需要认证的应用根目录下,创建.htaccess文件,内容如下:
AuthName "User Authentication"
AuthType basic
AuthUserFile /etc/hattpd/.htpasswd
require valid-user

修改/etc/httpd/conf/httpd.conf配置文件,或者是用户userdir.conf,将Directory标签中的AllowOverride参数值修改为All,如下:

AllowOverride All

修改后的配置表示的含义为:/var/www/html目录下或者/home/*/public_html每个应用的访问权限由该目录下的.htaccess文件来控制。

保存后,重启apache
5、虚拟主机
利用虚拟主机功能,可以把一台处于运行状态的物理服务器分割成多个“虚拟的服务器”。
该技术无法实现目前云主机技术的硬件资源隔离,让这些虚拟的服务器共同使用物理服务器的硬件资源,供应商只能限制硬盘的使用空间大小。
Apache 的虚拟主机功能是服务器基于用户请求的不同 IP 地址、主机域名或端口号,实现提供多个网站同时为外部提供访问服务的技术。
5.1、基于IP,确保IP都可以连接
[root@bigdata-senior01 ~]# vi /etc/httpd/conf/httpd.conf
... ...
#追加如下内容
 <VirtualHost 192.168.31.10>
   DocumentRoot /home/wwwroot/10
   ServerName www.home10.com
         <Directory /home/wwwroot/10 >
           AllowOverride None
           Require all granted
        </Directory>
 </VirtualHost>
 <VirtualHost 192.168.31.11>
   DocumentRoot /home/wwwroot/11
   ServerName www.home11.com
        <Directory /home/wwwroot/11 >
          AllowOverride None
          Require all granted
         </Directory>
 </VirtualHost>
... ...
5.2、基于域名
[root@bigdata-senior01 bbs]# vi /etc/hosts

127.0.0.1   localhost localhost.localdomain localhost4 localhost4.localdomain4
::1         localhost localhost.localdomain localhost6 localhost6.localdomain6
192.168.31.10 bigdata-senior01.home.com www.home10.com
192.168.31.11 www.home11.com bbs.home.com


[root@bigdata-senior01 wwwroot]# vi /etc/httpd/conf/httpd.conf
。。。 。。。
 <VirtualHost 192.168.31.10>
   DocumentRoot /home/wwwroot/10
   ServerName www.home10.com
         <Directory /home/wwwroot/10 >
           AllowOverride None
           Require all granted
        </Directory>
 </VirtualHost>
 <VirtualHost 192.168.31.11>
   DocumentRoot /home/wwwroot/11
   ServerName www.home11.com
        <Directory /home/wwwroot/11 >
          AllowOverride None
          Require all granted
         </Directory>
 </VirtualHost>
 <VirtualHost 192.168.31.11>
   DocumentRoot /home/wwwroot/bbs
   ServerName bbs.home.com
        <Directory /home/wwwroot/bbs >
          AllowOverride None
          Require all granted
         </Directory>
 </VirtualHost>
[root@bigdata-senior01 wwwroot]# systemctl restart httpd
#在本机上测试,没有浏览器,用curl简单测试
[root@bigdata-senior01 wwwroot]# curl bbs.home.com
this is a bbs
5.3、基于端口
[root@bigdata-senior01 wwwroot]# ls
10  11  9092  9093  9094  bbs  index.html
[root@bigdata-senior01 wwwroot]# echo "listen port:9092" > 9092/index.html
[root@bigdata-senior01 wwwroot]# echo "listen port:9093" > 9093/index.html
[root@bigdata-senior01 wwwroot]# cat 9092/index.html
listen port:9092

[root@bigdata-senior01 wwwroot]# vi /etc/httpd/conf/httpd.conf
。。。。。。
# Change this to Listen on specific IP addresses as shown below to
# prevent Apache from glomming onto all bound IP addresses.
#
#Listen 12.34.56.78:80
Listen 80
Listen 9092
Listen 9093

 <VirtualHost 192.168.31.10:9092>
   DocumentRoot /home/wwwroot/9092
   ServerName www.home10.com
        <Directory /home/wwwroot/bbs >
          AllowOverride None
          Require all granted
         </Directory>
 </VirtualHost>
 <VirtualHost 192.168.31.10:9093>
   DocumentRoot /home/wwwroot/9093
   ServerName www.home10.com
        <Directory /home/wwwroot/bbs >
          AllowOverride None
          Require all granted
         </Directory>
 </VirtualHost>
。。。