Tree Panel是ExtJS中最多能的组件之一,它非常适合用于展示分层的数据。Tree Panel和Grid Panel继承自相同的基类,所以所有从Grid Panel能获得到的特性、扩展、插件等带来的好处,在Tree Panel中也同样可以获得。列、列宽调整、拖拽、渲染器、排序、过滤等特性,在两种组件中都是差不多的工作方式。
让我们开始创建一个简单的树组件
Ext.create('Ext.tree.Panel', {
    renderTo: Ext.getBody(),
    title: 'Simple Tree',
     150,
    height: 150,
    root: {
        text: 'Root',
        expanded: true,
        children: [
            {
                text: 'Child 1',
                leaf: true
            },
            {
                text: 'Child 2',
                leaf: true
            },
            {
                text: 'Child 3',
                expanded: true,
                children: [
                    {
                        text: 'Grandchild',
                        leaf: true
                    }
                ]
            }
        ]
    }
});
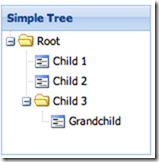
运行效果如图
这个Tree Panel直接渲染在document.body上,我们定义了一个默认展开的根节点,根节点有三个子节点,前两个子节点是叶子节点,这意味着他们不能拥有自己的子节点了,第三个节点不是叶子节点,它有一个子节点。每个节点的text属性用来设置节点上展示的文字。Tree Panel内部使用Tree Store存储数据。上面的例子中使用了root配置项作为使用store的捷径。如果我们单独指定store,代码像这样:
var store = Ext.create('Ext.data.TreeStore', {
    root: {
        text: 'Root',
        expanded: true,
        children: [
            {
                text: 'Child 1',
                leaf: true
            },
            {
                text: 'Child 2',
                leaf: true
            },
            ...
        ]
    }
});

Ext.create('Ext.tree.Panel', {
    title: 'Simple Tree',
    store: store,
    ...
});
The Node Interface 节点接口
上面的例子中我们在节点上设定了两三个不同的属性,但是节点到底是什么?前面提到,TreePanel绑定了一个TreeStore,Store在ExtJS中的作用是管理Model实例的集合。树节点是用NodeInterface装饰的简单的模型实例。用NodeInterface装饰Model使Model获得了在树中使用需要的方法、属性、字段。下面是个树节点对象在开发工具中打印的截图

关于节点的方法、属性等,请查看API文档(ps. 每一个学习ExtJS的开发者都应该仔细研读API文档,这是最好的教材)
Visually changing your tree 外观定制
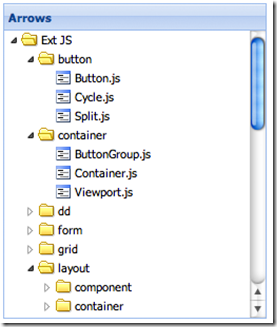
先尝试一些简单的改动。把useArrows设置为true,Tree Panel就会隐藏前导线使用箭头表示节点的展开
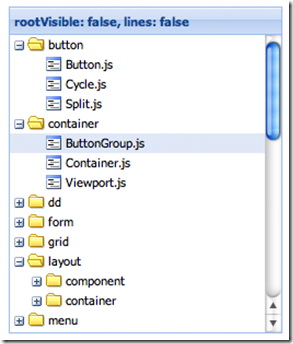
设置rootVisible属性为false,根节点就会被隐藏起来:
Multiple columns 多列
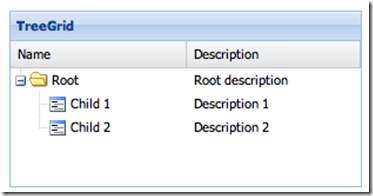
由于Tree Panel也是从Grid Panel相同的父类继承的,因此实现多列很容易。
var tree = Ext.create('Ext.tree.Panel', {
    renderTo: Ext.getBody(),
    title: 'TreeGrid',
     300,
    height: 150,
    fields: ['name', 'description'], //注意这里
    columns: [{
        xtype: 'treecolumn',
        text: 'Name',
        dataIndex: 'name',
         150,
        sortable: true
    }, {
        text: 'Description',
        dataIndex: 'description',
        flex: 1,
        sortable: true
    }],
    root: {
        name: 'Root',
        description: 'Root description',
        expanded: true,
        children: [{
            name: 'Child 1',
            description: 'Description 1',
            leaf: true
        }, {
            name: 'Child 2',
            description: 'Description 2',
            leaf: true
        }]
    }
});这里面的columns配置项期望得到一个Ext.grid.column.Column配置,就跟GridPanel一样的。唯一的不同就是Tree Panel需要至少一个treecolumn列,这种列是拥有tree视觉效果的,典型的Tree Panel应该只有一列treecolumn。
fields配置项会传递给tree内置生成的store用。dataIndex是如何跟列匹配的请仔细看上面例子中的 name和description,其实就是和每个节点附带的属性值匹配
如果不配置column,tree会自动生成一列treecolumn,并且它的dataIndex是text,并且也自动隐藏了表头,如果想显示表头,可以用hideHeaders配置为false。(LZ注:看到这里extjs3和4的tree已经有了本质的不同,extjs4的tree本质上就是TreeGrid,只是在只有一列的时候,展现形式为原来的TreePanel)
Adding nodes to the tree 添加节点
tree的根节点不是必须在初始化时设定。后续再添加也可以:
var tree = Ext.create('Ext.tree.Panel');
tree.setRootNode({
    text: 'Root',
    expanded: true,
    children: [{
        text: 'Child 1',
        leaf: true
    }, {
        text: 'Child 2',
        leaf: true
    }]
});
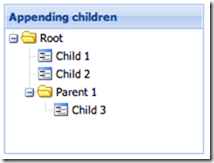
尽管对于很小的树只有默认几个静态节点的,这种直接在代码里面配置的方式很方便,但是大多数情况tree还是有很多节点的。让我们看一下如何通过程序添加节点。
var root = tree.getRootNode();

var parent = root.appendChild({
    text: 'Parent 1'
});

parent.appendChild({
    text: 'Child 3',
    leaf: true
});

parent.expand();每一个不是叶节点的节点都有一个appendChild方法,这个方法接收一个Node类型,或者是Node的配置参数的参数,返回值是新添加的节点对象。上面的例子中也调用了expand方法展开这个新的父节点。
上面的例子利用内联的方式,亦可:
var parent = root.appendChild({
    text: 'Parent 1',
    expanded: true,
    children: [{
        text: 'Child 3',
        leaf: true
    }]
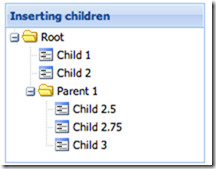
});有时我们期望将节点插入到一个特定的位置,而不是在最末端添加。除了appendChild方法,Ext.data.NodeInterface还提供了insertBefore和insertChild方法。
var child = parent.insertChild(0, {
    text: 'Child 2.5',
    leaf: true
});

parent.insertBefore({
    text: 'Child 2.75',
    leaf: true
}, child.nextSibling);insertChild方法需要一个节点位置,新增的节点将会插入到这个位置。insertBefore方法需要一个节点的引用,新节点将会插入到这个节点之前。
NodeInterface也提供了几个可以引用到其他节点的属性
nextSiblingpreviousSiblingparentNodelastChildfirstChildchildNodes
Loading and Saving Tree Data using a Proxy 加载和保存树上的数据
加载和保存树上的数据比处理扁平化的数据要复杂一点,因为每个字段都需要展示层级关系,这一章将会解释处理这一复杂的工作。
NodeInterface Fields
使用tree数据的时候,最重要的就是理解NodeInterface是如何工作的。每个tree节点都是一个用NodeInterface装饰的Model实例。假设有个Person Model,它有两个字段id和name:
Ext.define('Person', {
    extend: 'Ext.data.Model',
    fields: [
        { name: 'id', type: 'int' },
        { name: 'name', type: 'string' }
    ]
});
如果只做这些,Person Model还只是普通的Model,如果取它的字段个数:
1
console.log(Person.prototype.fields.getCount()); //输出 '2'但是如果将Person Model应用到TreeStore之中后,就会有些变化:
var store = Ext.create('Ext.data.TreeStore', {
    model: 'Person',
    root: {
        name: 'Phil'
    }
});

console.log(Person.prototype.fields.getCount()); //输出 '24'被TreeStore使用之后,Person多了22个字段。所有这些字段都是在NodeInterface中定义的,TreeStore初次实例化Person的时候,这些字段会被加入到Person的原型链中。
那这22个字段都是什么,有什么用处?让我们简要的看一下NodeInterface,它用如下字段装饰Model,这些字段都是存储tree相关结构和状态的:
{name: 'parentId',   type: idType,    defaultValue: null},
{name: 'index',      type: 'int',     defaultValue: null, persist: false},
{name: 'depth',      type: 'int',     defaultValue: 0, persist: false},
{name: 'expanded',   type: 'bool',    defaultValue: false, persist: false},
{name: 'expandable', type: 'bool',    defaultValue: true, persist: false},
{name: 'checked',    type: 'auto',    defaultValue: null, persist: false},
{name: 'leaf',       type: 'bool',    defaultValue: false},
{name: 'cls',        type: 'string',  defaultValue: null, persist: false},
{name: 'iconCls',    type: 'string',  defaultValue: null, persist: false},
{name: 'icon',       type: 'string',  defaultValue: null, persist: false},
{name: 'root',       type: 'boolean', defaultValue: false, persist: false},
{name: 'isLast',     type: 'boolean', defaultValue: false, persist: false},
{name: 'isFirst',    type: 'boolean', defaultValue: false, persist: false},
{name: 'allowDrop',  type: 'boolean', defaultValue: true, persist: false},
{name: 'allowDrag',  type: 'boolean', defaultValue: true, persist: false},
{name: 'loaded',     type: 'boolean', defaultValue: false, persist: false},
{name: 'loading',    type: 'boolean', defaultValue: false, persist: false},
{name: 'href',       type: 'string',  defaultValue: null, persist: false},
{name: 'hrefTarget', type: 'string',  defaultValue: null, persist: false},
{name: 'qtip',       type: 'string',  defaultValue: null, persist: false},
{name: 'qtitle',     type: 'string',  defaultValue: null, persist: false},
{name: 'children',   type: 'auto',   defaultValue: null, persist: false}
NodeInterface Fields are Reserved Names 节点接口的字段都是保留字
有一点非常重要,就是上面列举的这些字段都应该当作保留字段。例如,Model中就不允许有一个字段叫做parentId了,因为当Model用在Tree上时,Model的字段会覆盖NodeInterface的字段。除非这里有个合法的需求要覆盖NodeInterface的字段的持久化属性。
Persistent Fields vs Non-persistent Fields and Overriding the Persistence of Fields 持久化字段和非持久化字段,如何覆盖持久化属性
大多数NodeInterface的字段都默认是persist: false不持久化的。非持久化字段在TreeStore做保存操作的时候不会被保存。大多数情况默认的配置是符合需求的,但是如果真的需要覆盖持久化设置,下面展示了如何覆盖持久化配置。当覆盖持久化配置的时候,只改变presist属性,其他任何属性都不要修改
// overriding the persistence of NodeInterface fields in a Model definition
Ext.define('Person', {
    extend: 'Ext.data.Model',
    fields: [
        // Person fields
        { name: 'id', type: 'int' },
        { name: 'name', type: 'string' }

        // override a non-persistent NodeInterface field to make it persistent
        { name: 'iconCls', type: 'string',  defaultValue: null, persist: true },
    ]
});让我们深入的看一下NodeInterface的字段,列举一下可能需要覆盖persist属性的情景。下面的每个例子都假设使用了Server Proxy除非提示不使用。(注:这需要有一些server端编程的知识)
默认持久化的:
parentId- 用来指定父节点的id,这个字段应该总是持久化,不要覆盖它leaf- 用来指出这个节点是不是叶子节点,因此决定了节点是不是可以有子节点,最好不要改变它的持久化设置
默认不持久化的:
index- 用来指出当前节点在父节点的所有子节点中的位置,当有节点插入或者移除,它的所有邻居节点的位置都会更新,如果需要,可以用这个属性去持久化树节点的排列顺序。然而如果服务器端使用另外的排序方法,最好把这个字段保留为非持久化的,当使用WebStorage Proxy作为存储,且需要保留节点顺序,那一定要设置为持久化的。如果使用了本地排序,建议设置非持久化,因为本地排序会改变节点的index属性depth用来存储节点在树中的层级,如果server需要保存节点层级请开启持久化。使用WebStorage Proxy的时候建议不要持久化,会多占用存储空间。checked如果在tree使用checkbox特性,看业务需求来开启持久化expanded存储节点的展开收起状态,要不要持久化看业务需求expandable内部使用,不要变更持久化配置cls用来给节点增加css类,看业务需求iconCls用来给节点icon增加css类,看业务需求icon用来自定义节点,看业务需求root对根节点的引用,不要变动配置isLast标识最后一个节点,此配置一般不需要变动isFirst标识第一个节点,此配置一般不需要变动allowDrop用来标识可放的节点,此配置不要动allowDrag用来标识可拖的节点,此配置不要动loaded用来标识子节点是否加载完成,此配置不要动loading用来标识子节点是否正在加载中,此配置不要动href用来指定节点链接,此配置看业务需求变动hrefTarget节点链接的target,此配置看业务需求变动qtip指定tooltip文字,此配置看业务需求变动qtitle指定tooltip的title,此配置看业务需求变动children内部使用,不要动
Loading Data 加载数据
有两种加载数据的方式。一次性加载全部节点和分步加载,当节点过多时,一次加载会有性能问题,而且不一定每个节点都用到。动态分步加载是指在父节点展开的时候加载子节点。
Loading the Entire Tree 一次加载
Tree的内部实现是只有节点展开的时候加载数据。然而全部的层级关系可以通过一个嵌套的数据结构一次全部加载,只要配置root节点是展开的即可
Ext.define('Person', {
    extend: 'Ext.data.Model',
    fields: [
        { name: 'id', type: 'int' },
        { name: 'name', type: 'string' }
    ],
    proxy: {
        type: 'ajax',
        api: {
            create: 'createPersons',
            read: 'readPersons',
            update: 'updatePersons',
            destroy: 'destroyPersons'
        }
    }

});

var store = Ext.create('Ext.data.TreeStore', {
    model: 'Person',
    root: {
        name: 'People',
        expanded: true
    }
});

Ext.create('Ext.tree.Panel', {
    renderTo: Ext.getBody(),
     300,
    height: 200,
    title: 'People',
    store: store,
    columns: [
        { xtype: 'treecolumn', header: 'Name', dataIndex: 'name', flex: 1 }
    ]
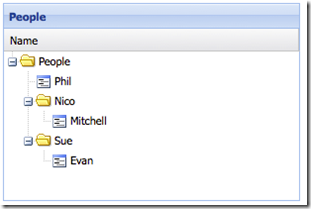
});假设readPersons返回数据如下
{
    "success": true,
    "children": [
        { "id": 1, "name": "Phil", "leaf": true },
        { "id": 2, "name": "Nico", "expanded": true, "children": [
            { "id": 3, "name": "Mitchell", "leaf": true }
        ]},
        { "id": 4, "name": "Sue", "loaded": true }
    ]
}
最终形成的树就是这样
需要注意的是:
- 所有非叶子节点,但是又没有子节点的,例如上面图中的
Sue,服务器端返回的数据必须是loaded属性设置为true,否则这个节点会变成可展开的,并且会尝试向服务器请求它的子节点数据 - 另外一个问题,既然
loaded是个默认不持久化的属性,上面一条说了服务器端要返回loaded为true,那么服务器端的其他返回内容也会影响tree的其他属性,比如expanded,这就需要注意了,服务器返回的有些数据可能会导致错误,比如如果服务器返回的数据带有root,和可能会导致错误。通常建议除了loaded和expanded,服务器端不要返回其他会被树利用的属性。
Dynamically Loading Children When a Node is Expanded 节点展开时动态加载
对于节点非常多的树,通常期望动态加载,当点击父节点的展开icon时再向服务器请求子节点数据。例如上面的例子中假设Sue没有被服务器端返回的数据设置为loaded true,那么当它的展开icon点击时,树的proxy会尝试向读取api readPersons请求一个这样的url
1
/readPersons?node=4这意思是告诉服务器取得id为4的节点的子节点,返回的数据格式跟一次加载相同:
{
    "success": true,
    "children": [
        { "id": 5, "name": "Evan", "leaf": true }
    ]
}
现在树会变成这样:
Saving Data 保存数据
创建、更新、删除节点都由Proxy自动无缝的处理了。
Creating a New Node 创建新节点
1
2
3
// Create a new node and append it to the tree:
var newPerson = Ext.create('Person', { name: 'Nige', leaf: true });
store.getNodeById(2).appendChild(newPerson);由于Model中定义过proxy,Model的save方法可以用来持久化节点数据:
1
newPerson.save();Updating an Existing Node 更新节点
1
store.getNodeById(1).set('name', 'Philip');Removing a Node 删除节点
1
store.getRootNode().lastChild.remove();Bulk Operations 批处理
也可以等创建、更新、删除了若干个节点之后,由TreeStore的sync方法一次保存全部
1
store.sync();