Nexus简介
Nexus是Sonatype推出的强大Maven仓库管理器产品,要比以前TSS上介绍的Artifactory要好使用的多,也是一个拆箱即用的Java App,内嵌Jetty容器和Java Wrapper做Windows服务,安装简单到解压然后双击install即可。更详细的帮助手册请上官方网站查看,这里推荐一个翻译中的书籍——《Maven权威指南》(在线阅读英文版,中文版),一本全面介绍Maven的书,其中也有介绍Nexus的章节,猛击这。Nexus的优点这里得啰嗦一下(摘抄自Maven中文Blog):
代理远程仓库。配置Nexus代理中央仓库,其它任何公开的Maven仓库,将你组织内部的Maven配置指向Nexus,这样所有构件都将从Nexus下载,如果Nexus没有你要的构件,它会自动先去外部仓库下载到本地,仅一次。
本地宿主仓库。Nexus可以在服务器上建立本地的宿主仓库,你可以往这个仓库里提交任意的Maven规范构件,包括不能从公开仓库下载到的构件,或者你组织内部产生的构件。
仓库组。有了仓库组,你就能将很多仓库聚合起来,对外公开一个统一的接口提供构件服务。
构件搜索。Nexus能下载远程的仓库索引,并在本地构件自己的仓库索引,有了该索引,你就能很快速方便的搜索任何你感兴趣的构件。
事情RSS源。Nexus服务器上发生的几乎任何事情,你都能用RSS监视,方便管理。
Release和Snapshots区分。配置Nexus提供Release构件服务或者Snapshots服务,能更清晰的管理构件。
路由。Nexus的路由能够管理为特定的请求提供特定的仓库。加入你在一个组中配置了很多仓库,一条路由能够极大提高某些特定请求的响应速度。
上传构件。使用Nexus你能很方便的在web界面上上传一些特殊的构件至仓库。
高用户体验的UI。使用AJAX和REST技术开发的Nexus,在界面上为提供了很舒适的用户体验。
初始化
1 下载nexus安装包 网址:http://www.sonatype.org/nexus/
建议下载最新的版本,最新的版本支持比较新的jdk版本
2 启动nexus服务
进入nexus的文件目录:D:\nexus-oss-webapp-1.9.2.4-bundle\nexus-oss-webapp-1.9.2.4\bin\jsw\windows-x86-32下面,
Installnexus.bat 表示安装nexus服务到window服务中去。
Startnexus.bat 表示启动nexus服务。
nexus.bat 表示启动nexus应用程序 。
Resumenexus.bat 表示重启nexus 。
Stopnexus.bat 表示停止nexus服务
启动nexus 无需启动tomcat,只需要点击“nexus.bat "就可以启动。
启动成功后 在浏览器地址栏中输入:
http://localhost:8081/nexus/index.html
如果看到nexus界面 说明启动成功。
默认安装后的访问路径为http://localhost:8081/nexus/, 管理员登录为admin/admin123,UI是用Ext搭建的,熟悉Ext的人根本没有操作障碍,登录后最重要的事情就是打开远程索引下载,操作为进入Repository菜单,修改 Apache Snapshots,Codehaus Snapshots,Maven Central的Download Remote indexs 为true. 并右击每一个仓库的 repair Index ,进行更新index 并把所有的proxy类型的仓库添加到public repository中去。,这一步别忘,我当时搭建的时候就忘了Re-Index,结果等了一天还 没任何索引文件。
自己觉得比较好的其他的代理仓库如下:
添加新的repository 即代理仓库
http://repository.jboss.org/nexus/content/groups/public/
https://repository.jboss.org/nexus/content/groups/developer/
http://morphia.googlecode.com/svn/mavenrepo/
Re-Index后,Nexus会从后台去官方地址下载仓库索引文件,大概20M大小,根据网速快慢下载相应时间后选择仓库时会以树形目录的方式显示仓库内容。
角色权限
Nexus的操作权限完全仿照RBAC角色权限模型,默认三个用户:admin、anonymous、deployment,对应的是管理用户、匿 名访问用户和部署用户,管理用户用于仓库管理和系统配置,匿名用户用于仓库查询和仓库下载,部署用户用于私人jar包的上传。在这里,我对 deployment的默认角色Nexus Deployment Role做了自定义修改,加入了"All M2 Repositories"的create和update权限,并且加入了"UI:Base UI Privaties"权限,用意稍后解释。
Nexus的使用
从浏览器里打开访问地址后,通过"Artifact Search"菜单可以进行构件搜索。
对于一些特殊的构件,比如sqlserver2005的jdbc驱动,你可以通过管理员登录然后从第三方上传构件
提供仓库组的概念,对于远程代理仓库和本地宿主仓库,还有第三方仓库,全部创建为一个public-group,然后通过访问组就可以访问所有的仓库构件了,这就是所谓的分散存储,统一访问
和Maven结合也很简单,首先是要配置Maven,打开$user$/.m2/下的settings.xml(没有的话创建一个),然后拷贝以下内容到文件中:settings.xml
<settings>
  <mirrors>
    <mirror>
      <!--This sends everything else to /public -->
      <id>nexus</id>
      <mirrorOf>*</mirrorOf>
      <url>http://服务器IP地址:8081/nexus/content/groups/public</url>
    </mirror>
  </mirrors>
  <profiles>
    <profile>
      <id>nexus</id>
      <!--Enable snapshots for the built in central repo to direct -->
      <!--all requests to nexus via the mirror -->
      <repositories>
        <repository>
          <id>central</id>
          <url>http://central</url>
          <releases><enabled>true</enabled></releases>
          <snapshots><enabled>true</enabled></snapshots>
        </repository>
      </repositories>
      <pluginRepositories>
        <pluginRepository>
          <id>central</id>
          <url>http://central</url>
          <releases><enabled>true</enabled></releases>
          <snapshots><enabled>true</enabled></snapshots>
        </pluginRepository>
      </pluginRepositories>
    </profile>
  </profiles>
  <activeProfiles>
    <!--make the profile active all the time -->
    <activeProfile>nexus</activeProfile>
  </activeProfiles>
</settings>
然后,在从你的工程里的pom.xml中加入以下内容:
<repositories>

<repository>

<id>nexus</id>

<name>nexus</name>

<url>http://192.168.1.59:8080/nexus/content/groups/public/</url>

<releases>

<enabled>true</enabled>

</releases>

<snapshots>

<enabled>true</enabled>

</snapshots>

</repository>

</repositories>

<pluginRepositories>

<pluginRepository>

<id>nexus</id>

<name>nexus</name>

<url>http://192.168.1.59:8080/nexus/content/groups/public/</url>

<releases>

<enabled>true</enabled>

</releases>

<snapshots>

<enabled>true</enabled>

</snapshots>

</pluginRepository>

</pluginRepositories>
解释一下:
settings.xml中的proxies/proxy节点配置的是部署服务器访问属性,deployment/deploy对应的是部署用户名和密 码;mirrors/mirror配置的是maven访问仓库的地址,这里使用的是Nexus提供的群组概念,将多个仓库组成一个public- group的方式进行访问;profiles/profile则主要用来描述仓库部署的访问配置。
上传jar到本地仓库,如第三方的jar包 gearman 相关的jar包
选中3rd party 点击Artifact Upload标签
点击 select artifact(s) 按钮 选择要上传到jar包 然后再add artiffact 如图所示
点击 uplaod artiffacts 上传jar包
配置中央仓库
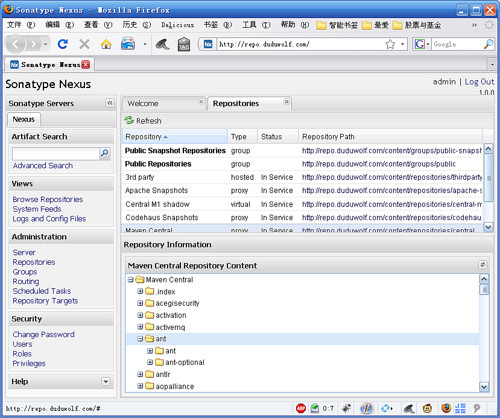
在左边菜单栏里选择Repositories, 会看到如下的界面:
其中右边栏上半部分列出当前nexus管理的repository,黑体字是类型为group的repository. 这里简单介绍下几种repository的类型:
hosted,本地仓库。通常我们会部署自己的构件到这一类型的仓库。比如公司/组织开发的项目
proxy,代理仓库,它们被用来代理远程的公共仓库,如maven中央仓库或一些第三方公共仓库。
group,仓库组,用来合并多个hosted/proxy仓库,当你的项目希望在多个repository使用依赖项时,无需引用多个仓库了,只需要引用一个类型为group的repository即可。
Maven central是Maven的中央仓库,点击它并选择configuration标签栏,我们会看到下面的页面:
这里有几个配置项是经常用到的:
Override local storage location: 该选项允许配置 Nexus本地仓库的存放地址,用来覆盖其默认的存放地址
Remote storage location: 该选项允许配置远程仓库的地址。一般为了提高代理速度,你可以将其修改为国内的镜像地址。默认值是http://repo1.maven.org/maven2/
Download remote indexes: 该选项配置是否下载远程索引文件。 建议配置为true,这样我们便可以通过nexus的搜索功能来搜索我们需要的依赖项。
添加代理仓库(proxy)
nexus默认提供了Maven central这个代理仓库,如果你需要添加其他代理仓库,那么可以点击左边栏页面上的Repositories链接,然后在右边栏页面上依次点击add -> add proxy repository, 随后出现以下页面:
根据提示填写相关信息保存即可。
管理本地仓库(hosted)
Nexus预定义了三种本地仓库,分别是Releases, Snapshots, 3rd Party. 下面分别介绍一下这三种类型仓库的作用
Releases: 存放稳定版本的构件。比如我们完成了一个版本的下数组件的开发,就可以把它发布到这里。
Snapshots: 存放快照版本的构件。 比如一个下数组件在完成所有开发和测试工作之前,是不应该发布到release仓库的,但可能其他项目只需用到这个组件的某些接口,只要这些接口完成了开发并通过测试,就可以拿来使用, 从而实现多个项目并行开发。
3rd Party: 存放其他第三方构件。你可能会问, 不是有中央仓库和其他第三方公共仓库来管理这些依赖项了吗?没错。但由于某些开源项目出现的时间比maven要早,因此他们大都没有采用maven方式进行构建。 其他还包括包括一些非开源或使用maven 1.x构建的组件. 我们可以把这类组件通通添加到这里。
创建本地仓库的方法很简单。点击Repository面板上方的Add按钮,然后选择Hosted Repository,然后在下方的配置面板中输入相关信息。 注意根据自己的需要选择本地仓库的类型
仓库组(group)
通过前面介绍我们了解到, 可以建立多个代理仓库和本地仓库. 但如果没有仓库组的概念,那么当需要引用这些仓库时, 就需要将他们逐个添加到pom.xml或setting.xml. 仓库组是为了简化仓库的引用而提出的。有了仓库组的概念, 我们可以把仓库根据不同目的进行分组,比如把常用的归到一组或根据访问权限分组, 然后直接声明引用某个仓库组即可. 下面是pom.xml中声明引用一个nexus仓库组的例子:
  <repositories>

              <repository>

                 <id>nexus-public</id>

                 <url>
                     http://127.0.0.1:8081/nexus/content/groups/public/
                 </url>

                 <releases>

                     <enabled>true</enabled>

                 </releases>

                 <snapshots>

                     <enabled>true</enabled>

                 </snapshots>

              </repository>

         </repositories>
可以看到声明引用一个仓库组和一个普通的远程仓库,配置的写法完全一样。
maven本身没有仓库组的概念
Nexus中预设了2个仓库组, 分别是public repositories和public snapshot repositories. 如图:
public repository默认包含本地仓库的Releases, snapshots和3rd party以及代理仓库的Maven Central. 你可以在Configuration配置页添加其他仓库到这个仓库组。 如果需要,你还可以创建一个仓库组,方法是点击 Add->Repository Group, 当New Repository Group界面后,填入ID, name 等相关信息, 然后在右边Available Repositories 栏里可以选择你要添加的仓库到你新建的仓库组.
通过 Nexus 搜索构件
在开发过程中过程中,我们往往只记得某个构件的大致名字,这时我们可以通过nexus提供的构件搜索功能查询该构件的完整配置信息(groupId,artifactId,version).如果通过nexus搜不到某个的构件,那说明这个构件不在当前nexus所登记的仓库中,可能需要添加额外的代理仓库或手工上传某个构件。
在使用nexus的搜索功能之前,必须先让nexus所登记的仓库建立索引文件, Nexus默认是不为每个仓库建立索引文件的,因为建立像中央仓库这样的索引文件需要耗费比较大的网络带宽和事件,仅索引文件就要几十兆. 要开启中央仓库的索引文件下载功能需要在Maven Central的配置页中, 把Download Remote Indexes改为true. 如图:
这样设置之后, Nexus会自动从远程中央仓库下载索引文件, 为了检验索引文件自动下载是否生效,可以切换到Browse标签页,如图:
下面我们试一下搜索功能, 搜索栏输入testing, 查询结果如下:
这是模糊查询的结果,当然如果你知道更多信息,比如版本号等,你可以使用高级搜索,点击高级搜索后,右边界面会提供集中搜索方式:keyword, classname, GAV, checksum
比如我们这里选择GAV模式. 假设我只知道artifact的名字(如testng)和版本号(如5.8), 其他的我不知道, 那么就在artifact 和 version处分别输入testng 和 5.8 , 搜索结果如下:
如果你不知道知道构件的名称, 只知道classname, 那么你也可以通过class name 的方式搜索,这里就不再赘述。
当你选中某项搜索结果, 页面的下方会出现这个构件的详细信息, 并且会列出这个构件的Maven依赖配置, 你可以直接拷贝到你的pom文件中使用,这是个非常实用的功能:
在 Maven 中使用Nexus
到此我们介绍了如何安装和使用Nexus以及其基本配置, 那么如何在Maven来使用Nexus本地仓库呢?其实和配置远程仓库的方法一样。下面是在settings.xml中添加了一个nexus本地仓库的例子:
<profiles>

            ...

            <profile>

                <id>dev</id>

                <repositories>

                     <repository>

                         <id>nexus</id>

                         <url>http://127.0.0.1:8081/nexus/content/groups/public/</url>

                         <releases>

                             <enabled>true</enabled>

                         </releases>

                         <snapshots>

                             <enabled>true</enabled>

                         </snapshots>

                      </repository>

                 </repositories>


                 <pluginRepositories>

                       <pluginRepository>

                           <id>nexus</id>

                           <url>http://127.0.0.1:8081/nexus/content/groups/public</url>

                           <releases>

                               <enabled>true</enabled>

                           </releases>

                           <snapshots>

                               <enabled>true</enabled>

                            </snapshots>

                        </pluginRepository>

                  </pluginRepositories>

              </profile>

            ...

         </profiles>

         <activeProfiles>

                <activeProfile>dev</activeProfile>

         </activeProfiles>
你也可以在pom.xml中声明引用某个nexus仓库。
资料:
http://my.oschina.net/shootercn/blog/12269