Spring源码分析之BeanFactory
献自己:
枯燥无味的学习之路有时真的是无法静下心来苦心钻研;没有掌声,没有鲜花,只有自己内心浮躁不安。
谨记:戒骄戒躁,潜心求知。
一、工程代码如下:
//实体类
public class Person {
    private String name;
    public String getName() {
        return "Axuduo";
    }
    public void setName(String name) {
        this.name = name;
    }
}
//测试类
public class TestBean {
    @Test
    public void getPerson(){
        BeanFactory beanFactory = new XmlBeanFactory(new ClassPathResource("spring-bean.xml"));
        Person person = (Person) beanFactory.getBean("person");
        Assert.assertEquals("Axuduo",person.getName());
    }
}
//配置文件:spring-bean.xml
<?xml version="1.0" encoding="UTF-8"?>
<beans xmlns="http://www.springframework.org/schema/beans"
       xmlns:xsi="http://www.w3.org/2001/XMLSchema-instance"
       xsi:schemaLocation="http://www.springframework.org/schema/beans http://www.springframework.org/schema/beans/spring-beans.xsd">

    <bean id="person" class="com.oops.pojo.Person"/>
</beans>
二、基础容器XmlBeanFactory
首先将分析实例化XmlBeanFactory开始;对应代码:
BeanFactory beanFactory = new XmlBeanFactory(new ClassPathResource("spring-bean.xml"));
1、封装配置文件
时序图如下:
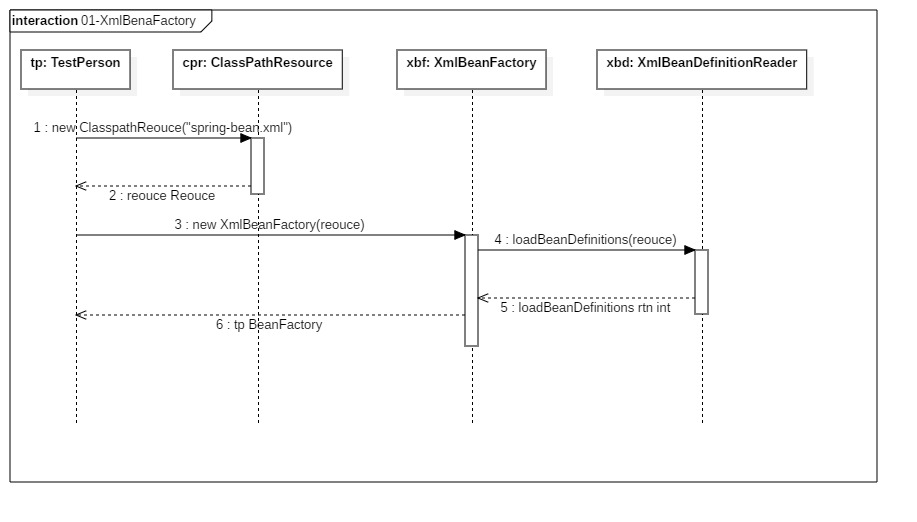
归纳:测试类首先调用ClassPathResouce的构造函数,构造Resource资源文件的实例对象;将Resource对象传递给XMLBeanFactory进行实例化该对象初始化。
那么,ClassPathResouce都做了哪些操作呢?
其实Spring对其内部使用到的资源实现了自己的抽象结构,Resource接口封装底层资源。其中InputStreamSource接口封装任何可能返回InputStream的类,它只定义了一个方法getInputStream方法,该方法返回一个InputStream对象。
在得到InputStream后就可以利用Resource及其子类为我们提供的特性进行后续开发了。有了Resource接口便可以对所有资源文件统一处理了。具体Resource接口如下:
public interface Resource extends InputStreamSource {

    /**
     * 是否存在*/
    boolean exists();
    /**
     * 可读性*/
    default boolean isReadable() {
        return exists();
    }
    /**
     * 是否打开状态*/
    default boolean isOpen() {
        return false;
    }
    /**
     * 是否是一个文件*/
    default boolean isFile() {
        return false;
    }
    /**
     * 获取URL资源*/
    URL getURL() throws IOException;
    /**
     * 获取URI资源*/
    URI getURI() throws IOException;
    /**
     * 获取文件资源*/
    File getFile() throws IOException;
    /**
     * 取消读取*/
    default ReadableByteChannel readableChannel() throws IOException {
        return Channels.newChannel(getInputStream());
    }
    /**
     * 内容长度*/
    long contentLength() throws IOException;
    /**
     * 最后修改时间*/
    long lastModified() throws IOException;
    /**
     * 创建一个相对资源*/
    Resource createRelative(String relativePath) throws IOException;
    /**
     * 获取文件名*/
    @Nullable
    String getFilename();
    /**
     * 获取文件描述*/
    String getDescription();
}
当通过Resource相关类完成了对配置文件进行封装后;配置文件的读取工作就全部交给XmlBeanFactory来处理了。
2、XmlBeanFactory
XmlBeanFactory通过封装后的Resource进行实例化对象。代码如下:
public class XmlBeanFactory extends DefaultListableBeanFactory {
    private final XmlBeanDefinitionReader reader = new XmlBeanDefinitionReader(this);
    /**
     * 构造函数需要:Resource 对象*/
    public XmlBeanFactory(Resource resource) throws BeansException {
        this(resource, null);
    }
    /**
     * 待自身构造调用;委派至XMLBeanDeinitionReader*/
    public XmlBeanFactory(Resource resource, BeanFactory parentBeanFactory) throws BeansException {
        super(parentBeanFactory);          // 注意父类中执行了两个或多个类的自动装配功能
        this.reader.loadBeanDefinitions(resource);
    }
}
3、加载Bean
首先看一下时序图
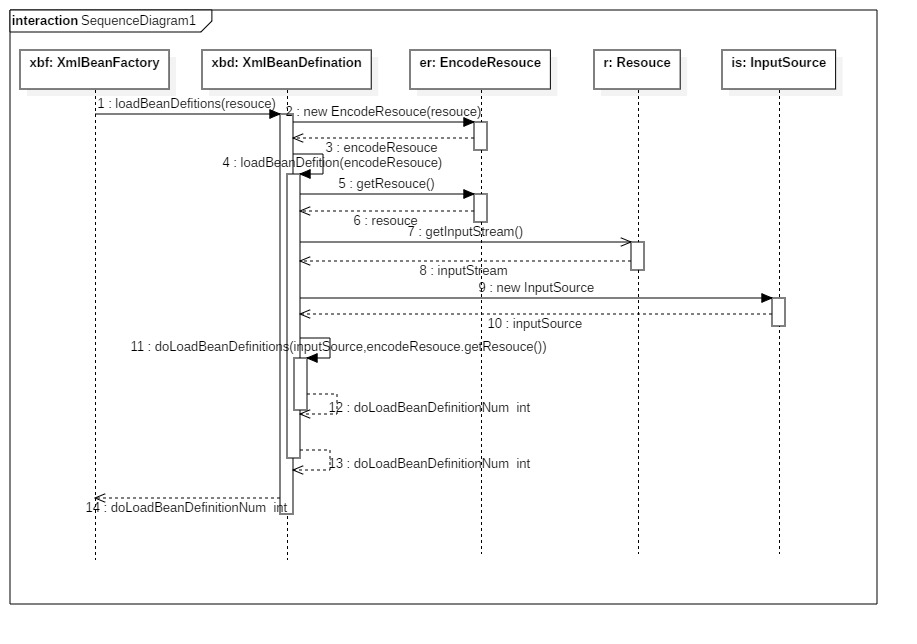
流程梳理:
1、封装资源文件。当进入XMlBeanDefiinitionReader后首先对参数Resource使用EncodedResource类进行封装。
2、获取输入流。从Resouce中获取对应的InputStream 并构造InputSource.
3、通过构造的InputSource实例和Resouce实例继续调用函数doLoadBeanDefinitions.
EncodeResource主要是对资源文件进行编码处理;如果有指定编码则使用指定编码;没有则采用默认。方法如下
   public int loadBeanDefinitions(Resource resource) throws BeanDefinitionStoreException {
        return loadBeanDefinitions(new EncodedResource(resource));
    }
通过上面的对资源文件的处理后将进入最核心的部位了:doLoadBeanDefinitions(InputSource inputSource,Resouce resource)
//代码经过去除catch部位
protected int doLoadBeanDefinitions(InputSource inputSource, Resource resource)throws BeanDefinitionStoreException {
        try {
            Document doc = doLoadDocument(inputSource, resource);   // 将资源文件传缓存 document
            int count = registerBeanDefinitions(doc, resource);    // 执行注册
            if (logger.isDebugEnabled()) {
                logger.debug("Loaded " + count + " bean definitions from " + resource);
            }
            return count;
        }
    }
至此可以清晰的看见只有两部操作:1、转换Document;2、执行注册;
到此完成注册流程。