本文转自:http://blog.csdn.net/jyt0551/article/details/58714595
EasyPusher是一款非常棒的推送客户端。稳定、高效、低延迟,音视频同步等都特别好。装在安卓上可作为一款单兵设备来用。说到单兵,在项目中通常都需要边传边录的功能,因此后来EasyPusher也加入了该特性。该文章将结合代码来阐述下这个功能是如何实现的。
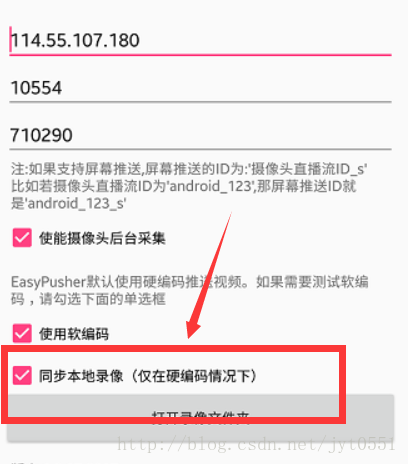
EasyPusher在设置里增加了相关选项来方便开启和关闭本地录像功能,如下图所示,在设置里勾选后就可以推送的同时进行录像了。
EasyPusher用来实现录像的类叫做EasyMuxer,该类对安卓系统的MediaMuxer进行了一些封装,专门对从MediaCodec编码出来的音视频数据进行录像,同时实现了录像自动分段存储的功能。其构造函数如下:
public EasyMuxer(String path, long durationMillis) {
        mFilePath = path;
        this.durationMillis = durationMillis;
        Object mux = null;
        try {
            if (Build.VERSION.SDK_INT >= Build.VERSION_CODES.JELLY_BEAN_MR2) {
                mux = new MediaMuxer(path + "-" + index++ + ".mp4", MediaMuxer.OutputFormat.MUXER_OUTPUT_MPEG_4);
            }
        } catch (IOException e) {
            e.printStackTrace();
        } finally {
            mMuxer = (MediaMuxer) mux;
        }
}构造函数有两个参数,第一个参数为本次录像的文件路径;第二个参数为单个文件最大时长,用来做录像分段(由于MediaMuxer在JELLY_BEAN_MR2以上才加入,因此这里做了判断,低于该版本的系统直接忽略了)。函数内部创建了一个MediaMuxer对象,用来实现真正的录像存储功能。
MediaMuxer在录像之前需要加入Video Track和Audio Track,EasyMuxuer进行了如下封装。
    public synchronized void addTrack(MediaFormat format, boolean isVideo) {
        // now that we have the Magic Goodies, start the muxer
        if (mAudioTrackIndex != -1 && mVideoTrackIndex != -1)
            throw new RuntimeException("already add all tracks");

        if (Build.VERSION.SDK_INT >= Build.VERSION_CODES.JELLY_BEAN_MR2) {
            int track = mMuxer.addTrack(format);
            if (VERBOSE)
                Log.i(TAG, String.format("addTrack %s result %d", isVideo ? "video" : "audio", track));
            if (isVideo) {
                mVideoFormat = format;
                mVideoTrackIndex = track;
                if (mAudioTrackIndex != -1) {
                    if (VERBOSE)
                        Log.i(TAG, "both audio and video added,and muxer is started");
                    mMuxer.start();
                    mBeginMillis = System.currentTimeMillis();
                }
            } else {
                mAudioFormat = format;
                mAudioTrackIndex = track;
                if (mVideoTrackIndex != -1) {
                    mMuxer.start();
                    mBeginMillis = System.currentTimeMillis();
                }
            }
        }
    }
这个函数有两个参数,第一个为要加入的媒体流的MediaFormat,可通过MediaCodec获取到,第二个表示加入的是Video还是Audio。从代码可以看到,在音频和视频都添加成功后会自动启动录像,这样做的好处是应用层的音视频的处理完全可以独立,不用操心录像的事情,减少了代码耦合性。同时,录像启动的时候会记录下来开始时间,后面需要用这个开始时间来计算文件时长。
录像启动后,接下来就应该保存数据了。我们再继续看下面的函数封装。
    public synchronized void pumpStream(ByteBuffer outputBuffer, MediaCodec.BufferInfo bufferInfo, boolean isVideo) {
        if (mAudioTrackIndex == -1 || mVideoTrackIndex == -1) {
            Log.i(TAG, String.format("pumpStream [%s] but muxer is not start.ignore..", isVideo ? "video" : "audio"));
            return;
        }
        if ((bufferInfo.flags & MediaCodec.BUFFER_FLAG_CODEC_CONFIG) != 0) {
            // The codec config data was pulled out and fed to the muxer when we got
            // the INFO_OUTPUT_FORMAT_CHANGED status.  Ignore it.
        } else if (bufferInfo.size != 0) {
            if (isVideo && mVideoTrackIndex == -1) {
                throw new RuntimeException("muxer hasn't started");
            }

            // adjust the ByteBuffer values to match BufferInfo (not needed?)
            outputBuffer.position(bufferInfo.offset);
            outputBuffer.limit(bufferInfo.offset + bufferInfo.size);

            if (Build.VERSION.SDK_INT >= Build.VERSION_CODES.JELLY_BEAN_MR2) {
                mMuxer.writeSampleData(isVideo ? mVideoTrackIndex : mAudioTrackIndex, outputBuffer, bufferInfo);
            }
            if (VERBOSE)
                Log.d(TAG, String.format("sent %s [" + bufferInfo.size + "] with timestamp:[%d] to muxer", isVideo ? "video" : "audio", bufferInfo.presentationTimeUs / 1000));
        }

        if ((bufferInfo.flags & MediaCodec.BUFFER_FLAG_END_OF_STREAM) != 0) {
            if (VERBOSE)
                Log.i(TAG, "BUFFER_FLAG_END_OF_STREAM received");
        }

        if (System.currentTimeMillis() - mBeginMillis >= durationMillis) {
            if (Build.VERSION.SDK_INT >= Build.VERSION_CODES.JELLY_BEAN_MR2) {
                if (VERBOSE)
                    Log.i(TAG, String.format("record file reach expiration.create new file:" + index));
                mMuxer.stop();
                mMuxer.release();
                mMuxer = null;
                mVideoTrackIndex = mAudioTrackIndex = -1;
                try {
                    mMuxer = new MediaMuxer(mFilePath + "-" + index++ + ".mp4", MediaMuxer.OutputFormat.MUXER_OUTPUT_MPEG_4);
                    addTrack(mVideoFormat, true);
                    addTrack(mAudioFormat, false);
                } catch (IOException e) {
                    e.printStackTrace();
                }
            }
        }
    }
需要注意的是音视频的处理分别是在不同的线程中进行的,因此上面这两个函数都是需要加锁的。
pumpStream方法会把从MediaCodec得到的音视频数据,保存到录像文件中。第一个参数表示媒体数据;第二个参数表示帧格式信息;第三个参数表示是音频还是视频。我们之前说到,音视频可能在不同的线程进行采集的,因此可能会有不同步的情况,比如音频已经开始了,视频还没出来。那这时候的音频数据,实际上是在录像开始之前pump,那它就不会保存下来;当录像开始后,muxer会通过writeSampleData方法来写入媒体数据。
同时,这个函数会判断是否已经达到了最大文件时长,是的话,会更换文件再存储。这里先把muxer关闭,再创建新的,并使用之前的MediaFormat来加入音视频轨道信息。为什么可以这样?因为这里音视频的媒体信息没有发生更改,所以完全是可以复用的。
最后,录像结束后,需要调用release来释放资源并生产最后一个完整的MP4文件。
    public synchronized void release() {
        if (Build.VERSION.SDK_INT >= Build.VERSION_CODES.JELLY_BEAN_MR2) {
            if (mMuxer != null) {
                if (mAudioTrackIndex != -1 && mVideoTrackIndex != -1) {
                    if (VERBOSE)
                        Log.i(TAG, String.format("muxer is started. now it will be stoped."));
                    try {
                        mMuxer.stop();
                        mMuxer.release();
                    } catch (IllegalStateException ex) {
                        ex.printStackTrace();
                    }
                }
            }
        }
    }
release函数很简单,无需再介绍了。
结合音视频线程,函数调用的流程图如下:
经测试,EasyMuxer非常稳定、好用。一个小时的测试,基本没有出现录像丢失和文件损坏的情况。详细代码参见Github。
项目地址:
https://github.com/EasyDarwin/EasyPusher_Android
APP下载:
https://fir.im/EasyPusher
获取更多信息
Copyright © EasyDarwin.org 2012-2017
