场景
Ionic介绍以及搭建环境、新建和运行项目:
https://blog.csdn.net/BADAO_LIUMANG_QIZHI/article/details/106308166
在上面搭建起来项目的基础上,实现中英国际化的切换。
注:
博客:
https://blog.csdn.net/badao_liumang_qizhi
关注公众号
霸道的程序猿
获取编程相关电子书、教程推送与免费下载。
实现
安装ngx-translate模块
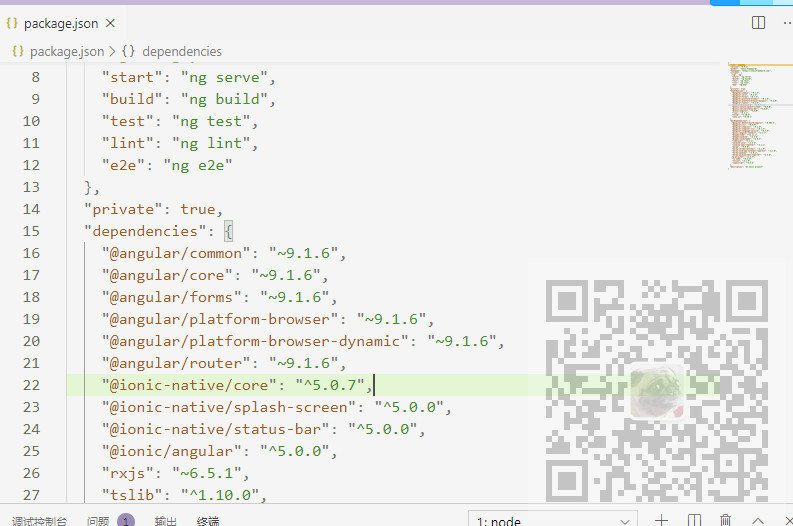
使用VSCode打开项目并打开package.json,没有安装ngx-translate模块是这样
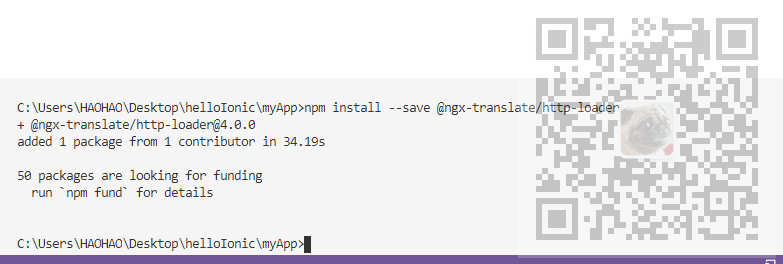
在项目下打开命令行或者在VSCode中打开终端
npm install --save @ngx-translate/core

npm install --save @ngx-translate/http-loader
安装完这两个模块后再打开package.json就可以看到已经添加成功这两个模块

模块源码地址:https://github.com/ngx-translate/core
模块app.module.ts中引入该模块
打开项目的app.module.ts
引入模块
//HttpClient
import {HttpClient, HttpClientModule} from '@angular/common/http';
//引入国际化资源
import { TranslateModule, TranslateLoader } from '@ngx-translate/core';
import { TranslateHttpLoader } from '@ngx-translate/http-loader';
export function HttpLoaderFactory(httpClient: HttpClient) {
  return new TranslateHttpLoader(httpClient);
}
然后声明
@NgModule({
  declarations: [AppComponent],
  entryComponents: [],
  imports: [BrowserModule,
     IonicModule.forRoot(),
      AppRoutingModule,
      HttpClientModule,
      TranslateModule.forRoot({
      loader: {
        provide: TranslateLoader,
        useFactory: HttpLoaderFactory,
        deps: [HttpClient]
      }
    })
    ],
  providers: [
    StatusBar,
    SplashScreen,
    { provide: RouteReuseStrategy, useClass: IonicRouteStrategy }
  ],
  bootstrap: [AppComponent]
})
export class AppModule {}
具体添加位置见下图

新建国际化资源
在项目的assets下新建文件夹i18n在文件夹下新建两个json文件en.json和zh-CN.json存储中英两个资源文件

zn-CN.json
{
    "badao": "霸道的",
    "liumang": "程序猿"
}
en.json
{
    "badao": "Domineering",
    "liumang": "Code Monkey"
}
添加并设置国际化资源
打开项目的app.component.ts
引入并声明TranslateService
import { TranslateService } from '@ngx-translate/core';

export class AppComponent {
  constructor(
    private platform: Platform,
    private splashScreen: SplashScreen,
    private statusBar: StatusBar,
    public translate:TranslateService
  ) {
    this.initializeApp();
  }

然后在初始化的方法initializeApp中加载国际化文件并设置当前的国际化文件
设置选择中文
 initializeApp() {
    this.platform.ready().then(() => {
      this.statusBar.styleDefault();
      this.splashScreen.hide();
      //装载国际化资源文件
      this.translate.addLangs(['en', 'zh-CN']);
      //设置默认国际化资源文件
      this.translate.setDefaultLang('zh-CN');
      //获取当前浏览器环境的语言
      const browserLang = this.translate.getBrowserLang();
      this.translate.use(browserLang.match(/en|zh-CN/) ? browserLang : 'zh-CN');

    });
在相应的组件中使用Translate服务
比如我想在tab1这个模块中使用国际化服务,打开tab1.module.ts,引入并声明模块
import { TranslateModule } from '@ngx-translate/core' ;

@NgModule({
  imports: [
    IonicModule,
    CommonModule,
    FormsModule,
    ExploreContainerComponentModule,
    Tab1PageRoutingModule,
    TranslateModule
  ],
  declarations: [Tab1Page]
})
export class Tab1PageModule {}
然后打开tab1.page.html
<div>
  <h1>公众号:</h1>
  {{ 'badao' | translate }}{{ 'liumang' | translate }}
</div>
然后运行项目查看tab1的页面

如果想要修改为英文的话,只需要打开app.component.ts,修改为
  initializeApp() {
    this.platform.ready().then(() => {
      this.statusBar.styleDefault();
      this.splashScreen.hide();
      //装载国际化资源文件
      this.translate.addLangs(['en', 'zh-CN']);
      //设置默认国际化资源文件
      this.translate.setDefaultLang('en');
      //获取当前浏览器环境的语言
      const browserLang = this.translate.getBrowserLang();
      this.translate.use(browserLang.match(/en|zh-CN/) ? browserLang : 'en');

    });
  }
运行看效果

示例代码下载
见下面文章末尾
https://mp.weixin.qq.com/s/HFSKb7il-K_KB8XL6XRl7A