场景
WebSocket
HTTP 协议是一种无状态的、无连接的、单向的应用层协议。它采用了请求/响应模型。通信请求只能由客户端发起,服务端对请求做出应答处理。
这种通信模型有一个弊端:HTTP 协议无法实现服务器主动向客户端发起消息。
这种单向请求的特点,注定了如果服务器有连续的状态变化,客户端要获知就非常麻烦。大多数 Web 应用程序将通过频繁的异步 JavaScript 和 XML(AJAX)请求实现长轮询。轮询的效率低,非常浪费资源(因为必须不停连接,或者 HTTP 连接始终打开)。
WebSocket 就是这样发明的。WebSocket 连接允许客户端和服务器之间进行全双工通信,以便任一方都可以通过建立的连接将数据推送到另一端。WebSocket 只需要建立一次连接,就可以一直保持连接状态。这相比于轮询方式的不停建立连接显然效率要大大提高。
若依前后端分离版手把手教你本地搭建环境并运行项目:
https://blog.csdn.net/BADAO_LIUMANG_QIZHI/article/details/108465662
在上面将前后端的项目搭建起来之后。进行后台SpringBoot和Vue的WebSocket集成。
注:
博客:
https://blog.csdn.net/badao_liumang_qizhi
关注公众号
霸道的程序猿
获取编程相关电子书、教程推送与免费下载。
实现
SpringBoot集成
首先在pom文件中引入依赖
        <dependency>
            <groupId>org.springframework.boot</groupId>
            <artifactId>spring-boot-starter-websocket</artifactId>
        </dependency>
然后新建一个WebSocket的配置类,用来开启WebSocket的支持
import org.springframework.context.annotation.Bean;
import org.springframework.context.annotation.Configuration;
import org.springframework.web.socket.server.standard.ServerEndpointExporter;

@Configuration
public class WebSocketConfig {

    @Bean
    public ServerEndpointExporter serverEndpointExporter(){
        return  new ServerEndpointExporter();
    }
}
然后新建一个客户端实体类WebSocketClient用来存储连接的Session和Uri
import javax.websocket.Session;

public class WebSocketClient {
    // 与某个客户端的连接会话,需要通过它来给客户端发送数据
    private Session session;

    //连接的uri
    private String uri;

    public Session getSession() {
        return session;
    }

    public void setSession(Session session) {
        this.session = session;
    }

    public String getUri() {
        return uri;
    }

    public void setUri(String uri) {
        this.uri = uri;
    }
}
然后新建WebSocketService,用来创建和处理连接
import org.apache.commons.lang.StringUtils;
import org.slf4j.Logger;
import org.slf4j.LoggerFactory;
import org.springframework.stereotype.Component;
import javax.websocket.*;
import javax.websocket.server.PathParam;
import javax.websocket.server.ServerEndpoint;
import java.io.IOException;
import java.util.concurrent.ConcurrentHashMap;

@ServerEndpoint(value = "/websocket/{userName}")
@Component
public class WebSocketService {

    private static final Logger log = LoggerFactory.getLogger(WebSocketService.class);

    //静态变量,用来记录当前在线连接数。应该把它设计成线程安全的。
    private static int onlineCount = 0;
    //concurrent包的线程安全Set,用来存放每个客户端对应的WebSocketServer对象。
    private static ConcurrentHashMap<String, WebSocketClient> webSocketMap = new ConcurrentHashMap<>();


    /**与某个客户端的连接会话,需要通过它来给客户端发送数据*/
    private Session session;
    /**接收userName*/
    private String userName="";
    /**
     * 连接建立成功调用的方法*/
    @OnOpen
    public void onOpen(Session session, @PathParam("userName") String userName) {
        if(!webSocketMap.containsKey(userName))
        {
            addOnlineCount(); // 在线数 +1
        }
        this.session = session;
        this.userName= userName;
        WebSocketClient client = new WebSocketClient();
        client.setSession(session);
        client.setUri(session.getRequestURI().toString());
        webSocketMap.put(userName, client);

        log.info("----------------------------------------------------------------------------");
        log.info("用户连接:"+userName+",当前在线人数为:" + getOnlineCount());
        try {
            sendMessage("来自后台的反馈:连接成功");
        } catch (IOException e) {
            log.error("用户:"+userName+",网络异常!!!!!!");
        }
    }

    /**
     * 连接关闭调用的方法
     */
    @OnClose
    public void onClose() {
        if(webSocketMap.containsKey(userName)){
            webSocketMap.remove(userName);
            if(webSocketMap.size()>0)
            {
                //从set中删除
                subOnlineCount();
            }
        }
        log.info("----------------------------------------------------------------------------");
        log.info(userName+"用户退出,当前在线人数为:" + getOnlineCount());
    }

    /**
     * 收到客户端消息后调用的方法
     *
     * @param message 客户端发送过来的消息*/
    @OnMessage
    public void onMessage(String message, Session session) {
        log.info("收到用户消息:"+userName+",报文:"+message);
        //可以群发消息
        //消息保存到数据库、redis
        if(StringUtils.isNotBlank(message)){

        }
    }

    /**
     *
     * @param session
     * @param error
     */
    @OnError
    public void onError(Session session, Throwable error) {
        log.error("用户错误:"+this.userName+",原因:"+error.getMessage());
        error.printStackTrace();
    }

    /**
     * 连接服务器成功后主动推送
     */
    public void sendMessage(String message) throws IOException {
        synchronized (session){
            this.session.getBasicRemote().sendText(message);
        }
    }

    /**
     * 向指定客户端发送消息
     * @param userName
     * @param message
     */
    public static void sendMessage(String userName,String message){
        try {
            WebSocketClient webSocketClient = webSocketMap.get(userName);
            if(webSocketClient!=null){
                webSocketClient.getSession().getBasicRemote().sendText(message);
            }
        } catch (IOException e) {
            e.printStackTrace();
            throw new RuntimeException(e.getMessage());
        }
    }


    public static synchronized int getOnlineCount() {
        return onlineCount;
    }

    public static synchronized void addOnlineCount() {
        WebSocketService.onlineCount++;
    }

    public static synchronized void subOnlineCount() {
        WebSocketService.onlineCount--;
    }

    public static void setOnlineCount(int onlineCount) {
        WebSocketService.onlineCount = onlineCount;
    }


    public static ConcurrentHashMap<String, WebSocketClient> getWebSocketMap() {
        return webSocketMap;
    }

    public static void setWebSocketMap(ConcurrentHashMap<String, WebSocketClient> webSocketMap) {
        WebSocketService.webSocketMap = webSocketMap;
    }

    public Session getSession() {
        return session;
    }

    public void setSession(Session session) {
        this.session = session;
    }

    public String getUserName() {
        return userName;
    }

    public void setUserName(String userName) {
        this.userName = userName;
    }

}
注意这里的引用的WebSocketClient是上面自己新建的用来存储连接相关信息的实体类
然后@ServerEndpoint(value = "/websocket/{userName}")
这里的就是WebSocket连接的地址,后面的{userName}是用来接收前端传递的参数,用作不同标识,进而做不同的处理
然后下面的OnOpen注解的方法是连接建立成功后调用的方法,这里做了用户在线数的计数处理,可以根据自己
的业务需要去处理。
然后OnClose注解的是连接关系调用的方法。
然后OnMessage注解的是客户端发来消息时的回调方法,里面根据自己需要去处理数据
sendMessage方法在客户端连接到服务器时使用当前会话来给客户端推送一个反馈消息
然后向指定客户端发送消息使用的是sendMessage方法,传递的是用户的唯一标识和消息内容
新建一个Controller接口用来测试消息的推送
import com.ruoyi.web.websocket.WebSocketService;
import org.springframework.web.bind.annotation.GetMapping;
import org.springframework.web.bind.annotation.RequestMapping;
import org.springframework.web.bind.annotation.RestController;


@RestController
@RequestMapping("/websocket")
public class WebSocketController {


    @GetMapping("/pushone")
    public void pushone()
    {
        WebSocketService.sendMessage("badao","公众号:霸道的程序猿");
    }
}
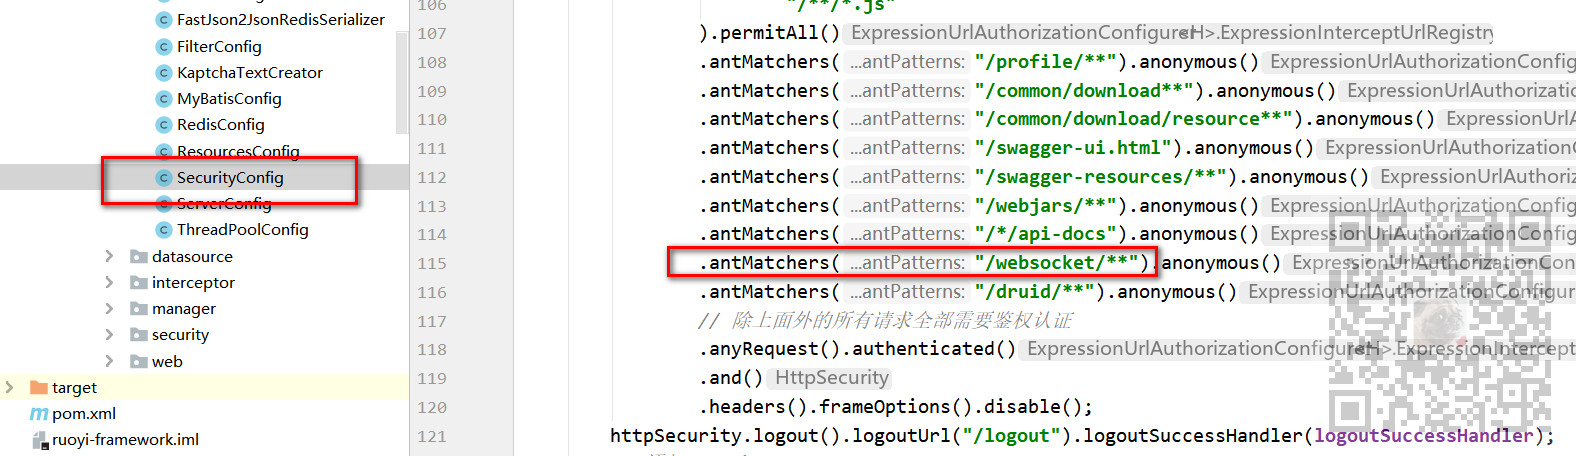
如果是普通的SpringBoot项目则后台到此就可以了,然后因为是使用上面若依搭建的框架,所以需要将ws的url和接口的url放开权限认证
Vue项目集成
新建一个WebSocket组件,这里放在componets目录下

然后声明一些变量
        data() {
            return {
                // ws是否启动
                wsIsRun: false,
                // 定义ws对象
                webSocket: null,
                // ws请求链接(类似于ws后台地址)
                ws: '',
                // ws定时器
                wsTimer: null,
            }
        },
在mounted函数中执行初始化websocket连接的方法
        async mounted() {
            this.wsIsRun = true
            this.wsInit()
        },
在执行初始化的方法实现中
           const wsuri = 'ws://你的电脑ip:7777/websocket/badao'
                this.ws = wsuri
                if (!this.wsIsRun) return
                // 销毁ws
                this.wsDestroy()
                // 初始化ws
                this.webSocket = new WebSocket(this.ws)
                // ws连接建立时触发
                this.webSocket.addEventListener('open', this.wsOpenHanler)
                // ws服务端给客户端推送消息
                this.webSocket.addEventListener('message', this.wsMessageHanler)
                // ws通信发生错误时触发
                this.webSocket.addEventListener('error', this.wsErrorHanler)
                // ws关闭时触发
                this.webSocket.addEventListener('close', this.wsCloseHanler)

                // 检查ws连接状态,readyState值为0表示尚未连接,1表示建立连接,2正在关闭连接,3已经关闭或无法打开
                clearInterval(this.wsTimer)
                this.wsTimer = setInterval(() => {
                    if (this.webSocket.readyState === 1) {
                        clearInterval(this.wsTimer)
                    } else {
                        console.log('ws建立连接失败')
                        this.wsInit()
                    }
                }, 3000)
            },
进行websocket连接并传递badao参数,并且设置相应的回调处理方法。
最后设置了一个3秒的定时器去定时检查websocket的连接状态。
此组件还添加了一个按钮并设置其点击事件用来给服务端推送消息
            sendDataToServer() {
                if (this.webSocket.readyState === 1) {
                    this.webSocket.send('来自前端的数据')
                } else {
                    throw Error('服务未连接')
                }
            },
完整的WebSocket组件代码
<template>
  <el-button @click="sendDataToServer" >给后台发送消息</el-button>
</template>

<script>
    export default {
        name: "WebSocket",
        data() {
            return {
                // ws是否启动
                wsIsRun: false,
                // 定义ws对象
                webSocket: null,
                // ws请求链接(类似于ws后台地址)
                ws: '',
                // ws定时器
                wsTimer: null,
            }
        },
        async mounted() {
            this.wsIsRun = true
            this.wsInit()
        },
        methods: {
            sendDataToServer() {
                if (this.webSocket.readyState === 1) {
                    this.webSocket.send('来自前端的数据')
                } else {
                    throw Error('服务未连接')
                }
            },
            /**
             * 初始化ws
             */
            wsInit() {
                const wsuri = 'ws://10.229.36.158:7777/websocket/badao'
                this.ws = wsuri
                if (!this.wsIsRun) return
                // 销毁ws
                this.wsDestroy()
                // 初始化ws
                this.webSocket = new WebSocket(this.ws)
                // ws连接建立时触发
                this.webSocket.addEventListener('open', this.wsOpenHanler)
                // ws服务端给客户端推送消息
                this.webSocket.addEventListener('message', this.wsMessageHanler)
                // ws通信发生错误时触发
                this.webSocket.addEventListener('error', this.wsErrorHanler)
                // ws关闭时触发
                this.webSocket.addEventListener('close', this.wsCloseHanler)

                // 检查ws连接状态,readyState值为0表示尚未连接,1表示建立连接,2正在关闭连接,3已经关闭或无法打开
                clearInterval(this.wsTimer)
                this.wsTimer = setInterval(() => {
                    if (this.webSocket.readyState === 1) {
                        clearInterval(this.wsTimer)
                    } else {
                        console.log('ws建立连接失败')
                        this.wsInit()
                    }
                }, 3000)
            },
            wsOpenHanler(event) {
                console.log('ws建立连接成功')
            },
            wsMessageHanler(e) {
                console.log('wsMessageHanler')
                console.log(e)
                //const redata = JSON.parse(e.data)
                //console.log(redata)
            },
            /**
             * ws通信发生错误
             */
            wsErrorHanler(event) {
                console.log(event, '通信发生错误')
                this.wsInit()
            },
            /**
             * ws关闭
             */
            wsCloseHanler(event) {
                console.log(event, 'ws关闭')
                this.wsInit()
            },
            /**
             * 销毁ws
             */
            wsDestroy() {
                if (this.webSocket !== null) {
                    this.webSocket.removeEventListener('open', this.wsOpenHanler)
                    this.webSocket.removeEventListener('message', this.wsMessageHanler)
                    this.webSocket.removeEventListener('error', this.wsErrorHanler)
                    this.webSocket.removeEventListener('close', this.wsCloseHanler)
                    this.webSocket.close()
                    this.webSocket = null
                    clearInterval(this.wsTimer)
                }
            },
        }
    }
</script>

<style scoped>

</style>
然后在首页中引用该组件
<template>
  <div class="app-container home">
    <el-row :gutter="20">
      websocket推送
      <WebSocket></WebSocket>
    </el-row>
    <el-divider />
  </div>
</template>
import WebSocket from '@/components/WebSocket/WebSocket'
export default {
  name: "index",
   components: {
     WebSocket
  },
效果
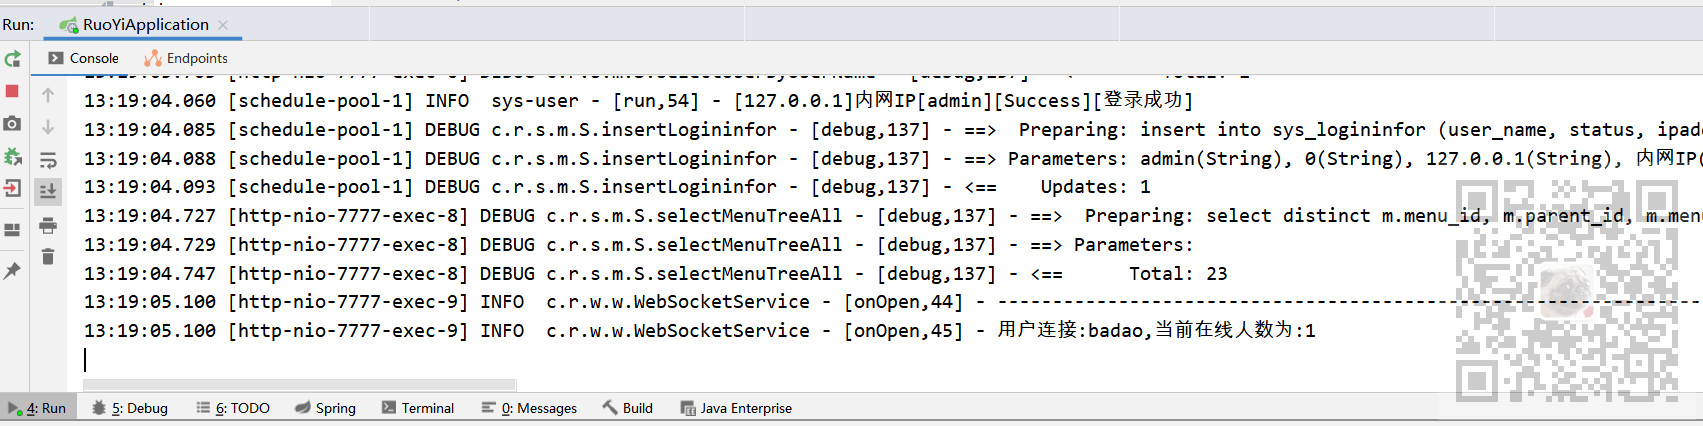
首先运行后台SpringBoot服务,然后运行前端项目并登录到首页,打开控制台输出

可以看到websocket建立连接成功,并且在后台也有输出
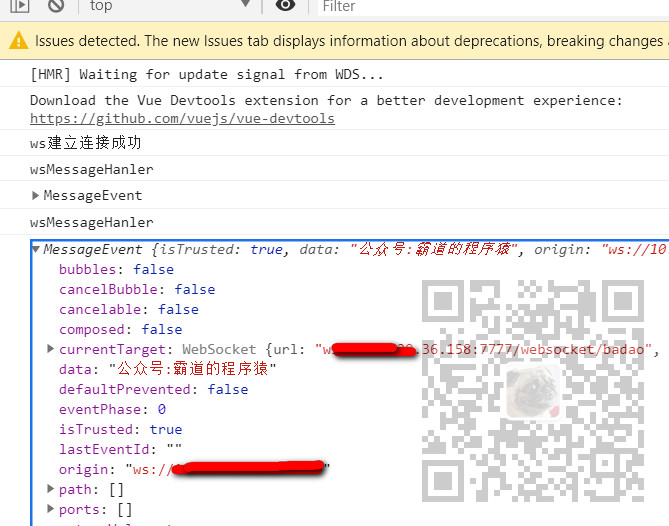
然后后台给前端推送消息,调用后台发送消息的接口
然后就可以在前端收到后台的推送
然后点击前端的给后台发送消息按钮
则在后台的回调方法中收到发送的消息
