BootStrap
Bootstrap,来自 Twitter,是目前最受欢迎的前端框架。Bootstrap 是基于 HTML、CSS、JAVASCRIPT 的,它简洁灵活,使得 Web 开发更加快捷。
1 Bootstrap 基本结构
Bootstrap 是一个用于快速开发 Web 应用程序和网站的前端框架。Bootstrap 是基于 HTML、CSS、JAVASCRIPT 的。
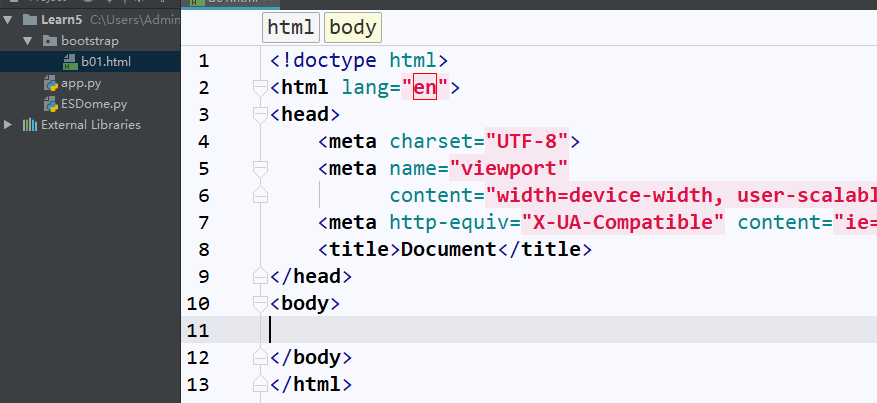
(1)创建html框架:在pycharm中输入!,之后tab即可
(2)Bootstrap 安装。您可以从 http://getbootstrap.com/ 上下载 Bootstrap 的最新版本。包含了 jquery.js、bootstrap.min.js 和 bootstrap.min.css 文件,用于让一个常规的 HTML 文件变为使用了 Bootstrap 的模板。国内推荐使用 Staticfile CDN 上的库:
<!-- 新 Bootstrap 核心 CSS 文件 -->
<link href="https://cdn.staticfile.org/twitter-bootstrap/3.3.7/css/bootstrap.min.css" rel="stylesheet">
<!-- jQuery文件。务必在bootstrap.min.js 之前引入 -->
<script src="https://cdn.staticfile.org/jquery/2.1.1/jquery.min.js"></script>
<!-- 最新的 Bootstrap 核心 JavaScript 文件 -->
<script src="https://cdn.staticfile.org/twitter-bootstrap/3.3.7/js/bootstrap.min.js"></script>
2 Bootstrap CSS
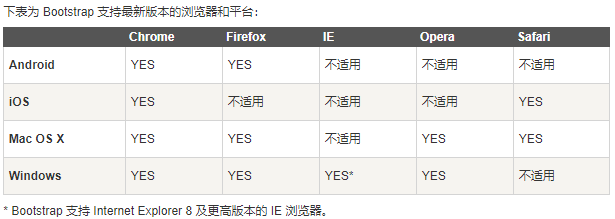
Bootstrap 3 默认的 CSS 本身就对移动设备友好支持。Bootstrap 3 的设计目标是移动设备优先,然后才是桌面设备。这实际上是一个非常及时的转变,因为现在越来越多的用户使用移动设备。为了让 Bootstrap 开发的网站对移动设备友好,确保适当的绘制和触屏缩放,需要在网页的 head 之中添加 viewport meta 标签,如下所示:
<meta name="viewport" content="width=device-width, initial-scale=1.0">
width 属性控制设备的宽度。假设您的网站将被带有不同屏幕分辨率的设备浏览,那么将它设置为 device-width 可以确保它能正确呈现在不同设备上。
initial-scale=1.0 确保网页加载时,以 1:1 的比例呈现,不会有任何的缩放。
- 响应式图像
<img src="..." class="img-responsive" alt="响应式图像">
img-responsive class 为图像赋予了 max- 100%; 和 height: auto; 属性,可以让图像按比例缩放,不超过其父元素的尺寸。
.img-responsive {
display: block;
height: auto;
max- 100%;
}
这表明相关的图像呈现为 block。当您把元素的 display 属性设置为 block,以块级元素显示。设置 height:auto,相关元素的高度取决于浏览器。
设置 max-width 为 100% 会重写任何通过 width 属性指定的宽度。这让图片对响应式布局的支持更友好。
如果需要让使用了 .img-responsive 类的图片水平居中,请使用 .center-block 类,不要用 .text-center。
body {margin: 0;} 来移除 body 的边距。请看下面有关 body 的设置:
body {
font-family: "Helvetica Neue", Helvetica, Arial, sans-serif;
font-size: 14px;
line-height: 1.428571429;
color: #333333;
background-color: #ffffff;
}
第一条规则设置 body 的默认字体样式为 "Helvetica Neue", Helvetica, Arial, sans-serif。最后一条规则设置默认的背景颜色为白色。
2.1 网格系统
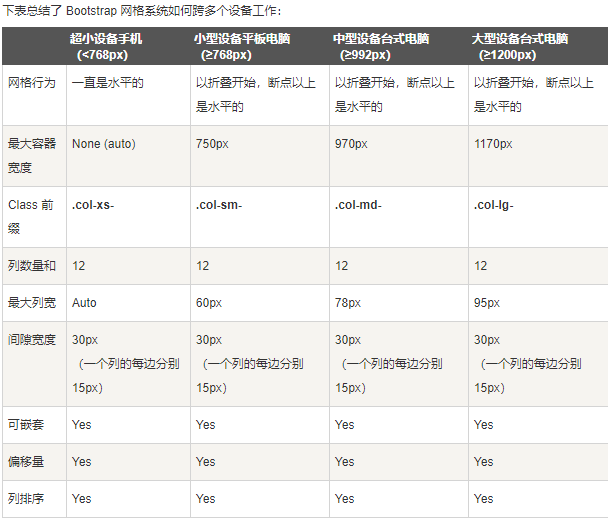
Bootstrap 提供了一套响应式、移动设备优先的流式网格系统,随着屏幕或视口(viewport)尺寸的增加,系统会自动分为最多12列。其实就是页面布局。
- bootstrap网格系统(Grid System):Bootstrap 包含了一个响应式的、移动设备优先的、不固定的网格系统,可以随着设备或视口大小的增加而适当地扩展到 12 列。它包含了用于简单的布局选项的预定义类,也包含了用于生成更多语义布局的功能强大的混合类。
- 网格系统工作原理
- 行必须放置在 .container class 内,以便获得适当的对齐(alignment)和内边距(padding)。
- 使用行来创建列的水平组。
- 内容应该放置在列内,且唯有列可以是行的直接子元素。
- 预定义的网格类,比如 .row 和 .col-xs-4,可用于快速创建网格布局。LESS 混合类可用于更多语义布局。
- 列通过内边距(padding)来创建列内容之间的间隙。该内边距是通过 .rows 上的外边距(margin)取负,表示第一列和最后一列的行偏移。
- 网格系统是通过指定您想要横跨的十二个可用的列来创建的。例如,要创建三个相等的列,则使用三个 .col-xs-4。
- 堆叠水平
<div class="container">
<h1>Hello, world!</h1>
<div class="row">
<div class="col-md-6" style="background-color: #dedef8; box-shadow: inset 1px -1px 1px #444, inset -1px 1px 1px #444;">
<p>Lorem ipsum dolor sit amet, consectetur adipisicing elit, sed do
eiusmod tempor incididunt ut labore et dolore magna aliqua. Ut
enim ad minim veniam, quis nostrud exercitation ullamco laboris
nisi ut aliquip ex ea commodo consequat.
</p>
<p>Sed ut perspiciatis unde omnis iste natus error sit voluptatem
accusantium doloremque laudantium, totam rem aperiam, eaque ipsa
quae ab illo inventore veritatis et quasi architecto beatae vitae
dicta sunt explicabo.
</p>
</div>
<div class="col-md-6" style="background-color: #dedef8;box-shadow: inset 1px -1px 1px #444, inset -1px 1px 1px #444;">
<p>Sed ut perspiciatis unde omnis iste natus error sit voluptatem
accusantium doloremque laudantium.
</p>
<p> Neque porro quisquam est, qui dolorem ipsum quia dolor sit amet,
consectetur, adipisci velit, sed quia non numquam eius modi
tempora incidunt ut labore et dolore magnam aliquam quaerat
voluptatem.
</p>
</div>
</div>
</div>
- ...元素被添加,确保居中和最大宽度。
- 一旦添加了容器,接下来您需要考虑以行为单位。添加 ...,并在行内添加列 。
- 网格中的每一行是由 12 个单元组成的,您可以使用这些单元定义列的尺寸。在我们的实例中,有两个列,每个列由 6 个单元组成,即 6+6=12。
2.2 手机平板电脑通用尺寸
https://www.runoob.com/bootstrap/bootstrap-grid-system-example3.html
2.3 排版
<small>本行内容是在标签内</small><br>
<strong>本行内容是在标签内</strong><br>
<em>本行内容是在标签内,并呈现为斜体</em><br>
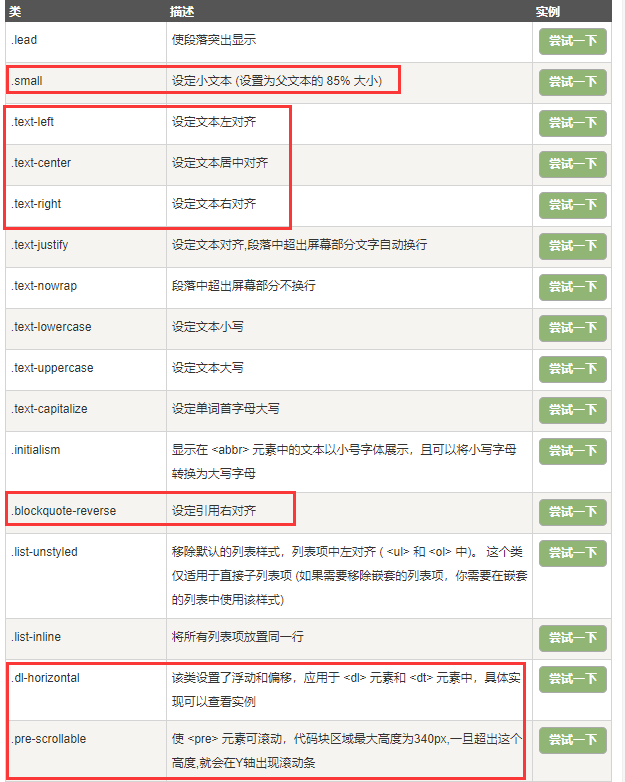
<p class="text-left">向左对齐文本</p>
<p class="text-center">居中对齐文本</p>
<p class="text-right">向右对齐文本</p>
<p class="text-muted">本行内容是减弱的</p>
<p class="text-primary">本行内容带有一个 primary class</p>
<p class="text-success">本行内容带有一个 success class</p>
<p class="text-info">本行内容带有一个 info class</p>
<p class="text-warning">本行内容带有一个 warning class</p>
<p class="text-danger">本行内容带有一个 danger class</p>
-
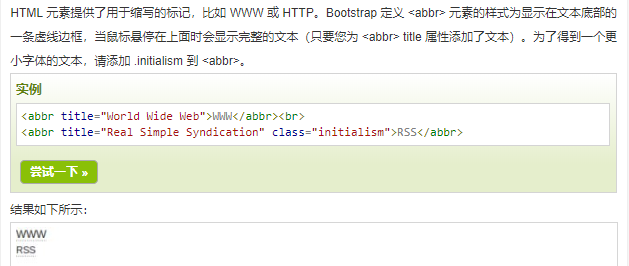
缩写
-
地址
<address>
<strong>Some Company, Inc.</strong><br>
007 street<br>
Some City, State XXXXX<br>
<abbr title="Phone">P:</abbr> (123) 456-7890
</address>
<address>
<strong>Full Name</strong><br>
<a href="mailto:#">mailto@somedomain.com</a>
</address>
- 引用
<blockquote>
<p>
这是一个默认的引用实例。这是一个默认的引用实例。这是一个默认的引用实例。这是一个默认的引用实例。这是一个默认的引用实例。这是一个默认的引用实例。这是一个默认的引用实例。这是一个默认的引用实例。
</p>
</blockquote>
<blockquote>
这是一个带有源标题的引用。
<small>Someone famous in <cite title="Source Title">Source Title</cite></small>
</blockquote>
<blockquote class="pull-right">
这是一个向右对齐的引用。
<small>Someone famous in <cite title="Source Title">Source Title</cite></small>
</blockquote>
- 列表
<h4>有序列表</h4>
<ol>
<li>Item 1</li>
<li>Item 2</li>
<li>Item 3</li>
<li>Item 4</li>
</ol>
<h4>无序列表</h4>
<ul>
<li>Item 1</li>
<li>Item 2</li>
<li>Item 3</li>
<li>Item 4</li>
</ul>
<h4>未定义样式列表</h4>
<ul class="list-unstyled">
<li>Item 1</li>
<li>Item 2</li>
<li>Item 3</li>
<li>Item 4</li>
</ul>
<h4>内联列表</h4>
<ul class="list-inline">
<li>Item 1</li>
<li>Item 2</li>
<li>Item 3</li>
<li>Item 4</li>
</ul>
<h4>定义列表</h4>
<dl>
<dt>Description 1</dt>
<dd>Item 1</dd>
<dt>Description 2</dt>
<dd>Item 2</dd>
</dl>
<h4>水平的定义列表</h4>
<dl class="dl-horizontal">
<dt>Description 1</dt>
<dd>Item 1</dd>
<dt>Description 2</dt>
<dd>Item 2</dd>
</dl>
- 其他排版
2.4 代码
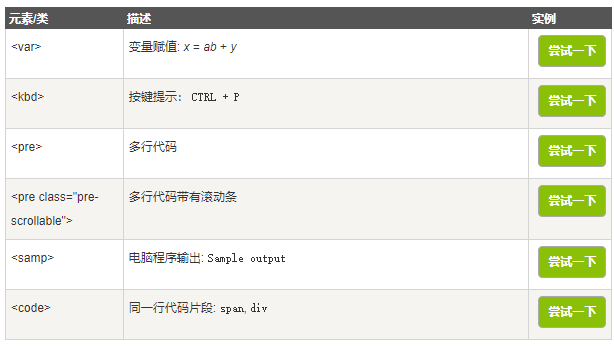
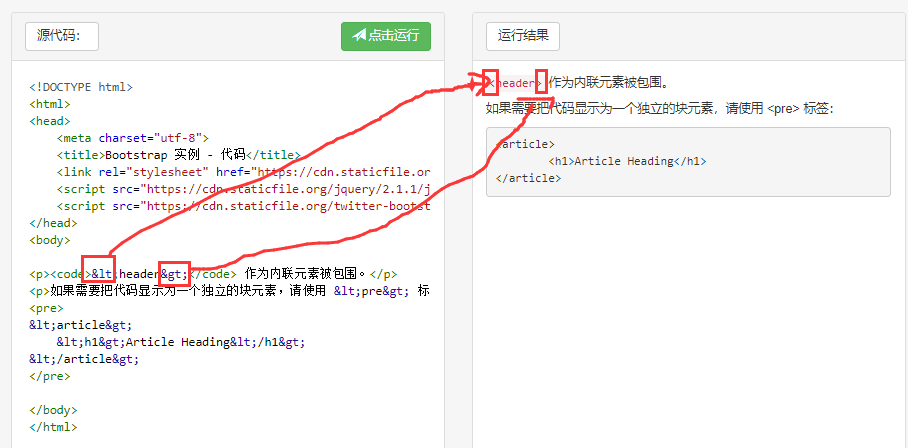
Bootstrap 允许您以两种方式显示代码:开始和结束标签使用了 unicode 变体: < 和 >。
- 第一种是
标签。如果您想要内联显示代码,那么您应该使用
标签。
- 第二种是
标签。如果代码需要被显示为一个独立的块元素或者代码有多行,那么您应该使用
标签。
2.5 表格
Bootstrap 提供了一个清晰的创建表格的布局。下表列出了 Bootstrap 支持的一些表格元素:
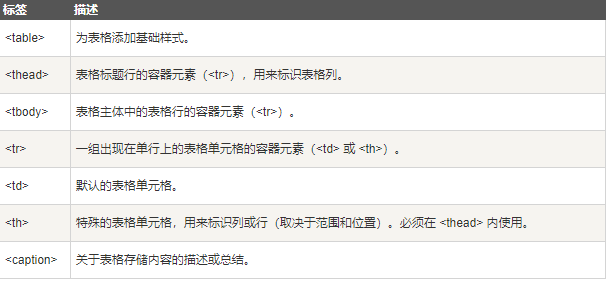
- 表格类,通过把任意的 .table 包在 .table-responsive class 内,您可以让表格水平滚动以适应小型设备(小于 768px)。当在大于 768px 宽的大型设备上查看时,您将看不到任何的差别。
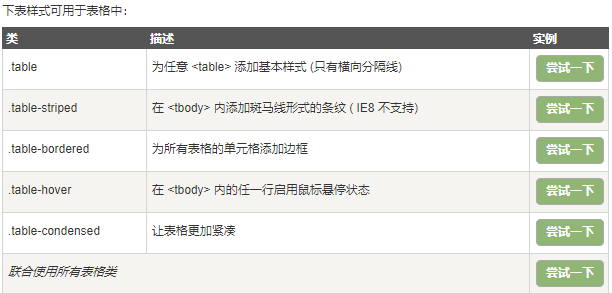
-
, 和 类 基本表格
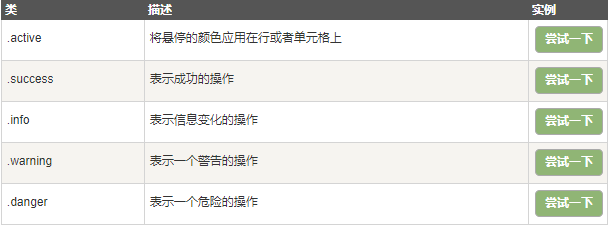
<table class="table"> <caption>基本的表格布局</caption> <thead> <tr> <th>名称</th> <th>城市</th> </tr> </thead> <tbody> <tr> <td>Tanmay</td> <td>Bangalore</td> </tr> <tr> <td>Sachin</td> <td>Mumbai</td> </tr> </tbody> </table>
2.6 表单
Bootstrap 提供了下列类型的表单布局:垂直表单(默认),内联表单,水平表单。创建基本表单的步骤:
- 向父
- 把标签和控件放在一个带有 class .form-group 的 中。这是获取最佳间距所必需的。
- 向所有的文本元素 、
<form role="form"> <div class="form-group"> <label for="name">名称</label> <input type="text" class="form-control" id="name" placeholder="请输入名称"> </div> <div class="form-group"> <label for="inputfile">文件输入</label> <input type="file" id="inputfile"> <p class="help-block">这里是块级帮助文本的实例。</p> </div> <div class="checkbox"> <label> <input type="checkbox">请打勾 </label> </div> <button type="submit" class="btn btn-default">提交</button> </form>
- 内联表单,请向
<form class="form-inline" role="form"> <div class="form-group"> <label class="sr-only" for="name">名称</label> <input type="text" class="form-control" id="name" placeholder="请输入名称"> </div> <div class="form-group"> <label class="sr-only" for="inputfile">文件输入</label> <input type="file" id="inputfile"> </div> <div class="checkbox"> <label> <input type="checkbox">请打勾 </label> </div> <button type="submit" class="btn btn-default">提交</button> </form>
- 水平表单
水平表单与其他表单不仅标记的数量上不同,而且表单的呈现形式也不同。如需创建一个水平布局的表单,请按下面的几个步骤进行:
- 向父
- 把标签和控件放在一个带有 class .form-group 的 中。
- 向标签添加 class .control-label。
<form class="form-horizontal" role="form"> <div class="form-group"> <label for="firstname" class="col-sm-2 control-label">名字</label> <div class="col-sm-10"> <input type="text" class="form-control" id="firstname" placeholder="请输入名字"> </div> </div> <div class="form-group"> <label for="lastname" class="col-sm-2 control-label">姓</label> <div class="col-sm-10"> <input type="text" class="form-control" id="lastname" placeholder="请输入姓"> </div> </div> <div class="form-group"> <div class="col-sm-offset-2 col-sm-10"> <div class="checkbox"> <label> <input type="checkbox">请记住我 </label> </div> </div> </div> <div class="form-group"> <div class="col-sm-offset-2 col-sm-10"> <button type="submit" class="btn btn-default">登录</button> </div> </div> </form>
Bootstrap 支持最常见的表单控件,主要是 input、textarea、checkbox、radio 和 select。
- 输入框
<form role="form"> <div class="form-group"> <label for="name">标签</label> <input type="text" class="form-control" placeholder="文本输入"> </div> </form>
- 文本框,多行输入使用文本框 textarea。必要时可以改变 rows 属性(较少的行 = 较小的盒子,较多的行 = 较大的盒子)。
<form role="form"> <div class="form-group"> <label for="name">文本框</label> <textarea class="form-control" rows="3"></textarea> </div> </form>
- 复选框和单选框
复选框和单选按钮用于让用户从一系列预设置的选项中进行选择。
- 当创建表单时,如果您想让用户从列表中选择若干个选项时,请使用 checkbox。如果您限制用户只能选择一个选项,请使用 radio。
- 对一系列复选框和单选框使用 .checkbox-inline 或 .radio-inline class,控制它们显示在同一行上。
<label for="name">默认的复选框和单选按钮的实例</label> <div class="checkbox"> <label><input type="checkbox" value="">选项 1</label> </div> <div class="checkbox"> <label><input type="checkbox" value="">选项 2</label> </div> <div class="radio"> <label> <input type="radio" name="optionsRadios" id="optionsRadios1" value="option1" checked> 选项 1 </label> </div> <div class="radio"> <label> <input type="radio" name="optionsRadios" id="optionsRadios2" value="option2">选项 2 - 选择它将会取消选择选项 1 </label> </div> <label for="name">内联的复选框和单选按钮的实例</label> <div> <label class="checkbox-inline"> <input type="checkbox" id="inlineCheckbox1" value="option1"> 选项 1 </label> <label class="checkbox-inline"> <input type="checkbox" id="inlineCheckbox2" value="option2"> 选项 2 </label> <label class="checkbox-inline"> <input type="checkbox" id="inlineCheckbox3" value="option3"> 选项 3 </label> <label class="radio-inline"> <input type="radio" name="optionsRadiosinline" id="optionsRadios3" value="option1" checked> 选项 1 </label> <label class="radio-inline"> <input type="radio" name="optionsRadiosinline" id="optionsRadios4" value="option2"> 选项 2 </label> </div>
- 选择框,当您想让用户从多个选项中进行选择,但是默认情况下只能选择一个选项时,则使用选择框。
- 使用
- 使用 multiple="multiple" 允许用户选择多个选项。
<form role="form"> <div class="form-group"> <label for="name">选择列表</label> <select class="form-control"> <option>1</option> <option>2</option> <option>3</option> <option>4</option> <option>5</option> </select> <label for="name">可多选的选择列表</label> <select multiple class="form-control"> <option>1</option> <option>2</option> <option>3</option> <option>4</option> <option>5</option> </select> </div> </form>
- 静态控件,在一个水平表单内的表单标签后放置纯文本时,请在
上使用 class .form-control-static。
<form class="form-horizontal" role="form"> <div class="form-group"> <label class="col-sm-2 control-label">Email</label> <div class="col-sm-10"> <p class="form-control-static">email@example.com</p> </div> </div> <div class="form-group"> <label for="inputPassword" class="col-sm-2 control-label">密码</label> <div class="col-sm-10"> <input type="password" class="form-control" id="inputPassword" placeholder="请输入密码"> </div> </div> </form>
2.7 按钮
以下样式可用于,
- 按钮实例
<!-- 标准的按钮 --> <button type="button" class="btn btn-default">默认按钮</button> <!-- 提供额外的视觉效果,标识一组按钮中的原始动作 --> <button type="button" class="btn btn-primary">原始按钮</button> <!-- 表示一个成功的或积极的动作 --> <button type="button" class="btn btn-success">成功按钮</button> <!-- 信息警告消息的上下文按钮 --> <button type="button" class="btn btn-info">信息按钮</button> <!-- 表示应谨慎采取的动作 --> <button type="button" class="btn btn-warning">警告按钮</button> <!-- 表示一个危险的或潜在的负面动作 --> <button type="button" class="btn btn-danger">危险按钮</button> <!-- 并不强调是一个按钮,看起来像一个链接,但同时保持按钮的行为 --> <button type="button" class="btn btn-link">链接按钮</button>
- 按钮大小
<p> <button type="button" class="btn btn-primary btn-lg">大的原始按钮</button> <button type="button" class="btn btn-default btn-lg">大的按钮</button> </p> <p> <button type="button" class="btn btn-primary">默认大小的原始按钮</button> <button type="button" class="btn btn-default">默认大小的按钮</button> </p> <p> <button type="button" class="btn btn-primary btn-sm">小的原始按钮</button> <button type="button" class="btn btn-default btn-sm">小的按钮</button> </p> <p> <button type="button" class="btn btn-primary btn-xs">特别小的原始按钮</button> <button type="button" class="btn btn-default btn-xs">特别小的按钮</button> </p> <p> <button type="button" class="btn btn-primary btn-lg btn-block">块级的原始按钮</button> <button type="button" class="btn btn-default btn-lg btn-block">块级的按钮</button> </p>
- 按钮状态
<p> <button type="button" class="btn btn-default btn-lg ">默认按钮</button> <button type="button" class="btn btn-default btn-lg active">激活按钮</button> </p> <p> <button type="button" class="btn btn-primary btn-lg ">原始按钮</button> <button type="button" class="btn btn-primary btn-lg active">激活的原始按钮</button> </p>
- 按钮禁用
<p> <button type="button" class="btn btn-default btn-lg">默认按钮</button> <button type="button" class="btn btn-default btn-lg" disabled="disabled">禁用按钮</button> </p> <p> <button type="button" class="btn btn-primary btn-lg ">原始按钮</button> <button type="button" class="btn btn-primary btn-lg" disabled="disabled">禁用的原始按钮</button> </p> <p> <a href="#" class="btn btn-default btn-lg" role="button">链接</a> <a href="#" class="btn btn-default btn-lg disabled" role="button">禁用链接</a> </p> <p> <a href="#" class="btn btn-primary btn-lg" role="button">原始链接</a> <a href="#" class="btn btn-primary btn-lg disabled" role="button">禁用的原始链接</a> </p>
- 按钮标签,可以在 、
<a class="btn btn-default" href="#" role="button">链接</a> <button class="btn btn-default" type="submit">按钮</button> <input class="btn btn-default" type="button" value="输入"> <input class="btn btn-default" type="submit" value="提交">
- 按钮组,使用 .btn-group-lg|sm|xs 来控制按钮组的大小,如果要设置垂直方向的按钮可以通过 .btn-group-vertical 类来设置。通过 .btn-group-justified 类来设置自适应大小的按钮组。
<div class="btn-group btn-group-lg"> <button type="button" class="btn btn-primary">Apple</button> <button type="button" class="btn btn-primary">Samsung</button> <button type="button" class="btn btn-primary">Sony</button> </div>
- 内嵌下拉菜单按钮组
<div class="container"> <h2>内嵌按钮组</h2> <p>内嵌按钮组创建下拉菜单:</p> <div class="btn-group"> <button type="button" class="btn btn-primary">Apple</button> <button type="button" class="btn btn-primary">Samsung</button> <div class="btn-group"> <button type="button" class="btn btn-primary dropdown-toggle" data-toggle="dropdown"> Sony <span class="caret"></span></button> <ul class="dropdown-menu" role="menu"> <li><a href="#">Tablet</a></li> <li><a href="#">Smartphone</a></li> </ul> </div> </div> </div>
- 分隔按钮
<div class="container"> <h2>分隔按钮</h2> <div class="btn-group"> <button type="button" class="btn btn-primary">Sony</button> <button type="button" class="btn btn-primary dropdown-toggle" data-toggle="dropdown"> <span class="caret"></span> </button> <ul class="dropdown-menu" role="menu"> <li><a href="#">Tablet</a></li> <li><a href="#">Smartphone</a></li> </ul> </div> </div>
2.8 图片
Bootstrap 提供了三个可对图片应用简单样式的 class:
- .img-rounded:添加 border-radius:6px 来获得图片圆角。
- .img-circle:添加 border-radius:50% 来让整个图片变成圆形。
- .img-thumbnail:添加一些内边距(padding)和一个灰色的边框。
<img src="/wp-content/uploads/2014/06/download.png" class="img-rounded"> <img src="/wp-content/uploads/2014/06/download.png" class="img-circle"> <img src="/wp-content/uploads/2014/06/download.png" class="img-thumbnail">
- img类
- 响应式图片
通过在 标签添加 .img-responsive 类来让图片支持响应式设计。 图片将很好地扩展到父元素。.img-responsive 类将 max- 100%; 和 height: auto; 样式应用在图片上:
3 Bootstrap 布局组件
3.1 基本布局
- 使用图标,在图标和文本之间保留适当的空间
<button type="button" class="btn btn-default btn-lg"> <span class="glyphicon glyphicon-user"></span> User </button>
- 带有字体图标的导航栏
<body> <div class="navbar navbar-fixed-top navbar-inverse" role="navigation"> <div class="container"> <div class="navbar-header"> <button type="button" class="navbar-toggle" data-toggle="collapse" data-target=".navbar-collapse"> <span class="sr-only">Toggle navigation</span> <span class="icon-bar"></span> <span class="icon-bar"></span> <span class="icon-bar"></span> </button> <a class="navbar-brand" href="#">Project name</a> </div> <div class="collapse navbar-collapse"> <ul class="nav navbar-nav"> <li class="active"><a href="#"><span class="glyphicon glyphicon-home"></span> Home</a></li> <li><a href="#shop"><span class="glyphicon glyphicon-shopping-cart"></span> Shop</a></li> <li><a href="#support"><span class="glyphicon glyphicon-headphones"></span> Support</a></li> </ul> </div><!-- /.nav-collapse --> </div><!-- /.container --> </div> </body>
- 查看更多小图标:https://www.runoob.com/bootstrap/bootstrap-glyphicons.html
- 下拉菜单。只需要在 class .dropdown 内加上下拉菜单即可。
<div class="dropdown"> <button type="button" class="btn dropdown-toggle" id="dropdownMenu1" data-toggle="dropdown">主题 <span class="caret"></span> </button> <ul class="dropdown-menu" role="menu" aria-labelledby="dropdownMenu1"> <li role="presentation"> <a role="menuitem" tabindex="-1" href="#">Java</a> </li> <li role="presentation"> <a role="menuitem" tabindex="-1" href="#">数据挖掘</a> </li> <li role="presentation"> <a role="menuitem" tabindex="-1" href="#">数据通信/网络</a> </li> <li role="presentation" class="divider"></li> <li role="presentation"> <a role="menuitem" tabindex="-1" href="#">分离的链接</a> </li> </ul> </div>
- 按钮组
按钮大小
- 导航元素
- 导航栏
创建一个默认的导航栏的步骤如下:
- 向
- 向上面的元素添加 role="navigation",有助于增加可访问性。
- 向
-
相关阅读:
获取指定位置的颜色值
《QTP自动化测试进阶》读书笔记
Delphi自动化测试
QTP中DOM的递归调用取html页面值
PowerShell
Dictionary对象与XML文件之间的导入导出
BPT业务流程自动化测试
VisualStudio 自动化测试框架 Coded UI Test
使用QTP查找邮件
QTP11视频
- 原文地址:https://www.cnblogs.com/baiboy/p/11014687.html
Copyright © 2011-2022 走看看