以太坊系列之十六: 使用golang与智能合约进行交互
官方提供的使用web3来进行智能合约的部署,调用等,实际上使用go也是可以的,这样更接近geth源码,更多的库可以使用.
此例子的目录结构
方便大家对照使用
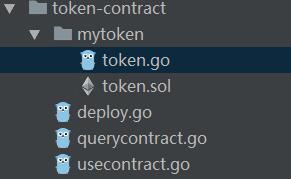
我是在windows下进行的,在linux以及mac下都差不多,只需要更改里面的ipc地址即可
token contract
这是官方提供的一个智能合约的例子,比较简单,是一个典型的基于智能合约的代币.代码位于:
token源码.
智能合约的golang wrapper
go直接和智能合约交互,有很多琐碎的细节需要照顾到,比较麻烦.以太坊专门为我们提供了一个abigen的工具,他可以根据sol或者abi文件生成
特定语言的封装,方便进行交互,支持golang,objc,java三种语言.
abigen --sol token.sol --pkg mytoken --out token.go
token.go地址
可以看到里面把合约里面所有导出的函数都进行了封装,方便调用.
部署合约
使用go进行部署合约思路上和web3都差不多,首先需要启动geth,然后通过我们的程序通过ipc连接到geth进行操作.
直接上代码,然后解释
package main

import (
	"fmt"
	"log"
	"math/big"
	"strings"
	"time"

	"github.com/ethereum/go-ethereum/accounts/abi/bind"
	"github.com/ethereum/go-ethereum/ethclient"
	"token-contract/mytoken"
)

const key = `
{
  "address": "1a9ec3b0b807464e6d3398a59d6b0a369bf422fa",
  "crypto": {
    "cipher": "aes-128-ctr",
    "ciphertext": "a471054846fb03e3e271339204420806334d1f09d6da40605a1a152e0d8e35f3",
    "cipherparams": {
      "iv": "44c5095dc698392c55a65aae46e0b5d9"
    },
    "kdf": "scrypt",
    "kdfparams": {
      "dklen": 32,
      "n": 262144,
      "p": 1,
      "r": 8,
      "salt": "e0a5fbaecaa3e75e20bccf61ee175141f3597d3b1bae6a28fe09f3507e63545e"
    },
    "mac": "cb3f62975cf6e7dfb454c2973bdd4a59f87262956d5534cdc87fb35703364043"
  },
  "id": "e08301fb-a263-4643-9c2b-d28959f66d6a",
  "version": 3
}
`

func main() {
	// Create an IPC based RPC connection to a remote node and an authorized transactor
	conn, err := ethclient.Dial("\\.\pipe\geth.ipc")
	if err != nil {
		log.Fatalf("Failed to connect to the Ethereum client: %v", err)
	}
	auth, err := bind.NewTransactor(strings.NewReader(key), "123")
	if err != nil {
		log.Fatalf("Failed to create authorized transactor: %v", err)
	}
	// Deploy a new awesome contract for the binding demo
	address, tx, token, err := mytoken.DeployMyToken(auth, conn, big.NewInt(9651), "Contracts in Go!!!", 0, "Go!")
	if err != nil {
		log.Fatalf("Failed to deploy new token contract: %v", err)
	}
	fmt.Printf("Contract pending deploy: 0x%x
", address)
	fmt.Printf("Transaction waiting to be mined: 0x%x

", tx.Hash())
	startTime := time.Now()
	fmt.Printf("TX start @:%s", time.Now())
	ctx := context.Background()
	addressAfterMined, err := bind.WaitDeployed(ctx, conn, tx)
	if err != nil {
		log.Fatalf("failed to deploy contact when mining :%v", err)
	}
	fmt.Printf("tx mining take time:%s
", time.Now().Sub(startTime))
	if bytes.Compare(address.Bytes(), addressAfterMined.Bytes()) != 0 {
		log.Fatalf("mined address :%s,before mined address:%s", addressAfterMined, address)
	}
	name, err := token.Name(&bind.CallOpts{Pending: true})
	if err != nil {
		log.Fatalf("Failed to retrieve pending name: %v", err)
	}
	fmt.Println("Pending name:", name)
}
1.账户问题
部署合约是需要有以太坊账户的,账户一般位于/home/xxx/.eth/geth/keystore 目录里面,找到一个账户,然后把内容直接粘贴到key里面即可.
因为部署合约是要消耗以太币的,所以必须保证里面有以太币,并且在`bind.NewTransactor(strings.NewReader(key), "123")`时,还需提供密码.
2. 连接到geth
`ethclient.Dial("\\.\pipe\geth.ipc")`就是连接到本地的geth,你可以通过http等通道,要是使用http通道,记得geth启动的时候要加上
`--rpcapi "eth,admin,web3,net,debug" `,否则很多rpc api是无法使用的
3. 部署合约
真正的部署合约反而是比较简单,因为有了token的golang封装,就像直接调用构造函数一样. 只不过多了两个参数,第一个是auth,也就是账户的封装;
第二个是ethclient的连接.
4. 测试部署结果
在testrpc或者其他模拟区块链上,因为合约部署不需要花时间,所以`name, err := token.Name(&bind.CallOpts{Pending: true})`是可以获取到name的,
但是在真实的区块链上有一个比较大的延时,所以运行结果会是:
Contract pending deploy: 0xa9b61a3cc7cc1810e133174caa7ead7ef909d701
Transaction waiting to be mined: 0xf832802f6f262677f02eca761ffe65ae21bbe41e983ceeb6cf645166073f4eb5

TX start @:2017-09-04 11:13:57.217 +0800 CSTtx mining take time:34.009s
Pending name: Contracts in Go!!!
5. 等待成功部署到区块链上
这里的成功可能不是真正的成功,大家都知道区块链稳定下来要等至少12个周期.不过通过`bind.WaitDeployed`
基本上可以确定该合约已经进入了区块链,并且可以在上面进行操作了.
golang 查询合约
前一个例子中我们借助remix查询到已经到账了,实际上golang完全可以做到,并且做起来也很简单.
先看代码,再做解释.
func main() {
	// Create an IPC based RPC connection to a remote node and instantiate a contract binding
	conn, err := ethclient.Dial("\\.\pipe\geth.ipc")
	if err != nil {
		log.Fatalf("Failed to connect to the Ethereum client: %v", err)
	}
	token, err := mytoken.NewMyToken(common.HexToAddress("0x5e300171d7dc10e43f959877dba98a44df5d1466"), conn)
	if err != nil {
		log.Fatalf("Failed to instantiate a Token contract: %v", err)
	}

	contractName, err := token.Name(nil)
	if err != nil {
		log.Fatalf("query name err:%v", err)
	}
	fmt.Printf("MyToken Name is:%s
", contractName)
	balance, err := token.BalanceOf(nil, common.HexToAddress("0x8c1b2e9e838e2bf510ec7ff49cc607b718ce8401"))
	if err != nil {
		log.Fatalf("query balance error:%v", err)
	}
	fmt.Printf("0x8c1b2e9e838e2bf510ec7ff49cc607b718ce8401's balance is %s
", balance)
}
运行结果:
MyToken Name is:Contracts in Go!!!
0x8c1b2e9e838e2bf510ec7ff49cc607b718ce8401's balance is 387
token.Name,token.BalanceOf就是读取合约上的数据,因为这些操作并不会修改合约的状态,所以不会发起tx,也不需要auth.
读取合约的第一个参数是bind.CallOpts,定义如下:
// CallOpts is the collection of options to fine tune a contract call request.
type CallOpts struct {
	Pending bool           // Whether to operate on the pending state or the last known one
	From    common.Address // Optional the sender address, otherwise the first account is used

	Context context.Context // Network context to support cancellation and timeouts (nil = no timeout)
}
大多数时候直接使用nil即可,我们不需要特殊指定什么.
调用合约
这里说调用实际上指的是要发生tx,这里举的例子就是token中进行转账操作,因为这个操作修改了合约的状态,所以它必须是一个tx(事务).

先看完整的例子
func main() {
	// Create an IPC based RPC connection to a remote node and instantiate a contract binding
	conn, err := ethclient.Dial("\\.\pipe\geth.ipc")
	if err != nil {
		log.Fatalf("Failed to connect to the Ethereum client: %v", err)
	}
	token, err := mytoken.NewMyToken(common.HexToAddress("0xa9b61a3cc7cc1810e133174caa7ead7ef909d701"), conn)
	if err != nil {
		log.Fatalf("Failed to instantiate a Token contract: %v", err)
	}
	toAddress := common.HexToAddress("0x8c1b2e9e838e2bf510ec7ff49cc607b718ce8401")
	val, _ := token.BalanceOf(nil, toAddress)
	fmt.Printf("before transfer :%s
", val)
	// Create an authorized transactor and spend 1 unicorn
	auth, err := bind.NewTransactor(strings.NewReader(key), "123")
	if err != nil {
		log.Fatalf("Failed to create authorized transactor: %v", err)
	}
	tx, err := token.Transfer(auth, toAddress, big.NewInt(387))
	if err != nil {
		log.Fatalf("Failed to request token transfer: %v", err)
	}
	ctx := context.Background()
	receipt, err := bind.WaitMined(ctx, conn, tx)
	if err != nil {
		log.Fatalf("tx mining error:%v
", err)
	}
	val, _ = token.BalanceOf(nil, toAddress)
	fmt.Printf("after transfere:%s
", val)
	fmt.Printf("tx is :%s
", tx)
	fmt.Printf("receipt is :%s
", receipt)
}
执行结果:
before transfer :0
after transfere:387
tx is :
	TX(3028e06dbe037731f05c7c73c4694080df72460cf39a70bdb8df76e771800958)
	Contract: false
	From:     1a9ec3b0b807464e6d3398a59d6b0a369bf422fa
	To:       a9b61a3cc7cc1810e133174caa7ead7ef909d701
	Nonce:    29
	GasPrice: 0x430e23400
	GasLimit  0x8e73
	Value:    0x0
	Data:     0xa9059cbb0000000000000000000000008c1b2e9e838e2bf510ec7ff49cc607b718ce84010000000000000000000000000000000000000000000000000000000000000183
	V:        0x1b
	R:        0xbb57f25039d5e33c1f74607f4d1733cd77ecf99dc6ffff5a7ac90404f6208ea2
	S:        0x1e6685f69d51654d30cae14207f74f6858a9ffb9ccc5f1d3d9c852027d49f6c3
	Hex:      f8a91d850430e23400828e7394a9b61a3cc7cc1810e133174caa7ead7ef909d70180b844a9059cbb0000000000000000000000008c1b2e9e838e2bf510ec7ff49cc607b718ce840100000000000000000000000000000000000000000000000000000000000001831ba0bb57f25039d5e33c1f74607f4d1733cd77ecf99dc6ffff5a7ac90404f6208ea2a01e6685f69d51654d30cae14207f74f6858a9ffb9ccc5f1d3d9c852027d49f6c3

receipt is :receipt{med=5c0564d6b6568328a4407dfd86da58c1a8d26b38f93cbbd2b8c7cca13b3a792b cgas=36466 bloom=00000000000000000000000000000000001000000000000000000000000000000000000000010000000000000010000000000000000000000000000000200000000000000000000000000008000000000000000000000000000000000000000000000000000000000000000000000000400000000000000000000010000000000000000000000000000000000000000000000000000000000000000000000000000000000000000000000000000000000000000000000000000000000000000000000002000000000000000000008000000000000000000000000000000000020000000000000000000000000000000000400000000000000040000000000000 logs=[log: a9b61a3cc7cc1810e133174caa7ead7ef909d701 [ddf252ad1be2c89b69c2b068fc378daa952ba7f163c4a11628f55a4df523b3ef 0000000000000000000000001a9ec3b0b807464e6d3398a59d6b0a369bf422fa 0000000000000000000000008c1b2e9e838e2bf510ec7ff49cc607b718ce8401] 0000000000000000000000000000000000000000000000000000000000000183 3028e06dbe037731f05c7c73c4694080df72460cf39a70bdb8df76e771800958 0 ccb6f7f26ddcb2d1438f98f51046e3115b8eb27cfab9ffcbc3bd259b68e73d11 0]}
首先同样要连接到geth,然后才能进行后续操作.
1. 直接构造合约
因为合约已经部署到区块链上了,我们直接基于地址构造合约就可以了.
`token, err := mytoken.NewMyToken(common.HexToAddress("0x5e300171d7dc10e43f959877dba98a44df5d1466"), conn)`
这次我们不需要auth,因为这个操作实际上是仅读取区块链上的内容.
2. 创建账户
进行转账修改了合约的状态,必须需要auth,和上次一样创建即可.
3.进行转账(函数调用)
转账操作`token.Transfer(auth, common.HexToAddress("0x8c1b2e9e838e2bf510ec7ff49cc607b718ce8401"), big.NewInt(387))`,是要给账户
0x8c1b2e9e838e2bf510ec7ff49cc607b718ce8401转387个代币,这实际上是调用了sol中的
    /* Send coins */
    function transfer(address _to, uint256 _value) {
        if (balanceOf[msg.sender] < _value) throw;           // Check if the sender has enough
        if (balanceOf[_to] + _value < balanceOf[_to]) throw; // Check for overflows
        balanceOf[msg.sender] -= _value;                     // Subtract from the sender
        balanceOf[_to] += _value;                            // Add the same to the recipient
        Transfer(msg.sender, _to, _value);                   // Notify anyone listening that this transfer took place
    }
可以看出,和在sol中是差不多的,只不过多了一个auth,他实际上起到的作用就是要对这个事务进行签名.
4. 等待tx完成
可以通过bind.WaitMined来等待事务真正被矿工处理完毕,这时候通过条用BalanceOf就可以查询到转账前后的数值变化.
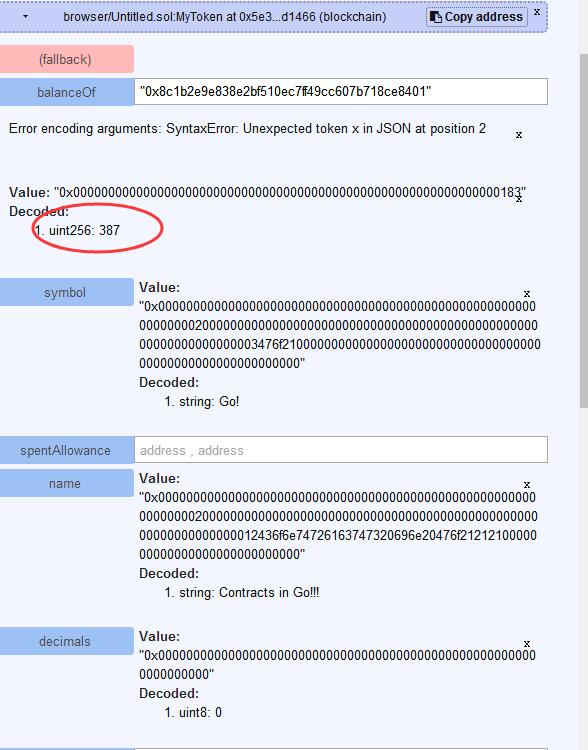
5.通过remix来查询结果
转账是一个tx,必须等待矿工挖矿,提交到区块链中以后才能查询到结果,除了在程序中等待一段时间进行查询,也可以自己等待一会儿,然后直接在remix中进行查询了.

    #### (1) 打开http://ethereum.github.io/browser-solidity/#version=soljson-v0.4.16+commit.d7661dd9.js
    #### (2) 粘贴token.sol的内容
    #### (3) 切换到Web3 Provider
    #### (4) 使用At Address创建合约
        这是因为我们合约已经创建完毕了,通过指定地址就可以直接与我们的合约进行交互了
        然后可以调用balanceof来查询已经到账了.截图如下: