- Perform a callout to receive data from an external service.
- Perform a callout to send data to an external service.
- Test callouts by using mock callouts.
HTTP and Callout Basics
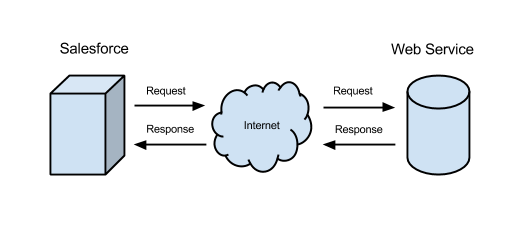
The simplest request is a GET request (GET is an HTTP method). A GET request means that the sender wants to obtain information about a resource from the server. When the server receives and processes this request, it returns the request information to the recipient. A GET request is similar to navigating to an address in the browser. When you visit a web page, the browser performs a GET request behind the scenes. In the browser, the result of the navigation is a new HTML page that’s displayed. With a callout, the result is the response object.
To illustrate how a GET request works, open your browser and navigate to the following URI: https://th-apex-http-callout.herokuapp.com/animals. Your browser displays a list of animals in a weird format, because the service returns the response in a format called JSON. Sometimes a GET response is also formatted in XML.
The following are descriptions of common HTTP methods.
| HTTP Method | Description |
|---|---|
| GET | Retrieve data identified by a URL. |
| POST | Create a resource or post data to the server. |
| DELETE | Delete a resource identified by a URL. |
| PUT | Create or replace the resource sent in the request body. |
If you have some free time, browse the exhaustive list of all HTTP methods in the Resources section.
In addition to the HTTP method, each request sets a URI, which is the endpoint address at which the service is located. For example, an endpoint can be http://www.example.com/api/resource. In the example in the “HTTP and Callout Basics” unit, the endpoint is https://th-apex-http-callout.herokuapp.com/animals.
When the server processes the request, it sends a status code in the response. The status code indicates whether the request was processed successfully or whether errors were encountered. If the request is successful, the server sends a status code of 200. You’ve probably seen some other status codes, such as 404 for file not found or 500 for an internal server error.
If you still have free time after browsing the list of HTTP methods, check out the list of all response status codes in theResources section. If you’re having a hard time sleeping at night, these two resources can help.
Get Data from a Service
Before you run the examples in this unit, you’ll need to authorize the endpoint URL of the callout, https://th-apex-http-callout.herokuapp.com, using the steps from the Authorize Endpoint Addresses section.
- Open the Developer Console under Your Name or the quick access menu (
 ).
). - In the Developer Console, select
- Delete the existing code and insert the following snippet.
01Http http =newHttp();02HttpRequest request =newHttpRequest();03request.setEndpoint('https://th-apex-http-callout.herokuapp.com/animals');04request.setMethod('GET');05HttpResponse response = http.send(request);06// If the request is successful, parse the JSON response.07if(response.getStatusCode() ==200) {08// Deserialize the JSON string into collections of primitive data types.09Map<String, Object> results = (Map<String, Object>) JSON.deserializeUntyped(response.getBody());10// Cast the values in the 'animals' key as a list11List<Object> animals = (List<Object>) results.get('animals');12System.debug('Received the following animals:');13for(Object animal: animals) {14System.debug(animal);15}16} - Select Open Log, and then click Execute.
- After the debug log opens, select Debug Only to view the output of the System.debug statements.
The names of the animals are displayed.
The JSON for our example is fairly simple and easy to parse. For more complex JSON structures, you can useJSON2Apex. This tool generates strongly typed Apex code for parsing a JSON structure. You simply paste in the JSON, and the tool generates the necessary Apex code for you. Brilliant!
Send Data to a Service
This example sends a POST request to the web service to add an animal name. The new name is added to the request body as a JSON string. The request Content-Type header is set to let the service know that the sent data is in JSON format so that it can process the data appropriately. The service responds by sending a status code and a list of all animals, including the one you added. If the request was processed successfully, the status code returns 201, because a resource has been created. The response is sent to the debug log when anything other than 201 is returned.
- Open the Developer Console under Your Name or the quick access menu ().
- In the Developer Console, select
- Delete any existing code and insert the following snippet.
01Http http =newHttp();02HttpRequest request =newHttpRequest();03request.setEndpoint('https://th-apex-http-callout.herokuapp.com/animals');04request.setMethod('POST');05request.setHeader('Content-Type','application/json;charset=UTF-8');06// Set the body as a JSON object07request.setBody('{"name":"mighty moose"}');08HttpResponse response = http.send(request);09// Parse the JSON response10if(response.getStatusCode() !=201) {11System.debug('The status code returned was not expected: '+12response.getStatusCode() +' '+ response.getStatus());13}else{14System.debug(response.getBody());15} - Select Open Log, and then click Execute.
- When the debug log opens, select Debug Only to view the output of the System.debug statement. The last item in the list of animals is "mighty moose".
Test Callouts
There’s good news and bad news regarding callout testing. The bad news is that Apex test methods don’t support callouts, and tests that perform callouts fail. The good news is that the testing runtime allows you to “mock” the callout. Mock callouts allow you to specify the response to return in the test instead of actually calling the web service. You are essentially telling the runtime, “I know what this web service will return, so instead of calling it during testing, just return this data.” Using mock callouts in your tests helps ensure that you attain adequate code coverage and that no lines of code are skipped due to callouts.
Prerequisites
Before you write your tests, let’s create a class that contains the GET and POST request examples we executed anonymously in the “Send Data to a Service” unit. These examples are slightly modified so that the requests are in methods and return values, but they’re essentially the same as the previous examples.
- In the Developer Console, select
- For the class name, enter AnimalsCallouts and then click OK.
- Replace the autogenerated code with the following class definition.
01publicclassAnimalsCallouts {0203publicstaticHttpResponse makeGetCallout() {04Http http =newHttp();05HttpRequest request =newHttpRequest();06request.setEndpoint('https://th-apex-http-callout.herokuapp.com/animals');07request.setMethod('GET');08HttpResponse response = http.send(request);09// If the request is successful, parse the JSON response.10if(response.getStatusCode() ==200) {11// Deserializes the JSON string into collections of primitive data types.12Map<String, Object> results = (Map<String, Object>) JSON.deserializeUntyped(response.getBody());13// Cast the values in the 'animals' key as a list14List<Object> animals = (List<Object>) results.get('animals');15System.debug('Received the following animals:');16for(Object animal: animals) {17System.debug(animal);18}19}20returnresponse;21}2223publicstaticHttpResponse makePostCallout() {24Http http =newHttp();25HttpRequest request =newHttpRequest();26request.setEndpoint('https://th-apex-http-callout.herokuapp.com/animals');27request.setMethod('POST');28request.setHeader('Content-Type','application/json;charset=UTF-8');29request.setBody('{"name":"mighty moose"}');30HttpResponse response = http.send(request);31// Parse the JSON response32if(response.getStatusCode() !=201) {33System.debug('The status code returned was not expected: '+34response.getStatusCode() +' '+ response.getStatus());35}else{36System.debug(response.getBody());37}38returnresponse;39}4041} - Press CTRL+S to save.
Test a Callout with StaticResourceCalloutMock
To test your callouts, use mock callouts by either implementing an interface or using static resources. In this example, we use static resources and a mock interface later on. The static resource contains the response body to return. Again, when using a mock callout, the request isn’t sent to the endpoint. Instead, the Apex runtime knows to look up the response specified in the static resource and return it instead. The Test.setMock method informs the runtime that mock callouts are used in the test method. Let’s see mock callouts in action. First, we create a static resource containing a JSON-formatted string to use for the GET request.
- In the Developer Console, select
- For the name, enter GetAnimalResource.
- For the MIME type, select text/plain, even though we are using JSON.
- Click Submit.
- In the tab that opens for the resource, insert the following content. Make sure that it is all on one line and doesn’t break to the next line. This content is what the mock callout returns. It’s an array of three woodland creatures.
1{"animals": ["pesky porcupine","hungry hippo","squeaky squirrel"]} - Press CTRL+S to save.
You’ve successfully created your static resource! Now, let’s add a test for our callout that uses this resource.
- In the Developer Console, select
- For the class name, enter AnimalsCalloutsTest and then click OK.
- Replace the autogenerated code with the following test class definition.
01@isTest02privateclassAnimalsCalloutsTest {0304@isTeststaticvoidtestGetCallout() {05// Create the mock response based on a static resource06StaticResourceCalloutMock mock =newStaticResourceCalloutMock();07mock.setStaticResource('GetAnimalResource');08mock.setStatusCode(200);09mock.setHeader('Content-Type','application/json;charset=UTF-8');10// Associate the callout with a mock response11Test.setMock(HttpCalloutMock.class, mock);12// Call method to test13HttpResponse result = AnimalsCallouts.makeGetCallout();14// Verify mock response is not null15System.assertNotEquals(null,result,16'The callout returned a null response.');17// Verify status code18System.assertEquals(200,result.getStatusCode(),19'The status code is not 200.');20// Verify content type21System.assertEquals('application/json;charset=UTF-8',22result.getHeader('Content-Type'),23'The content type value is not expected.');24// Verify the array contains 3 items25Map<String, Object> results = (Map<String, Object>)26JSON.deserializeUntyped(result.getBody());27List<Object> animals = (List<Object>) results.get('animals');28System.assertEquals(3, animals.size(),29'The array should only contain 3 items.');30}3132} - Press CTRL+S to save.
- Select
- To run the test, select
- From the Test Classes list, select AnimalsCalloutsTest.
- Click
The test result is displayed in the Tests tab under a test run ID. When the test execution finishes, expand the test run to view details. Now double-click AnimalCallouts in the Overall Code Coverage pane to see which lines are covered by your tests.
Test a Callout with HttpCalloutMock
To test your POST callout, we provide an implementation of the HttpCalloutMock interface. This interface enables you to specify the response that’s sent in the respond method. Your test class instructs the Apex runtime to send this fake response by calling Test.setMock again. For the first argument, pass HttpCalloutMock.class. For the second argument, pass a new instance of AnimalsHttpCalloutMock, which is your interface implementation of HttpCalloutMock. (We’ll writeAnimalsHttpCalloutMock in the example after this one.)
1 |
Test.setMock(HttpCalloutMock.class, new AnimalsHttpCalloutMock()); |
Now add the class that implements the HttpCalloutMock interface to intercept the callout. If an HTTP callout is invoked in test context, the callout is not made. Instead, you receive the mock response that you specify in the respond method implementation in AnimalsHttpCalloutMock.
- In the Developer Console, select
- For the class name, enter AnimalsHttpCalloutMock and then click OK.
- Replace the autogenerated code with the following class definition.
01@isTest02globalclassAnimalsHttpCalloutMockimplementsHttpCalloutMock {03// Implement this interface method04global HTTPResponse respond(HTTPRequest request) {05// Create a fake response06HttpResponse response =newHttpResponse();07response.setHeader('Content-Type','application/json');08response.setBody('{"animals": ["majestic badger", "fluffy bunny", "scary bear", "chicken", "mighty moose"]}');09response.setStatusCode(200);10returnresponse;11}12} - Press CTRL+S to save.
In your test class, create the testPostCallout method to set the mock callout, as shown in the next example. ThetestPostCallout method calls Test.setMock, and then calls the makePostCallout method in the AnimalsCallouts class. It then verifies that the response that’s returned is what you specified in the respond method of the mock implementation.
- Modify the test class AnimalsCalloutsTest to add a second test method. Click the class tab, and then add the following method before the closing bracket.
01@isTeststaticvoidtestPostCallout() {02// Set mock callout class03Test.setMock(HttpCalloutMock.class,newAnimalsHttpCalloutMock());04// This causes a fake response to be sent05// from the class that implements HttpCalloutMock.06HttpResponse response = AnimalsCallouts.makePostCallout();07// Verify that the response received contains fake values08StringcontentType = response.getHeader('Content-Type');09System.assert(contentType =='application/json');10StringactualValue = response.getBody();11System.debug(response.getBody());12StringexpectedValue ='{"animals": ["majestic badger", "fluffy bunny", "scary bear", "chicken", "mighty moose"]}';13System.assertEquals(actualValue, expectedValue);14System.assertEquals(200, response.getStatusCode());15} - Press CTRL+S to save.
- Select
- From the Test Classes list, select AnimalsCalloutsTest.
- Click
The test result displays in the Tests tab under a new test run ID. When the test execution finishes, expand the test run to view details about both tests.
Tell Me More...
When making a callout from a method, the method waits for the external service to send back the callout response before executing subsequent lines of code. Alternatively, you can place the callout code in an asynchronous method that’s annotated with @future(callout=true) or use Queueable Apex. This way, the callout runs on a separate thread, and the execution of the calling method isn’t blocked.
When making a callout from a trigger, the callout must not block the trigger process while waiting for the response. For the trigger to be able to make a callout, the method containing the callout code must be annotated with@future(callout=true) to run in a separate thread.