最近推导了一些机器学习入门的算法,老是搞那些数学知识,搞的自己都没信心和新区了。今天学着玩点有趣好玩的。
图像的艺术风格迁移算法,算是一个简单有趣,而且一般人都能看得到效果的算法。图像艺术风格迁移,简单的理解,就是找一个照片作为内容,然后把这个照片换成梵高或者毕加索等制定的风格。关于图像艺术风格迁移的一些历史和知识,大家可以看看这篇文章:图像风格迁移(Neural Style)简史。
思路
风格迁移的大概思路是:我们需要准备两张图片。一张是我们将要输出的内容图片,另外一张是我们需要模仿的风格图片。我们需要输出一张图片,让输出的这张图片的内容和内容图片相近,让输出图片的风格和风格图片的风格相近。
内容最接近的算法
内容最接近,相对来说比较简单。简单的理解可以对比每个图片的像素,然后计算他们的差距。也可以是计算CNN中间某个卷积层得到的特征值之间的距离。
我经过调试发现,如果内容图层取得太靠前,效果不太好。因为内容特征越靠前,相当于对比的越细腻,而风格迁移要得到的效果是宏观上更像内容图片,细节上用风格表现,这样效果最好。
风格最接近的算法
风格的比较是最难理解的。要理解风格比较的算法,需要了解一个名词叫做格拉姆矩阵。听常博士说这个知识属于矩阵分析里面的内容。我对这方面没系统学习过,不太懂。但是我能理解到的层次是:你给定N个卷积核,然后可以得到N个矩阵。把这N个矩阵拉直了形成N个向量,N个向量两两內积形成的矩阵,就是格莱姆矩阵。而生成图片和风格图片的格莱姆矩阵的距离差,就是风格差。
实现办法
那么最终实现的办法,就是我们生成一张图片,然后得到一个损失函数(loss=contentloss+styleloss),然后我们用梯度下降让损失函数最小就可以了。
具体的实现
在看我的代码之前,我参考了tensorflow的官网的算法,这个算法的实现用的是tf最新的API,好处是简单,坏处是封装的太死了,太简单了,很多底层的东西看不到。我想用比较笨的办法。可以顺便学习下VGG19。但是总体思路差不多。
VGG19的实现
首先我下载一个vgg19的模型,并且简单实现了vgg实际加载模型和计算卷积的过程,我把其中全连接层给删除了。因为卷积是共享参数的,所以输入的图表不一定要和VGG19图像一样,但是全连接层会一样。
import tensorflow as tf
import scipy.io
import numpy as np
import cv2

DEFAULT_PATH ='E:\project\ChangeStyle\model\imagenet-vgg-verydeep-19.mat'
VGG19_LAYERS=('conv1_1','relu1_1','conv1_2','relu1_2','pool1',
              'conv2_1','relu2_1','conv2_2','relu2_2','pool2',
              'conv3_1','relu3_1','conv3_2','relu3_2','conv3_3','relu3_3','conv3_4','relu3_4','pool3',
              'conv4_1','relu4_1','conv4_2','relu4_2','conv4_3','relu4_3','conv4_4','relu4_4','pool4',
              'conv5_1','relu5_1','conv5_2','relu5_2','conv5_3','relu5_3','conv5_4','relu5_4','pool5')
              #,'fc6','relu6','fc7','relu7','fc8','softmax'

VGG19_index_Map = {'conv1_1':0,'conv1_2':2,'conv2_1':5,'conv2_2':7,'conv3_1':10,'conv3_2':12,'conv3_3':14,
                   'conv3_4':16,'conv4_1':19,'conv4_2':21,'conv4_3':23,
            'conv4_4':25,'conv5_1':28,'conv5_2':30,'conv5_3':32,'conv5_4':34,'fc6':37,'fc7':39,'fc8':41}

class VGG19:


    def __init__(self, model_path = None):
        layers = []
        if model_path == None:
            layers = scipy.io.loadmat(DEFAULT_PATH)
        else:
            layers = scipy.io.loadmat(model_path)
        assert layers != None
        self.vgg_layers = layers['layers'][0]


    def _compute_(self, layer_name, input):
        output = []

        w = []
        b = []
        if VGG19_index_Map.__contains__(layer_name):
            i = VGG19_index_Map[layer_name]
            w = self.vgg_layers[i][0][0][0][0][0]
            b = self.vgg_layers[i][0][0][0][0][1]

        type = layer_name[:3]
        if type == 'con':
            output = tf.nn.conv2d(input,w,strides=[1,1,1,1],padding='SAME')
            output = tf.add(output, b)
        elif type == 'rel':
            output = tf.nn.relu(input)
        elif type == 'poo':
            output = tf.nn.max_pool(input,ksize=[1,2,2,1],strides=[1,2,2,1],padding='SAME')
        elif type == 'fc6':
            b = np.reshape(b,-1)
            input = tf.reshape(input,[input.shape[0],-1])
            w = tf.reshape(w,(-1,w.shape[-1]))
            output = tf.nn.bias_add(tf.matmul(input,w),b)
        elif type == 'fc7':
            w = np.reshape(w,(-1,w.shape[-1]))
            output = tf.add(tf.matmul(input,w),b)
        elif type == 'fc8':
            w = np.reshape(w,(-1,w.shape[-1]))
            output = tf.add(tf.matmul(input,w),b)
        else:
            output = tf.nn.softmax(input)
        return output


    def build_model(self, image):

        net={}
        net['input'] = image

        input = image
        for layer in VGG19_LAYERS:
            input = self._compute_(layer,input)
            net[layer] = input

        return net
上述代码基本上比较简单,我个人感觉不需要怎么解释。
我们有了vgg19的代码架构以后,我们需要的是可以实现图像的可以通过vgg19以后得到的卷积后的数值,同时可以计算他的数值
IMAGE_SIZE = 512
feature_layers_w = [0.1,0.1,0.4,0.3,0.1]
STYLE_LAYERS =['conv1_1','conv2_1','conv3_1','conv4_1','conv5_1']
CONTENT_LAYERS =['conv5_2']
import tensorflow as tf
import numpy as np
from PIL import Image
import matplotlib.pyplot as plt


def get_content_loss(p, x):

    loss = tf.reduce_mean(tf.pow(p - x,2))
    return loss

def gram_matrix(input_tensor):
    channels = int(input_tensor.shape[-1])
    a = tf.reshape(input_tensor, [-1, channels])
    n = tf.shape(a)[0]
    gram = tf.matmul(a, a, transpose_a=True) / tf.to_float(n)
    return gram

def get_style_loss(base_style, gram_target, index):
    gram_style = gram_matrix(base_style)
    gram_target = gram_matrix(gram_target)

    return feature_layers_w[index] * tf.reduce_mean(tf.pow(gram_style - gram_target,2))

def get_compute_loss(genarate,content, style):

    c_loss = 0
    s_loss = 0

    for i,s_name in enumerate(STYLE_LAYERS):
        g_data = genarate[s_name]
        s_data = style[s_name]

        g_data = tf.reshape(g_data,(-1,g_data.shape[3]))
        s_data = tf.reshape(s_data,(-1,s_data.shape[3]))

        s_loss = s_loss + get_style_loss(s_data,g_data,i)

    for c_name in CONTENT_LAYERS:
        g_data = genarate[c_name]
        c_data = content[c_name]

        g_data = tf.reshape(g_data,(-1,g_data.shape[3]))
        c_data = tf.reshape(c_data,(-1,c_data.shape[3]))

        c_loss = c_loss + get_content_loss(c_data, g_data)

    return 1e-2 * s_loss/ tf.to_float(tf.size(STYLE_LAYERS)) + 1e3 *c_loss
import tensorflow as tf
import numpy as np
from PIL import Image
import matplotlib.pyplot as plt


def deprocess_img(processed_img):
    x = processed_img.copy()
    if len(x.shape) == 4:
        x = np.squeeze(x, 0)
    assert len(x.shape) == 3, ("Input to deprocess image must be an image of "
                             "dimension [1, height, width, channel] or [height, width, channel]")
    if len(x.shape) != 3:
        raise ValueError("Invalid input to deprocessing image")

    #perform the inverse of the preprocessiing step
    x[:, :, 0] += 103.939
    x[:, :, 1] += 116.779
    x[:, :, 2] += 123.68
    x = x[:, :, ::-1]
    x = np.clip(x, 0, 255).astype('uint8')
    return x

def load_img(img_path):
    img = Image.open(img_path)
    img = img.resize((IMAGE_SIZE,IMAGE_SIZE))
    img = img.tobytes()
    img = tf.decode_raw(img,tf.uint8)
    img = tf.cast(img,tf.float32)
    img = tf.reshape(img,(1,IMAGE_SIZE,IMAGE_SIZE,3))
    img = tf.keras.applications.vgg19.preprocess_input(img)
    return img


content_img = load_img('E:\project\ChangeStyle\img\nst\Tuebingen_Neckarfront.jpg')
style_img = load_img('E:\project\ChangeStyle\img\nst\1024px-Van_Gogh_-_Starry_Night_-_Google_Art_Project.jpg')
generate_img = tf.Variable(content_img, dtype=tf.float32)

with tf.Session() as sess:
    vgg = VGG19()

    g_model = vgg.build_model(generate_img)
    c_model = sess.run(vgg.build_model(content_img))
    s_model = sess.run(vgg.build_model(style_img))

    loss = get_compute_loss(g_model,c_model,s_model)
    optimizer = tf.train.AdamOptimizer(learning_rate=5, beta1=0.99, epsilon=1e-1)
    op = optimizer.minimize(loss,global_step= tf.train.get_global_step())
    sess.run(tf.global_variables_initializer())
    for i in range(1000):
        _,l = sess.run((op,loss))

    img = sess.run(generate_img)

    img = deprocess_img(img)
    plt.imshow(img)
    plt.show()
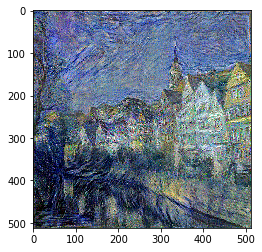
这个代码有几个问题:
- 生成任何一张图片,需要消耗太多的时间。
- 我测试通过上述参数,绘制油画效果就不错,但是绘制素描效果就比较差,当然可以通过调整参数获得相对较好的效果。