https://github.com/bbqz007/zhelper-wxWidgets
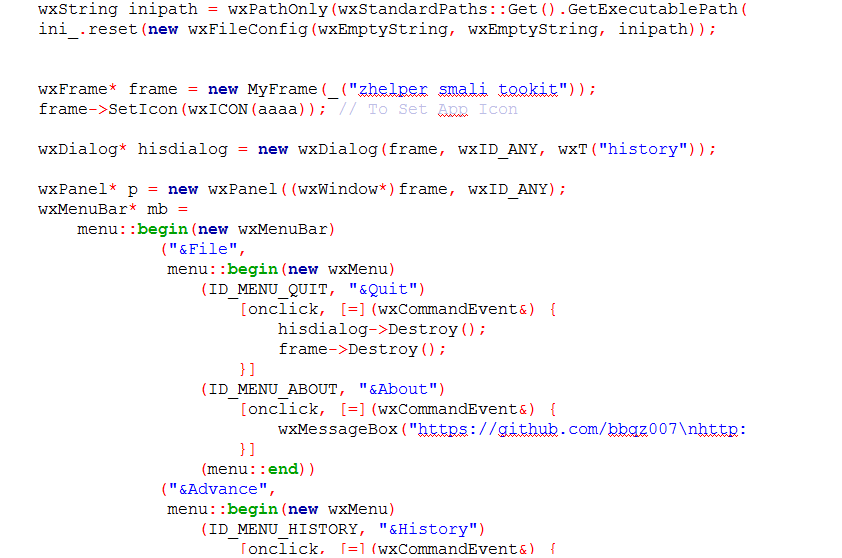
https://github.com/bbqz007/zhelper-wxWidgets/tree/master/demo/smali-toolkit
zhelper-wxWidgets
a helper header help you easy to program gui app on wxWidgets 3.x
you can easily write menus like this
Frame* frame = new Frame;
Delegate* delegate = new Delegate(frame);
menu::begin(new MenuBar)
    ("File",
         menu::begin(new Menu)
            (ID_OPEN, "open")
                [onclick = [=] (event& e) {
                    delegate->handle(e);
                }]
            (ID_NEW,  "new")
                [onclick, [=] (event& e) {
                    delegate->handle(e);
                }]
            (menu::end))
     ("About",
          menu::begin(new Menu)
            (ID_HELP,   "help")
                [onclick, [=] (event&)  {   }]
            (menu::end))
     (menu::end,
        [=] (MenuBar* mb) {
            frame->SetMenuBar(mb);
        });
you can easily write windows like this as well:
Frame* frame = new Frame;
layout::begin(new layout)
    (layout::begin(new layout)
        [layout_flags]
        (new textctrl)
            [layout_flags]
            [ ondropfiles = [] (event&) {} ]
            [ onchar = [] (event&) {} ]
        (new button)
            [layout_flags]
            [ onclick = [] (event&) {} ]
        (layout::end))
    (layout::begin(new layout)
        [layout_flags]
        (new textctrl)
            [layout_flags]
        (new button)
            [layout_flags]
            [ onclick = [] (event&) {} ]
        (layout::end))
    (layout::begin(new layout)
        (new button)
            [ onclick = [] (event&) {} ]
        (layout::end))
    (layout::begin(new layout)
        (new button)
            [ onclick = [] (event&) {} ]
        (layout::end))
    (layout::end,
     layout::oncomplete = [=] (layout& layout) {
         frame->SetLayout(layout);
     });
just easy like writing a html
<div id='0'>
    <div id='1'>
        <input type="button" onclick="handler()">
    </div>
    <div id='2'>
        <input type="button" onclick="handler()">
    </div>
    <div id='3'>
        <input type="button" onclick="handler()">
    </div>
    <div id='4'>
        <input type="button" onclick="handler()">
    </div>
</div>
how to use?
just include the header and use c++11.
how to write layouts?
1.begin with calling layout::begin(somelayout)
2.add elements(layout or widget) to layout, by calling operator () (widget)
3.configure your latest added elements, by calling operator [] (prop)
4.end with calling operator () (layout::end)
just like
layout::begin(somelayout)   // begin to write a layout
    [prop]              // configure layout properties of somelayout
    (new element)           // add a element to somelayout
        [prop]              // configure layout properties of new element
        [onclick = ...]     // configure onclick function associated with new element
        [onchar = ...]      // configure onchar function associated with new element
    (layout::end)           // end up writing a layout
new features for programming with wxListCtrl
you do not need to fill things into item then insert and lots of code,
you do not need to know about the interfaces of wxListCtrl.
you just need to write () and [ ].
- easy way to write wxListCtrl headers (columns)
wxListCtrl* p = new wxListCtrl;
using namespace zhelper::wxWidgets::listctrlhlp;
column::begin(p)
  ("col 1") [ font ] [ color ]
  ("col 2") [ font ] [ color ]
  (column::end)
- easy way to append rows into wxListCtrl
row::begin(p)
  ("row 1_col 1") [ font ] [ color ]
  ("row 1_col 2") [ font ] [ color ]
  (row::another)
  ("row 2_col 1") [ font ] [ color ]
  ("row 2_col 2") [ font ] [ color ]
  (row::end)
- easy way to modify cell of wxListCtrl
cell::begin(p)
  (1, 1)    // row 2 , col 2
    [ "change value" ] [ change_font ] [ change_color ]
  (0, 1)    // row 1 , col 2
    [ "change value" ] [ change_font ] [ change_color ]
   (cell:end)