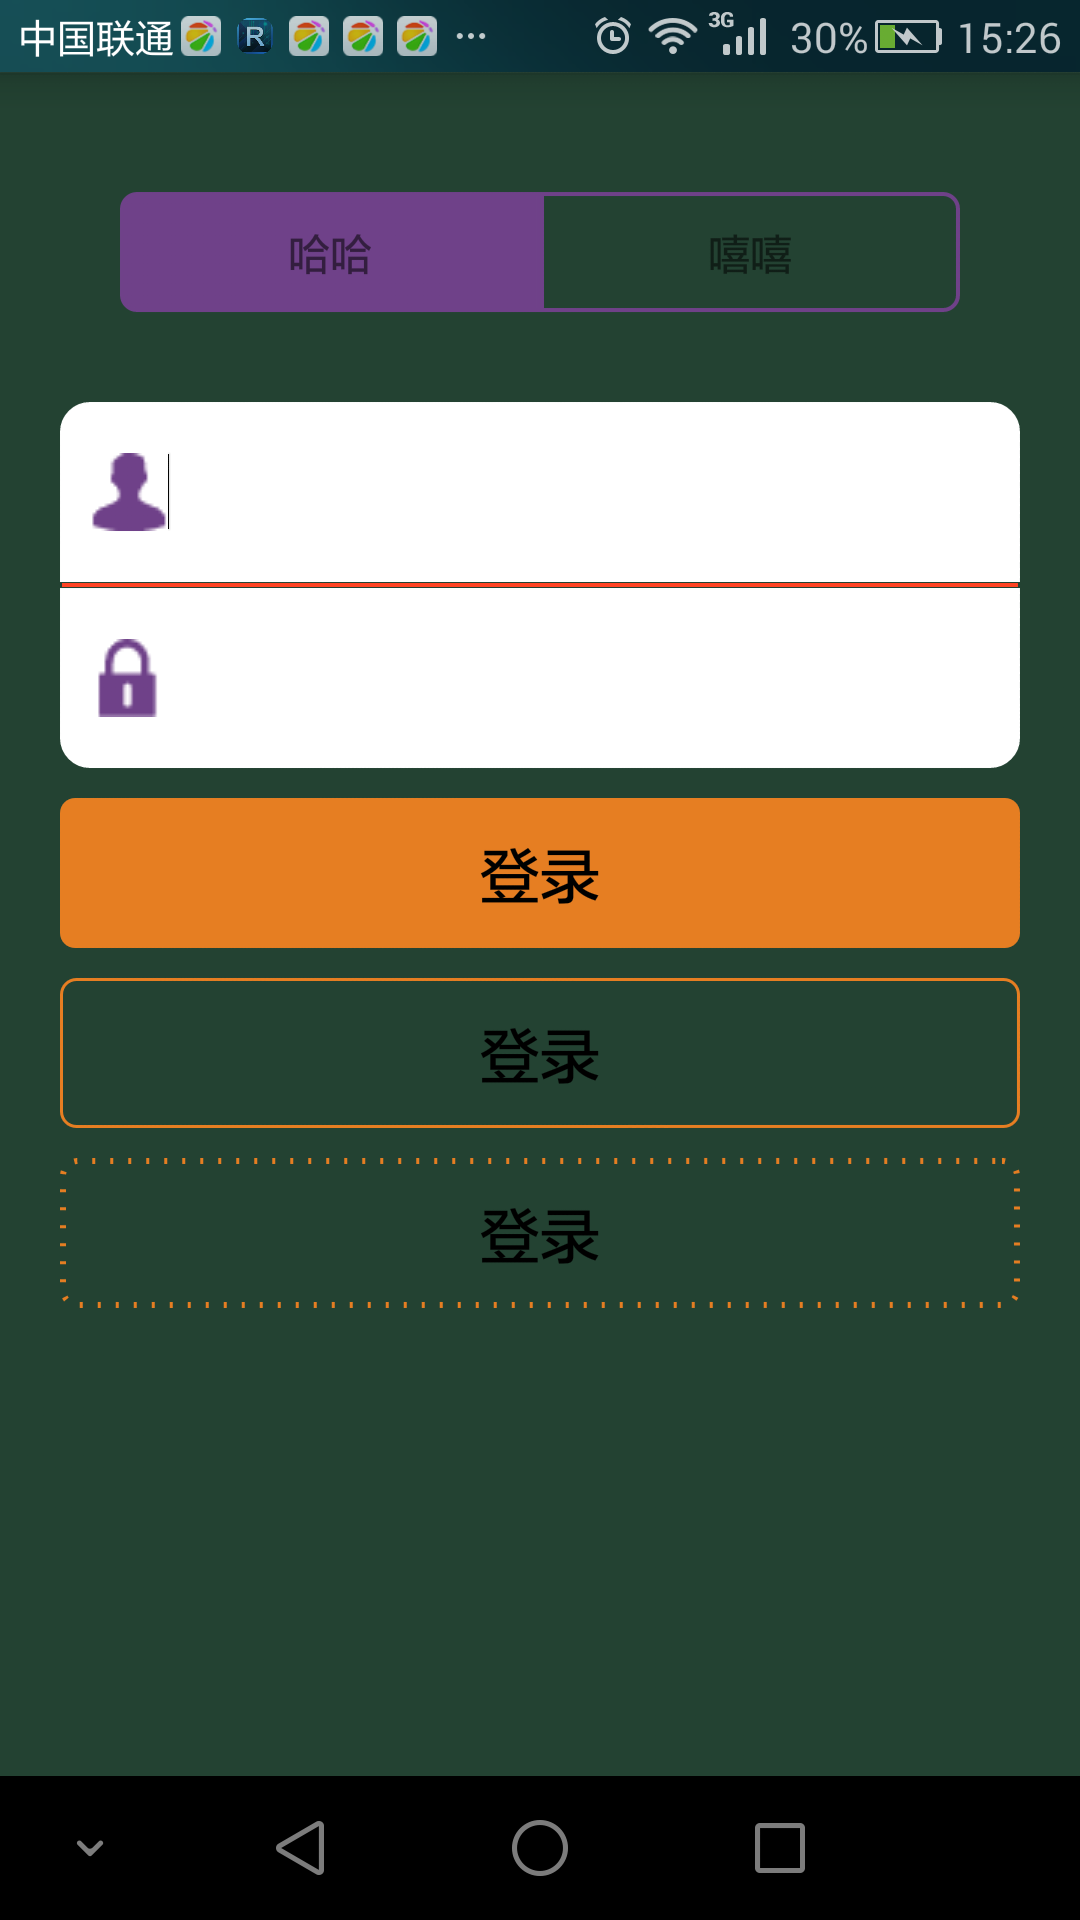
先上图
在现实项目开发中,单纯的Button,EditText等控件远远不能满足我们项目的UI设计需求,这时候,我们就需要自己动手丰衣足食啦。接下来先给大家介绍一些属性,备注写的都非常清楚啦,我就不啰嗦啦。
 1 <?xml version="1.0" encoding="utf-8"?>
 2 <!--android:shape属性代表绘制的图形形状 retangle;矩形,oval:椭圆 ,line:线 ring,环形-->
 3 <shape xmlns:android="http://schemas.android.com/apk/res/android"
 4     android:shape="###">
 5
 6     <!--stroke主要给我们所要画的图形进行描边 color:边框颜色,边框宽度,dashGap:虚线框的间隔,dashWidth:虚线框的宽度-->
 7     <stroke
 8         android:width="###"
 9         android:color="###"
10         android:dashGap="###"
11         android:dashWidth="###" />
12
13     <!--corners主要是设置我们所画图形四个角的半径 radius:四角半径 bottomLeftRadius:左下角半径,
14     bottomRightRadius:右下角半径,topLeftRadius:左上角半径,topRightRadius:右上角半径-->
15     <corners
16         android:bottomLeftRadius="###"
17         android:bottomRightRadius="###"
18         android:radius="###"
19         android:topLeftRadius="###"
20         android:topRightRadius="###" />
21
22     <!--padding主要设置内边距,也就是你装载的内容(大部分是Textview或者button)离图形边框的距离
23     bottom:下内边距,left:左内边距,right:右内边距,top:上内边距-->
24     <padding
25         android:bottom="###"
26         android:left="###"
27         android:right="###"
28         android:top="###" />
29
30     <!--这个就不需要讲了吧-->
31     <size
32         android:width="###"
33         android:height="###" />
34     <!--主要设置你所画图形的填充色-->
35     <solid
36         android:color="###"/>
37     <!--gradient主要指定一个渐变颜色的形状。-->
38     <gradient
39         android:angle="###"
40         android:centerColor="###"
41         android:centerX="###"
42         android:centerY="###"
43         android:gradientRadius="###"
44         android:endColor="###"
45         android:startColor="###"
46         android:type="###"
47         android:useLevel="###"/>
48 </shape>
接下来我们看最顶上的"哈哈"与"嘻嘻"。通过corners设置左下角和左上角的半径为5dp,右上角,右下角半径为0dp,我们就可以得到左边圆角,右边直角的边框啦。
 1 <?xml version="1.0" encoding="utf-8"?>
 2 <layer-list xmlns:android="http://schemas.android.com/apk/res/android">
 3
 4     <item>
 5         <shape android:shape="rectangle">
 6             <stroke
 7                 android:width="1.2dp"
 8                 android:color="#6f4189" />
 9
10             <solid android:color="#6f4189" />
11             <corners
12                 android:bottomLeftRadius="5dp"
13                 android:bottomRightRadius="0dp"
14                 android:topLeftRadius="5dp"
15                 android:topRightRadius="0dp" />
16
17             <padding
18                 android:bottom="2dp"
19                 android:left="12dp"
20                 android:right="12dp"
21                 android:top="2dp" />
22         </shape>
23     </item>
24
25 </layer-list>
下面一样,通过corners设置右下角和右上角的半径为5dp,左上角,左下角半径为0dp,我们即可得到左边直角,右边圆角的边框。
 1 <layer-list xmlns:android="http://schemas.android.com/apk/res/android" >
 2
 3     <item>
 4         <shape>
 5             <stroke
 6                 android:width="1.2dp"
 7                 android:color="#6f4189" />
 8             <corners
 9                 android:bottomLeftRadius="0dp"
10                 android:bottomRightRadius="5dp"
11                 android:topLeftRadius="0dp"
12                 android:topRightRadius="5dp" />
13             <solid android:color="#00000000" />
14             <padding
15                 android:bottom="2dp"
16                 android:left="12dp"
17                 android:right="12dp"
18                 android:top="2dp" />
19         </shape>
20     </item>
21
22 </layer-list>
它俩再加上viewpager就可以实现很多App上都有的左右滑动翻页效果啦。
我们再看图中的用户名和密码输入框,至于整个框框就不说啦,和上面的'嘻嘻','哈哈'一个原理,主要给大家介绍一下中间的红线。实现很简单,我们只需要设置android:shape="line",然后通过stoke的android:width设置直线的宽度,android;color设置直线的颜色即可。
1 <?xml version="1.0" encoding="utf-8"?>
2 <shape xmlns:android="http://schemas.android.com/apk/res/android"
3     android:shape="line">
4    <stroke
5        android:width="1.2dp"
6        android:color="#ff4323"/>
7 </shape>
让其在页面的显示代码如下
1 <LinearLayout
2             android:id="@+id/straight_line"
3             android:layout_width="fill_parent"
4             android:layout_height="2dp"
5             android:background="@drawable/line"
6             android:orientation="vertical"/>
其实设置直线还有种跟直观的方法,通过<view/>来设置,在这里就不细讲,大家可以自行百度。
接下来我们看看下面的三个登录框框,重点给大家讲讲最后面那个"断点"虚线框框。下面最后一个代码模块是"断点"虚线框框的代码,其中color是定义虚线的颜色,dashGap定义的是虚线的间隔,width定义的是虚线的大小,dashWidth定义虚线的宽度。
1 <?xml version="1.0" encoding="utf-8"?>
2 <shape xmlns:android="http://schemas.android.com/apk/res/android"
3     android:shape="rectangle">
4     <corners
5         android:radius="5dp"/>
6     <solid
7         android:color="#E67e22"/>
8 </shape>
1 <?xml version="1.0" encoding="utf-8"?>
2 <shape xmlns:android="http://schemas.android.com/apk/res/android"
3     android:shape="rectangle">
4     <corners
5         android:radius="5dp"/>
6     <stroke
7         android:color="#E67e22"
8         android:width="1.0dp"/>
9 </shape>
 1 <?xml version="1.0" encoding="utf-8"?>
 2 <shape xmlns:android="http://schemas.android.com/apk/res/android"
 3     android:shape="rectangle">
 4     <corners android:radius="5dp" />
 5     <stroke
 6         android:color="#E67e22"
 7         android:dashGap="5dp"
 8         android:width="2dp"
 9         android:dashWidth="1.0dp" />
10 </shape>