实验目的和内容
实验目的:复习linux系统总线驱动设备模型,了解在该框架下触摸屏驱动程序的实现步骤。
实验内容:以四线电阻触摸屏为例,实现触摸点X、Y坐标位置的检测。
电阻触摸屏工作原理简介
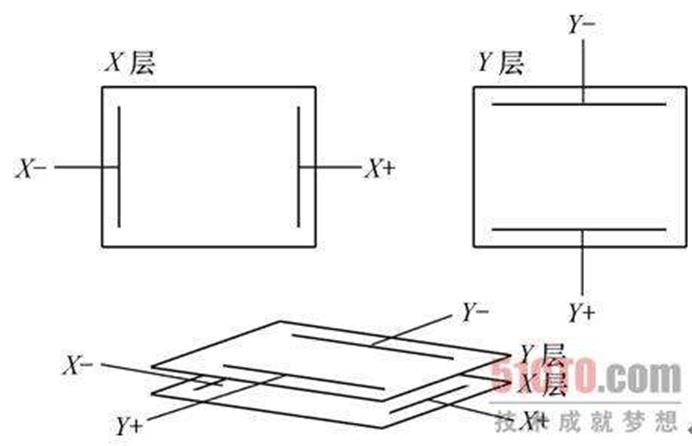
触摸屏一般由如下三部分组成:两层透明导体层、中间的隔离层、电极。电阻触摸屏选用租型导体材料。当某一层(X层)电极加上电压(X+、X-)后,会在该层形成电压梯度,当手指按压触摸屏时,平时相互绝缘的两层导体层会在接触点有了接触,此时可在未加电的一层(Y层)测得接触点的电压,再根据电压与电极之间的距离关系,即可换算出该接触点加电层(X层)对应的坐标位置。将电压切换至另一层(Y层),得到另一层(Y层)的坐标位置。即可确定接触点当前的坐标位置。电阻屏的关键在于材料,根据引线多少,分为四线、无线、六线等多线电阻触摸屏。

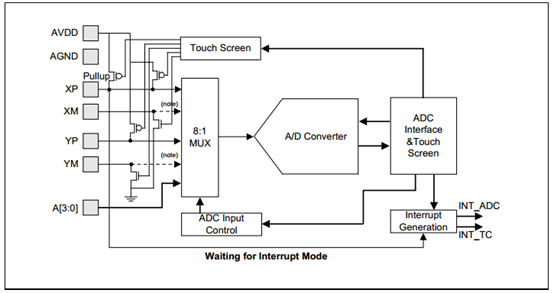
S3C2440内置的ADC和触摸屏接口如图所示,通过4个MOS管分别给X、Y方向施加电压,通过ADC通道采集X、Y方向的电压值。

触摸屏的使用过程中:
-
当有触摸动作时,产生触摸屏INT_TC中断;
-
在INT_TC中断服务程序中,启动ADC转换X、Y的坐标;
-
ADC转换结束,产生ADC中断;
-
在ADC中断服务程序中,向上层上报ADC转换的结果;
-
松开触摸屏。
为了让触摸屏支持连按、滑动等动作,因此在处理中需增加定时器,在4中一次ADC转换结果上报结束后。启动定时器,一旦定时器时间到达,重新启动一次ADC转换。
程序编写
Linux内核中触摸屏驱动是在input输入子系统的框架上编写的。前面章节已经对输入子系统的结构进行了分析,https://www.cnblogs.com/beijiqie1104/p/11418082.html。其中inputcore层由内核提供,不需要修改,EventHandler层中的Evdev.c文件也可支持所有的输入设备。因此,本次实验只需完成input driver层对触摸屏设备的访问,中断的设置,以及将产生的触摸事件上报给inputcore,即实现触摸屏input_dev的分配,设置、注册,以及硬件相关的配置。
入口函数s3c_ts_init编写如下:
-
使用input_allocate_device分配s3c_ts_dev结构体空间;
-
配置s3c_ts_dev结构体可以产生EV_KEY、EV_ABS事件,细分为EV_KEY中的BTN_TOUCH事件,EV_ABS事件中ABS_X、ABS_Y、ABS_PRESSURE事件。
-
使用input_register_device注册s3c_ts_dev设备。
-
硬件相关的配置:
-
ADC/TC时钟使能;
-
设置S3C2440的ADC/TC的寄存器配置;
-
IRQ_TC中断和IRQ_ADC中断的注册;
-
进入等待按键按下模式。
出口函数s3c_ts_exit编写如下:
-
IRQ_TC中断和IRQ_ADC中断的注销;
-
取消s3c_ts_dev设备挂载;
-
释放分配的s3c_ts_dev结构体空间。
按照上述步骤,已基本完成触摸屏驱动程序的编写,当有触摸动作发生时,已经可以检测到触摸信号。为了得到触摸点的坐标值,还需要在IRQ_TC中断服务函数中处理,当检测是按键按下操作时,调用enter_measure_xy_mode()进入到XY坐标测量模式,启动ADC转换start_adc()。
为了提高坐标检测的精度,采取舍弃无效值,多次测量求平均值,软件过滤等方式。
通过增加定时器,实现按键的连按和滑动检测。
代码如下:
-
#include <linux/errno.h>
-
#include <linux/kernel.h>
-
#include <linux/module.h>
-
#include <linux/slab.h>
-
#include <linux/input.h>
-
#include <linux/init.h>
-
#include <linux/serio.h>
-
#include <linux/delay.h>
-
#include <linux/platform_device.h>
-
#include <linux/clk.h>
-
#include <asm/io.h>
-
#include <asm/irq.h>
-
-
#include <asm/plat-s3c24xx/ts.h>
-
-
#include <asm/arch/regs-adc.h>
-
#include <asm/arch/regs-gpio.h>
-
-
static struct input_dev *s3c_ts_dev;
-
-
struct s3c_ts_reg
-
{
-
unsigned long adccon;
-
unsigned long adctsc;
-
unsigned long adcdly;
-
unsigned long adcdat0;
-
unsigned long adcdat1;
-
unsigned long adcupdn;
-
};
-
-
static volatile struct s3c_ts_reg *s3c_ts_regs;
-
static struct timer_list s3c_ts_timer;
-
-
static void enter_wait_pen_down_mode(void)
-
{
-
s3c_ts_regs->adctsc = 0xd3;
-
}
-
-
static void enter_wait_pen_up_mode(void)
-
{
-
s3c_ts_regs->adctsc = 0x1d3;
-
}
-
-
static void enter_measure_xy_mode(void)
-
{
-
s3c_ts_regs->adctsc = (1<<3) | (1<<2);
-
}
-
-
static void start_adc(void)
-
{
-
s3c_ts_regs->adccon |= (1<<0);
-
}
-
-
static int s3c_filter_ts(int x[], int y[])
-
{
-
#define ERR_LIMIT 10
-
int avr_x, avr_y;
-
int det_x, det_y;
-
-
avr_x = (x[0] + x[1])/2;
-
avr_y = (y[0] + y[1])/2;
-
-
det_x =(x[2] > avr_x)?(x[2] - avr_x):(avr_x - x[2]);
-
det_y =(y[2] > avr_y)?(y[2] - avr_y):(avr_y - y[2]);
-
-
if((det_x > ERR_LIMIT)||(det_y > ERR_LIMIT))
-
return 0;
-
-
avr_x = (x[1] + x[2])/2;
-
avr_y = (y[1] + y[2])/2;
-
-
det_x =(x[3] > avr_x)?(x[3] - avr_x):(avr_x - x[3]);
-
det_y =(y[3] > avr_y)?(y[3] - avr_y):(avr_y - y[3]);
-
-
if((det_x > ERR_LIMIT)||(det_y > ERR_LIMIT))
-
return 0;
-
-
return 1;
-
}
-
-
-
static irqreturn_t pen_down_up_irq(int irq, void *dev_id)
-
{
-
if(s3c_ts_regs->adcdat0 & (1<<15))
-
{
-
//printk("pen up ");
-
enter_wait_pen_down_mode();
-
input_report_abs(s3c_ts_dev, ABS_PRESSURE, 0);
-
input_report_key(s3c_ts_dev, BTN_TOUCH, 0);
-
input_sync(s3c_ts_dev);
-
}
-
else
-
{
-
//printk("pen down ");
-
//enter_wait_pen_up_mode();
-
enter_measure_xy_mode();
-
start_adc();
-
}
-
return IRQ_HANDLED;
-
}
-
-
-
static irqreturn_t adc_irq(int irq, void *dev_id)
-
{
-
static int cnt = 0;
-
static int x[4],y[4];
-
int adcdat0, adcdat1;
-
/* 优化措施2: ADC转换完成时,触摸笔弹起,则扔掉此次转换的数据 */
-
-
adcdat0 = s3c_ts_regs->adcdat0;
-
adcdat1 = s3c_ts_regs->adcdat1;
-
if(adcdat0 & (1<<15))
-
{
-
cnt = 0;
-
enter_wait_pen_down_mode();
-
input_report_abs(s3c_ts_dev, ABS_PRESSURE, 0);
-
input_report_key(s3c_ts_dev, BTN_TOUCH, 0);
-
input_sync(s3c_ts_dev);
-
}
-
else
-
{
-
//printk("adc irq cnt = %d, x = %d, y = %d ", ++cnt, s3c_ts_regs->adcdat0 & 0x3ff, s3c_ts_regs->adcdat1 & 0x3ff);
-
/* 优化措施3; 多次测量求平均值 */
-
x[cnt] = adcdat0 & 0x3ff;
-
y[cnt] = adcdat1 & 0x3ff;
-
cnt++;
-
if(cnt == 4)
-
{
-
/* 优化措施4: 软件过滤 */
-
if(s3c_filter_ts(x, y))
-
{
-
//printk("x = %d, y = %d ",(x[0]+x[1]+x[2]+x[3])/4, (y[0]+y[1]+y[2]+y[3])/4);
-
-
input_report_abs(s3c_ts_dev, ABS_X, (x[0]+x[1]+x[2]+x[3])/4);
-
input_report_abs(s3c_ts_dev, ABS_Y, (y[0]+y[1]+y[2]+y[3])/4);
-
input_report_abs(s3c_ts_dev, ABS_PRESSURE, 1);
-
input_report_key(s3c_ts_dev, BTN_TOUCH, 1);
-
input_sync(s3c_ts_dev);
-
}
-
cnt = 0;
-
enter_wait_pen_up_mode();
-
mod_timer(&s3c_ts_timer, jiffies + HZ/100);
-
}
-
else
-
{
-
enter_measure_xy_mode();
-
start_adc();
-
}
-
-
}
-
return IRQ_HANDLED;
-
}
-
-
static void s3c_ts_timer_func(unsigned long data)
-
{
-
if(s3c_ts_regs->adcdat0 & (1<<15))
-
{
-
/* 弹起 */
-
enter_wait_pen_down_mode();
-
}
-
else
-
{
-
/* 按下 */
-
enter_measure_xy_mode();
-
start_adc();
-
}
-
}
-
-
static int s3c_ts_init(void)
-
{
-
struct clk *adc_clk ;
-
-
/* 1 分配 */
-
s3c_ts_dev = input_allocate_device();
-
-
/* 2 配置 */
-
/* 2.1、可以产生哪类事件 */
-
set_bit(EV_KEY, s3c_ts_dev->evbit);
-
set_bit(EV_ABS, s3c_ts_dev->evbit);
-
-
/* 2.2 能产生事件中的哪一类子事件 */
-
set_bit(BTN_TOUCH, s3c_ts_dev->keybit);
-
-
input_set_abs_params(s3c_ts_dev, ABS_X, 0, 0x3FF, 0, 0);
-
input_set_abs_params(s3c_ts_dev, ABS_Y, 0, 0x3FF, 0, 0);
-
input_set_abs_params(s3c_ts_dev, ABS_PRESSURE, 0, 1, 0, 0);
-
-
/* 3 注册 */
-
input_register_device(s3c_ts_dev);
-
-
/* 4 硬件相关配置 */
-
/* 4.1 使能时钟*/
-
adc_clk = clk_get(NULL, "adc");
-
if(!adc_clk)
-
{
-
printk(KERN_ERR "failed to get adc clock source ");
-
return -ENOENT;
-
}
-
clk_enable(adc_clk);
-
-
/* 4.2 设置s3c2440的ADC/TS寄存器 */
-
s3c_ts_regs = ioremap(0x58000000, sizeof(struct s3c_ts_reg));
-
-
/* ADCCON
-
* ADCCON[14] : 1 A/D converter prescaler enable
-
* ADCCON[13:6]: A/D converter prescaler value
-
* 49, ADCCLK = 50MHz/(49+1) = 1 MHz
-
* ADCCON[5:3]: Analog input channel select
-
000 = AIN 0
-
001 = AIN 1
-
010 = AIN 2
-
011 = AIN 3
-
100 = YM
-
101 = YP
-
110 = XM
-
111 = XP
-
* ADCCON[2]: Standby mode select
-
0 = Normal operation mode
-
* ADCCON[0]: A/D conversion starts by enable
-
* 0 = No operation
-
1 = A/D conversion starts and this bit is cleared after the startup
-
*/
-
s3c_ts_regs->adccon = (1<<14) |(49<<6);
-
-
request_irq(IRQ_TC, pen_down_up_irq, IRQF_SAMPLE_RANDOM,
-
"s3c_ts_pen", NULL);
-
-
request_irq(IRQ_ADC, adc_irq, IRQF_SAMPLE_RANDOM,
-
"adc", NULL);
-
-
/* 优化措施1 :
-
* 设置ADCDLY为最大,确保电压稳定后再触发IRQ_TC中断
-
*/
-
s3c_ts_regs->adcdly = 0xffff;
-
-
/* 优化措施2:
-
*启动定时器,处理长按/滑动的情况
-
*/
-
init_timer(&s3c_ts_timer);
-
s3c_ts_timer.function = s3c_ts_timer_func;
-
add_timer(&s3c_ts_timer);
-
-
enter_wait_pen_down_mode();
-
-
return 0;
-
}
-
-
static void s3c_ts_exit(void)
-
{
-
free_irq(IRQ_TC, NULL);
-
free_irq(IRQ_ADC, NULL);
-
iounmap(s3c_ts_regs);
-
input_unregister_device(s3c_ts_dev);
-
input_free_device(s3c_ts_dev);
-
del_timer(&s3c_ts_timer);
-
}
-
-
module_init(s3c_ts_init);
-
module_exit(s3c_ts_exit);
-
MODULE_LICENSE("GPL");
-
测试
首先,使用menuconfig去掉linux内核中的触摸屏驱动,然后make uImage生成新的内核文件。使用新的不带触摸屏驱动的内核文件启动。
方法一:
安装触摸屏驱动insmod s3c_ts.ko,使用hexdump查看触摸屏设备上报的事件数据。

方法二:
使用Tslib进行测试。Tslib是一个开源的程序,能够为触摸屏驱动获得的采样提供诸如滤波、去抖、校准等功能,通常作为触摸屏驱动的适配层,为上层的应用提供了一个统一的接口。
(1)Tslib交叉编译安装
步骤如下:
tar xzf tslib-1.4.tar.gz //解压
cd tslib //进入到tslib目录
./autogen.sh //执行autogen.sh
mkdir tmp //创建tmp目录,保存编译产生的文件
echo "ac_cv_func_malloc_0_nonnull=yes" >arm-linux.cache
./configure --host=arm-linux --cache-file=arm-linux.cache --prefix=$(pwd)/tmp /配置/
Make //编译
make install //编译安装
按照上述步骤操作,编译安装好的Tslib工具全部保存到tmp文件夹下。注意在执行./autogen.sh命令时,可能回出现如下错误:

错误原因:没有安装automake工具。
解决方法:使用以下命令安装automake工具。
sudo apt-get install autoconf
sudo apt-get install automake
sudo apt-get install libtool
(2)移植Tslib
-
将tmp目录下的Tslib工具拷贝到文件系统的根目录下;
-
安装s3c_ts.ko, lcd.ko驱动程序;
-
修改/etc/ts.conf文件的第1行内容(去掉#号和第一个空格);
-
设置环境变量:
export TSLIB_TSDEVICE=/dev/event0
export TSLIB_CALIBFILE=/etc/pointercal
export TSLIB_CONFFILE=/etc/ts.conf
export TSLIB_PLUGINDIR=/lib/ts
export TSLIB_CONSOLEDEVICE=none
export TSLIB_FBDEVICE=/dev/fb0
-
使用ts_calibrate命令进行屏幕校准;
-
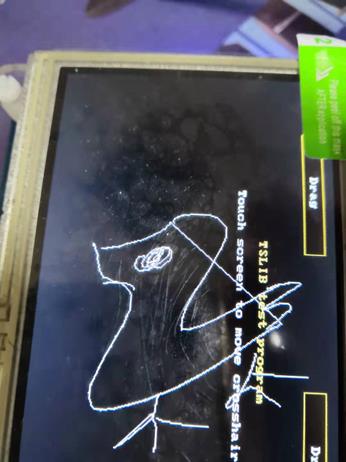
使用ts_test命令进行测试。
