一、环境简述
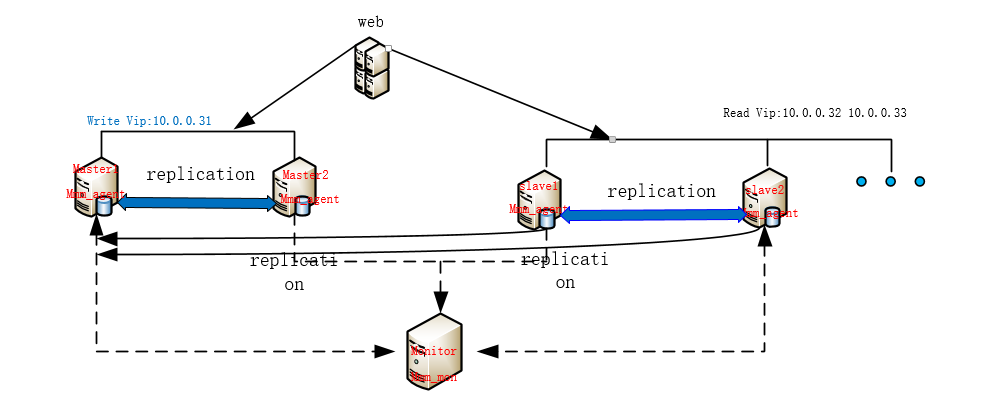
1、工作逻辑图
2、MySQL-MMM优缺点
- 优点:高可用性,扩展性好,出现故障自动切换,对于主主同步,在同一时间只提供一台数据库写操作,保证的数据的一致性。
- 缺点:Monitor节点是单点,可以结合Keepalived实现高可用,对主机的数量有要求,需要实现读写分离,对程序来说是个挑战。
3、MySQL-MMM工作原理
MMM(Master-Master replication managerfor Mysql,Mysql主主复制管理器)是一套灵活的脚本程序,基于perl实现,用来对mysql replication进行监控和故障迁移,并能管理mysql Master-Master复制的配置(同一时间只有一个节点是可写的)。
- mmm_mond:监控进程,负责所有的监控工作,决定和处理所有节点角色活动。此脚本需要在监管机上运行。
- mmm_agentd:运行在每个mysql服务器上的代理进程,完成监控的探针工作和执行简单的远端服务设置。此脚本需要在被监管机上运行。
- mmm_control:一个简单的脚本,提供管理mmm_mond进程的命令。
mysql-mmm的监管端会提供多个虚拟IP(VIP),包括一个可写VIP,多个可读VIP,通过监管的管理,这些IP会绑定在可用mysql之上,当某一台mysql宕机时,监管会将VIP迁移至其他mysql。
在整个监管过程中,需要在mysql中添加相关授权用户,以便让mysql可以支持监理机的维护。授权的用户包括一个mmm_monitor用户和一个mmm_agent用户,如果想使用mmm的备份工具则还要添加一个mmm_tools用户。
4、需求描述
- 操作系统:CentOS 6.6_X64
- 数据库:MySQL 5.1
- MMM:MySQL-MMM 2.2.1

虚拟IP地址(VIP):
| ip | role |
| 10.0.0.31 | writer |
| 10.0.0.32 | reader |
| 10.0.0.33 | reader |
数据库同步需要的用户:
| function | description | privileges |
| monitor user | mmm监控用于对mysql服务器进程健康检查 | REPLICATION CLIENT |
| agent user | mmm代理用来更改只读模式,复制的主服务器等 | SUPER, REPLICATION CLIENT, PROCESS |
| replication user | 用于复制 | REPLICATION SLAVE |
二、db1,db2,db3和db4安装数据库并配置
# 初始密码为空,进入数据库改相对安全,在命令行用mysqladmin修改密码显示不安全。
[root@db1 ~]# yum install mysql-server mysql
[root@db1 ~]# service mysqld start
[root@db1 ~]# mysqladmin -u root password “yourpassword”
# 修改配置这里以db1为例子
[root@db1 ~]# vi /etc/my.cnf   #添加如下
[mysqld]
binlog-do-db=test           #需要记录二进制日志的数据库,多个用逗号隔开
binlog-ignore-db=mysql,information_schema  #不需要记录二进制日志的数据库,多个用逗号隔开
auto_increment_increment=2  #字段一次递增多少
auto_increment_offset=1     #自增字段的起始值,值设置不同
replicate-do-db=test        #同步的数据库,多个写多行
replicate-ignore-db = information_schema #不同步的数据库,多个写多行
server_id = 1               #每台设置不同
log_bin = mysql-bin
log_slave_updates           #当一个主故障,另一个立即接管
sync-binlog=1               #每条自动更新,安全性高,默认是0
[root@db1 ~]# service mysqld restart
#使用scp分别复制到其他主机 改下server_id 分别对应db 1 2 3 4(记得先将各个主机配置文件改名.bak后缀)
三、配置db1和db2主主同步
#先查看下log bin日志和pos值位置
mysql> show master status;
+------------------+----------+--------------+--------------------------+
| File             | Position | Binlog_Do_DB | Binlog_Ignore_DB         |
+------------------+----------+--------------+--------------------------+
| mysql-bin.000004 |      106 | test         | mysql,information_schema |
+------------------+----------+--------------+--------------------------+
1 row in set (0.00 sec)

grant replication slave on *.* to 'replication'@'10.0.0.%' identified by 'replication';
Query OK, 0 rows affected (0.03 sec)

mysql> flush privileges;
Query OK, 0 rows affected (0.00 sec)
# 这里的log-file  和 log-pos 记录的是你需要同步的主库的master信息。即db1同步db2的master db2同步db1的。
mysql> change master to
    -> master_host='10.0.0.23',
    -> master_user='replication',
    -> master_password='replication',
    -> master_log_file='mysql-bin.000002',
    -> master_log_pos=106;
Query OK, 0 rows affected (0.03 sec)

mysql> start slave;
Query OK, 0 rows affected (0.00 sec)
#查看db1和db2上面的sql线程和io线程状态
#在db1上查看
mysql> show slave status G;
*************************** 1. row ***************************
               Slave_IO_State: Waiting for master to send event
                  Master_Host: 10.0.0.23
                  Master_User: replication
                  Master_Port: 3306
                Connect_Retry: 60
              Master_Log_File: mysql-bin.000003
          Read_Master_Log_Pos: 932
               Relay_Log_File: mysqld-relay-bin.000002
                Relay_Log_Pos: 831
        Relay_Master_Log_File: mysql-bin.000003
             Slave_IO_Running: Yes
            Slave_SQL_Running: Yes
              Replicate_Do_DB: test
          Replicate_Ignore_DB: information_schema
#在db2上查看
mysql> show slave statusG;
*************************** 1. row ***************************
               Slave_IO_State: Waiting for master to send event
                  Master_Host: 10.0.0.22
                  Master_User: replication
                  Master_Port: 3306
                Connect_Retry: 60
              Master_Log_File: mysql-bin.000004
          Read_Master_Log_Pos: 599
               Relay_Log_File: mysqld-relay-bin.000002
                Relay_Log_Pos: 497
        Relay_Master_Log_File: mysql-bin.000004
             Slave_IO_Running: Yes
            Slave_SQL_Running: Yes
              Replicate_Do_DB: test
          Replicate_Ignore_DB: information_schema
#在db1和db2上test库互插数据各自验证
#db1插
mysql> use test
Database changed
mysql> create table user (name varchar(10),gender int(2));
Query OK, 0 rows affected (0.03 sec)
#db2看
mysql> use test;
Reading table information for completion of table and column names
You can turn off this feature to get a quicker startup with -A

Database changed
mysql> show tables;
+----------------+
| Tables_in_test |
+----------------+
| user           |
+----------------+
1 row in set (0.00 sec)
mysql> select * from user;
+-----------+--------+
| name      | gender |
+-----------+--------+
| xiaozhang |      1 |
+-----------+--------+
----------------------------------------------------------------------------------spilit---------------------------------------------------------------------------------------
#db2插
mysql> use test;
Database changed
mysql> create table person(name varchar(10),salary int(5));
Query OK, 0 rows affected (0.05 sec)
mysql> insert into person values('sb','10');
Query OK, 1 row affected (0.01 sec)
#db1看
mysql> show tables;
+----------------+
| Tables_in_test |
+----------------+
| person |
| user |
+----------------+
2 rows in set (0.00 sec)
mysql> select * from person;
+------+--------+
| name | salary |
+------+--------+
| sb | 10 |
+------+--------+
1 row in set (0.00 sec)
如果都没问题,表示双主已经配置成功。
四、配置slave1和slave2做为master1的从库
#先看下db1上master1状态值
mysql> show master status;
+------------------+----------+--------------+--------------------------+
| File             | Position | Binlog_Do_DB | Binlog_Ignore_DB         |
+------------------+----------+--------------+--------------------------+
| mysql-bin.000004 |     1047 | test         | mysql,information_schema |
+------------------+----------+--------------+--------------------------+
1 row in set (0.00 sec)
在slave1和slave2分别执行changemaster同步db1上的master binlog文件和位置:老规矩两个线程必须都为yes
#slave1 执行(db3)
mysql> change master to
    -> master_host='10.0.0.22',
    -> master_user='replication',
    -> master_password='replication',
    -> master_log_file='mysql-bin.000004'
    -> ,master_log_pos=1047;
Query OK, 0 rows affected (0.06 sec)

mysql> start slave;
Query OK, 0 rows affected (0.00 sec)

mysql> show slave status G;
*************************** 1. row ***************************
               Slave_IO_State: Waiting for master to send event
                  Master_Host: 10.0.0.22
                  Master_User: replication
                  Master_Port: 3306
                Connect_Retry: 60
              Master_Log_File: mysql-bin.000004
          Read_Master_Log_Pos: 1047
               Relay_Log_File: mysqld-relay-bin.000002
                Relay_Log_Pos: 251
        Relay_Master_Log_File: mysql-bin.000004
             Slave_IO_Running: Yes
            Slave_SQL_Running: Yes
              Replicate_Do_DB: test
          Replicate_Ignore_DB: information_schema
#动手多敲敲命令,没办法脑子不好的我就多动动手咯。slave2(db4) input again
在slave1和slave2查看如下说明主从复制成功。但是数据没过来,这是因为主从复制原理只同步配置完后的增删改记录,以后的数据是不能同步的,我们可以把主的数据库备份了,然后在送数据库还原。
#在slave1和slave2上查看都是空的。
mysql> use test
Database changed
mysql> show table;
mysql> show tables;
Empty set (0.00 sec)
#在db1上备份test 库 scp传到slave1 和 slave2 并导入
mysql> system mysqldump -uroot -p123 test >test.sql
[root@db1 ~]# scp test.sql root@10.0.0.24:~/
The authenticity of host '10.0.0.24 (10.0.0.24)' can't be established.
RSA key fingerprint is 98:3f:4e:61:76:6c:6f:b9:ba:5e:94:00:6c:ef:25:fd.
Are you sure you want to continue connecting (yes/no)? yes
Warning: Permanently added '10.0.0.24' (RSA) to the list of known hosts.
root@10.0.0.24's password:
test.sql 100% 2430 2.4KB/s 00:00
[root@db1 ~]# scp test.sql root@10.0.0.25:~/
The authenticity of host '10.0.0.25 (10.0.0.25)' can't be established.
RSA key fingerprint is 98:3f:4e:61:76:6c:6f:b9:ba:5e:94:00:6c:ef:25:fd.
Are you sure you want to continue connecting (yes/no)? yes
Warning: Permanently added '10.0.0.25' (RSA) to the list of known hosts.
root@10.0.0.25's password:
test.sql 100% 2430 2.4KB/s 00:00
[root@db3 ~]# mysql -uroot -p123 test < test.sql
[root@db4 ~]# mysql -uroot -p123 test < test.sql
#查看
mysql> use test
mysql> show tables;
+----------------+
| Tables_in_test |
+----------------+
| person |
| user |
+----------------+
2 rows in set (0.00 sec)
五、MySQL-MMM安装配置
CentOS6 默认没有 mysql-mmm 软件包,官方推荐使用 epel 的网络源,五台都安装epel:
rpm -ivh http://mirrors.ustc.edu.cn/fedora/epel/6/x86_64/epel-release-6-8.noarch.rpm
1、monitor节点安装
[root@monitor ~]# yum -y install mysql-mmm-monitor
2、四台db节点安装
[root@db1 ~]# yum -y install mysql-mmm-agent
3.在四台db节点授权monitor和agent用户访问
mysql> GRANT REPLICATION CLIENT ON *.* TO 'mmm_monitor'@'10.0.0.%' IDENTIFIED BY 'monitor';
Query OK, 0 rows affected (0.00 sec)
mysql> grant super,replication client,process on *.* to 'mmm_agent'@'10.0.0.%' identified by 'agent';
Query OK, 0 rows affected (0.00 sec)
4、修改mmm_common.conf文件(五台相同)
[root@db1 ~]# vim /etc/mysql-mmm/mmm_common.conf
active_master_role writer
<host default>
cluster_interface eth0
pid_path /var/run/mysql-mmm/mmm_agentd.pid
bin_path /usr/libexec/mysql-mmm/
replication_user replication
replication_password replication
agent_user mmm_agent
agent_password agent
</host>
<host db1>
ip 10.0.0.22
mode master
peer db2
</host>
<host db2>
ip 10.0.0.23
mode master
peer db1
</host>
<host db3>
ip 10.0.0.24
mode slave
</host>
<host db4>
ip 10.0.0.25
mode slave
</host>
<role writer>
hosts db1, db2
ips 10.0.0.31 #只有一个host可以writer,一般写操作是这个模式
mode exclusive
</role>
<role reader>
hosts db3, db4
ips 10.0.0.32, 10.0.0.33 #多个host可以reader
mode balanced
</role>
#其他主机分别将配置改名备份 然后db1分别scp传到其他4个主机。
mv /etc/mysql-mmm/mmm_common.conf /etc/mysql-mmm/mmm_common.conf.bak
[root@db1 ~]# scp /etc/mysql-mmm/mmm_common.conf root@10.0.0.22:/etc/mysql-mmm/
The authenticity of host '10.0.0.22 (10.0.0.22)' can't be established.
RSA key fingerprint is 98:3f:4e:61:76:6c:6f:b9:ba:5e:94:00:6c:ef:25:fd.
Are you sure you want to continue connecting (yes/no)? yes
Warning: Permanently added '10.0.0.22' (RSA) to the list of known hosts.
root@10.0.0.22's password:
mmm_common.conf 100% 840 0.8KB/s 00:00
5、修改四台db代理端 mmm_agent.conf 文件
include mmm_common.conf

# The 'this' variable refers to this server.  Proper operation requires
# that 'this' server (db1 by default), as well as all other servers, have the
# proper IP addresses set in mmm_common.conf.
this db1 #不同主机对应不同的db名称
6、修改管理端mmm_mon.conf文件
[root@monitor ~]# vi /etc/mysql-mmm/mmm_mon.conf
include mmm_common.conf

<monitor>
    ip                  127.0.0.1
    pid_path            /var/run/mysql-mmm/mmm_mond.pid
    bin_path            /usr/libexec/mysql-mmm
    status_path         /var/lib/mysql-mmm/mmm_mond.status
    ping_ips            10.0.0.22,10.0.0.23,10.0.0.24,10.0.0.25 #真实数据库IP,>来颊侧网络是否正常
    auto_set_online     10 #恢复后自动设置在线时间

    # The kill_host_bin does not exist by default, though the monitor will
    # throw a warning about it missing.  See the section 5.10 "Kill Host
    # Functionality" in the PDF documentation.
    #
    # kill_host_bin     /usr/libexec/mysql-mmm/monitor/kill_host
    #
</monitor>

<host default>
    monitor_user        mmm_monitor
    monitor_password    monitor
</host>
六、启动MySQL-MMM
1、db代理端启动
[root@db1 ~]# /etc/init.d/mysql-mmm-agent start
[root@db1 ~]# chkconfigmysql-mmm-agent on
2、monitor管理端启动
[root@monitor1 ~]# /etc/init.d/mysql-mmm-monitor start
[root@monitor1 ~]# chkconfigmysql-mmm-monitor on
坑:
如果出现Configuration file /etc/mysql-mmm/mmm_common.conf is world readable!这种错误,需要查看/etc/mysql-mmm/mmm_common.conf文件的权限,应该是 chmod 640 /etc/mysql-mmm/mmm_common.conf
集群中所有配置文件的权限最好都设置为640,否则启动 MMM 服务的时候可能出错
七、测试集群
1、查看集群状态
mmm_control show