服务器之间文件实时同步,监控文件的变化,发送邮件通知,并实时同步文件。
由于人工同步多台服务器的文件比较吃力,可以借助这样一套软件,自动化的实现这样的工作。
并且可以事实监控变化发送邮件给系统管理人员。
服务器的架构图:
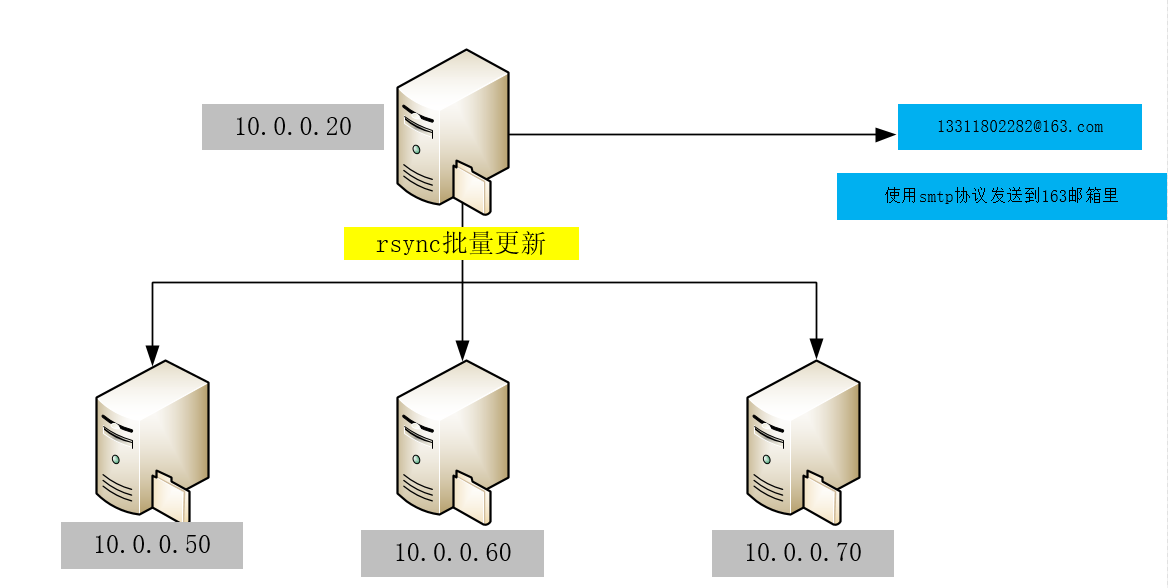
文件源服务器:10.0.0.20
需要同步的目标服务器:10.0.0.50 10.0.0.60 10.0.0.70
一.目标服务器配置
1.关闭selinux
vi /etc/selinux/config #编辑防火墙配置文件

#SELINUX=enforcing #注释掉

#SELINUXTYPE=targeted #注释掉

SELINUX=disabled #增加

:wq! #保存,退出

setenforce 0  #立即生效
2.如果生产环境防火墙不关闭就开放rsync的TCP端口
vi /etc/sysconfig/iptables #编辑防火墙配置文件

-A RH-Firewall-1-INPUT -m state --state NEW -m tcp -p tcp --dport 873 -j ACCEPT


/etc/init.d/iptables restart #最后重启防火墙使配置生效
3、安装Rsync服务端软件
yum install rsync xinetd #安装
vi /etc/xinetd.d/rsync #编辑配置文件,设置开机启动rsync
disable = no #修改为no
4、创建rsyncd.conf配置文件
[root@master ~]# cat /etc/rsyncd.conf
uid = root
gid = root
use chroot = no
max connections = 100
timeout = 600
pid file=/var/run/rsyucd.pid
lock file = /var/run/rsyncd.lock
log file = /var/log/rsyncd.log
[benjamindata]
path = /home/benjamindata
ignore errors
read only = no
list = no
hosts allow = 10.0.0.20/255.255.255.0
auth users = benjamin
secrets file = /etc/rsync.pass
5.创建用户认证文件
[root@manager ~]# cat /etc/rsync.pass
benjamin:123
6、设置文件权限
chmod 600 /etc/rsyncd.conf  #设置文件所有者读取、写入权限

chmod 600 /etc/rsync.pass  #设置文件所有者读取、写入权限
7、启动rsync
/etc/init.d/xinetd start  #启动

service xinetd stop   #停止

service xinetd restart #重新启动
二.源服务器配置
1.关闭selinux
同上
2.防火墙开放873端口
同上
3.修改优化内核参数
vi /etc/sysctl.conf #内核参数修改

fs.inotify.max_queued_events = 16384

fs.inotify.max_user_instances = 1024

fs.inotify.max_user_watches = 1048576

sysctl -p #初始化内核参数
参数说明:
max_queued_events:
inotify队列最大长度,如果值太小,会出现"** Event Queue Overflow **"错误,导致监控文件不准确
max_user_watches:
要同步的文件包含多少目录,可以用:find /home/benjamindata -type d | wc -l 统计,必须保证max_user_watches值大于统计结果(这里/home/benjamindata为同步文件目录)
max_user_instances:
每个用户创建inotify实例最大值
4.编译安装 inotify-tools工具
wget http://github.com/downloads/rvoicilas/inotify-tools/inotify-tools-3.14.tar.gz
tar xzvf inotify-tools-3.14.tar.gz
cd inotify-tools-3.14./configure --prefix=/usr/local/inotify
make
make install
5、设置系统环境变量,添加软连接
echo "PATH=/usr/local/inotify/bin:$PATH" >>/etc/profile.d/inotify.sh

source /etc/profile.d/inotify.sh  #使设置立即生效

echo "/usr/local/inotify/lib" >/etc/ld.so.conf.d/inotify.conf

ln -s /usr/local/inotify/include  /usr/include/inotify
6、创建脚本,实时触发rsync进行同步
vi /usr/local/inotify/rsync.sh   #编辑,添加以下代码

======================================

#!/bin/sh

srcdir=/home/benjamindata/

dstdir=benjamindata

excludedir=/usr/local/inotify/exclude.list

rsyncuser=benjamin

rsyncpassdir=/etc/passwd.txt

dstip="10.0.0.50 10.0.0.60 10.0.0.70"

for ip in $dstip

do

rsync -avH --port=873 --progress --delete  --exclude-from=$excludedir  $srcdir $rsyncuser@$ip::$dstdir --password-file=$rsyncpassdir

done

/usr/local/inotify/bin/inotifywait -mrq --timefmt '%d/%m/%y %H:%M' --format '%T %w%f%e' -e close_write,modify,delete,create,attrib,move $srcdir |  while read file

do

for ip in $dstip

do

rsync -avH --port=873 --progress --delete  --exclude-from=$excludedir  $srcdir $rsyncuser@$ip::$dstdir --password-file=$rsyncpassdir

echo "  ${file} was rsynced" >> /tmp/rsync.log 2>&1

done

done

======================================

chmod +x /usr/local/inotify/rsync.sh   #添加脚本执行权限

脚本参数说明:

srcdir=/home/benjamindata/  #源服务器同步目录

dstdir=benjamindata    #目标服务器rsync同步目录模块名称

excludedir=/usr/local/inotify/exclude.list

#不需要同步的目录,如果有多个,每一行写一个目录,使用相对于同步模块的路径;

#例如:不需要同步/home/benjamin/目录下的a目录和b目录下面的b1目录,exclude.list文件可以这样写

a/
b/b1/

rsyncuser=benjamin  #目标服务器rsync同步用户名

rsyncpassdir=/etc/passwd.txt  #目标服务器rsync同步用户的密码在源服务器的存放路径

dstip="10.0.0.50 10.0.0.60 10.0.0.70"  #目标服务器ip,多个ip用空格分开

/tmp/rsync.log  #脚本运行日志记录
6、设置脚本开机自动执行
vi /etc/rc.d/rc.local  #编辑,在最后添加一行

sh /usr/local/inotify/rsync.sh & #设置开机自动在后台运行脚本
7、测试inotify实时触发rsync同步脚本是否正常运行
在源服务器10.0.0.20上创建目录inotify_test

mkdir /home/benjamindata/inotify_test
#重新启动源服务器:10.0.0.20
等系统启动之后,查看三台目标服务器10.0.0.50,10.0.0.60,10.0.0.70的/home/benjamindata下是否有inotify_test文件夹
#手动输命令指定一个主机测试
[root@manager ~]# rsync -avH --port=873 --progress --delete  --exclude-from=/usr/local/inotify/exclude.list /home/benjamindata/ benjamin@10.0.0.50::benjamindata
--password-file=/etc/passwd.txt
sending incremental file list
./
inotify_test/

sent 76 bytes  received 15 bytes  182.00 bytes/sec
total size is 0  speedup is 0.00
# 使用脚本批量执行。
[root@manager ~]# bash /usr/local/inotify/rsync.sh
sending incremental file list
sent 70 bytes received 9 bytes 52.67 bytes/sec
total size is 0 speedup is 0.00
sending incremental file list
./
inotify_test/
sent 76 bytes received 15 bytes 182.00 bytes/sec
total size is 0 speedup is 0.00
sending incremental file list
./
inotify_test/
sent 76 bytes received 15 bytes 182.00 bytes/sec
total size is 0 speedup is 0.00
在目标服务器查看
[root@master ~]# ifconfig |awk -F '[ :]+' 'NR==2{print $4}'
10.0.0.50
[root@master ~]# ll /home/benjamindata/
total 4
drwxr-xr-x 2 root root 4096 Mar 12 14:22 inotify_test
三.配置安装mutt+msmtp 发送邮件
1.安装
分别下载解压msmtp mutt
[root@manager ~] wget http://downloads.openwrt.org.cn/sources/msmtp-1.4.17.tar.bz2
[root@manager ~]# tar xf msmtp-1.4.17.tar.bz2
[root@manager msmtp-1.4.17]# cd msmtp-1.4.17
[root@manager msmtp-1.4.17]# ./configure --prefix=/usr/local/nsmtp

[root@manager msmtp-1.4.17]# make && make install
# mutt安装如上
[root@manager ~]# wget http://downloads.openwrt.org.cn/sources/mutt-1.5.20.tar.gz
执行 configure 脚本时报configure: error: no curses library found 错误
[root@manager mutt-1.5.20]# yum install -y ncurses-devel
2.修改配置文件
[root@manager mutt-1.5.20]# cat /root/.msmtprc
account default
port 25
host smtp.163.com
tls off
auth plain
from 13311802282@163.com
user 13311802282
password xxxxx
logfile /var/log/msmtp.log
[root@manager ~]# vi /usr/local/msmtp/etc/msmtprc
account default
host smtp.163.com
from 13311802282@163.com
auth login
port 25
tls off
user 13311802282
password xxxx
logfile /usr/local/msmtp/log/msmtp.log
[root@manager ~] chomod 400
vi /root/.muttrc
set sendmail="/usr/local/msmtp/bin/msmtp"
set use_from=yes
set from=13311802282@163.com
set envelope_from=yes
[root@manager ~]# vi /etc/Muttrc
set sendmail="/usr/local/msmtp/bin/msmtp"
set use_from=yes
set from="13311802282@163.com"
set realname="13311802282@163.com"
set editor="vim"
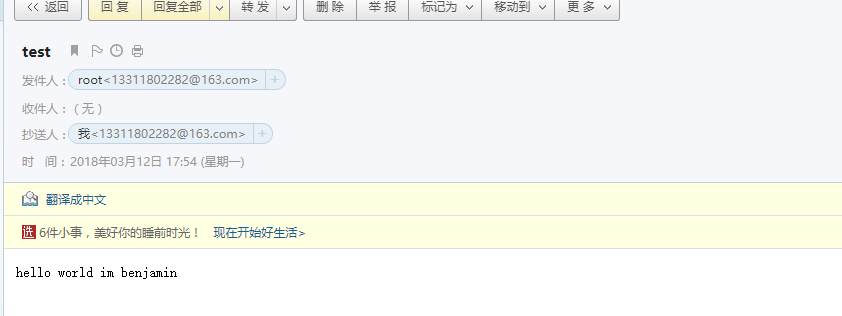
测试发送邮件,自己发给自己
[root@manager ~]# /usr/local/mutt/bin/mutt -s "test" -c 13311802282@163.com < /tmp/mailtest.txt
监控目录变化脚本
[root@manager ~]# cat mon.sh
#!/bin/bash

src=/home/benjamindata
dstip="10.0.0.50 10.0.0.60 10.0.0.70"
/usr/local/inotify/bin/inotifywait -m -r -d -o /tmp/monitor.log --timefmt '%F%T' --format '%T%w%f%e' -e modify,attrib,move,close_write,create,delete,delete_self $src| while read DIRECTORY EVENT FILE

do

for ip in $detip
do
rsync -vzrtopg --delete --progress  benjamin@$ip::static --password-file=/etc/passwd.txt

echo "${files} was rsynced" >> /tmp/rsync.log 2>&1

done

done

#参数说明
-m, 即--monitor,表示始终保持事件监听状态。
-r, 即--recursive,表示递归查询目录。
-q, 即--quiet,表示打印出监控事件。
-e, 即--event,通过此参数可以指定要监控的事件,常见的事件有modify、delete、create、attrib等
--timefmt:指定时间的输出格式
--format:指定变化文件的详细信息
# 一旦发现文件改变会生成日志
发送邮件脚本
[root@manager ~]# cat sendmail.sh
#!/bin/bash

clear

path_f=/tmp/monitor.log

email=13311802282@163.com


function mutt_send()

{

/usr/local/mutt/bin/mutt -s "WARN" -c ${email}</tmp/monitor.log

}

if [ -s $path_f ]; then

mutt_send

echo "mail send.......";sleep 1

/usr/local/mutt/bin/mutt -s "WARN" -c ${email}</tmp/monitor.log

fi

cat /dev/null > $path_f
测试
 cd /home/benjamindata/
 touch  123
# 由于定时任务要5分钟才轮询执行一次脚本,我手动触发脚本执行。这个脚本就是检查 monitor.log是否存在内容来判断是否发送邮件,当每次脚本执行以后会清空该日志内容。
 sh sendmail.sh

[root@manager ~]# rm -fr  /home/benjamindata/*

[root@manager ~]# cat /tmp/monitor.log
2018-03-1218:27:41/home/benjamindata/123DELETE
2018-03-1218:27:41/home/benjamindata/inotify_testDELETE,ISDIR
2018-03-1218:27:41/home/benjamindata/inotify_test/DELETE_SELF

这里就结束了。