BOS物流管理系统-第五天-定区管理-WebServcie远程调用
主要内容:
-
分区设置—导出(分区条件查询后的结果导出为Excel—POI生成Excel和文件下载)
-
定区管理---定区添加(定区关联分区和取派员,easyUi相关的注意的地方)
-
定区管理-分页条件查询(复习—form表单json转换,Spring Data Specification )
-
定区管理—定区关联客户(模拟系统间:bos和crm(Customer Relational Managerment)的远程调用—WebService CXF、Hessiancrm系统架构+SSH,json的解析:Gson技术)
学习目标:
-
Excel文件的导出;
-
定区的管理的业务--复杂业务的编写
-
远程调用,接口数据的调用(搭环境)
-
GSON的使用
-
分区设置—导出分区数据
目标:分区条件查询后的结果导出为Excel,备份出来。

需求分析:
导出的数据不仅是本页的,而是符合条件的全部数据。
因此:程序中list查询,需要带业务条件,但不能带分页条件!
【回顾】
文件下载的要求:
-
JavaWeb:
-
客户端同步方式提交请求,不能使用Ajax方式,否则浏览器无法捕捉到下载,无法出现下载框。
-
服务器需要向响应中放入文件的输出流,并且一般需要指定Content-Type(内容类型)和Content-Disposition(附件打开方式和附件的名字)。
-
-
Struts2:
-
客户端同步方式提交请求。
-
使用Stream类型的结果集,该结果集封装了一些操作,比如将输出流放入响应中,但也需要设置Content-Type和Content-Disposition。
-
开发步骤:
-
客户端页码代码
因为查询的form中的表单缓存了查询条件,因此,直接提交该表单,进行导出数据。

使用分区查询form提交给下载服务器端路径:
|
|

给导出按钮添加表单提交事件:
|
|

-
服务端代码
SubareaAction:
|
//导出分区文件 @Action(value="subarea_exportData") public String exportData() throws IOException{ //获取查询条件Specification对象 Specification<Subarea> specification = getSubareaSpecification(); //调用业务层查询数据(无需分页) List<Subarea> subareaList= subareaService.findSubareaListByspecification(specification);
//使用POI,将数据转换生成Excel(.xls格式) //开发过程 //1.创建一个新的空白工作簿Excel HSSFWorkbook hssfWorkbook = new HSSFWorkbook(); //2.在工作簿中创建一个新的工作表 HSSFSheet sheet = hssfWorkbook.createSheet();//可以匿名,也可以有名字 //3.在工作表中创建第一行,作为标题行 HSSFRow headRow = sheet.createRow(0); //给标题行的每一格写入数据 headRow.createCell(0).setCellValue("分区编号"); headRow.createCell(1).setCellValue("区域编码"); headRow.createCell(2).setCellValue("关键字"); headRow.createCell(3).setCellValue("起始号"); headRow.createCell(4).setCellValue("结束号"); headRow.createCell(5).setCellValue("单双号"); headRow.createCell(6).setCellValue("位置信息"); //4.在工作表中写入其他数据行,每一个分区对应一行数据 for (Subarea subarea : subareaList) { HSSFRow dataRow = sheet.createRow(sheet.getLastRowNum()+1);//从第二行开始写 dataRow.createCell(0).setCellValue(subarea.getId()); dataRow.createCell(1).setCellValue(subarea.getRegion().getId()); dataRow.createCell(2).setCellValue(subarea.getAddresskey()); dataRow.createCell(3).setCellValue(subarea.getStartnum()); dataRow.createCell(4).setCellValue(subarea.getEndnum()); dataRow.createCell(5).setCellValue(subarea.getSingle().toString());//Character不识别 dataRow.createCell(6).setCellValue(subarea.getPosition()); }
//设置客户端浏览器用于识别附件的两个参数Content-Type和Content-Disposition //文件名 String downFilename="分区数据.xls"; //获取文件的MIME类型: String contentType=ServletActionContext.getServletContext().getMimeType(downFilename); //将MIME类型放入响应 ServletActionContext.getResponse().setContentType(contentType); //浏览器类型 String agent = ServletActionContext.getRequest().getHeader("user-agent"); //附件名编码,解决中文乱码问题 downFilename = FileUtils.encodeDownloadFilename(downFilename, agent); //获取附件的名字和下载方式 String contentDisposition="attachment;filename="+downFilename; //将附件名字和下载方式放入响应头信息中 ServletActionContext.getResponse().setHeader("Content-Disposition", contentDisposition); //将Excel的文件流写入到客户端响应中 hssfWorkbook.write(ServletActionContext.getResponse().getOutputStream());
return NONE; } |
SubareaService:
|
/** * 根据条件查询分区列表 * @param specification * @return */ public List<Subarea> findSubareaListByspecification(Specification<Subarea> specification); |
SubareaServiceImpl:
|
public List<Subarea> findSubareaListByspecification(Specification<Subarea> specification) { return subareaDAO.findAll(specification); } |
提示:
可将Specification对象的获取抽取出来一个单独的方法,可简化代码。


-
定区管理—定区添加
需求分析:
了解什么是定区?取派员固定的配送区域,该区域需要配置管理。它是动态可调整的。
定区是分区的集合,实际业务中,定区需要指定多名取派员负责,(需开发取派员排班功能、收派时间管理)。
这里简化业务,一个定区关联了一个取派员。

目标:

定区添加,主要是关联 取派员和分区。即定区是由哪个取派员负责的,该定区包含哪几个分区。
-
取派员下来列表的数据填充
目标:显示取派员的下拉列表:

开发步骤:
-
客户端页码
|
|

注意:从业务角度上说,要显示的快递员必须是未作废的、正常的。
-
服务端代码
StaffAction:
|
//异步请求没有删除标记的派送员列表 @Action(value="staff_listNoDelAjax") public String listNoDelAjax(){ //调用业务层 List<Staff> staffList= staffService.findStaffListForNoDel(); //压入栈顶 ActionContext.getContext().getValueStack().push(staffList); return JSON; } |

StaffService:
|
/** * 查询所有没有作废的员工 * @return */ public List<Staff> findStaffListForNoDel(); |
StaffServiceImpl:
|
public List<Staff> findStaffListForNoDel() { //调用dao层查询,查询未作废的派送员 return staffDAO.findByDeltag('0'); } |
StaffDAO:
|
//根据删除标志来查询派送员 //使用了自动参数查找的查询策略,即根据删除标记来查询派送员列表 List<Staff> findByDeltag(Character deltag); |
-
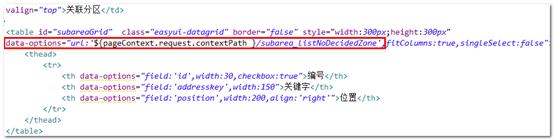
未分配的分区列表的表格(Datagrid)显示
目标:在添加页面显示未分配的分区列表,用户关联分区。

-
客户端代码
|
|
-
服务端代码
SubareaAction:
|
//查询所有没有定区关联的分区列表 @Action(value="subarea_listNoDecidedZone") public String listNoDecidedZone(){ //调用业务层查询 List<Subarea> subareaList= subareaService.findSubareaListForNoDecidedZone(); //压入栈顶 ActionContext.getContext().getValueStack().push(subareaList); return JSON; } |
SubareaService:
|
/** * 查询出所有没有被定区关联的分区 * @return */ public List<Subarea> findSubareaListForNoDecidedZone(); |
SubareaServiceImpl:
|
public List<Subarea> findSubareaListForNoDecidedZone() { //调用dao层 return subareaDAO.findByDecidedZoneIsNull(); // return subareaDAO.findSubareaListForNoDecidedZone(); } |
SubareaDAO:
|
//查询定区是空的分区:方法一:使用Spring Data JPA的属性表达式 List<Subarea> findByDecidedZoneIsNull(); //查询定区是空的分区:方法二:直接写语句 @Query("from Subarea where decidedZone is null")//注意面向对象的写法 List<Subarea> findSubareaListForNoDecidedZone(); |
-
定区添加的实现
目标:保存定区数据,在分区表中使用外键关联定区。
-
解决请求中定区编号和分区编号的参数名称冲突的问题
1)客户端代码
decidedzone.jsp:
|
点击添加form中save按钮,提交form (验证功能) //保存定区 $("save").click(){ //表单校验 if($("#decidedZoneForm").form("validate")){ $("#decidedZoneForm").submit();//提交表单保存数据 } }; |


2)服务端代码:
PO采用手动指定id的方式:
|
|

【思考】
多个分区如何封装?
分区的datagrid勾选后,在表单中提交什么?
问题: 分区datagrid 勾选 分区编号,会不会随form 提交 ???
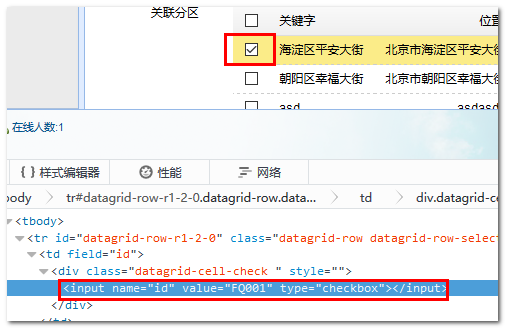
相当于页面上有:很多checkbox

发现提交的是表单复选框的字段。
但请求参数中定区编号和分区编号的参数名称会发生冲突:
分区编号提交时 也为id 和定区编号冲突
解决方案:
1)修改datagrid的复选框的field的名字:
|
|
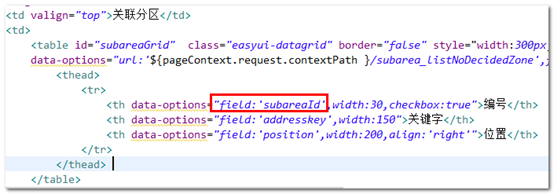
-
服务端代码
修改服务器返回json,含有subareaId , 修改Subarea
Subarea:
|
//添加含有subareaId的getter方法,为了前端json显示该参数 @Transient public String getSubareaId(){ return id; } |
测试:

-
添加定区的服务端代码实现
服务端代码如下:
DecidedZoneAction:
|
//定区的Action @ParentPackage("basic-bos") @Namespace("/") @Controller @Scope("prototype") public class DecidedZoneAction extends BaseAction<DecidedZone>{ //属性驱动接受关联的分区 private String[] subareaId; public void setSubareaId(String[] subareaId) { this.subareaId = subareaId; }
//注入service @Autowired private DecideZoneService decideZoneService;
@Action(value="decideZone_save",results={@Result(name=SUCCESS,location="/WEB-INF/pages/base/decidedzone.jsp")}) public String save(){ //调用业务层保存定区 decideZoneService.saveDecideZone(model,subareaId); return SUCCESS; } } |
DecidedZoneService:
|
//定区业务层接口 public interface DecideZoneService { /** * 保存定区,并关联分区 * @param decidedZone * @param subareaIdArray */ public void saveDecideZone(DecidedZone decidedZone, String[] subareaIdArray); } |
DecidedZoneServiceImpl:
|
//定区业务层实现类 @Service @Transactional public class DecideZoneServiceImpl implements DecideZoneService{ //注入dao @Autowired private DecideZoneDAO decideZoneDAO; @Autowired private SubareaDAO subareaDAO; public void saveDecideZone(DecidedZone decidedZone, String[] subareaIdArray) { //保存定区(可能bug) decideZoneDAO.save(decidedZone); // decidedZoneDAO.saveAndFlush(decidedZone);//flush,刷出,
if(subareaIdArray!=null){//是否关联了分区 //分区关联定区(更新分区)(快照?全属性更新?) for (String subareaId: subareaId) { //1。快照更新(先查出来,再设置属性)--critieral // Subarea subarea = subareaDAO.findOne(subareaId); // subarea.setDecidedZone(decidedZone); //2.直接发出更新语句 subareaDAO.updateForDecidedZone(subareaId,decidedZone); } } } } |
DecidedZoneDAO:
|
//定区dao public interface DecideZoneDAO extends JpaRepository<DecidedZone, String>{ } |
SubareaDAO:
|
/** * 更新分区的定区外键字段 * @param subareaId * @param decidedZone */ @Modifying @Query("update Subarea set decidedZone =?2 where id = ?1") public void updateForDecidedZone(String subareaId, DecidedZone decidedZone); |
【hibernate的快照问题】

-
定区管理—分页条件查询
目标:分页条件查询(和分区列表查询一样,多表关联查询)
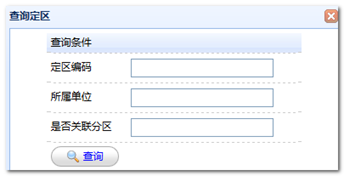
定区编码:T_BC_DECIDEDZONE
所属单位:T_BC_STAFF
是否关联分区:T_BC_SUBAREA

回顾条件分页列表查询:
-
前端:调用easyui的datagrid的load方法,参数就是条件(条件缓存到了dg);使用了jq的扩展方法,获取到了表单的所有参数的值,"拼接"为json对象,传递给参数。
-
后端:接收前端参数(分页条件+业务条件)
分页条件:page当前页码,rows:最大记录数—baseAction。
业务条件:模型驱动封装model(如果model封装不了,使用属性驱动或者直接getParameter())
编码:先拼接分页条件对象+规范条件对象-----》findAll(,);
Pageable pageable=new PageRequest (page-1,rows);
Specification spec = new Specification(){
拼接条件-类似于criteria
CriteriaBuilder:构建条件的工具:cb
Predicate:where后面的条件对象(相当于name=?)
可以有N个,这些条件可以and 、or,条件随意组合,无需考虑语句怎么写。
root根对象,主查询对象
root.join(关联属性,连接方式)子查询对象
}
最后:查询:Page pageResponse=dao.findAll(pageable, spec);
开发步骤:
-
前端代码
修改表单
decidedzone.jsp
|
|

jquery-extends-customization.js

|
/** * jquery自定义扩展 */ //注册serializeJson方法:可将form参数转换为json对象 $.fn.serializeJson=function(){ var serializeObj={}; var array=this.serializeArray(); var str=this.serialize(); $(array).each(function(){ if(serializeObj[this.name]){ if($.isArray(serializeObj[this.name])){ serializeObj[this.name].push(this.value); }else{ serializeObj[this.name]=[serializeObj[this.name],this.value]; } }else{ serializeObj[this.name]=this.value; } }); return serializeObj; }; |
decidedzone.jsp:
|
<!-- 导入jquery自定义扩展 --> <script type="text/javascript" src="${pageContext.request.contextPath }/js/jquery-extends-customization.js"></script> |
点击查询按钮时,将Form表单数据转换为json,加载(load)到Datagrid的中缓存起来,自动发起新的请求。
|
//查询按钮事件 $("#btn").click(function(){ //alert("执行查询..."); //form表单数据转换为json var params= $("#searchForm").serializeJson(); //调用datagrid的load方法,将参数传进去 $("#grid").datagrid("load",params); //关闭查询窗口 $('#searchWindow').window("close"); }); |
|
|

-
服务器端代码(Spring Data JPA Specification):
DecidedZoneAction:
|
//属性驱动获取是否关联了分区 private String hasSubarea; public void setHasSubarea(String hasSubarea) { this.hasSubarea = hasSubarea; }
//列表分页查询定区 @Action("decidedZone_listpage") public String listpage(){ //分页数据 Pageable pageable = new PageRequest(page-1, rows); //业务条件 Specification<DecidedZone> specification = new Specification<DecidedZone>() { public Predicate toPredicate(Root<DecidedZone> root, CriteriaQuery<?> query, CriteriaBuilder cb) { //条件表达式集合 Predicate predicateAnd = cb.conjunction();//and//交集 Predicate predicateOr = cb.disjunction();//or//并集
//定区编码条件-当前表 if(StringUtils.isNotBlank(model.getId())){ predicateAnd.getExpressions().add(cb.equal(root.get("id").as(String.class), model.getId())); } //所属单位 if(model.getStaff()!=null){ //多表关联 //+++++关联员工表:多对一 Join<DecidedZone, Staff> staffJoin = root.join(root.getModel().getSingularAttribute("staff", Staff.class), JoinType.LEFT); //根据取派员的单位作为条件 if(StringUtils.isNotBlank(model.getStaff().getStation())){ predicateAnd.getExpressions().add( cb.like(staffJoin.get("station").as(String.class), "%"+model.getStaff().getStation()+"%") ); } } //+++++关联分区表:一对多 //是否关联分区 if(StringUtils.isNotBlank(hasSubarea)){ //因为面向对象,只需要看看其关联集合是否为空即可。这里无需显式使用多表关联, if(hasSubarea.equals("1")){ //关联了分区 predicateAnd.getExpressions().add( cb.isNotEmpty(root.get("subareas").as(Set.class)) ); }else{ //没有关联分区 predicateAnd.getExpressions().add( cb.isEmpty(root.get("subareas").as(Set.class)) ); } }
return predicateAnd; } };
//调用业务层查询 Page<DecidedZone> page= decideZoneService.findDecideZoneListPage(pageable,specification); //转换为datagrid所需要的格式 Map<String, Object> resultMap = new HashMap<String, Object>(); resultMap.put("total", page.getTotalElements()); resultMap.put("rows", page.getContent()); //压入栈顶 ActionContext.getContext().getValueStack().push(resultMap); return JSON; } |
DecideZoneService:
|
/** * 分页查询定区列表 * @param pageable * @param specification * @return */ public Page<DecidedZone> findDecideZoneListPage(Pageable pageable, Specification<DecidedZone> specification); |
DecideZoneServiceImpl:
|
public Page<DecidedZone> findDecideZoneListPage(Pageable pageable, Specification<DecidedZone> specification) { return decideZoneDAO.findAll(specification, pageable); } |
DecideZoneDAO:
|
//定区dao public interface DecideZoneDAO extends JpaRepository<DecidedZone, String>,JpaSpecificationExecutor<DecidedZone>{ } |
测试:
添加多条数据测试列表。

-
定区管理—定区关联客户
目标:

-
需求分析
物流系统中划分了定区,不同的取派员被分配管理着不同的定区,每个定区中又包含多个不同的分区;
客户居住在某个区域的某个分区中,而分区又属于定区,因此,当客户下单后,会自动关联分配对应的取派员(通过定区识别),从而实现自动派单。
下面,我们做的功能就是手动将客户和定区进行关联,以方便系统后期的查询和管理、自动下单等。

这里有个特别的业务技术点就是,远程数据交互。

现在系统的很多模块都有相关接口的描述,即远程系统交互接口。不同的数据存放到不同的系统中,以实现SOA。
ERP:企业全套解决方案。包含了N多的子系统或子模块。
CRM:(Customer Relation Managerment):客户关系管理:客户信息。
我们的系统子系统交互关系:
客户信息---CRM系统
定区信息---BOS系统(后台管理系统-核心业务管理系统)
BOS系统必须远程访问CRM系统,获取客户信息,然后关联定区。
在CRM中建立一张表,模拟一张客户表,用来存放客户信息。客户一般来自于电话、互联网平台,客服(坐席)-BOS—也可以添加到crm中
BOS读取crm表中的客户数据。
方案:
传统方案:数据库连接(开个用户直连-一个库,Oracle的DBlink-两个库)--跨数据库和跨域访问。
现在的方案:接口技术连接。----SOA思想

功能分析:

-
左面select 加载所有未关联定区的客户
-
右面select 加载当前选中定区,已经关联的客户
-
将移动到右面 select中所有客户,关联到当前选中的定区上
-
技术选型:接口技术
常见远程调用技术:
WebService(传统的—大Web Service)
SOCKET
RMI
Hessian
http-restful
上述技术统称 Web Service
各种远程调用技术效率对比:
SOCKET》 RMI》Hessian》http-restful》WebService
WebService
优点:早期非常流行,大公司的弄的,标准的,很容易跨平台,跨语言。设计的时候在网络上传输。
缺点:额外使用soap协议(xml包装-消息太大---解析成本),效率不高,大公司绑架,在开源的时代,很多人抵制它。Webservice没有集群的支持。--集群化思想。
--阿里 duble—支持集群
Hessian:
优点:二进制传输,效率超高
缺点:跨平台还是有点小问题。
选型:
如果跨平台跨语言,不太追求效率,可以使用webservice。
如果跨平台跨语言,追求效率,http-restful.
同平台(都是java),追求效率:Hessian
基础架构;

我们今天:子系统间的交互也用Webservice。
传统行业和互联网行业:
技术:CXF与Spring整合。
参考Spring的规范:

-
CRM系统的CXF服务端构建开发
-
SSH基础环境搭建
-
技术架构:
Spring + Hibernate(spring和hibernate直接整合)+CXF+Oracle+gson
新建Maven项目:
|
|

引入Maven坐标:
Spring、Hibernate、数据库和连接池、日志、Servlet、JSP、junit、编译版本覆盖、tomcat端口覆盖8888:
Pom.xml
|
<project xmlns="http://maven.apache.org/POM/4.0.0" xmlns:xsi="http://www.w3.org/2001/XMLSchema-instance" xsi:schemaLocation="http://maven.apache.org/POM/4.0.0 http://maven.apache.org/xsd/maven-4.0.0.xsd"> <modelVersion>4.0.0</modelVersion> <groupId>cn.itcast.projects</groupId> <artifactId>mavencrm</artifactId> <version>0.0.1-SNAPSHOT</version> <packaging>war</packaging> <name>mavencrm</name> <description>物流的客服子系统</description> <properties> <spring.version>3.2.12.RELEASE</spring.version> <hibernate.version>3.6.10.Final</hibernate.version> <slf4j.version>1.7.5</slf4j.version> <c3p0.version>0.9.1.2</c3p0.version> <oracle.version>10.2.0.4.0</oracle.version> <servlet.version>2.5</servlet.version> <jsp.version>2.0</jsp.version> <junit.version>4.11</junit.version> </properties> <dependencies> <dependency> <groupId>org.springframework</groupId> <artifactId>spring-context</artifactId> <version>${spring.version}</version> </dependency> <dependency> <groupId>org.springframework</groupId> <artifactId>spring-aspects</artifactId> <version>${spring.version}</version> </dependency> <dependency> <groupId>org.springframework</groupId> <artifactId>spring-orm</artifactId> <version>${spring.version}</version> </dependency> <dependency> <groupId>org.springframework</groupId> <artifactId>spring-web</artifactId> <version>${spring.version}</version> </dependency> <dependency> <groupId>org.springframework</groupId> <artifactId>spring-test</artifactId> <version>${spring.version}</version> </dependency> <dependency> <groupId>org.hibernate</groupId> <artifactId>hibernate-core</artifactId> <version>${hibernate.version}</version> </dependency> <dependency> <groupId>org.slf4j</groupId> <artifactId>slf4j-log4j12</artifactId> <version>${slf4j.version}</version> </dependency> <dependency> <groupId>c3p0</groupId> <artifactId>c3p0</artifactId> <version>${c3p0.version}</version> </dependency> <dependency> <groupId>com.oracle</groupId> <artifactId>ojdbc14</artifactId> <version>${oracle.version}</version> <scope>runtime</scope> </dependency> <dependency> <groupId>javax.servlet</groupId> <artifactId>servlet-api</artifactId> <version>${servlet.version}</version> <scope>provided</scope> </dependency> <dependency> <groupId>javax.servlet</groupId> <artifactId>jsp-api</artifactId> <version>${jsp.version}</version> <scope>provided</scope> </dependency> <dependency> <groupId>junit</groupId> <artifactId>junit</artifactId> <version>${junit.version}</version> <scope>test</scope> </dependency> <dependency> <groupId>javassist</groupId> <artifactId>javassist</artifactId> <version>3.12.0.GA</version> </dependency> </dependencies> <build> <plugins> <plugin> <groupId>org.codehaus.mojo</groupId> <artifactId>tomcat-maven-plugin</artifactId> <version>1.1</version> <configuration> <port>8888</port> </configuration> </plugin> <plugin> <groupId>org.apache.maven.plugins</groupId> <artifactId>maven-resources-plugin</artifactId> <version>2.6</version> <configuration> <encoding>UTF-8</encoding> </configuration> </plugin> <!-- 编译的jdk版本 --> <plugin> <groupId>org.apache.maven.plugins</groupId> <artifactId>maven-compiler-plugin</artifactId> <version>3.1</version> <configuration> <source>1.7</source> <target>1.7</target> </configuration> </plugin> </plugins> </build> </project> |
配置Spring整合Hibernate(几个配置文件:applicationContext.xml、db.properties,web.xml,log4j.properties等)
|
|

db.properties:
|
jdbc.driverClass=oracle.jdbc.driver.OracleDriver jdbc.url=jdbc:oracle:thin:@localhost:1521:xe jdbc.username=CRM25 jdbc.password=CRM25 |
applicationContext.xml:
|
<?xml version="1.0" encoding="UTF-8"?> <beans xmlns="http://www.springframework.org/schema/beans" xmlns:xsi="http://www.w3.org/2001/XMLSchema-instance" xmlns:context="http://www.springframework.org/schema/context" xmlns:aop="http://www.springframework.org/schema/aop" xmlns:tx="http://www.springframework.org/schema/tx" xsi:schemaLocation="http://www.springframework.org/schema/beans http://www.springframework.org/schema/beans/spring-beans.xsd http://www.springframework.org/schema/context http://www.springframework.org/schema/context/spring-context.xsd http://www.springframework.org/schema/aop http://www.springframework.org/schema/aop/spring-aop.xsd http://www.springframework.org/schema/tx http://www.springframework.org/schema/tx/spring-tx.xsd">
<!-- 引入外部的属性配置文件 --> <context:property-placeholder location="classpath:db.properties"/> <!-- 连接池 --> <bean id="dataSource" class="com.mchange.v2.c3p0.ComboPooledDataSource"> <property name="driverClass" value="${jdbc.driverClass}"/> <property name="jdbcUrl" value="${jdbc.url}"/> <property name="user" value="${jdbc.username}"/> <property name="password" value="${jdbc.password}"/> </bean>
<!-- spring来整合hibernate AnnotationSessionFactoryBean:spring提供的专门来整合hibernate注解 --> <bean id="sessionFactory" class="org.springframework.orm.hibernate3.annotation.AnnotationSessionFactoryBean"> <!-- 注入数据源 --> <property name="dataSource" ref="dataSource"/> <!-- hibernate一般属性 --> <property name="hibernateProperties"> <props> <prop key="hibernate.dialect">org.hibernate.dialect.Oracle10gDialect</prop> <prop key="hibernate.hbm2ddl.auto">update</prop> <prop key="hibernate.show_sql">true</prop> <prop key="hibernate.format_sql">true </prop> </props> </property> <!-- 映射的类 packagesToScan:扫描哪个包,会将脑门上带@Entity的类,注册为实体类 --> <property name="packagesToScan"> <list> <value>cn.itcast.crm.domain</value> </list> </property> </bean> <!-- 事务管理器 --> <bean id="transactionManager" class="org.springframework.orm.hibernate3.HibernateTransactionManager"> <property name="sessionFactory" ref="sessionFactory" /> </bean> <!-- 注解驱动 --> <tx:annotation-driven transaction-manager="transactionManager"/>
<!-- 开启spring的bean组件扫描(默认也会开启注解功能) --> <context:component-scan base-package="cn.itcast.crm.service,cn.itcast.crm.dao"/> </beans> |
web.xml:
|
<?xml version="1.0" encoding="UTF-8"?> <web-app version="2.5" xmlns="http://java.sun.com/xml/ns/javaee" xmlns:xsi="http://www.w3.org/2001/XMLSchema-instance" xsi:schemaLocation="http://java.sun.com/xml/ns/javaee http://java.sun.com/xml/ns/javaee/web-app_2_5.xsd"> <display-name>宅急送客服管理系统</display-name> <!-- spring配置文件位置 --> <context-param> <param-name>contextConfigLocation</param-name> <param-value>classpath:applicationContext.xml</param-value> </context-param> <!-- spring核心监听器 --> <listener> <listener-class>org.springframework.web.context.ContextLoaderListener</listener-class> </listener> <!-- 欢迎页面 --> <welcome-file-list> <welcome-file>index.jsp</welcome-file> </welcome-file-list> </web-app> |
新建实体类:

Customer:
|
@Entity @Table(name="t_customer",schema="CRM25") public class Customer { @Id @GeneratedValue private Integer id;//OID属性 private String name;//客户名称 private String residence;//住所 private String telephone;//联系电话 private String decidedZoneId;//定区编号(客户和定区关联的字段) } |
测试上面的配置,启动服务,自动建表:
需要先建立用户CRM25:

-
CXF环境的搭建
关于CXF:

引入Maven坐标:(javasist(单独导入,如果需要的)、CXF(官方))
Pom.xml:
|
<properties> <cxf.version>3.1.5</cxf.version> </properties> <dependencies> <dependency> <groupId>org.apache.cxf</groupId> <artifactId>cxf-rt-frontend-jaxws</artifactId> <version>${cxf.version}</version> </dependency> <dependency> <groupId>org.apache.cxf</groupId> <artifactId>cxf-rt-transports-http</artifactId> <version>${cxf.version}</version> </dependency> </dependencies> </project> |
引入cxf的jar最好参考官方的文档:

规划java开发包:
|
|

回顾:Webservice的服务端开发:
第一步:编写SEI:接口和实现类
第二步:加注解
第三步:发布:使用spring整合的发布。
编写SEI(获取定区未关联和已经关联的数据、客户关联定区):
CustomerService:
|
//SEI:客户的业务接口 @WebService( name="CustomerService", serviceName="CRMService", portName="CRMServicePort", targetNamespace="http://ws.itcast.cn/" ) @BindingType(value=javax.xml.ws.soap.SOAPBinding.SOAP12HTTP_BINDING)//soap1.2 public interface CustomerService { @WebMethod(operationName="operateCustomer") public @WebResult(name="result") String operateCustomer(@WebParam(name="param")String param); } |
CustomerServiceImpl:
|
//SEI:客户的业务实现类 @Service("customerService") @Transactional public class CustomerServiceImpl implements CustomerService { //注入DAO @Autowired private GenericDAO<Customer, Integer> customerDAO;
@Override /*参数定义规则: *{'opertype':'101'} *opertype:101,代表获取所有用户,102,代表获取没有定区的用户,103,代表获取有定区的用户
*/ public String operateCustomer(String param) {
return "{'resultstatus':1,'data':[{},{}]}"; } } |
通用DAO:(略,参考Spring课程)
|
|

配置Spring,发布服务。
引入名称空间:
|
<beans xmlns="http://www.springframework.org/schema/beans" xmlns:xsi="http://www.w3.org/2001/XMLSchema-instance" xmlns:context="http://www.springframework.org/schema/context" xmlns:aop="http://www.springframework.org/schema/aop" xmlns:tx="http://www.springframework.org/schema/tx" xmlns:jaxws="http://cxf.apache.org/jaxws" xsi:schemaLocation="http://www.springframework.org/schema/beans http://www.springframework.org/schema/beans/spring-beans.xsd http://www.springframework.org/schema/context http://www.springframework.org/schema/context/spring-context.xsd http://www.springframework.org/schema/aop http://www.springframework.org/schema/aop/spring-aop.xsd http://www.springframework.org/schema/tx http://www.springframework.org/schema/tx/spring-tx.xsd http://cxf.apache.org/jaxws http://cxf.apache.org/schemas/jaxws.xsd"> |
CXF服务端配置:
|
<!-- 配置CXF服务 --> <!-- Import Apache CXF Bean Definition --> <import resource="classpath:META-INF/cxf/cxf.xml"/> <import resource="classpath:META-INF/cxf/cxf-servlet.xml"/> <!-- 配置我们自己的ws服务 --> <jaxws:server id="customerWebService" address="/CustomerWS" serviceClass="cn.itcast.crm.service.CustomerService"> <jaxws:serviceBean> <ref bean="customerService"/> </jaxws:serviceBean> <!-- 配置日志拦截器 --> <jaxws:inInterceptors> <ref bean="loggingInInterceptor"/> </jaxws:inInterceptors> <jaxws:outInterceptors> <ref bean="loggingOutInterceptor"/> </jaxws:outInterceptors> </jaxws:server>
<!-- 实例化日志拦截器 --> <bean id="loggingInInterceptor" class="org.apache.cxf.interceptor.LoggingInInterceptor"/> <bean id="loggingOutInterceptor" class="org.apache.cxf.interceptor.LoggingOutInterceptor"/>
|
CXF的核心控制器:
Web.xml
|
<!-- cxf的核心控制器 --> <servlet> <servlet-name>cxf</servlet-name> <servlet-class>org.apache.cxf.transport.servlet.CXFServlet</servlet-class> <load-on-startup>1</load-on-startup> </servlet> <servlet-mapping> <servlet-name>cxf</servlet-name> <url-pattern>/ws/*</url-pattern> </servlet-mapping> |
-
接口联调
集团接口,各地市分期调试。
SOAPUI测试:
http://localhost:9999/mavencrm/ws/CustomerWS?wsdl
SOAP调试(服务端调试和双方初步接口联调):
工具SOAPUI:

-
接口的设计
Webservice支持复杂数据类型的传输,如list ,Customer。
但:
如果使用了复杂数据类型,可能失去跨平台的特性了。因为如customer这种数据类型,是跟语言有关的。
解决方案:
传字符串就行了。因为不同平台的语言,字符串的设计,都差不多。
问题又来了,用字符串能传递复杂数据类型么?
传递一张二维表的数据。
解决方案:
可以使用一定格式的字符串来传递。
以前流行XML格式,来封装业务数据。缺点:编写复杂,解析麻烦,内容过大。
现在流行JSON格式!!!!!!!json任何平台都能识别和解析。
现在理念:用JSON来描述任意的对象。
如何开发(步骤):
-
双方要协商,要传哪些数据(请求和响应)
-
设计json格式
-
开发接口
-
联调
-
上线发布。
设计json的格式:(约定—双方)
|
请求的数据: {'opertype':'101','param':{'参数1':'参数1的值',……………}} opertype':操作类型:你要做什么,比如,你要查询未关联的客户列表,双方约定101,如果是查询已经关联的客户列表:102, 如果某个业务需要传参,那么param该参数就有效了。比如,根据客户编号,查询客户信息:{'opertype':'301','param':{'参数1':'参数1的值',……………}} 响应的数据: {'status':1,'data':[{},{},{}]} Status:状态码,作用告诉客户端,你的请求的情况,1代表正常,向下解析数据了,如果0,说明未知异常,如果2,您的参数格式不正确。 |
使用json来传递数据有什么好处?
接口业务的开发重心发生变化,以前是一个业务开发一个接口,工作量在接口上;
现在N个业务用一个接口,工作量转移到解析json上面了。
扩展:
xml和java对象的 相互转换xStream:

json的序列化(封装)和反序列化(解析-java对象):

本课程使用Gson-google
-
Json解析-GSON
-
GSON的下载安装
https://github.com/google/gson

通过Maven坐标引入:
|
<gson.version>2.6.1</gson.version> <dependency> <groupId>com.google.code.gson</groupId> <artifactId>gson</artifactId> <version>${gson.version}</version> </dependency> |
Gson是google的一个开源、功能强大的json的序列化和反序列化的工具。
序列化:java----》json
反序列化:json---》java
-
Gson的基本使用(了解)
|
//Gson instances are Thread-safe so you can reuse them freely across multiple threads. Gson gson= new Gson(); //测试一下gson //简单数据类型的序列化和反序列化 //map:json对象 //list:json数组 //-------json对象的操作 //序列化:map--->json Map<String, Object> jsonMap=new HashMap<String,Object>(); jsonMap.put("username", "Rose"); jsonMap.put("age", 18);
String jsonObject = gson.toJson(jsonMap); System.out.println(jsonObject);
//反序列化:json---》map Map fanxuliehuaMap = gson.fromJson(jsonObject, Map.class); System.out.println(fanxuliehuaMap);
//问题:大家以后在封装json的时候,尽量都使用字符串的值!(避免数字反序列化的时候自动变成double)
//-------json数组的操作 List<Customer> customerList = new ArrayList<>(); Customer customer1=new Customer(); customer1.setId(1001); customer1.setName("Rose"); customerList.add(customer1); Customer customer2=new Customer(); customer2.setId(1002); customer2.setName("Jack"); customerList.add(customer2); //序列化list---》json数组 String jsonArray = gson.toJson(customerList); System.out.println(jsonArray); //发现:java对象中为空的字段不会转换(可以控制) //反序列化json数组---list List fanxuliehuaList = gson.fromJson(jsonArray, List.class); System.out.println(fanxuliehuaList); //结果:序列化的时候,能自动将java对象转换为json字符串,但反序列化的时候,不能自动转换为java对象。 //默认所有的json对象都会自动转变换为map(com.google.gson.internal.LinkedTreeMap) System.out.println(fanxuliehuaList.get(0).getClass());
//如果对于简单业务来说,你就用map和list来封装json就可以了。 //对于复杂的一些业务来说,使用map感觉不是很好,一般使用javabean来封装,但反序列化有问题。 |
-
GsonUtils-GSON工具类
-
抽取GsonUtils
|
//gson的工具类 public class GsonUtils { //线程安全的 private static final Gson GSON; static{ GSON = new GsonBuilder() .excludeFieldsWithoutExposeAnnotation()//打开Export注解,但打开了这个注解,副作用,要转换和不转换都要加注解 // .serializeNulls() //是否序列化空值 .setDateFormat("yyyy-MM-dd HH:mm:ss")//序列化日期格式 "yyyy-MM-dd" // .setFieldNamingPolicy(FieldNamingPolicy.UPPER_CAMEL_CASE)//会把字段首字母大写 .setPrettyPrinting() //自动格式化换行 // .setVersion(1.0) //需要结合注解使用,有的字段在1。0的版本的时候解析,但0。1版本不解析 .create(); }
//获取gson解析器 public static Gson getGson(){ return GSON; }
//对象转换为json public static String toJson(Object object){ return GSON.toJson(object); }
//JSON转换为对象1--普通类型 public static <T> T fromJson(String json, Class<T> classOfT){ return GSON.fromJson(json, classOfT); } //JSON转换为对象-针对泛型的类型 public static <T> T fromJson(String json, Type typeOfT){ return GSON.fromJson(json, typeOfT); }
} |
提示:
TypeToken,它是gson提供的数据类型转换器,可以支持各种带泛型的类型数据的转换。
-
序列化和反序列化示例
【示例1】
1.普通类型(Customer)对象的序列化和反序列化。
|
// Gson gson = GsonUtils.getGson();
//普通类型的 //序列化 Customer customer = new Customer(); customer.setId(1111); customer.setName("Rose"); customer.setResidence("上海"); customer.setTelephone("1333333333");
String cJson = GsonUtils.toJson(customer); System.out.println(cJson); //反序列化: Customer newcustomer = GsonUtils.fromJson(cJson, Customer.class); System.out.println(newcustomer); |
Customer:
|
public class Customer {
@Expose private Integer id;//OID属性,使用的Oracle序列, @Expose private String name;//客户名称 @Expose @SerializedName("address") private String residence;//住所 @Expose private String telephone;//联系电话 @Expose private String decidedZoneId;//定区编号(客户和定区关联的字段)//外键关联到bos系统的定区的主键 |
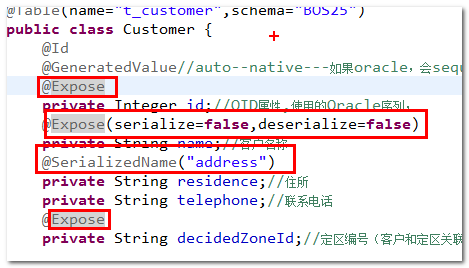
提示:
Gson可以不需要注解来序列化和反序列化对象;但要使用更复杂功能,需要打开注解,那么没有注解的字段将不会被序列化和反序列化。
【示例2】
1.泛型对象(List<T>或Map<T1,T2>)的序列化和反序列化
|
//泛型的类型 //序列化(都没问题) List<Customer> customerList = new ArrayList<>(); Customer customer1=new Customer(); customer1.setId(1001); customer1.setName("Rose"); customerList.add(customer1); Customer customer2=new Customer(); customer2.setId(1002); customer2.setName("Jack"); customerList.add(customer2); String listjson = GsonUtils.toJson(customerList); System.out.println(listjson); //反序列化 List list1 = GsonUtils.fromJson(listjson, List.class); System.out.println(list1); //泛型类型需要使用另外一个api // Type typeOfT = new TypeToken<Collection<Foo>>(){}.getType(); Type typeOfT = new TypeToken<List<Customer>>(){}.getType(); Object list2 = GsonUtils.fromJson(listjson, typeOfT); System.out.println(list2); |
-
重点和作业
-
导出Excel的文件(文件下载、POI)
-
定区添加(Datagrid的checked提交)
-
定区的分页条件列表查询(Spring Data JPA 的Specification)
-
CRM系统提供客户信息操作的服务(CXF服务端技术,GSON工具技术)--基于SOA
-
BOS系统从远程操作客户信息(CXF客户端技术,GSON技术、列表选择框)
课后:使用Hessian实现远程调用。
提示:建议团队作战,分析好需求,可以手动画页面流程图,页面技术如何实现,后台如何实现等。
额外:其他在课堂上未实现的功能,实现一下。