大概分为下面几部:
① 导入 AOP 相关坐标
② 创建目标接口和目标类(内部有切点)
③ 创建切面类(内部有增强方法)
④ 将目标类和切面类的对象创建权交给 spring
⑤ 在 applicationContext.xml 中配置织入关系
⑥ 测试代码
实现:
先导入 Spring的gav 和 织入(切面类织入)的gav:
<!--导入spring的context坐标,context依赖aop-->
<dependency>
<groupId>org.springframework</groupId>
<artifactId>spring-context</artifactId>
<version>5.0.5.RELEASE</version>
</dependency>
<!-- aspectj的织入 -->
<dependency>
<groupId>org.aspectj</groupId>
<artifactId>aspectjweaver</artifactId>
<version>1.8.13</version>
</dependency>
说一下这个 aspectjweaver ,这玩意 是 第三方的,比Spring的配置应用性能比 AOP 还要好,官方也是主张推荐使用他,因为Spring不会放弃好的框架的 啊哈哈哈!
创建目标接口和目标类(内部有切点):
package com.bihu.aop;

public interface TargetInterface {
    public void method();
}
package com.bihu.aop;

public class Target implements TargetInterface {
    @Override
    public void method() {
        System.out.println("method Running·····");
    }
}
然后我们需要 创建切面类(内部有增强方法)
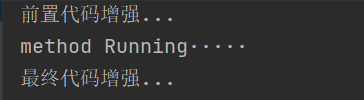
package com.bihu.aop;

public class MyAspect {
    //前置增强方法
    public void before(){
        System.out.println("前置代码增强...");
    }
}
然后我们将这个权限配置给Spring 有到了配置啦:
            <bean id="target" class="com.bihu.aop.Target"></bean>
            <bean id="myAspect" class="com.bihu.aop.MyAspect"></bean>
一个是 :目标方法(内部有切点)的bean
一个是:切面(内部有增强方法) 的Bean
这两个bean 作用:
目标方法的bean 是 在测试的时候注入
切面方法的bean 是 在配置切面类的时候引入
看代码要细心 是什么? 为什么? 怎么做 ? 三问.
然后又得配置:
在 applicationContext.xml 中配置织入关系
注意的是 配置的标签是 aop,记得要导入头即可:
<?xml version="1.0" encoding="UTF-8"?>
<beans xmlns="http://www.springframework.org/schema/beans"
       xmlns:aop="http://www.springframework.org/schema/aop"
       xmlns:xsi="http://www.w3.org/2001/XMLSchema-instance"
       xsi:schemaLocation="http://www.springframework.org/schema/beans http://www.springframework.org/schema/beans/spring-beans.xsd
                            http://www.springframework.org/schema/aop http://www.springframework.org/schema/aop/spring-aop.xsd">

            <bean id="target" class="com.bihu.aop.Target"></bean>
            <bean id="myAspect" class="com.bihu.aop.MyAspect"></bean>


            <aop:config>
                <!--引用myAspect的Bean为切面对象-->
                <aop:aspect ref="myAspect">
                    <!--配置Target的method方法执行时要进行myAspect的before方法前置增强-->
                    <aop:before method="before" pointcut="execution(public void com.bihu.aop.Target.method())"/>
                </aop:aspect>
            </aop:config>

</beans>
最后我们测试一下:
AopTest.java :
import com.bihu.aop.TargetInterface;
import org.junit.Test;
import org.junit.runner.RunWith;
import org.springframework.beans.factory.annotation.Autowired;
import org.springframework.test.context.ContextConfiguration;
import org.springframework.test.context.junit4.SpringJUnit4ClassRunner;

@RunWith(SpringJUnit4ClassRunner.class)
@ContextConfiguration("classpath:springContext.xml")
public class AopTest {
    @Autowired
    private TargetInterface target;
    @Test
    public void test1(){
        target.method();
    }
}
注意了!!! 用这种测试的话 ,要满足:
1. Juint 测试要 4.12 及以上版本
2. 要Spring-tets 这个 GAV坐标即可。
运行:

当然有前置增强 也有后置增强(这里演示的是最终通知 具体看 下面 通知的类型):
   <aop:config>
                <!--引用myAspect的Bean为切面对象-->
                <aop:aspect ref="myAspect">
                    <!--配置Target的method方法执行时要进行myAspect的before方法前置增强-->
                    <aop:before method="before" pointcut="execution(public void com.bihu.aop.Target.method())"/>
                    <aop:after method="after" pointcut="execution(public void com.bihu.aop.Target.method())"/>
                </aop:aspect>
            </aop:config>
运行:
以上代码讲解如下:
其实上面要讲的只有 XML 配置 AOP 这段:
XML 配置 AOP 详解:
1. 切点表达式的写法:
表达式语法:
execution([修饰符] 返回值类型 包名.类名.方法名(参数))
其中:
访问修饰符可以省略
返回值类型、包名、类名、方法名可以使用星号* 代表任意
包名与类名之间一个点 . 代表当前包下的类,两个点 .. 表示当前包及其子包下的类
参数列表可以使用两个点 .. 表示任意个数,任意类型的参数列表
其实那些条件都是匹配的,例如下面:
execution(public void com.xxx.aop.Target.method())
execution(void com.xxx.aop.Target.*(..))
execution(* com.xxx.aop.*.*(..))
execution(* com.xxx.aop..*.*(..))
execution(* *..*.*(..))
第一个 全部都写出来了,那就精准定位到 指定包下 指定的类 指定方法
第二个 返回值是void 表示 只有返回值类型是 void 的方法, 方法是 * 表示全部方法,参数是.. 表示任意参数,换句话说: 这个类下面的所有返回值为void 的 方法都要增强
第三个 返回值类型是* 表示返回值类型是什么都可以, 包是* 说明 类 和 方法是 * 说明 com.xxx.aop 下面的所有包和所有方法,参数名是.. 证明有无参数的方法都要被增强, 其实这个就是 aop包下的所有类中的所有方法。
第四个 返回值类型是* 表示返回值类型是什么都可以, 包是* 说明 类 和 方法是 * 说明 com.xxx.aop 下面的所有包和所有方法,参数名是.. 证明有无参数的方法都要被增强, 其实这个就是 aop包 以及 aop的 子包 下的 的所有类中的所有方法。【这个包是两个点的!!!注意看! 】
第五个 ,第五个不用说 凡是方法我都增强
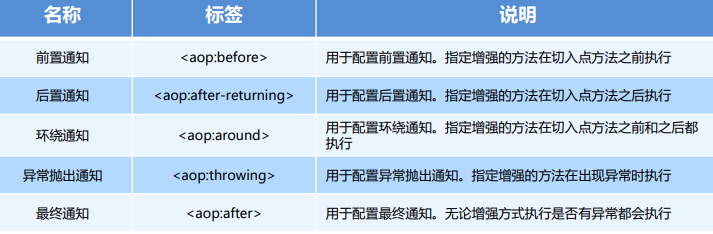
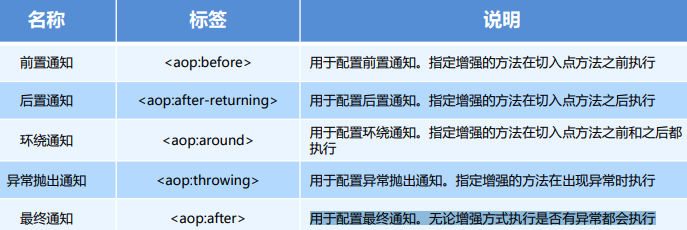
2.通知的类型:
<aop:通知类型 method=“切面类中方法名” pointcut=“切点表达式"></aop:通知类型>
所以上面演示的 是 前置通知 和 最终通知
我们重新写上代码演示一下:
以这些代码为前提:
目标方法.java
package com.bihu.aop;

public class Target implements TargetInterface {
    @Override
    public void method() {
        System.out.println("method Running·····");
    }
}
目标接口.java
package com.bihu.aop;

public interface TargetInterface {
    public void method();
}
测试类 AopTest.java :
import com.bihu.aop.TargetInterface;
import org.junit.Test;
import org.junit.runner.RunWith;
import org.springframework.beans.factory.annotation.Autowired;
import org.springframework.test.context.ContextConfiguration;
import org.springframework.test.context.junit4.SpringJUnit4ClassRunner;

@RunWith(SpringJUnit4ClassRunner.class)
@ContextConfiguration("classpath:springContext.xml")
public class AopTest {
    @Autowired
    private TargetInterface target;
    @Test
    public void test1(){
        target.method();
    }
}
切面(内部编写增强方法:)
package com.bihu.aop;

public class MyAspect {

}
1 .前置通知就不说了 ,就是最先开始的那个。
2 .后置通知就是 执行 切点方法之后执行的:
这里代码给出前后通知的代码:
切面.java:
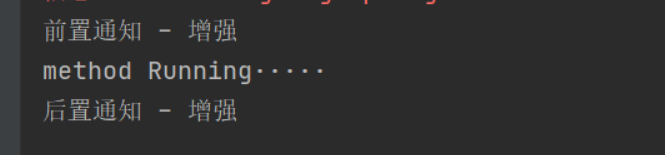
package com.bihu.aop;

public class MyAspect {
    //前置通知
    public void before(){
        System.out.println("前置通知 - 增强");
    }

    //后置通知
    public void after_returning(){
        System.out.println("后置通知 - 增强");
    }
}
配置.xml:
<?xml version="1.0" encoding="UTF-8"?>
<beans xmlns="http://www.springframework.org/schema/beans"
       xmlns:aop="http://www.springframework.org/schema/aop"
       xmlns:xsi="http://www.w3.org/2001/XMLSchema-instance"
       xsi:schemaLocation="http://www.springframework.org/schema/beans http://www.springframework.org/schema/beans/spring-beans.xsd
                            http://www.springframework.org/schema/aop http://www.springframework.org/schema/aop/spring-aop.xsd">

            <bean id="target" class="com.bihu.aop.Target"></bean>
            <bean id="myAspect" class="com.bihu.aop.MyAspect"></bean>


            <aop:config>
                <!--引用myAspect的Bean为切面对象-->
                <aop:aspect ref="myAspect">
                    <!--配置Target的method方法执行时要进行myAspect的before方法前置增强-->
                    <aop:before method="before" pointcut="execution(* com.bihu.aop.*.*(..))"/>
                    <aop:after method="after_returning" pointcut="execution(* com.bihu.aop.*.*(..))"/>
                </aop:aspect>
            </aop:config>

</beans>
可以看到 配置了 切面是 myAspect类 然后切点是 aop包下所有的方法,你完全可以自定义的。
测试代码.java:
import com.bihu.aop.TargetInterface;
import org.junit.Test;
import org.junit.runner.RunWith;
import org.springframework.beans.factory.annotation.Autowired;
import org.springframework.test.context.ContextConfiguration;
import org.springframework.test.context.junit4.SpringJUnit4ClassRunner;

@RunWith(SpringJUnit4ClassRunner.class)
@ContextConfiguration("classpath:springContext.xml")
public class AopTest {
    @Autowired
    private TargetInterface target;
    @Test
    public void test1(){
        target.method();
    }
}
可以看到 这里用的是 Spring整合Junit测试,但是我是看不懂的 当时没学,但是会用即可了啊
运行结果:
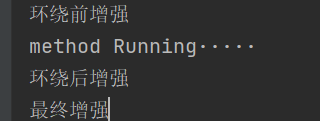
下面讲解 怀绕 ,环绕通知比较特殊,他是结合前后,所以他要一个切点对象做参数:
//Tips 因为环绕和前、后通知做的事情差不多,所以这里注释掉前后通知。
切面.java:
package com.bihu.aop;

import org.aspectj.lang.ProceedingJoinPoint;

public class MyAspect {

    //环绕通知
    //需要一个切点对象(Proceeding:执行 JoinPoint:连接点)  正在执行的切点 = 切点
    public Object around(ProceedingJoinPoint pjp) throws Throwable {

        System.out.println("环绕前增强");
        Object proceed = pjp.proceed(); //执行切点方法(抛出异常)
        System.out.println("环绕后增强");
        return proceed;//然后返回对象即可

    }

}
配置.xml:
<?xml version="1.0" encoding="UTF-8"?>
<beans xmlns="http://www.springframework.org/schema/beans"
       xmlns:aop="http://www.springframework.org/schema/aop"
       xmlns:xsi="http://www.w3.org/2001/XMLSchema-instance"
       xsi:schemaLocation="http://www.springframework.org/schema/beans http://www.springframework.org/schema/beans/spring-beans.xsd
                            http://www.springframework.org/schema/aop http://www.springframework.org/schema/aop/spring-aop.xsd">


            <bean id="target" class="com.bihu.aop.Target"></bean>
            <bean id="myAspect" class="com.bihu.aop.MyAspect"></bean>


            <aop:config>
                <!--引用myAspect的Bean为切面对象-->
                <aop:aspect ref="myAspect">
                    <!--配置Target的method方法执行时要进行myAspect的before方法前置增强-->
<!--                    <aop:before method="before" pointcut="execution(* com.bihu.aop.*.*(..))"/>-->
<!--                    <aop:after method="after_returning" pointcut="execution(* com.bihu.aop.*.*(..))"/>-->
                        <aop:around method="around" pointcut="execution(* com.bihu.aop.*.*(..))"/>
                </aop:aspect>
            </aop:config>

</beans>
运行结果:

所以你看 其实这个环绕就是 集合了 前通知 和 后通知一起。 注意写增强方法的时候 加上参数即可 ,还有返回那个对象。
异常抛出通知
这个我们在目标方法 作死一下即可 1/0 这样吧 。
package com.bihu.aop;

public class Target implements TargetInterface {
    @Override
    public void method() {
        System.out.println("method Running·····");
        System.out.println(1/0);
    }
}
然后在 配置切面:
package com.bihu.aop;

public class MyAspect {

public void afterThrowing(){
    System.out.println("目标方法afterThrowing出现了异常! 请检测代码!");
 }
 }
配置xml:


<?xml version="1.0" encoding="UTF-8"?>
<beans xmlns="http://www.springframework.org/schema/beans"
       xmlns:aop="http://www.springframework.org/schema/aop"
       xmlns:xsi="http://www.w3.org/2001/XMLSchema-instance"
       xsi:schemaLocation="http://www.springframework.org/schema/beans http://www.springframework.org/schema/beans/spring-beans.xsd
                            http://www.springframework.org/schema/aop http://www.springframework.org/schema/aop/spring-aop.xsd">


            <bean id="target" class="com.bihu.aop.Target"></bean>
            <bean id="myAspect" class="com.bihu.aop.MyAspect"></bean>


            <aop:config>
                <!--引用myAspect的Bean为切面对象-->
                <aop:aspect ref="myAspect">
                  <aop:after-throwing method="afterThrowing" pointcut="execution(* com.bihu.aop.*.*(..))"/>
                </aop:aspect>
            </aop:config>

</beans>
然后运行:
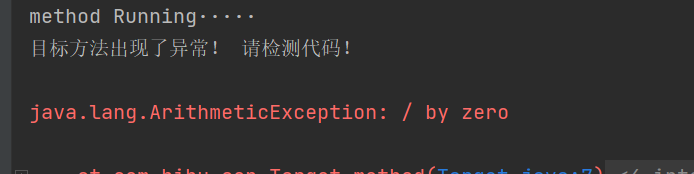
可以发现 先运行了方法 在出错的 ,所以呢 代码也是一样的。
最终增强也一样:用于配置最终通知。无论增强方式执行是否有异常都会执行 。反正我都执行。是在方法
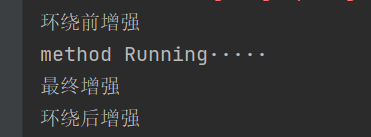
下面除了异常 其他都演示一遍:
你会发现 执行顺序不一样:
切面:
package com.bihu.aop;


import org.aspectj.lang.ProceedingJoinPoint;

public class MyAspect {

    //前置通知
    public  void before() {

    }

    //后置通知
    public  void afterReturning() {

    }

    //环绕通知
    public  Object around(ProceedingJoinPoint pjp) throws Throwable {
        System.out.println("环绕前增强");
        Object proceed = pjp.proceed();
        System.out.println("环绕后增强");
        return proceed;
    }

    //最终通知
    public  void after() {
        System.out.println("最终增强");
    }

}
<?xml version="1.0" encoding="UTF-8"?>
<beans xmlns="http://www.springframework.org/schema/beans"
       xmlns:aop="http://www.springframework.org/schema/aop"
       xmlns:xsi="http://www.w3.org/2001/XMLSchema-instance"
       xsi:schemaLocation="http://www.springframework.org/schema/beans http://www.springframework.org/schema/beans/spring-beans.xsd
                            http://www.springframework.org/schema/aop http://www.springframework.org/schema/aop/spring-aop.xsd">


            <bean id="target" class="com.bihu.aop.Target"></bean>
            <bean id="myAspect" class="com.bihu.aop.MyAspect"></bean>


            <aop:config>
                <!--引用myAspect的Bean为切面对象-->
                <aop:aspect ref="myAspect">
                  <aop:before method="before" pointcut="execution(* com.bihu.aop.*.*(..))"/>
                  <aop:after-returning method="afterReturning" pointcut="execution(* com.bihu.aop.*.*(..))"/>
                  <aop:around method="around" pointcut="execution(* com.bihu.aop.*.*(..))"/>
                  <aop:after method="after" pointcut="execution(* com.bihu.aop.*.*(..))"/>
                </aop:aspect>
            </aop:config>

</beans>
目标:
package com.bihu.aop;

public class Target implements TargetInterface {
    @Override
    public void method() {
        System.out.println("method Running·····");
    }
}
配置:
<?xml version="1.0" encoding="UTF-8"?>
<beans xmlns="http://www.springframework.org/schema/beans"
       xmlns:aop="http://www.springframework.org/schema/aop"
       xmlns:xsi="http://www.w3.org/2001/XMLSchema-instance"
       xsi:schemaLocation="http://www.springframework.org/schema/beans http://www.springframework.org/schema/beans/spring-beans.xsd
                            http://www.springframework.org/schema/aop http://www.springframework.org/schema/aop/spring-aop.xsd">

            <bean id="target" class="com.bihu.aop.Target"></bean>
            <bean id="myAspect" class="com.bihu.aop.MyAspect"></bean>

            <aop:config>
                <!--引用myAspect的Bean为切面对象-->
                <aop:aspect ref="myAspect">
                  <aop:before method="before" pointcut="execution(* com.bihu.aop.*.*(..))"/>
                  <aop:after-returning method="afterReturning" pointcut="execution(* com.bihu.aop.*.*(..))"/>
                  <aop:around method="around" pointcut="execution(* com.bihu.aop.*.*(..))"/>
                  <aop:after method="after" pointcut="execution(* com.bihu.aop.*.*(..))"/>
                </aop:aspect>
            </aop:config>

</beans>
注意看运行:
可以看到 :
如果我们用了 环绕,他会替代掉前通知和后通知,因为:
注意看图 所以都替代掉了
那为为什么最终通知不是最后呢?
因为我也不,我这样写 他就这样来....懂即可
但是: 前 后 通知 + 最终就是这样的运行结果:
意义不大 懂即可
更多你可以自己去尝试 但是环绕一般不和前后一起用