前言
HDFS作为一套成熟的分布式文件系统,其上可以存储上千万个文件,这些大大小小的文件存储着海量的数据.随着数据的变多,其中的安全性就显得非常的重要.但是在其中,有一类数据同样非常重要,那就是元数据,也就是所谓的描述数据的数据.为什么说他重要呢,举个例子,元数据就像一本书的目录信息,书中的具体内容就是真实的数据,如果有一天这本书的目录信息没了,那么你怎么迅速查阅里面的信息呢?可能你会想这本书的目录上什么信息也没有,肯定没有我想要的信息.元数据绝对不能被忽视,在HDFS中有专门的文件用来存储这样的信息,叫做fsImage,还配有专门的机制来定期生成和更新此文件(就是HDFS中的QJM机制,感兴趣的同学可自行查阅相关资料).但是本文的重点不在于分析此机制,因为这样的资料太多了,随处可以找到.最近社区做了一个关于fsImage的new feature HDFS-9825,挺有意思的,本文结合这个issue和目前现有的fsImage的解析来聊一聊HDFS镜像文件的解析与反解析.
HDFS的FsImage镜像文件
在详细了解镜像文件的解析与反解析之前需要对FsImage有一个全面的了解,否则你会不知道文章在讲什么.
FsImage的存储位置
没有专门运维过Hadoop集群的同学可能只是或多或少听到过这个名词,但是真正见到过,打开看过此文件的人应该不多.即便你打开了,你看到的应该是这样的乱码:
HDFSIMG1^V^H¸<8c>ßË^D^Pè^G^Xô^G ^@(<8c><80><80><80>^D0P^F^H<95><80>^A^P^U1^H^B^P<81>
<80>^A^Z^@*'^H<94>¾ <99>¹*^Pÿÿÿÿÿÿÿÿ^?^Xÿÿÿÿÿÿÿÿÿ^A!í^A^A^@^@^@^@^@:^@6^H^B^P<82><80>^A^Z^Ddir0*(^Hϼ
<99>¹*^Pÿÿÿÿÿÿÿÿÿ^A^Xÿÿÿÿÿÿÿÿÿ^A!í^A^A^@^@^@^@^@:^@<^H^A^P<83><80>^A^Z^Efile0"-^H^A^P§¼
可能会有人疑问为什么是这样的呢,这里本人认为有2点原因:
- 因为考虑到元数据信息可能随着数据的变多而不断变大,为了缩小文件的空间大小,需要进行压缩编码处理.
- 进行编码处理,避免直接明文保存的不安全性.
第二点原因是我的个人看法,主要还是第一点.当然想要看里面的信息前提是找到此文件的位置信息,由此配置项所控制:
<property>
<name>dfs.namenode.name.dir</name>
<value></value>
</property>
FsImage的存储信息
下面列举几个常见的可能存储的信息:
- 文件目录信息
- 位置信息
- 副本数
- 权限信息
可能以上几点就是传统意义上的元信息组成结构了,但是很显然,HDFS有他自己的独特性,fsImage保存的类型信息远远多于此,下文还将会提到.
FsImage的解析
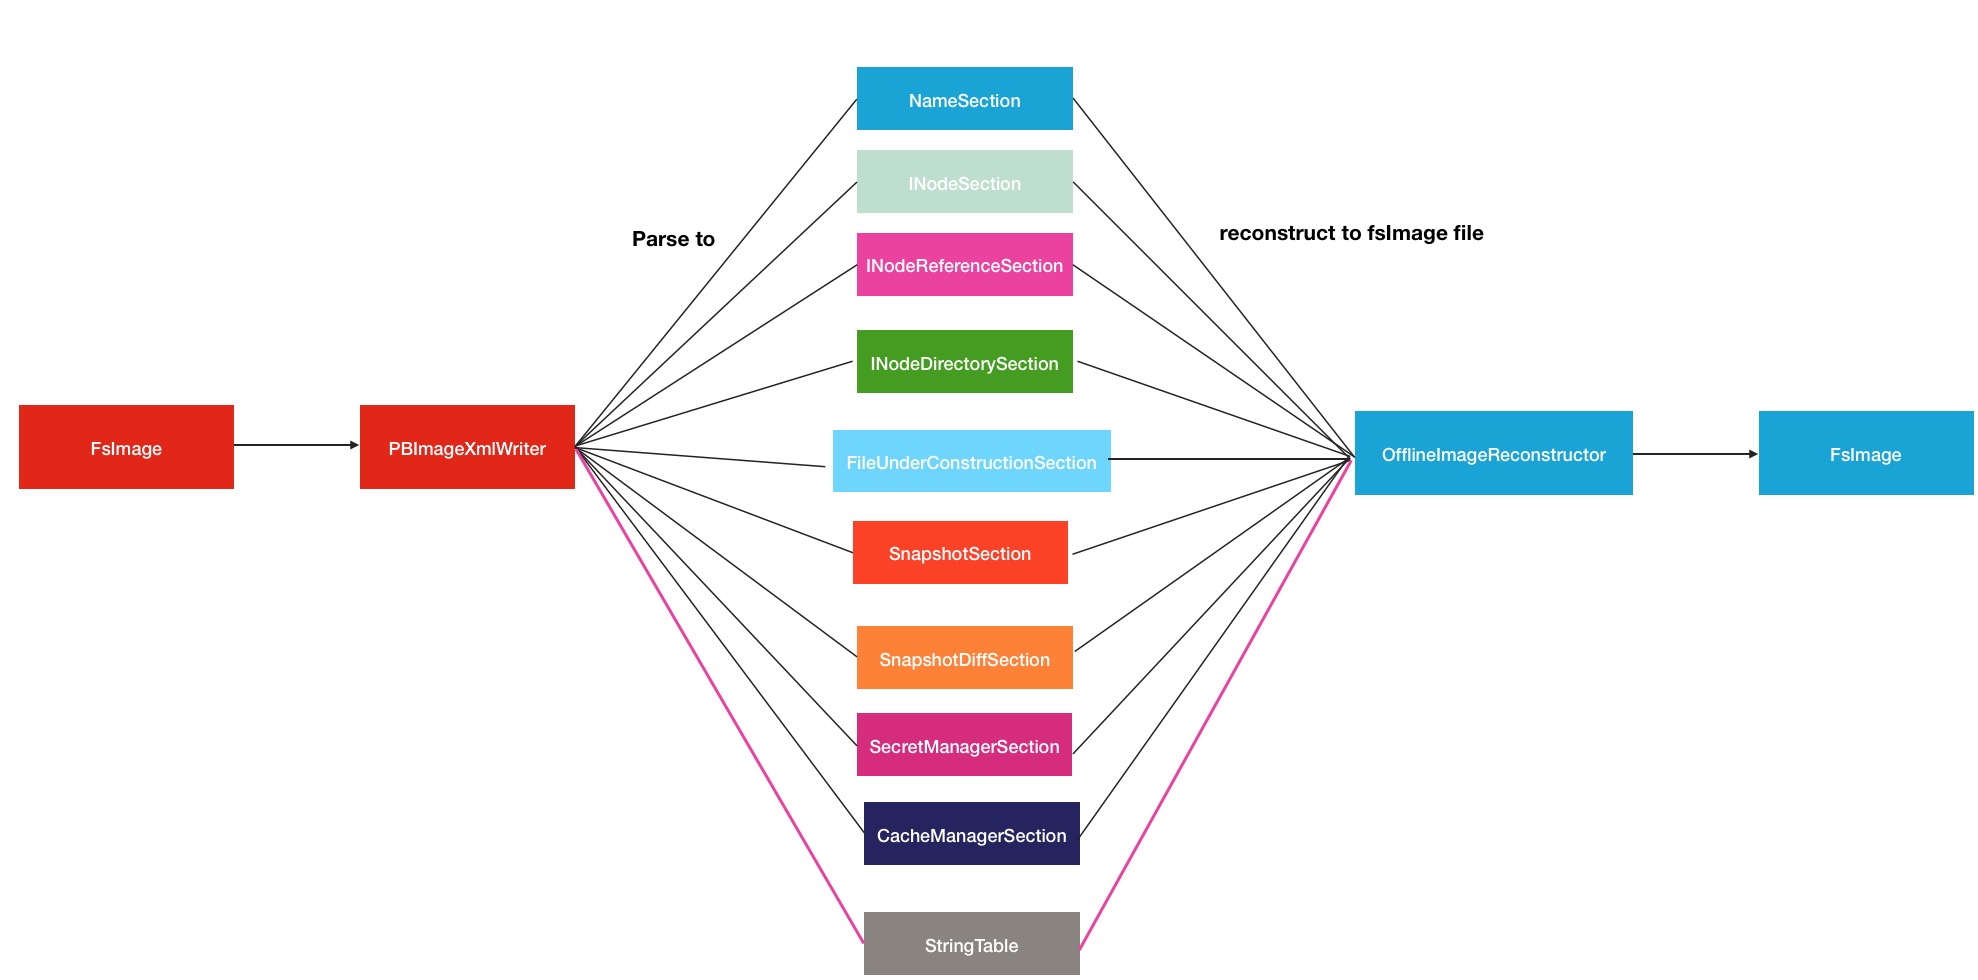
fsImage镜像文件的解析指的是将HDFS镜像文件解析成使用者能直接阅读的形式,而不是像上文一样的乱码.这里就不得不提到一个重要的解析类PBImageXmlWriter.当然解析成XML文件格式只是其中一种常见的解析方式,同样可以直接解析展示到终端上或者以行的形式直接保存在普通文件中.下面进入解析操作的入口:
    Configuration conf = new Configuration();
    try (PrintStream out = outputFile.equals("-") ?
        System.out : new PrintStream(outputFile, "UTF-8")) {
      switch (processor) {
        case "FileDistribution":
          long maxSize = Long.parseLong(cmd.getOptionValue("maxSize", "0"));
          int step = Integer.parseInt(cmd.getOptionValue("step", "0"));
          new FileDistributionCalculator(conf, maxSize, step, out).visit(
              new RandomAccessFile(inputFile, "r"));
          break;
        case "XML":
          new PBImageXmlWriter(conf, out).visit(
              new RandomAccessFile(inputFile, "r"));
          break;
        ...
进入其中的visit方法,首先会进行FileSummary的解析
FileSummary summary = FSImageUtil.loadSummary(file);解析summary的目的是要获取其中section.
ArrayList<FileSummary.Section> sections = Lists.newArrayList(summary
          .getSectionsList());
Section的概念非常的重要,每个section会对应一类的数据.Xml格式文件也会依赖section进行每段XML数据的输出.从FsImage中解析出的section有下面几类(代码部分省略)
switch (SectionName.fromString(s.getName())) {
        case NS_INFO:
          break;
        case STRING_TABLE:
          break;
        case INODE:
          break;
        case INODE_REFERENCE:
          break;
        case INODE_DIR:
          break;
        case FILES_UNDERCONSTRUCTION:
          break;
        case SNAPSHOT:
          break;
        case SNAPSHOT_DIFF:
          break;
        case SECRET_MANAGER:
          break;
        case CACHE_MANAGER:
          break;
        default:
          break;
        }
以上10个分支可大致分为以下7大类:
- 命名空间类Section, 包括namespaceId, rollingUpgradeStartTime等类型的变量.
- INode相关Section,包含了文件,目录相关inode的信息
- fileUnderConstructionSection正在构建中的文件信息.
- SnapShot快照相关信息.
- SecretManager安全管理相关信息
- CacheManager缓存管理相关信息
- StringTable权限相关的信息(辅助其他section输出xml信息)
具体对应section里面保存有哪些信息可以在文章末尾的fsImage解析的XML文件样本中进行查看.但其实section本质上并不保存信息,只是提供了偏移量和长度,最终获取内部的数据还是从fsImage的输入流中而来,从下面的代码中可以得出这样的结论.
      for (FileSummary.Section s : sections) {
        fin.getChannel().position(s.getOffset());
        InputStream is = FSImageUtil.wrapInputStreamForCompression(conf,
            summary.getCodec(), new BufferedInputStream(new LimitInputStream(
                fin, s.getLength())));

        switch (SectionName.fromString(s.getName())) {
        case NS_INFO:
          dumpNameSection(is);
        ...
我们以一个简单的解析来看一下XML是怎么被输出的,以NameSection为例:
  private void dumpNameSection(InputStream in) throws IOException {
    NameSystemSection s = NameSystemSection.parseDelimitedFrom(in);
    out.print("<" + NAME_SECTION_NAME + ">");
    o(NAME_SECTION_NAMESPACE_ID, s.getNamespaceId());
    o(NAME_SECTION_GENSTAMPV1, s.getGenstampV1())
        .o(NAME_SECTION_GENSTAMPV2, s.getGenstampV2())
        .o(NAME_SECTION_GENSTAMPV1_LIMIT, s.getGenstampV1Limit())
        .o(NAME_SECTION_LAST_ALLOCATED_BLOCK_ID,
            s.getLastAllocatedBlockId())
        .o(NAME_SECTION_TXID, s.getTransactionId());
    out.print("</" + NAME_SECTION_NAME + ">
");
  }
原理很简单,就是逐行的out的print输出.OK,到此fsImage文件的解析过程就是如此.
FsImage的反解析
前文中已经提过,fsImage的反解析是最近社区完成的一个new feature.就是针对xml文件的反解析,重新生成fsImage文件.与以往只能保存纯粹的无法直接查阅的fsImage文件相比,保存解析好后的xml文件显然非常放便于用户的使用.反解析核心类OfflineImageReconstructor,这个类可能要获取hadoop-trunk分支代码才能看到,目前发布版本的源码中并不存在.同样进入入口处理方法:
try (PrintStream out = outputFile.equals("-") ?
        System.out : new PrintStream(outputFile, "UTF-8")) {
      switch (processor) {
        ...
        case "ReverseXML":
          try {
            OfflineImageReconstructor.run(inputFile, outputFile);
          } catch (Exception e) {
            System.err.println("OfflineImageReconstructor failed: " +
                e.getMessage());
            e.printStackTrace(System.err);
            System.exit(1);
          }
          break;
接着进入其run方法:
public static void run(String inputPath, String outputPath)
      throws Exception {
    MessageDigest digester = MD5Hash.getDigester();
    FileOutputStream fout = null;
    File foutHash = new File(outputPath + ".md5");
    Files.deleteIfExists(foutHash.toPath()); // delete any .md5 file that exists
    CountingOutputStream out = null;
    FileInputStream fis = null;
    InputStreamReader reader = null;
    try {
      Files.deleteIfExists(Paths.get(outputPath));
      fout = new FileOutputStream(outputPath);
      fis = new FileInputStream(inputPath);
      reader = new InputStreamReader(fis, Charset.forName("UTF-8"));
      out = new CountingOutputStream(
          new DigestOutputStream(
              new BufferedOutputStream(fout), digester));
      OfflineImageReconstructor oir =
          new OfflineImageReconstructor(out, reader);
      oir.processXml();
    } finally {
      IOUtils.cleanup(LOG, reader, fis, out, fout);
    }
    // Write the md5 file
    MD5FileUtils.saveMD5File(new File(outputPath),
        new MD5Hash(digester.digest()));
  }
主要做了这么几件事情:
- 先判断之前是否已经存在目标文件,如果存在则进行删除
- 在内部进行了reconstructor对象的构建
- 然后进行xml文件的处理.
然后进入OfflineImageReconstructor的构造函数,里面会做哪些初始化操作呢
  private OfflineImageReconstructor(CountingOutputStream out,
      InputStreamReader reader) throws XMLStreamException {
    this.out = out;
    XMLInputFactory factory = XMLInputFactory.newInstance();
    this.events = factory.createXMLEventReader(reader);
    this.sections = new HashMap<>();
    this.sections.put(NameSectionProcessor.NAME, new NameSectionProcessor());
    this.sections.put(INodeSectionProcessor.NAME, new INodeSectionProcessor());
    this.sections.put(SecretManagerSectionProcessor.NAME,
        new SecretManagerSectionProcessor());
    this.sections.put(CacheManagerSectionProcessor.NAME,
        new CacheManagerSectionProcessor());
    this.sections.put(SnapshotDiffSectionProcessor.NAME,
        new SnapshotDiffSectionProcessor());
    this.sections.put(INodeReferenceSectionProcessor.NAME,
        new INodeReferenceSectionProcessor());
    this.sections.put(INodeDirectorySectionProcessor.NAME,
        new INodeDirectorySectionProcessor());
    this.sections.put(FilesUnderConstructionSectionProcessor.NAME,
        new FilesUnderConstructionSectionProcessor());
    this.sections.put(SnapshotSectionProcessor.NAME,
        new SnapshotSectionProcessor());
    this.isoDateFormat = PBImageXmlWriter.createSimpleDateFormat();
  }
在这里出现了很多的sectionProcessor对象,显然这是对应于PBImageXmlWriter中的9大Section的.但是好像stringTable没有对应到(答案在后面将会揭晓).
case STRING_TABLE:
          loadStringTable(is);
          break;
那么sectionProcessor对象是如何解析xml,然后将信息写入fsImage的输出文件呢,以NameSectionProcessor为例
private class NameSectionProcessor implements SectionProcessor {
    static final String NAME = "NameSection";

    @Override
    public void process() throws IOException {
      Node node = new Node();
      loadNodeChildren(node, "NameSection fields");
      NameSystemSection.Builder b =  NameSystemSection.newBuilder();
      Integer namespaceId = node.removeChildInt(NAME_SECTION_NAMESPACE_ID);
      if (namespaceId == null)  {
        throw new IOException("<NameSection> is missing <namespaceId>");
      }
      b.setNamespaceId(namespaceId);
      Long lval = node.removeChildLong(NAME_SECTION_GENSTAMPV1);
      if (lval != null)  {
        b.setGenstampV1(lval);
      }
      ...
      node.verifyNoRemainingKeys("NameSection");
      NameSystemSection s = b.build();
      if (LOG.isDebugEnabled()) {
        LOG.debug(SectionName.NS_INFO.name() + " writing header: {" +
            TextFormat.printToString(s) + "}");
      }
      s.writeDelimitedTo(out);
      recordSectionLength(SectionName.NS_INFO.name());
    }
  }
本人将以上的过程简要归纳为如下几步骤:
从xml文件中解析数据load到Node节点对象
loadNodeChildren(node, "NameSection fields");从Node对象中通过key名称获取对应的值并移除原有key-value对
Long lval = node.removeChildLong(NAME_SECTION_GENSTAMPV1);检查Node对象中的已经没有剩余的key
node.verifyNoRemainingKeys("NameSection");写出解析好后的信息到目标fsImage文件
s.writeDelimitedTo(out);
其他的sectionProcessor同理,这里就不进行多余的介绍了.回到刚刚提到的问题,为什么stringTable没有对应的processor,因为在生成的fsImage中会重新进行构造.
  /**
   * The FSImage contains a string table which maps strings to IDs.
   * This is a simple form of compression which takes advantage of the fact
   * that the same strings tend to occur over and over again.
   * This function will return an ID which we can use to represent the given
   * string.  If the string already exists in the string table, we will use
   * that ID; otherwise, we will allocate a new one.
   *
   * @param str           The string.
   * @return              The ID in the string table.
   * @throws IOException  If we run out of bits in the string table.  We only
   *                      have 25 bits.
   */
  int registerStringId(String str) throws IOException {
    Integer id = stringTable.get(str);
    if (id != null) {
      return id;
    }
    int latestId = latestStringId;
    if (latestId >= 0x1ffffff) {
      throw new IOException("Cannot have more than 2**25 " +
          "strings in the fsimage, because of the limitation on " +
          "the size of string table IDs.");
    }
    stringTable.put(str, latestId);
    latestStringId++;
    return latestId;
  }
在与permission相关的操作中会调用到此方法
  private long permissionXmlToU64(String perm) throws IOException {
    String components[] = perm.split(":");
    if (components.length != 3) {
      throw new IOException("Unable to parse permission string " + perm +
          ": expected 3 components, but only had " + components.length);
    }
    String userName = components[0];
    String groupName = components[1];
    String modeString = components[2];
    long userNameId = registerStringId(userName);
    long groupNameId = registerStringId(groupName);
    long mode = new FsPermission(modeString).toShort();
    return (userNameId << 40) | (groupNameId << 16) | mode;
  }
在OfflineImageReconstructor的总的processXml方法中,采取了while循环逐个解析的方法进行section的处理
private void processXml() throws Exception {
    LOG.debug("Loading <fsimage>.");
    expectTag("fsimage", false);
    // Read the <version> tag.
    readVersion();
    // Write the HDFSIMG1 magic number which begins the fsimage file.
    out.write(FSImageUtil.MAGIC_HEADER);
    // Write a series of fsimage sections.
    sectionStartOffset = FSImageUtil.MAGIC_HEADER.length;
    final HashSet<String> unprocessedSections =
        new HashSet<>(sections.keySet());
    while (!unprocessedSections.isEmpty()) {
      XMLEvent ev = expectTag("[section header]", true);
      ....
      SectionProcessor sectionProcessor = sections.get(sectionName);
      if (sectionProcessor == null) {
        throw new IOException("Unknown FSImage section " + sectionName +
            ".  Valid section names are [" +
            StringUtils.join(", ", sections.keySet()) + "]");
      }
      unprocessedSections.remove(sectionName);
      sectionProcessor.process();
    }

    // Write the StringTable section to disk.
    // This has to be done after the other sections, since some of them
    // add entries to the string table.
    writeStringTableSection();
    ...
while循环结束之后,最后会把stringTable再次写入.
解析与反解析的过程就是如此,所以如果你比较细心的话,还是应该能看出其中具有非常强的对称性,下面是我做的一张简单的流程图
HDFS镜像文件的解析与反解析命令
HDFS关于fsImage的命令主要是hdfs oiv打头,就是OfflineImageView的缩写.解析与反解析在这里的区别只是处理器processor的不同.总共有5大处理器:
- XML
- ReverseXML
- FileDistribution
- Web
- Delimited
调用命令如下:
Usage: bin/hdfs oiv -p XML/ReverseXML -i INPUTFILE -o OUTPUTFILEinputFile和outputFile为必填参数.如果想看其他参数,可以输入
bin/hdfs oiv -h进行查阅.
小结
希望读完这篇文章的同学能够有所收获,对fsImage以及hdfs oiv有更多的了解.在学习OfflineImageReconstructor源码的同时,本人发现了其中部分的可以优化的地方,向社区提交了patch HDFS-9951,目前已被社区接受.有兴趣的同学,可以点此链接.最后附上一个fsImage的xml格式文件样例,方便大家对照源码学习.
附: FsImage Xml解析文件样本
<?xml version="1.0"?>
<fsimage><version><layoutVersion>-63</layoutVersion><onDiskVersion>1</onDiskVersion><oivRevision>7e5609da9bed8ae7fff7e9a7ebc3fd4ee127cdec</oivRevision></version>
<NameSection><namespaceId>1127691130</namespaceId><genstampV1>1000</genstampV1><genstampV2>1012</genstampV2><genstampV1Limit>0</genstampV1Limit><lastAllocatedBlockId>1073741836</lastAllocatedBlockId><txid>80</txid></NameSection>
<INodeSection><lastInodeId>16405</lastInodeId><numInodes>21</numInodes><inode><id>16385</id><type>DIRECTORY</type><name></name><mtime>1458455831853</mtime><permission>zhexuan:supergroup:0755</permission><nsquota>9223372036854775807</nsquota><dsquota>-1</dsquota></inode>
<inode><id>16386</id><type>DIRECTORY</type><name>dir0</name><mtime>1458455831663</mtime><permission>zhexuan:supergroup:0755</permission><nsquota>-1</nsquota><dsquota>-1</dsquota></inode>
<inode><id>16387</id><type>FILE</type><name>file0</name><replication>1</replication><mtime>1458455831629</mtime><atime>1458455831093</atime><preferredBlockSize>134217728</preferredBlockSize><permission>zhexuan:supergroup:0644</permission><blocks><block><id>1073741825</id><genstamp>1001</genstamp><numBytes>1</numBytes></block>
</blocks>
<storagePolicyId>0</storagePolicyId></inode>
<inode><id>16388</id><type>FILE</type><name>file1</name><replication>1</replication><mtime>1458455831646</mtime><atime>1458455831634</atime><preferredBlockSize>134217728</preferredBlockSize><permission>zhexuan:supergroup:0644</permission><blocks><block><id>1073741826</id><genstamp>1002</genstamp><numBytes>1</numBytes></block>
</blocks>
<storagePolicyId>0</storagePolicyId></inode>
<inode><id>16389</id><type>FILE</type><name>file2</name><replication>1</replication><mtime>1458455831660</mtime><atime>1458455831649</atime><preferredBlockSize>134217728</preferredBlockSize><permission>zhexuan:supergroup:0644</permission><blocks><block><id>1073741827</id><genstamp>1003</genstamp><numBytes>1</numBytes></block>
</blocks>
<storagePolicyId>0</storagePolicyId></inode>
<inode><id>16390</id><type>FILE</type><name>file3</name><replication>1</replication><mtime>1458455831672</mtime><atime>1458455831663</atime><preferredBlockSize>134217728</preferredBlockSize><permission>zhexuan:supergroup:0644</permission><blocks><block><id>1073741828</id><genstamp>1004</genstamp><numBytes>1</numBytes></block>
</blocks>
<storagePolicyId>0</storagePolicyId></inode>
<inode><id>16391</id><type>DIRECTORY</type><name>dir1</name><mtime>1458455831720</mtime><permission>zhexuan:supergroup:0755</permission><nsquota>-1</nsquota><dsquota>-1</dsquota></inode>
<inode><id>16392</id><type>FILE</type><name>file0</name><replication>1</replication><mtime>1458455831689</mtime><atime>1458455831678</atime><preferredBlockSize>134217728</preferredBlockSize><permission>zhexuan:supergroup:0644</permission><blocks><block><id>1073741829</id><genstamp>1005</genstamp><numBytes>1</numBytes></block>
</blocks>
<storagePolicyId>0</storagePolicyId></inode>
<inode><id>16393</id><type>FILE</type><name>file1</name><replication>1</replication><mtime>1458455831702</mtime><atime>1458455831692</atime><preferredBlockSize>134217728</preferredBlockSize><permission>zhexuan:supergroup:0644</permission><blocks><block><id>1073741830</id><genstamp>1006</genstamp><numBytes>1</numBytes></block>
</blocks>
<storagePolicyId>0</storagePolicyId></inode>
<inode><id>16394</id><type>FILE</type><name>file2</name><replication>1</replication><mtime>1458455831717</mtime><atime>1458455831706</atime><preferredBlockSize>134217728</preferredBlockSize><permission>zhexuan:supergroup:0644</permission><blocks><block><id>1073741831</id><genstamp>1007</genstamp><numBytes>1</numBytes></block>
</blocks>
<storagePolicyId>0</storagePolicyId></inode>
<inode><id>16395</id><type>FILE</type><name>file3</name><replication>1</replication><mtime>1458455831730</mtime><atime>1458455831720</atime><preferredBlockSize>134217728</preferredBlockSize><permission>zhexuan:supergroup:0644</permission><blocks><block><id>1073741832</id><genstamp>1008</genstamp><numBytes>1</numBytes></block>
</blocks>
<storagePolicyId>0</storagePolicyId></inode>
<inode><id>16396</id><type>DIRECTORY</type><name>dir2</name><mtime>1458455831787</mtime><permission>zhexuan:supergroup:0755</permission><nsquota>-1</nsquota><dsquota>-1</dsquota></inode>
<inode><id>16397</id><type>FILE</type><name>file0</name><replication>1</replication><mtime>1458455831747</mtime><atime>1458455831736</atime><preferredBlockSize>134217728</preferredBlockSize><permission>zhexuan:supergroup:0644</permission><blocks><block><id>1073741833</id><genstamp>1009</genstamp><numBytes>1</numBytes></block>
</blocks>
<storagePolicyId>0</storagePolicyId></inode>
<inode><id>16398</id><type>FILE</type><name>file1</name><replication>1</replication><mtime>1458455831766</mtime><atime>1458455831750</atime><preferredBlockSize>134217728</preferredBlockSize><permission>zhexuan:supergroup:0644</permission><blocks><block><id>1073741834</id><genstamp>1010</genstamp><numBytes>1</numBytes></block>
</blocks>
<storagePolicyId>0</storagePolicyId></inode>
<inode><id>16399</id><type>FILE</type><name>file2</name><replication>1</replication><mtime>1458455831784</mtime><atime>1458455831771</atime><preferredBlockSize>134217728</preferredBlockSize><permission>zhexuan:supergroup:0644</permission><blocks><block><id>1073741835</id><genstamp>1011</genstamp><numBytes>1</numBytes></block>
</blocks>
<storagePolicyId>0</storagePolicyId></inode>
<inode><id>16400</id><type>FILE</type><name>file3</name><replication>1</replication><mtime>1458455831798</mtime><atime>1458455831787</atime><preferredBlockSize>134217728</preferredBlockSize><permission>zhexuan:supergroup:0644</permission><blocks><block><id>1073741836</id><genstamp>1012</genstamp><numBytes>1</numBytes></block>
</blocks>
<storagePolicyId>0</storagePolicyId></inode>
<inode><id>16401</id><type>DIRECTORY</type><name>emptydir</name><mtime>1458455831800</mtime><permission>zhexuan:supergroup:0755</permission><nsquota>-1</nsquota><dsquota>-1</dsquota></inode>
<inode><id>16402</id><type>DIRECTORY</type><name>dirContainingInvalidXMLChar�000;here</name><mtime>1458455831805</mtime><permission>zhexuan:supergroup:0755</permission><nsquota>-1</nsquota><dsquota>-1</dsquota></inode>
<inode><id>16403</id><type>DIRECTORY</type><name>src</name><mtime>1458455831843</mtime><permission>zhexuan:supergroup:0755</permission><nsquota>-1</nsquota><dsquota>-1</dsquota></inode>
<inode><id>16404</id><type>DIRECTORY</type><name>dst</name><mtime>1458455831826</mtime><permission>zhexuan:supergroup:0755</permission><nsquota>-1</nsquota><dsquota>-1</dsquota></inode>
<inode><id>16405</id><type>DIRECTORY</type><name>xattr</name><mtime>1458455831853</mtime><permission>zhexuan:supergroup:0755</permission><xattrs><xattr><ns>USER</ns><name>a4</name><valHex>c328</valHex></xattr><xattr><ns>USER</ns><name>a3</name><val></val></xattr><xattr><ns>USER</ns><name>a2</name><val>789</val></xattr><xattr><ns>USER</ns><name>a1</name><val>123</val></xattr></xattrs><nsquota>-1</nsquota><dsquota>-1</dsquota></inode>
</INodeSection>
<INodeReferenceSection><ref><referredId>16404</referredId><name></name><dstSnapshotId>2147483646</dstSnapshotId><lastSnapshotId>0</lastSnapshotId></ref>
<ref><referredId>16404</referredId><name>orig</name><dstSnapshotId>0</dstSnapshotId><lastSnapshotId>0</lastSnapshotId></ref>
</INodeReferenceSection><SnapshotSection><snapshotCounter>1</snapshotCounter><numSnapshots>1</numSnapshots><snapshottableDir><dir>16403</dir></snapshottableDir>
<snapshot><id>0</id><root><id>16403</id><type>DIRECTORY</type><name>snapshot</name><mtime>1458455831837</mtime><permission>zhexuan:supergroup:0755</permission><nsquota>-1</nsquota><dsquota>-1</dsquota></root></snapshot></SnapshotSection>
<INodeDirectorySection><directory><parent>16385</parent><child>16386</child><child>16391</child><child>16396</child><child>16402</child><child>16401</child><child>16403</child><child>16405</child><refChild>0</refChild></directory>
<directory><parent>16386</parent><child>16387</child><child>16388</child><child>16389</child><child>16390</child></directory>
<directory><parent>16391</parent><child>16392</child><child>16393</child><child>16394</child><child>16395</child></directory>
<directory><parent>16396</parent><child>16397</child><child>16398</child><child>16399</child><child>16400</child></directory>
</INodeDirectorySection>
<FileUnderConstructionSection></FileUnderConstructionSection>
<SnapshotDiffSection><dirDiffEntry><inodeId>16385</inodeId><count>0</count></dirDiffEntry><dirDiffEntry><inodeId>16403</inodeId><count>1</count><dirDiff><snapshotId>0</snapshotId><childrenSize>1</childrenSize><isSnapshotRoot/><name></name><createdListSize>0</createdListSize><deletedInoderef>1</deletedInoderef></dirDiff>
</dirDiffEntry><dirDiffEntry><inodeId>16404</inodeId><count>1</count><dirDiff><snapshotId>0</snapshotId><childrenSize>0</childrenSize><name>orig</name><createdListSize>0</createdListSize></dirDiff>
</dirDiffEntry></SnapshotDiffSection>
<SecretManagerSection><currentId>2</currentId><tokenSequenceNumber>1</tokenSequenceNumber><numDelegationKeys>2</numDelegationKeys><numTokens>1</numTokens><delegationKey><id>1</id><key>696c8a02c617790a</key><expiry>2016-03-20T06:37:19.806</expiry></delegationKey><delegationKey><id>2</id><key>11df597a666a6a2e</key><expiry>2016-03-21T06:37:19.807</expiry></delegationKey><token><owner>zhexuan</owner><renewer>JobTracker</renewer><realUser></realUser><issueDate>2016-03-20T06:37:11.810</issueDate><maxDate>2016-03-20T06:37:21.810</maxDate><sequenceNumber>1</sequenceNumber><masterKeyId>2</masterKeyId><expiryDate>2016-03-20T06:37:16.810</expiryDate></token></SecretManagerSection><CacheManagerSection><nextDirectiveId>1</nextDirectiveId><numDirectives>0</numDirectives><numPools>0</numPools></CacheManagerSection>
</fsimage>