最近准备学习Hadoop RFC的模块架构学习,但是这个模块用到了比较多的java中的比较新颖的知识,比如RMI,和动态代理的了,以及还有在jdk1.4中新添加的额NIO的知识。所以决定先花一点时间,复习一下前2个模块的知识。这样对于Hadoop的RPC通信会比较了解。java RMI和Proxy动态代理我不会高谈阔论,我主要简单的举出两个例子,分析他的调用步骤,,再结合一下他的源码,达到理解,会有的效果就可以了。
OK,首先说说RMI,全名Remote Method Invoke远程方法调用,是RPC的一种表现形式,但是有一个不太好的点是,他的很多东西都太定制化,而且有语言上的限制,目前只支持java直接的RMI调用。RMI结构的核心就是面向接口的设计。就是Remote接口,任何需要远程调用的接口必须继承Remote接口,相当于标记作用,类似于Serializable接口。下面一个hello world的例子:
package com.unmi;
import java.rmi.*;

/**
 * 远程接口必须扩展接口java.rmi.Remote
 */
public interface HelloInterface extends Remote
{
   /**
    * 远程接口方法必须抛出 java.rmi.RemoteException
    */
   public String say() throws RemoteException;
}
接着,接口应该以对象的形式进行包装;
package com.unmi;
import java.rmi.*;
import java.rmi.server.*;

/**
 * 扩展了UnicastRemoteObject类,并实现远程接口 HelloInterface
 */
public class Hello extends UnicastRemoteObject implements HelloInterface
{
   private String message;

   /**
    * 必须定义构造方法,即使是默认构造方法,也必须把它明确地写出来,因为它必须抛出出RemoteException异常
    */
   public Hello(String msg) throws RemoteException
   {
      message = msg;
   }

   /**
    * 远程接口方法的实现
    */
   public String say() throws RemoteException
   {
      System.out.println("Called by HelloClient");
      return message;
   }
}
然后把此对象在Naming上进行注册和查找就实现了RMI的调用。
         //启动RMI注册服务,指定端口为1099 (1099为默认端口)
         //也可以通过命令 $java_home/bin/rmiregistry 1099启动
         //这里用这种方式避免了再打开一个DOS窗口
         //而且用命令rmiregistry启动注册服务还必须事先用RMIC生成一个stub类为它所用
         LocateRegistry.createRegistry(1099);

        //创建远程对象的一个或多个实例,下面是hello对象
         //可以用不同名字注册不同的实例
         HelloInterface hello = new Hello("Hello, world!");

         //把hello注册到RMI注册服务器上,命名为Hello
         Naming.rebind("Hello", hello);
客户端只需要Name.lookup()即可;
HelloInterface hello = (HelloInterface) Naming.lookup("Hello");

         //如果要从另一台启动了RMI注册服务的机器上查找hello实例
         //HelloInterface hello = (HelloInterface)Naming.lookup("//192.168.1.105:1099/Hello");

         //调用远程方法
System.out.println(hello.say()); public class UnicastRemoteObject extends RemoteServer {public abstract class RemoteServer extends RemoteObjectpublic abstract class RemoteObject implements Remote, java.io.Serializable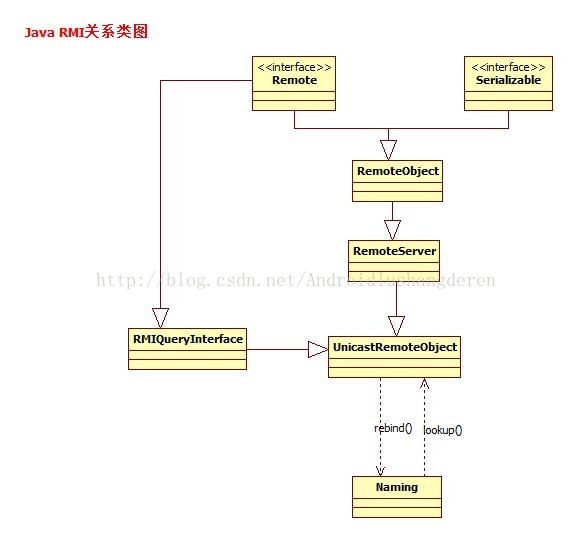
下面看一个另外的模块,Dynamic Proxy动态代理,这个思想在很多地方都有所体现,而且用处非常大,关键在于他的Dynamic的特点,也许有人会说,这样的代价会牺牲了很多的效率,这个说的也对。但是不是本篇中的重点,关键在于你如何去权衡吧。同样是一个动态代理的例子,还是helloWorld,首先定义一个接口:
public interface HelloWorld {
       void sayHelloWorld() ;
}public class HelloWorldImpl implements HelloWorld {
public void sayHelloWorld() {
System.out.println("Hello World!");
}
}public class HelloWorldHandler implements InvocationHandler {
// 要代理的原始对象
private Object objOriginal;
/**
* 构造函数。
*
* @param obj
* 要代理的原始对象。
*/
public HelloWorldHandler(Object obj) {
this.objOriginal = obj;
}
public Object invoke(Object proxy, Method method, Object[] args)
throws Throwable {
Object result;
// 方法调用之前
doBefore();
// 调用原始对象的方法
result = method.invoke(this.objOriginal, args);
// 方法调用之后
doAfter();
return result;
}/**
* 动态代理类的实现
*
* @author lyq
*
*/
public class Client {
public static void main(String[] agrs) {
HelloWorld hw = new HelloWorldImpl();
InvocationHandler handler = new HelloWorldHandler(hw);
HelloWorld proxy = (HelloWorld) Proxy.newProxyInstance(hw.getClass()
.getClassLoader(), hw.getClass().getInterfaces(), handler);
proxy.sayHelloWorld();
}
}before method invoke!
Hello World!
after method invoke!public interface InvocationHandler {
public Object invoke(Object proxy, Method method, Object[] args)
throws Throwable;
}public static Object newProxyInstance(ClassLoader loader,
Class<?>[] interfaces,
InvocationHandler h)
throws IllegalArgumentException
{
if (h == null) {
throw new NullPointerException();
}
final SecurityManager sm = System.getSecurityManager();
if (sm != null) {
checkProxyAccess(Reflection.getCallerClass(), loader, interfaces);
}
/*
* Look up or generate the designated proxy class.
*/
Class<?> cl = getProxyClass0(loader, interfaces);
/*
* Invoke its constructor with the designated invocation handler.
*/
try {
final Constructor<?> cons = cl.getConstructor(constructorParams);
final InvocationHandler ih = h;
if (sm != null && ProxyAccessHelper.needsNewInstanceCheck(cl)) {
// create proxy instance with doPrivilege as the proxy class may
// implement non-public interfaces that requires a special permission
return AccessController.doPrivileged(new PrivilegedAction<Object>() {
public Object run() {
return newInstance(cons, ih);
}
});
} else {
return newInstance(cons, ih);
}
} catch (NoSuchMethodException e) {
throw new InternalError(e.toString());
}
}