上篇我刚刚学习完,Spilt的过程,还算比较简单的了,接下来学习的就是Map操作的过程了,Map和Reduce一样,是整个MapReduce的重要内容,所以,这一篇,我会好好的讲讲里面的内部实现过程。首先要说,MapTask,分为4种,可能这一点上有人就可能知道了,分别是Job-setup Task,Job-cleanup Task,Task-cleanup和Map Task。前面3个都是辅助性质的任务,不是本文分析的重点,我讲的就是里面的最最重要的MapTask。
MapTask的整个过程分为5个阶段:
Read----->Map------>Collect------->Spill------>Combine
来张时序图,简单明了:

在后面的代码分析中,你会看到各自方法的调用过程。
在分析整个过程之前,得先了解里面的一些内部结构,MapTask类作为Map Task的一个载体,他的类关系如下:
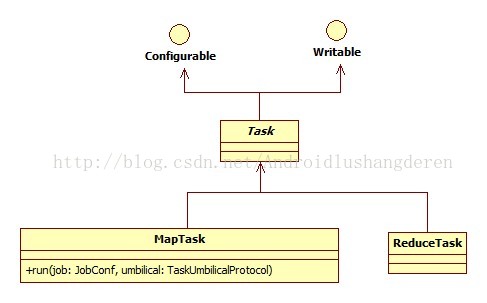
我们调用的就是里面的run方法,开启map任务,相应的代码:
/**
   * mapTask主要执行流程
   */
  @Override
  public void run(final JobConf job, final TaskUmbilicalProtocol umbilical)
    throws IOException, ClassNotFoundException, InterruptedException {
    this.umbilical = umbilical;

    // start thread that will handle communication with parent
    //发送task任务报告,与父进程做交流
    TaskReporter reporter = new TaskReporter(getProgress(), umbilical,
        jvmContext);
    reporter.startCommunicationThread();
    //判断用的是新的MapReduceAPI还是旧的API
    boolean useNewApi = job.getUseNewMapper();
    initialize(job, getJobID(), reporter, useNewApi);

    // check if it is a cleanupJobTask
    //map任务有4种,Job-setup Task, Job-cleanup Task, Task-cleanup Task和MapTask
    if (jobCleanup) {
      //这里执行的是Job-cleanup Task
      runJobCleanupTask(umbilical, reporter);
      return;
    }
    if (jobSetup) {
      //这里执行的是Job-setup Task
      runJobSetupTask(umbilical, reporter);
      return;
    }
    if (taskCleanup) {
      //这里执行的是Task-cleanup Task
      runTaskCleanupTask(umbilical, reporter);
      return;
    }

    //如果前面3个任务都不是,执行的就是最主要的MapTask,根据新老API调用不同的方法
    if (useNewApi) {
      runNewMapper(job, splitMetaInfo, umbilical, reporter);
    } else {
      //我们关注一下老的方法实现splitMetaInfo为Spilt分片的信息,由于上步骤的InputFormat过程传入的
      runOldMapper(job, splitMetaInfo, umbilical, reporter);
    }
    done(umbilical, reporter);
  }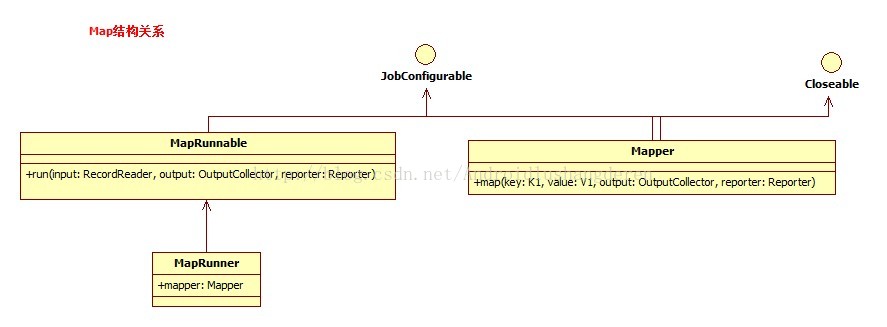
系统已经给了MapRunner的具体实现:
public void run(RecordReader<K1, V1> input, OutputCollector<K2, V2> output,
                  Reporter reporter)
    throws IOException {
    try {
      // allocate key & value instances that are re-used for all entries
      K1 key = input.createKey();
      V1 value = input.createValue();

      //从RecordReader中获取每个键值对,调用用户写的map函数
      while (input.next(key, value)) {
        // map pair to output
    	//调用用户写的map函数
        mapper.map(key, value, output, reporter);
        if(incrProcCount) {
          reporter.incrCounter(SkipBadRecords.COUNTER_GROUP,
              SkipBadRecords.COUNTER_MAP_PROCESSED_RECORDS, 1);
        }
      }
    } finally {
      //结束了关闭mapper
      mapper.close();
    }
}Read阶段的作业就是从RecordReader中读取出一个个key-value,准备给后面的map过程执行map函数操作。
//获取输入inputSplit信息
    InputSplit inputSplit = getSplitDetails(new Path(splitIndex.getSplitLocation()),
           splitIndex.getStartOffset());

    updateJobWithSplit(job, inputSplit);
    reporter.setInputSplit(inputSplit);

    //是否是跳过错误记录模式,获取RecordReader
    RecordReader<INKEY,INVALUE> in = isSkipping() ?
        new SkippingRecordReader<INKEY,INVALUE>(inputSplit, umbilical, reporter) :
        new TrackedRecordReader<INKEY,INVALUE>(inputSplit, job, reporter);
runner.run(in, new OldOutputCollector(collector, conf), reporter);
里面有个partitioner的成员变量,专门用于获取key-value的的分区号,默认是通过key的哈希取模运算,得到分区号的,当然你可以自定义实现,如果不分区的话partition就是等于-1。
  /**
   * Since the mapred and mapreduce Partitioners don't share a common interface
   * (JobConfigurable is deprecated and a subtype of mapred.Partitioner), the
   * partitioner lives in Old/NewOutputCollector. Note that, for map-only jobs,
   * the configured partitioner should not be called. It's common for
   * partitioners to compute a result mod numReduces, which causes a div0 error
   */
  private static class OldOutputCollector<K,V> implements OutputCollector<K,V> {
    private final Partitioner<K,V> partitioner;
    private final MapOutputCollector<K,V> collector;
    private final int numPartitions;

    @SuppressWarnings("unchecked")
    OldOutputCollector(MapOutputCollector<K,V> collector, JobConf conf) {
      numPartitions = conf.getNumReduceTasks();
      if (numPartitions > 0) {
    	//如果分区数大于0,则反射获取系统配置方法,默认哈希去模,用户可以自己实现字节的分区方法
    	//因为是RPC传来的,所以采用反射
        partitioner = (Partitioner<K,V>)
          ReflectionUtils.newInstance(conf.getPartitionerClass(), conf);
      } else {
    	//如果分区数为0,说明不进行分区
        partitioner = new Partitioner<K,V>() {
          @Override
          public void configure(JobConf job) { }
          @Override
          public int getPartition(K key, V value, int numPartitions) {
        	//分区号直接返回-1代表不分区处理
            return -1;
          }
        };
      }
      this.collector = collector;
    }
..........
@Override
public void collect(K key, V value) throws IOException {
try {
//具体通过collect方法分区写入内存,调用partitioner.getPartition获取分区号
//缓冲区为环形缓冲区
collector.collect(key, value,
partitioner.getPartition(key, value, numPartitions));
} catch (InterruptedException ie) {
Thread.currentThread().interrupt();
throw new IOException("interrupt exception", ie);
}
}interface MapOutputCollector<K, V> {
public void collect(K key, V value, int partition
) throws IOException, InterruptedException;
public void close() throws IOException, InterruptedException;
public void flush() throws IOException, InterruptedException,
ClassNotFoundException;
}他只是一个接口,真正的实现是谁呢?这个时候应该回头看一下代码:
private <INKEY,INVALUE,OUTKEY,OUTVALUE>
  void runOldMapper(final JobConf job,
                    final TaskSplitIndex splitIndex,
                    final TaskUmbilicalProtocol umbilical,
                    TaskReporter reporter
                    ) throws IOException, InterruptedException,
                             ClassNotFoundException {
	...
	int numReduceTasks = conf.getNumReduceTasks();
    LOG.info("numReduceTasks: " + numReduceTasks);
    MapOutputCollector collector = null;
    if (numReduceTasks > 0) {
      //如果存在ReduceTask,则将数据存入MapOutputBuffer环形缓冲
      collector = new MapOutputBuffer(umbilical, job, reporter);
    } else {
      //如果没有ReduceTask任务的存在,直接写入把操作结果写入HDFS作为最终结果
      collector = new DirectMapOutputCollector(umbilical, job, reporter);
    }
    MapRunnable<INKEY,INVALUE,OUTKEY,OUTVALUE> runner =
      ReflectionUtils.newInstance(job.getMapRunnerClass(), job);

    try {
      runner.run(in, new OldOutputCollector(collector, conf), reporter);
.....因为collect的操作时将数据存入环形缓冲区,这意味着,用户对数据的读写都是在同个缓冲区上的,所以为了避免出现脏数据的现象,一定会做额外处理,这里作者用了和BlockingQueue类似的操作,用一个ReetrantLocj,获取2个锁控制条件,一个为spillDone
,一个为spillReady,同个condition的await,signal方法实现丢缓冲区的读写控制。
.....
    private final ReentrantLock spillLock = new ReentrantLock();
    private final Condition spillDone = spillLock.newCondition();
    private final Condition spillReady = spillLock.newCondition();
.....public synchronized void collect(K key, V value, int partition
) throws IOException {
.....
try {
// serialize key bytes into buffer
int keystart = bufindex;
keySerializer.serialize(key);
if (bufindex < keystart) {
// wrapped the key; reset required
bb.reset();
keystart = 0;
}
// serialize value bytes into buffer
final int valstart = bufindex;
valSerializer.serialize(value);
int valend = bb.markRecord();
if (partition < 0 || partition >= partitions) {
throw new IOException("Illegal partition for " + key + " (" +
partition + ")");
}
....至于环形缓冲区的结构,不是本文的重点,结构设计还是比较复杂的,大家可以自行学习。当环形缓冲区内的数据渐渐地被填满之后,会出现"溢写"操作,就是把缓冲中的数据写到磁盘DISK中,这个过程就是后面的Spill阶段了。
Spill的阶段会时不时的穿插在collect的执行过程中。
...
          if (kvstart == kvend && kvsoftlimit) {
            LOG.info("Spilling map output: record full = " + kvsoftlimit);
            startSpill();
}private synchronized void startSpill() {
LOG.info("bufstart = " + bufstart + "; bufend = " + bufmark +
"; bufvoid = " + bufvoid);
LOG.info("kvstart = " + kvstart + "; kvend = " + kvindex +
"; length = " + kvoffsets.length);
kvend = kvindex;
bufend = bufmark;
spillReady.signal();
}private synchronized void startSpill() {
LOG.info("bufstart = " + bufstart + "; bufend = " + bufmark +
"; bufvoid = " + bufvoid);
LOG.info("kvstart = " + kvstart + "; kvend = " + kvindex +
"; length = " + kvoffsets.length);
kvend = kvindex;
bufend = bufmark;
spillReady.signal();
}spillThreadRunning = true;
try {
while (true) {
spillDone.signal();
while (kvstart == kvend) {
spillReady.await();
}
try {
spillLock.unlock();
//当缓冲区溢出时,写到磁盘中
sortAndSpill();private void sortAndSpill() throws IOException, ClassNotFoundException,
InterruptedException {
......
try {
// create spill file
final SpillRecord spillRec = new SpillRecord(partitions);
final Path filename =
mapOutputFile.getSpillFileForWrite(numSpills, size);
out = rfs.create(filename);
final int endPosition = (kvend > kvstart)
? kvend
: kvoffsets.length + kvend;
//在写入操作前进行排序操作
sorter.sort(MapOutputBuffer.this, kvstart, endPosition, reporter);
int spindex = kvstart;
IndexRecord rec = new IndexRecord();
InMemValBytes value = new InMemValBytes();
for (int i = 0; i < partitions; ++i) {
IFile.Writer<K, V> writer = null;
try {
long segmentStart = out.getPos();
writer = new Writer<K, V>(job, out, keyClass, valClass, codec,
spilledRecordsCounter);
if (combinerRunner == null) {
// spill directly
DataInputBuffer key = new DataInputBuffer();
while (spindex < endPosition &&
kvindices[kvoffsets[spindex % kvoffsets.length]
+ PARTITION] == i) {
final int kvoff = kvoffsets[spindex % kvoffsets.length];
getVBytesForOffset(kvoff, value);
key.reset(kvbuffer, kvindices[kvoff + KEYSTART],
(kvindices[kvoff + VALSTART] -
kvindices[kvoff + KEYSTART]));
//writer中写入键值对操作
writer.append(key, value);
++spindex;
}
} else {
int spstart = spindex;
while (spindex < endPosition &&
kvindices[kvoffsets[spindex % kvoffsets.length]
+ PARTITION] == i) {
++spindex;
}
// Note: we would like to avoid the combiner if we've fewer
// than some threshold of records for a partition
//如果分区多的话,执行合并操作
if (spstart != spindex) {
combineCollector.setWriter(writer);
RawKeyValueIterator kvIter =
new MRResultIterator(spstart, spindex);
//执行一次文件合并combine操作
combinerRunner.combine(kvIter, combineCollector);
}
}
......
//写入到文件中
spillRec.writeToFile(indexFilename, job);
} else {
indexCacheList.add(spillRec);
totalIndexCacheMemory +=
spillRec.size() * MAP_OUTPUT_INDEX_RECORD_LENGTH;
}
LOG.info("Finished spill " + numSpills);
++numSpills;
} finally {
if (out != null) out.close();
}
}.....
try {
runner.run(in, new OldOutputCollector(collector, conf), reporter);
//将collector中的数据刷新到内存中去
collector.flush();
} finally {
//close
in.close(); // close input
collector.close();
}
}public synchronized void flush() throws IOException, ClassNotFoundException,
InterruptedException {
...
// shut down spill thread and wait for it to exit. Since the preceding
// ensures that it is finished with its work (and sortAndSpill did not
// throw), we elect to use an interrupt instead of setting a flag.
// Spilling simultaneously from this thread while the spill thread
// finishes its work might be both a useful way to extend this and also
// sufficient motivation for the latter approach.
try {
spillThread.interrupt();
spillThread.join();
} catch (InterruptedException e) {
throw (IOException)new IOException("Spill failed"
).initCause(e);
}
// release sort buffer before the merge
kvbuffer = null;
//最后进行merge合并成一个文件
mergeParts();
Path outputPath = mapOutputFile.getOutputFile();
fileOutputByteCounter.increment(rfs.getFileStatus(outputPath).getLen());
}