一,开篇分析
Hi,大家好!大熊君又和大家见面了,还记得上一篇文章吗。主要讲述了以“jQuery的方式如何开发插件”,以及过程化设计与面向对象思想设计相结合的方式是
如何设计一个插件的,两种方式各有利弊取长补短,本系列文章是以学习为导向的,具体场景大家自己定夺使用方式。那么今天这篇文章我们说点什么那?嘿嘿嘿
。我们接着上篇文章对不足的地方进行重构,以深入浅出的方式来逐步分析,让大家有一个循序渐进提高的过程。废话少说,进入正题。让我们先来回顾一下之前的
Js部分的代码,如下:
 1 function ItemSelector(elem,opts){
 2     this.elem = elem ;
 3     this.opts = opts ;
 4 } ;
 5 var ISProto = ItemSelector.prototype ;
 6 ISProto.getElem = function(){
 7     return this.elem ;
 8 } ;
 9 ISProto.getOpts = function(){
10     return this.opts ;
11 } ;
12 /* data manip*/
13 ISProto._setCurrent = function(current){
14     this.getOpts()["current"] = current ;
15 } ;
16 ISProto.getCurrentValue = function(current){
17     return this.getOpts()["current"] ;
18 } ;
19 /* data manip*/
20 ISProto.init = function(){
21     var that = this ;
22     this.getOpts()["current"] = null ; // 数据游标
23     this._setItemValue(this.getOpts()["currentText"]) ;
24     var itemsElem = that.getElem().find(".content .items") ;
25     this.getElem().find(".title div").on("click",function(){
26         itemsElem.toggle() ;
27     }) ;
28     this.getElem().find(".title span").on("click",function(){
29         itemsElem.toggle() ;
30     }) ;
31     $.each(this.getOpts()["items"],function(i,item){
32         item["id"] = (new Date().getTime()).toString() ;
33         that._render(item) ;
34     }) ;
35 } ;
36 ISProto._setItemValue = function(value){
37     this.getElem().find(".title div").text(value)
38 } ;
39 ISProto._render = function(item){
40     var that = this ;
41     var itemElem = $("<div></div>")
42     .text(item["text"])
43     .attr("id",item["id"]) ;
44     if("0" == item["disabled"]){
45         itemElem.on("click",function(){
46             var onChange = that.getOpts()["change"] ;
47             that.getElem().find(".content .items").hide() ;
48             that._setItemValue(item["text"]) ;
49             that._setCurrent(item) ;
50             onChange && onChange(item) ;
51         })
52         .mouseover(function(){
53             $(this).addClass("item-hover") ;
54         })
55         .mouseout(function(){
56             $(this).removeClass("item-hover") ;
57         }) ;
58     }
59     else{
60         itemElem.css("color","#ccc").on("click",function(){
61             that.getElem().find(".content .items").hide() ;
62             that._setItemValue(item["text"]) ;
63         }) ;
64     }
65     itemElem.appendTo(this.getElem().find(".content .items")) ;
66 } ;
效果如下图所示:
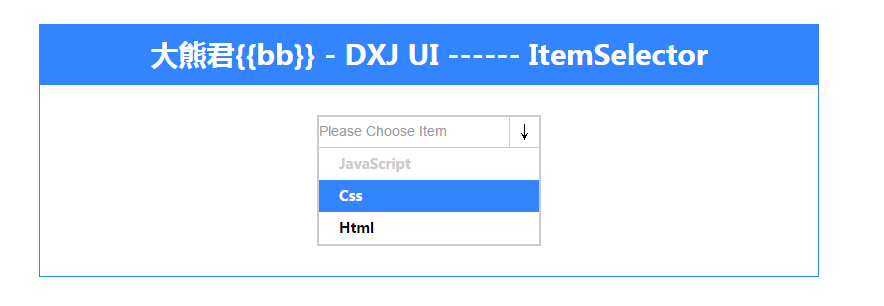
a)------非可操作状态
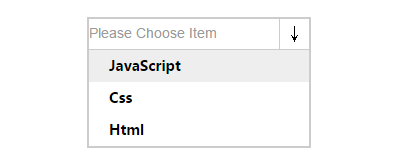
b)------可操作状态

(二),打开思路,进行重构
大家从代码不难看出,已经通过“Js”中的语法特性,以面向对象的方式进行了有效的组织,比松散的过程化形式的组织方式好多了,但是仍然会发现有很多不足的地方。
(1),里面重复代码太多
(2),职责划分不清晰
(3),流程梳理不健全
我们基于以上几点进行有效的重构,我们首先要梳理一下这个组件的需求,功能点如下:
(1),初始化配置组件
 1 $(function(){
 2     var itemSelector = new ItemSelector($("#item-selector"),{
 3         currentText : "Please Choose Item" ,
 4         items : [
 5             {
 6                 text : "JavaScript" ,
 7                 value : "js" ,
 8                 disabled : "1"
 9             } ,
10             {
11                 text : "Css" ,
12                 value : "css" ,
13                 disabled : "0"
14             } ,
15             {
16                 text : "Html" ,
17                 value : "html" ,
18                 disabled : "0"
19             }
20         ] ,
21     }) ;
22     itemSelector.init() ;
23 }) ;
这块代码很清晰,不需要做任何修改,但是大家可以基于以上配置扩展功能,比如增加配置项“mode”支持多种选项方式。如:“checkbox勾选模式”。
接下来是要完成初始化逻辑,如下:
 1 ISProto.init = function(){
 2     var that = this ;
 3     this.getOpts()["current"] = null ; // 数据游标
 4     this._setItemValue(this.getOpts()["currentText"]) ;
 5     var itemsElem = that.getElem().find(".content .items") ;
 6     this.getElem().find(".title div").on("click",function(){
 7         itemsElem.toggle() ;
 8     }) ;
 9     this.getElem().find(".title span").on("click",function(){
10         itemsElem.toggle() ;
11     }) ;
12     $.each(this.getOpts()["items"],function(i,item){
13         item["id"] = (new Date().getTime()).toString() ;
14         that._render(item) ;
15     }) ;
16 } ;
这段代码问题很多,职责不明确,初始化逻辑包含了功能点的细节实现。
再继续看渲染部分代码:
 1 ISProto._render = function(item){
 2     var that = this ;
 3     var itemElem = $("<div></div>")
 4     .text(item["text"])
 5     .attr("id",item["id"]) ;
 6     if("0" == item["disabled"]){
 7         itemElem.on("click",function(){
 8             var onChange = that.getOpts()["change"] ;
 9             that.getElem().find(".content .items").hide() ;
10             that._setItemValue(item["text"]) ;
11             that._setCurrent(item) ;
12             onChange && onChange(item) ;
13         })
14         .mouseover(function(){
15             $(this).addClass("item-hover") ;
16         })
17         .mouseout(function(){
18             $(this).removeClass("item-hover") ;
19         }) ;
20     }
21     else{
22         itemElem.css("color","#ccc").on("click",function(){
23             that.getElem().find(".content .items").hide() ;
24             that._setItemValue(item["text"]) ;
25         }) ;
26     }
27     itemElem.appendTo(this.getElem().find(".content .items")) ;
28 } ;
问题很明显,发现了重复性的操作,应该进行合理的抽象,已达到复用的目的。
整个组建的流程包括初始化,渲染(事件绑定),还有就是相关的数据操作方法以及dom操作的辅助方法。
综上所述,经过简单的梳理后,我们应该建立起功能的操作目的以及流程主线的任务分配,各负其责。
所以我们重构的目的很明确了,对!就是进行功能点的抽象,友好的职责划分,那么我们如何实现那?
第一步,建立流程功能方法:(方法接口)
ISProto.init = function(){
   // put you code here !
} ;
ISProto._render = function(){
   // put you code here !
} ;
第二部,建立抽象后的方法接口:
ISProto._fnItemSelectorDelegateHandler = function(){
   // put you code here !
} ;
ISProto._fnTriggerHandler = function(){
   // put you code here !
} ;
ISProto._addOrRemoveClass = function(){
   // put you code here !
} ;
第三步,建立数据操作接口:
1 ISProto._setCurrent = function(){
2    // put you code here !
3 } ;
4 ISProto._getCurrent = function(){
5    // put you code here !
6 } ;
还有一些参照下面的完整源码,这里只是说的思路。
(三),完整代码以供学习,本代码已经过测试
function ItemSelector(elem,opts){
	this.elem = elem ;
	this.opts = opts ;
	this.current = -1 ; // 数据游标
} ;
var ISProto = ItemSelector.prototype ;
/* getter api*/
ISProto.getElem = function(){
	return this.elem ;
} ;
ISProto.getOpts = function(){
	return this.opts ;
} ;
ISProto._getCurrent = function(){
	return this.current ;
} ;
/* getter api*/
/* data manip*/
ISProto._setCurrent = function(current){
	this.current = current ;
} ;
ISProto._setItemText = function(text){
	this.getElem().find(".title div").text(text) ;
} ;
/* data manip*/

/* update on 2015 1/31 23:38 */
ISProto._fnTriggerHandler = function(index,text,value){
	if(this._isDisabled(value)){
		index = -1 ;
		text = this.getOpts()["currentText"] ;
	}
	this._setItemText(text) ;
	this._setCurrent(index) ;
	this.getElem().find(".content .items").hide() ;
} ;
ISProto._addOrRemoveClass = function(elem,className,addIs){
	if(addIs){
		elem.addClass(className) ;
	}
	else{
		elem.removeClass(className) ;
	}
} ;
ISProto._fnItemSelectorDelegateHandler = function(){
	var that = this ;
	this.getElem().on("click","[data-toggle]",function(){
		that.getElem().find(".content .items").toggle() ;
	}) ;
} ;
ISProto._isDisabled = function(value){
	return ("1" == value) ? true : false ;
} ;
/* update on 2015 1/31 23:38 */
ISProto.init = function(){
	var that = this ;
	this._fnItemSelectorDelegateHandler() ;
	$.each(this.getOpts()["items"],function(i,item){
		item["index"] = i ;
		that._render(item) ;
	}) ;
	this._fnTriggerHandler(this._getCurrent(),this.getOpts()["currentText"],"1") ;
} ;
ISProto._render = function(item){
	var that = this ;
	var itemElem = $("<div></div>").text(item["text"]).attr("id",item["index"]) ;
	var activeClass = ("0" == item["disabled"]) ? "item-hover" : "item-disabled-hover" ;
	itemElem.on("click",function(){
		that._fnTriggerHandler(item["index"],item["text"],item["disabled"]) ;
	})
	.mouseover(function(){
		that._addOrRemoveClass($(this),activeClass,true) ;
	})
	.mouseout(function(){
		that._addOrRemoveClass($(this),activeClass,false) ;
	}) ;
	itemElem.appendTo(this.getElem().find(".content .items")) ;
} ;
(四),最后总结
(1),面向对象的思考方式合理分析功能需求。
(2),以类的方式来组织我们的插件逻辑。
(3),不断重构上面的实例,如何进行合理的重构那?不要设计过度,要游刃有余,推荐的方式是过程化设计与面向对象思想设计相结合。
(4),下篇文章中会扩展相关功能,比如“mode”这个属性,为"1"时支持checkbox多选模式,现在只是默认下拉模式。
哈哈哈,本篇结束,未完待续,希望和大家多多交流够沟通,共同进步。。。。。。呼呼呼……(*^__^*)