文件操作
touch命令
作用:
touch新建空文件或者更新文件时间标记
格式:
touch 文件名...
file命令:
查看文件类型
格式:file 文件名...
[root@localhost home]# touch file1
[root@localhost home]# ls
file1  oracle  rpm  test  test1
[root@localhost home]# touch file2 file3
[root@localhost home]# ls
file1  file2  file3  oracle  rpm  test  test1
[root@localhost home]# file file1
file1: empty
[root@localhost home]# file file2 file3 test
file2: empty
file3: empty
test:  directory
[root@localhost home]# vim file1
[root@localhost home]# file file1
file1: ASCII text
[root@localhost home]# touch test1/testfile
[root@localhost home]# ls test1
subtest1  testfile
touch可以创建单个或者多个文件,也可以嵌套创建,file可以查看单个或者多个文件或者目录的类型
cp命令
作用:复制文件或者目录
格式:cp [选项]... 源文件或者目录 目标文件或者目录
-r 递归复制整个目录树
-f 强制覆盖同名文件或者目录
-p 保持源文件属性不变
-i 需要覆盖文件或目录时进行提醒
[root@localhost home]# alias cp
alias cp='cp -i'
可以看到cp的别名就是cp -i
[root@localhost home]# ls
file1  file2  file3  oracle  rpm  test  test1  test2
[root@localhost home]# ls test
file
[root@localhost home]# ls test1
subtest1  testfile
[root@localhost home]# ls test2
目前home目录下有三个文件file1、file2、file3,三个新建的目录test、test1、test2,test和test1中都有内容,test2是空目录
尝试把test目录复制到test1或者test2目录中
[root@localhost home]# cp test test1
cp: omitting directory `test'
[root@localhost home]# cp test test2
cp: omitting directory `test'
发现不能直接用这种方法复制目录,加上-r递归复制整个目录树,再试试
[root@localhost home]# ls test1
subtest1  testfile
[root@localhost home]# ls test
file
[root@localhost home]# cp -r test test1
[root@localhost home]# ls test1
subtest1  test  testfile
可以看到,复制成功了,test1目录下有一个新的目录test
在home目录下新建一个file文件,编辑file
[root@localhost home]# vim file
[root@localhost home]# cat file
111
[root@localhost home]# cat test/file
[root@localhost home]#
home下的file文件中有111,test目录下的file文件为空文件,现在将home目录下的file文件复制到test下,用-f强制覆盖
[root@localhost home]# cp -f file test/file
cp: overwrite `test/file'? y
[root@localhost home]# cat file
111
[root@localhost home]# cat test/file
111
可以看到test下的file被覆盖了
cp也可以同时复制多个文件
rm命令
作用:删除文件或者目录
格式:rm [选项]... 文件或者目录
-f 强行删除文件或者目录
-i 删除文件或者目录时提醒用户
-r 递归删除整个目录树
[root@localhost home]# alias rm
alias rm='rm -i'
rm的别名时rm -i
[root@localhost home]# ls
file  file1  file2  file3  oracle  rpm  test  test1  test2
[root@localhost home]# rm file
rm: remove regular file `file'? y
[root@localhost home]# ls
file1  file2  file3  oracle  rpm  test  test1  test2
[root@localhost home]# rm file1 file2 file3
rm: remove regular file `file1'? y
rm: remove regular empty file `file2'? y
rm: remove regular empty file `file3'? y
[root@localhost home]# ls
oracle  rpm  test  test1  test2
[root@localhost home]# ls test
file
[root@localhost home]# rm test
rm: cannot remove directory `test': Is a directory
[root@localhost home]# rm -rf test
[root@localhost home]# ls
oracle  rpm  test1  test2
[root@localhost home]# ls test2
[root@localhost home]# rm test2
rm: cannot remove directory `test2': Is a directory
[root@localhost home]# rm -rf test2
[root@localhost home]# ls
oracle  rpm  test1
可以看到home目录下有新建的四个文件和三个目录,使用rm命令时会提示用户是否删除,这是应为rm的别名时rm -i,不能直接删除目录,需要用rm -r 递归删除整个目录树的方式删除,可以同时删除多个文件或者目录
mv命令:
用途:移动文件或者目录,如果目标位置和原位置相同,则相当于改名
格式:mv [选项]... 源文件或者目录... 目标文件或者目录
[root@localhost home]# ls
oracle  rpm  test1  test2
[root@localhost home]#
[root@localhost home]# ls
oracle  rpm  test1  test2
[root@localhost home]# ls test1
subtest1  test  testfile
[root@localhost home]# ls test2
file
[root@localhost home]# mkdir test
[root@localhost home]# ls
oracle  rpm  test  test1  test2
[root@localhost home]# mv test test1
mv: cannot move `test' to a subdirectory of itself, `test1/test'
[root@localhost home]# mv test test2
[root@localhost home]# ls
oracle  rpm  test1  test2
[root@localhost home]# ls test2
file  test
[root@localhost home]# mv test2/test /home
[root@localhost home]# ls
oracle  rpm  test  test1  test2
[root@localhost home]# ls test2
file
home目录下有新建的目录test1和test2,test1下面有test目录,test2下没有test目录,home目录下新建test目录;将home下的test目录移动到test1下,失败了因为test1下面本身有test目录,但是将home目录下的test可以移动到test2目录下,home下就没有test目录了,test2目录下有test目录。将test2目录下的test目录移动到home目录下,test2中没有test目录了,home目录中有test目录。
mv也可以同时对多个文件进行操作。
which命令:
用途:查找Linux命令文件并显示所在位置,搜索范围由Path环境变量指定
格式:which 命令或者程序名
查看ls和ln所在的位置
[root@localhost home]# which ls
alias ls='ls --color=tty'
        /bin/ls
[root@localhost home]# which ln
/bin/ln
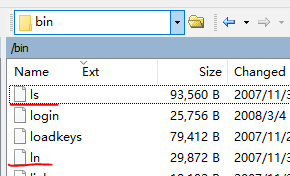
可以看到bin目录下有ls和ln,which ls输出的“alias ls='ls --color=tty'"表示你输入ls就等同于ls --color=tty,所以我们看到ls查看文件夹下的文件时,有颜色的区分
尝试用which去查找cd命令的位置
[root@localhost home]# echo $PATH
/usr/kerberos/sbin:/usr/kerberos/bin:/usr/local/sbin:/usr/local/bin:/sbin:/bin:/usr/sbin:/usr/bin:/root/bin:/sbin:/usr/bin:/usr/sbin
[root@localhost home]# which cd
/usr/bin/which: no cd in (/usr/kerberos/sbin:/usr/kerberos/bin:/usr/local/sbin:/usr/local/bin:/sbin:/bin:/usr/sbin:/usr/bin:/root/bin:/sbin:/usr/bin:/usr/sbin)
Linux的环境变量中没有找到cd这个命令,因为cd时Shell的内部命令。所以说which有一定的局限性,只能在环境变量中查找
find命令:
用途:用于查找文件或者目录
格式:find [查找范围] [查找条件]
-name 根据名字查找
-size 根据大小查找
-user 根据文件属主查找
-type 根据文件类型查找
[root@localhost home]# ls
bigbigtong  oracle  rpm  test  test1  test2
[root@localhost home]# ls test
bigbigtong
[root@localhost home]# find / -name bigbigtong
/home/bigbigtong
/home/test/bigbigtong
home目录下有bigbigtong文件夹,test目录下bigbigtong文件,在根目录下查找name为bigbigtong的文件或者目录,可以看到查询结果是正确的
ln命令:
用途:为文件或者目录建立连接
格式:ln [-s] 源文件或目录 链接文件或目标目录
-s 建立符号链接文件,省略就是建立硬链接
符号链接:指向原始文件所在路径,又称软连接
硬链接:指向原始文件所在的数据存储位置
不能为目录创建硬链接文件
硬链接与原始文件必须处在同一个分区(文件系统)中
先看看给文件建立符号链接(软连接)
[root@localhost home]# ls
[root@localhost home]# touch file1 file2 file3
[root@localhost home]# mkdir test1 test2
[root@localhost home]# ls
file1  file2  file3  test1  test2
[root@localhost home]# vim file1
[root@localhost home]# cat file1
123
[root@localhost home]# ln -s file1 test1
[root@localhost home]# cd test1
[root@localhost test1]# ls
file1
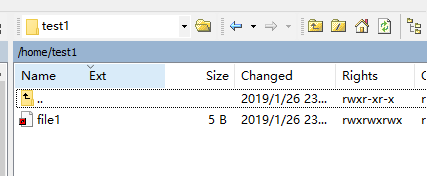
在home目录下新建文件file1、file2、file3和目录test1、test2,然后编辑file1,插入字符123;再在test1中建立file1的软连接
此时我们看一下test1中的file1

大小为5B,还有标红并且还不能打开这个文件。
我们再修改home目录下的file1
[root@localhost home]# vim file1
[root@localhost home]# cat file1
123
321
再去看看软连接file1

大小还是不变,还是标红
我们再把home目录下的file1删除,再看看软连接file1
[root@localhost home]# rm file1
rm: remove regular file `file1'? y
[root@localhost home]# ls
file2  file3  test1  test2
[root@localhost home]# ls test1
file1
可以看到它还是存在
如果我们用命令查看test1下的file1,会发现报错“cat: file1: Too many levels of symbolic links”这是因为我们在建立符号链接时用得时相对路径。下面我们把test1下的file1删除,在home目录下新建file1,插入123,再次给test1建立软连接,但是这次我们使用绝对路径。
[root@localhost home]# ls
file1  file2  file3  test1  test2
[root@localhost home]# cat file1
123
[root@localhost home]# ln -s /home/file1 /home/test1
[root@localhost home]# cd test1
[root@localhost test1]# ls
file1
[root@localhost test1]# cat file1
123
[root@localhost test1]# cd ..
[root@localhost home]# vim file1
[root@localhost home]# cat file1
123
12345
[root@localhost home]# cat test1/file1
123
12345
[root@localhost home]# rm -rf test1/file1
[root@localhost home]# ls
file1  file2  file3  test1  test2
[root@localhost home]# cat file1
123
12345
[root@localhost home]# ls test1
[root@localhost home]# ln -s /home/file1 /home/test1
[root@localhost home]# cat test1/file1
123
12345
[root@localhost home]# rm -rf file1
[root@localhost home]# ls
file2  file3  test1  test2
[root@localhost home]# ls test1
file1
可以看到,用绝对路径建立的软连接,是可以查看链接文件的,而且看到链接文件是随着源文件的更改而改变的,但是删除源文件,链接文件就变成了像之前用相对路径建立的符号链接一样。
给目录创建软连接
[root@localhost home]# ls
file2  file3  test1  test2
[root@localhost home]# ls test1
file1
[root@localhost home]# ls test2
[root@localhost home]# ln -s /home/test1 /home/test2
在test2下面创建软连接,我们再看看test2下有什么
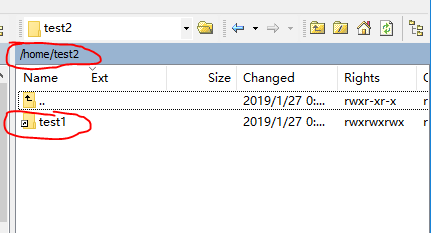
我们尝试点击这个test1

可以发现路径变了,变成了/home/test1了。这个给目录创建软连接像极了我们在Windows下面创建快捷方式一样。
硬链接就好理解了,不能给目录创建硬链接,给文件创建的硬链接,其实就是两个文件共同指向同一块内存地址(数据在内存中的存储位置),两边同步改变,删除一个另一个依然有效。
[root@localhost test1]# ln /home/test1 /home/test2
ln: `/home/test1': hard link not allowed for directory
小结:Linux中对文件操作命令有touch、file、cp、mv、which、find、ln等常见操作指令
给目录创建软连接相当于Windows中的创建快捷方式,不能给目录创建硬链接,文件的硬链接指向同一块数据存储位置