需求:收集日志
需求流程图

环境
- HDFS环境
- Flume环境
- Nginx环境
- HBase
- Hive
- mysql
nginx安装
安装之前准备
1、依赖 gcc openssl-devel pcre-devel zlib-devel
    安装:yum install gcc openssl-devel pcre-devel zlib-devel -y

安装Nginx
./configure

make && make install

默认安装目录:
/usr/local/nginx


配置Nginx为系统服务,以方便管理
  1、在/etc/rc.d/init.d/目录中建立文本文件nginx
  2、在文件中粘贴下面的内容:
#!/bin/sh
#
# nginx - this script starts and stops the nginx daemon
#
# chkconfig:   - 85 15
# description:  Nginx is an HTTP(S) server, HTTP(S) reverse
#               proxy and IMAP/POP3 proxy server
# processname: nginx
# config:      /etc/nginx/nginx.conf
# config:      /etc/sysconfig/nginx
# pidfile:     /var/run/nginx.pid

# Source function library.
. /etc/rc.d/init.d/functions

# Source networking configuration.
. /etc/sysconfig/network

# Check that networking is up.
[ "$NETWORKING" = "no" ] && exit 0

nginx="/usr/local/nginx/sbin/nginx"
prog=$(basename $nginx)

NGINX_CONF_FILE="/usr/local/nginx/conf/nginx.conf"

[ -f /etc/sysconfig/nginx ] && . /etc/sysconfig/nginx

lockfile=/var/lock/subsys/nginx

make_dirs() {
   # make required directories
   user=`nginx -V 2>&1 | grep "configure arguments:" | sed 's/[^*]*--user=([^ ]*).*/1/g' -`
   options=`$nginx -V 2>&1 | grep 'configure arguments:'`
   for opt in $options; do
       if [ `echo $opt | grep '.*-temp-path'` ]; then
           value=`echo $opt | cut -d "=" -f 2`
           if [ ! -d "$value" ]; then
               # echo "creating" $value
               mkdir -p $value && chown -R $user $value
           fi
       fi
   done
}

start() {
    [ -x $nginx ] || exit 5
    [ -f $NGINX_CONF_FILE ] || exit 6
    make_dirs
    echo -n $"Starting $prog: "
    daemon $nginx -c $NGINX_CONF_FILE
    retval=$?
    echo
    [ $retval -eq 0 ] && touch $lockfile
    return $retval
}

stop() {
    echo -n $"Stopping $prog: "
    killproc $prog -QUIT
    retval=$?
    echo
    [ $retval -eq 0 ] && rm -f $lockfile
    return $retval
}

restart() {
    configtest || return $?
    stop
    sleep 1
    start
}

reload() {
    configtest || return $?
    echo -n $"Reloading $prog: "
    killproc $nginx -HUP
    RETVAL=$?
    echo
}

force_reload() {
    restart
}

configtest() {
  $nginx -t -c $NGINX_CONF_FILE
}

rh_status() {
    status $prog
}

rh_status_q() {
    rh_status >/dev/null 2>&1
}

case "$1" in
    start)
        rh_status_q && exit 0
        $1
        ;;
    stop)
        rh_status_q || exit 0
        $1
        ;;
    restart|configtest)
        $1
        ;;
    reload)
        rh_status_q || exit 7
        $1
        ;;
    force-reload)
        force_reload
        ;;
    status)
        rh_status
        ;;
    condrestart|try-restart)
        rh_status_q || exit 0
            ;;
    *)
        echo $"Usage: $0 {start|stop|status|restart|condrestart|try-restart|reload|force-reload|configtest}"
        exit 2
esac

3、修改nginx文件的执行权限
    chmod +x nginx
4、添加该文件到系统服务中去
    chkconfig --add nginx
    查看是否添加成功
    chkconfig --list nginx

启动,停止,重新装载
service nginx start|stop
配置nginx:
#user  nobody;
worker_processes  1;

#error_log  logs/error.log;
#error_log  logs/error.log  notice;
#error_log  logs/error.log  info;

#pid        logs/nginx.pid;


events {
    worker_connections  1024;
}

# load modules compiled as Dynamic Shared Object (DSO)
#
#dso {
#    load ngx_http_fastcgi_module.so;
#    load ngx_http_rewrite_module.so;
#}

http {
    include       mime.types;
    default_type  application/octet-stream;

    #log_format  main  '$remote_addr - $remote_user [$time_local] "$request" '
    #                  '$status $body_bytes_sent "$http_referer" '
    #                  '"$http_user_agent" "$http_x_forwarded_for"';

    log_format my_format '$remote_addr^A$msec^A$http_host^A$request_uri';

    #access_log  logs/access.log  main;

    sendfile        on;
    #tcp_nopush     on;

    #keepalive_timeout  0;
    keepalive_timeout  65;

    #gzip  on;

    server {
        listen       80;
        server_name  localhost;

        #charset koi8-r;

        #access_log  logs/host.access.log  main;

        location / {
            root   html;
            index  index.html index.htm;
        }

        location = /log.gif {
            default_type image/gif;
            access_log /opt/data/access.log my_format;
        }


        #error_page  404              /404.html;

        # redirect server error pages to the static page /50x.html
        #
        error_page   500 502 503 504  /50x.html;
        location = /50x.html {
            root   html;
        }

        # proxy the PHP scripts to Apache listening on 127.0.0.1:80
        #
        #location ~ .php$ {
        #    proxy_pass   http://127.0.0.1;
        #}

        # pass the PHP scripts to FastCGI server listening on 127.0.0.1:9000
        #
        #location ~ .php$ {
        #    root           html;
        #    fastcgi_pass   127.0.0.1:9000;
        #    fastcgi_index  index.php;
        #    fastcgi_param  SCRIPT_FILENAME  /scripts$fastcgi_script_name;
        #    include        fastcgi_params;
        #}

        # deny access to .htaccess files, if Apache's document root
        # concurs with nginx's one
        #
        #location ~ /.ht {
        #    deny  all;
        #}
    }


    # another virtual host using mix of IP-, name-, and port-based configuration
    #
    #server {
    #    listen       8000;
    #    listen       somename:8080;
    #    server_name  somename  alias  another.alias;

    #    location / {
    #        root   html;
    #        index  index.html index.htm;
    #    }
    #}


    # HTTPS server
    #
    #server {
    #    listen       443 ssl;
    #    server_name  localhost;

    #    ssl_certificate      cert.pem;
    #    ssl_certificate_key  cert.key;

    #    ssl_session_cache    shared:SSL:1m;
    #    ssl_session_timeout  5m;

    #    ssl_ciphers  HIGH:!aNULL:!MD5;
    #    ssl_prefer_server_ciphers  on;

    #    location / {
    #        root   html;
    #        index  index.html index.htm;
    #    }
    #}

}
nginx启动
service nginx stop
service nginx start
nginx测试:

代码地址:生产nginx日志
flume编写
# example.conf: A single-node Flume configuration

# Name the components on this agent
a1.sources = r1
a1.sinks = k1
a1.channels = c1

# Describe/configure the source
a1.sources.r1.type = exec
a1.sources.r1.command = tail -F /opt/data/access.log

# Describe the sink
a1.sinks.k1.type = hdfs
a1.sinks.k1.hdfs.path = /project/%Y%m%d
a1.sinks.k1.hdfs.filePrefix = log-
a1.sinks.k1.hdfs.rollInterval = 0
a1.sinks.k1.hdfs.rollSize = 10240
a1.sinks.k1.hdfs.rollCount = 0
a1.sinks.k1.hdfs.idleTimeout = 30
a1.sinks.k1.hdfs.fileType = DataStream
a1.sinks.k1.hdfs.callTimeout = 60000
a1.sinks.k1.hdfs.useLocalTimeStamp = true

# Use a channel which buffers events in memory
a1.channels.c1.type = memory
a1.channels.c1.capacity = 1000
a1.channels.c1.transactionCapacity = 100

# Bind the source and sink to the channel
a1.sources.r1.channels = c1
a1.sinks.k1.channel = c1
启动:flume-ng agent --conf-file project --name a1 -Dflume.root.logger=INFO,console
启动nginx:
访问:http://localhost:8080/log.gif/demo3.jsp
tail -F /opt/data/access.log查看日志

通过flume在HDFS下生成日志

前台产生日志地址:
注意点:
- 需要将项目的ip修改成对应的nginx访问地址
- 配置tomcat启动,1.需要引入deployment
数据清洗:编写MR
代码地址:
注意点:
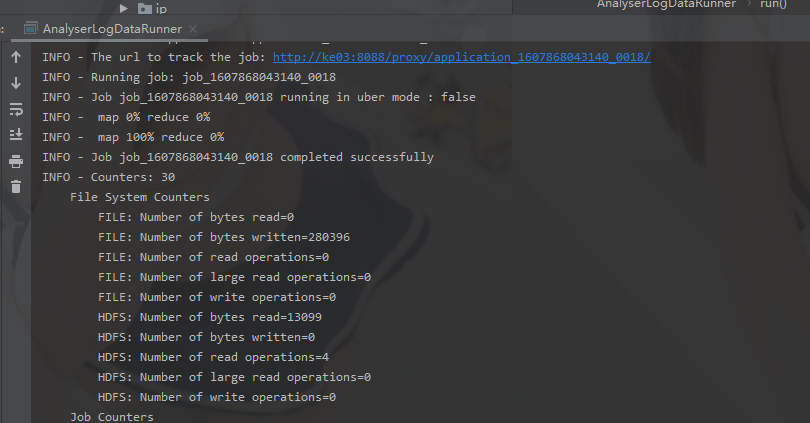
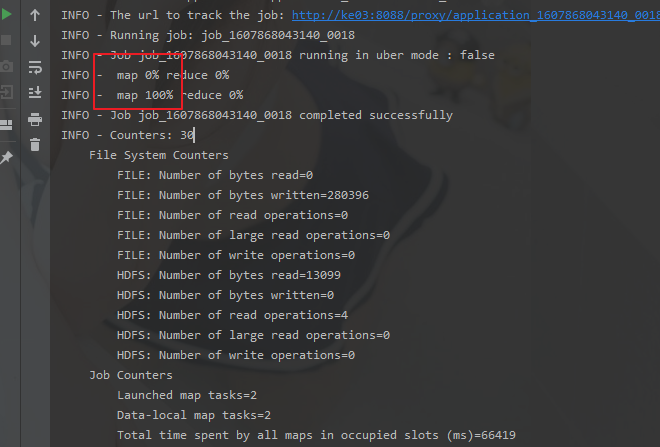
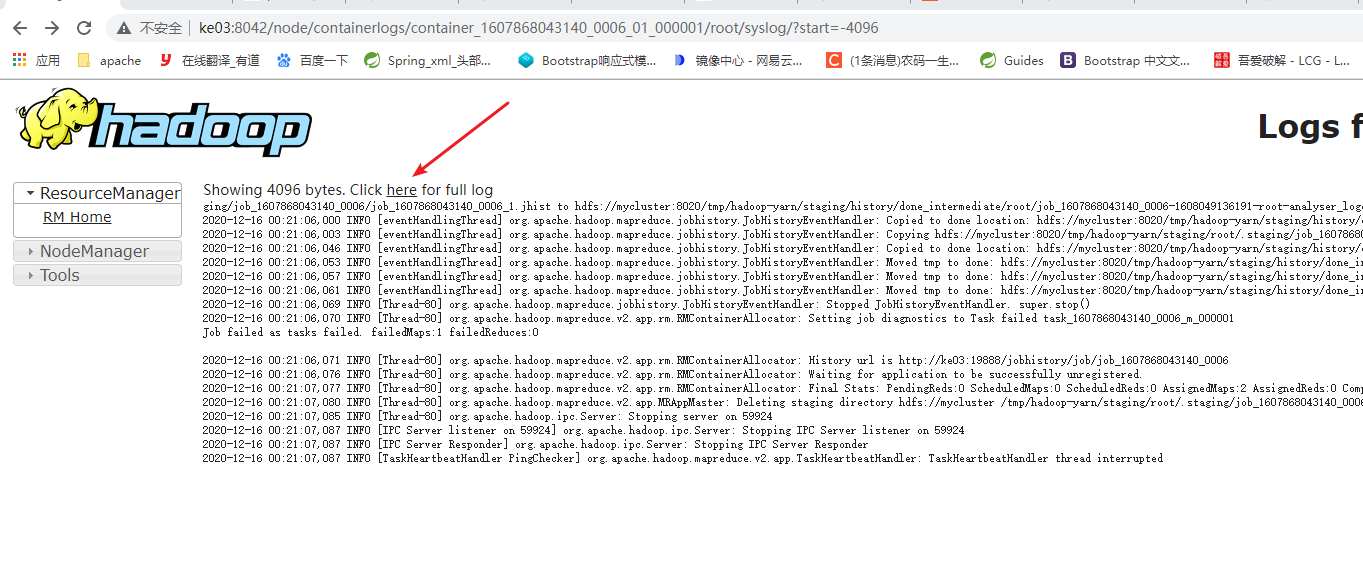
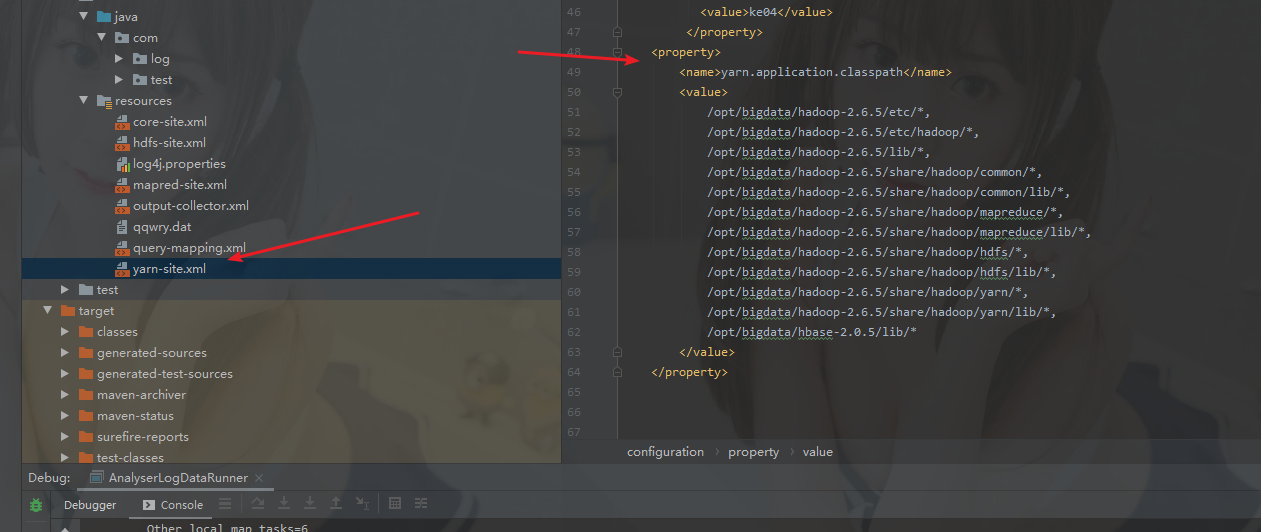
- 集群跑,可以通过每次跑的任务日志获取信息,日志地址如下
- 启动项配置日期:格式 2020-12-16
- 启动日志中遇到的错误排查
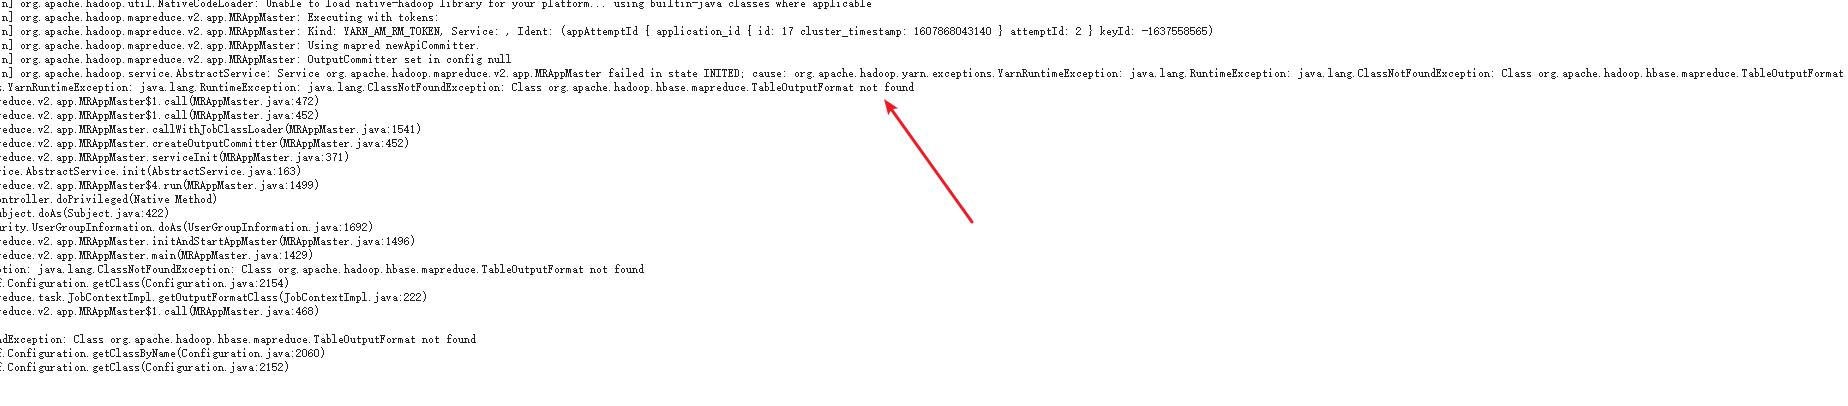
启动报错: org.apache.hadoop.hbase.mapreduce.TableOutputFormat,各种百度加入下面的配置
启动不报错了,然后去跑mapreduce 发现下面问题
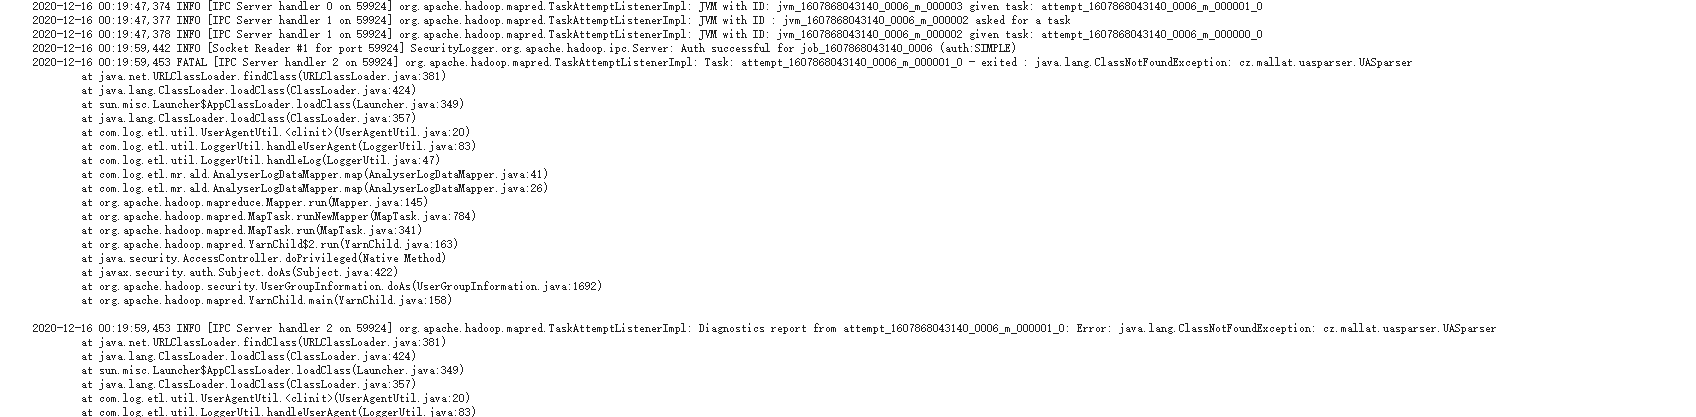
1.遇到上面问题,说明jar包没有加载该依赖类,说明打包产生冲突,导致对应jar包没有加载进来
2.重新打包报错Failure to find org.glassfish:javax.el:pom:3.0.1-b06-SNAPSHOT
3.解决方法:https://blog.csdn.net/qq_33598343/article/details/106379948 就是将该maven包SNAPSHOT所有版本删掉,重新创建(根据3.0.1-b06),然后改掉文件名,文件内SNAPSHOT名称
4.关掉idea,重新打开,重新打包,跑任务失败。
5.恢复报错,将cz.mallat.uasparser.UASparser对应的jar包放入目录: /opt/bigdata/hadoop-2.6.5/share/hadoop/hdfs/lib 重启打包 又遇到别的包找不到 失败!
6.最终解决方式
总结:
 1.报错没有mapreduce类,网上找的这个方法是直接忽略了直接去服务器上找,没有先找对应的jar包
2.虽然解决了该问题,但是引入了别的包没有找到问题。
3.总结: 打包失败,jar包没有打进来

所以更换打包方式
    <build>
        <plugins>
            <!-- Maven Shade Plugin -->
            <plugin>
                <groupId>org.apache.maven.plugins</groupId>
                <artifactId>maven-shade-plugin</artifactId>
                <version>3.2.0</version>
                <configuration>
                    <createDependencyReducedPom>true</createDependencyReducedPom>
                </configuration>
                <executions>
                    <execution>
                        <phase>package</phase>
                        <goals>
                            <goal>shade</goal>
                        </goals>
                        <configuration>
                            <transformers>
                                <transformer implementation="org.apache.maven.plugins.shade.resource.ManifestResourceTransformer">
                                    <!-- 主类的全限定名 -->
                                    <mainClass>com.healchow.consumer.Main</mainClass>
                                </transformer>
                            </transformers>
                        </configuration>
                    </execution>
                </executions>
            </plugin>
        </plugins>
    </build>
附上成功图: