一、数据库OLAP和OLTP简单的介绍比较
1.OLTP:on-line transaction processing在线事务处理,应用在传统关系型数据库比较多,执行日常基本的事务处理,比如数据库记录的增删改查,如银行的一笔交易记录,就是一个典型的事务处理,强调数据库内存效率,强调内存各种指标的命令率,强调绑定变量,强调并发操作;OLTP有以这几个特点:实时性要求高;数据量不是很大;交易一般是确定的;高并发;满足ACID
对于OLTP来说一般都是高可用的在线系统,以小的事务以及小的查询为主,评估其系统的时候,一般看其每秒执行的 Transaction 以及 Execute SQL 的数量。在这样的系统中,单个数据库每秒处理的 Transaction 往往超过几百个,或者是几千个, Select 语句的执行量每秒几千甚至几万个。典型的 OLTP 系统有电子商务系统、银行、证券等,如美国 eBay 的业务数据库,就是很典型的 OLTP 数据库。
OLTP 系统最容易出现瓶颈的地方就是 CPU 与磁盘子系统。
(1) CPU 出现瓶颈常表现在逻辑读总量与计算性函数或者是过程上,逻辑读总量等于单个语句的逻辑读乘以执行次数,如果单个语句执行速度虽然很快,但是执行次数非常多,那么,也可能会导致很大的逻辑读总量。设计的方法与优化的方法就是减少单个语句的逻辑读,或者是减少它们的执行次数。另外,一些计算型的函数,如自定义函数、 decode 等的频繁使用,也会消耗大量的 CPU 时间,造成系统的负载升高,正确的设计方法或者是优化方法,需要尽量避免计算过程,如保存计算结果到统计表就是一个好的方法。
(2) 磁盘子系统在 OLTP 环境中,它的承载能力一般取决于它的 IOPS 处理能力. 因为在 OLTP 环境中,磁盘物理读一般都是 db file sequential read,也就是单块读,但是这个读的次数非常频繁。如果频繁到磁盘子系统都不能承载其 IOPS 的时候,就会出现大的性能问题。OLTP 比较常用的设计与优化方式为 Cache 技术与 B-tree 索引技术, Cache 决定了很多语句不需要从磁盘子系统获得数据, 所以, Web cache 与 Oracle data buffer 对 OLTP 系统是很重要的。另外,在索引使用方面,语句越简单越好,这样执行计划也稳定,而且一定要使用绑定变量,减少语句解析,尽量减少表关联,尽量减少分布式事务,基本不使用分区技术、MV 技术、并行技术及位图索引。因为并发量很高,批量更新时要分批快速提交,以避免阻塞的发生。
OLTP 系统是一个数据块变化非常频繁, SQL 语句提交非常频繁的系统。 对于数据块来说,应尽可能让数据块保存在内存当中,对于 SQL 来说,尽可能使用变量绑定技术来达到 SQL 重用,减少物理 I/O 和重复的 SQL 解析,从而极大的改善数据库的性能。这里影响性能除了绑定变量,还有可能是热快(hot block)。 当一个块被多个用户同时读取时, Oracle 为了维护数据的一致性,需要使用 Latch 来串行化用户的操作。当一个用户获得了 latch 后,其他用户就只能等待,获取这个数据块的用户越多,等待就越明显。 这就是热快的问题。 这种热快可能是数据块,也可能是回滚端块。 对于数据块来讲,通常是数据库的数据分布不均匀导致,如果是索引的数据块,可以考虑创建反向所以来达到重新分布数据的目的,对于回滚段数据块,可以适当多增加几个回滚段来避免这种争用 。
2.OLAP:On-Line Analytical Processing在线事务分析,是数据仓库系统的主要应用,支持复杂的分析操作,侧重决策支持,并且提供直观易懂的查询结果。典型的应用就是复杂的动态的报表系统。OLAP有以下这几个特点:实时性要求不是很高;数据量大;OLAP系统的重点是通过数据提供决策支持,所以查询一般都是动态,自定义的。所以在OLAP中,维度的概念特别重要。一般会将用户所有关心的维度数据,存入对应数据平台。
在线事务处理有的时候也叫 DSS 决策支持系统,就是我们说的数据仓库。在这样的系统中,语句的执行量不是考核标准,因为一条语句的执行时间可能会非常长,读取的数据也非常多。所以,在这样的系统中, 考核的标准往往是磁盘子系统的吞吐量(带宽),如能达到多少 MB/s 的流量。磁盘子系统的吞吐量则往往取决于磁盘的个数,这个时候, Cache 基本是没有效果的,数据库的读写类型基本上是 db file scattered read 与 direct path read/write。应尽量采用个数比较多的磁盘以及比较大的带宽,如 4Gb 的光纤接口。在 OLAP 系统中,常使用分区技术、并行技术。
1)分区技术在 OLAP 系统中的重要性主要体现在数据库管理上,比如数据库加载,可以通过分区交换的方式实现,备份可以通过备份分区表空间实现,删除数据可以通过分区进行删除,至于分区在性能上的影响,它可以使得一些大表的扫描变得很快(只扫描单个分区) 。另外,如果分区结合并行的话,也可以使得整个表的扫描会变得很快。 总之,分区主要的功能是管理上的方便性,它并不能绝对保证查询性能的提高,有时候分区会带来性能上的提高,有时候会降低。并行技术除了与分区技术结合外,在 Oracle 10g 中,与 RAC 结合实现多节点的同时扫描,效果也非常不错,可把一个任务,如 select 的全表扫描,平均地分派到多个 RAC 的节点上去。在 OLAP 系统中,不需要使用绑定(BIND)变量,因为整个系统的执行量很小,分析时间对于执行时间来说,可以忽略,而且可避免出现错误的执行计划。但是 OLAP 中可以大量使用位图索引,物化视图,对于大的事务,尽量寻求速度上的优化,没有必要像 OLTP 要求快速提交,甚至要刻意减慢执行的速度。绑定变量真正的用途是在 OLTP 系统中,这个系统通常有这样的特点,用户并发数很大,用户的请求十分密集,并且这些请求的 SQL 大多数是可以重复使用的。对于 OLAP 系统来说,绝大多数时候数据库上运行着的是报表作业, 执行基本上是聚合类的 SQL 操作,比如 group by,这时候, 把优化器模式设置为 all_rows 是恰当的。 而对于一些分页操作比较多的网站类数据库,设置为 first_rows 会更好一些。 但有时候对于OLAP 系统,我们又有分页的情况下,我们可以考虑在每条 SQL 中用 hint。 如:
Select /*+first_rows(10) */ a.* from table a;
2)分开设计与优化
在设计上要特别注意,如在高可用的 OLTP 环境中,不要盲目地把 OLAP 的技术拿过来用。如分区技术,假设不是大范围地使用分区关键字,而采用其它的字段作为 where 条件,那么,如果是本地索引,将不得不扫描多个索引,而性能变得更为低下。如果是全局索引,又失去分区的意义。并行技术也是如此,一般在完成大型任务时才使用,如在实际生活中,翻译一本书,可以先安排多个人,每个人翻译不同的章节,这样可以提高翻译速度。如果只是翻译一页书,也去分配不同的人翻译不同的行,再组合起来,就没必要了,因为在分配工作的时间里,一个人或许早就翻译完了。位图索引也是一样,如果用在 OLTP 环境中,很容易造成阻塞与死锁。但是,在 OLAP环境中,可能会因为其特有的特性,提高 OLAP 的查询速度。 MV 也是基本一样,包括触发器等,在 DML 频繁的 OLTP 系统上,很容易成为瓶颈,甚至是 Library Cache 等待,而在 OLAP 环境上,则可能会因为使用恰当而提高查询速度。对于 OLAP 系统,在内存上可优化的余地很小, 增加 CPU 处理速度和磁盘 I/O 速度是最直接的提高数据库性能的方法,当然这也意味着系统成本的增加。比如我们要对几亿条或者几十亿条数据进行聚合处理,这种海量的数据,全部放在内存中操作是很难的,同时也没有必要,因为这些数据快很少重用,缓存起来也没有实际意义,而且还会造成物理 I/O 相当大。 所以这种系统的瓶颈往往是磁盘 I/O 上面的。对于 OLAP 系统, SQL 的优化非常重要,因为它的数据量很大,做全表扫描和索引对性能上来说差异是非常大的。
3.对二者的对比:

二、HBASE的特点:
1.简单介绍 hbase 是基于 Google BigTable 模型开发的, 典型的 key/value 系统。是建立在 hdfs之上,提供高可靠性、高性能、列存储、可伸缩、实时读写 nosql 的数据库系统。主要用于海量结构化和半结构化数据存储。它介于 nosql 和 RDBMS 之间,仅能通过主键(row key)和主键的 range 来检索数据,仅支持单行事务(可通过 hive 支持来实现多表 join 等复杂操作)。Hbase 查询数据功能很简单,不支持 join 等复杂操作,不支持复杂的事务(行级的事务)与 hadoop 一样, Hbase 目标主要依靠横向扩展,通过不断增加廉价的商用服务器,来增加计算和存储能力 。
2.HBase 中的表的特点:
1)大:一个表可以有上十亿行,上百万列
2)无模式:每行都有一个可排序的主键和任意多的列,列可以根据需要动态的增加,同一张表中不同的行可以有截然不同的列;
3)面向列:面向列(族)的存储和权限控制, 列(族)独立检索。
4)稀疏:对于为空(null)的列,并不占用存储空间,因此,表可以设计的非常稀疏。
5)数据多版本:每个单元中的数据可以有多个版本,默认情况下版本号自动分配,是单元格插入时的时间戳
6)数据类型单一: Hbase 中的数据都是字节数组 byte[]
3.HBASE逻辑划分:
HBase 以表的形式存储数据。表有行和列组成。列划分为若干个列族(column family
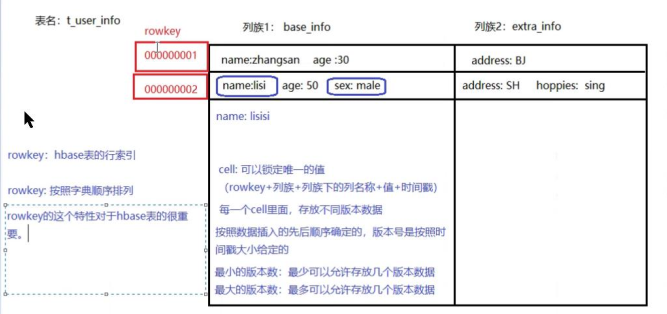
1)Row Key
与 nosql 数据库们一样,row key 是用来检索记录的主键。访问 hbase table 中的行,只有三种方式:
1 通过单个 row key 访问
2 通过 row key 的 range
3 全表扫描
1)Row key 行键 (Row key)
可以是任意字符串(最大长度是 64KB,实际应用中长度一般为 10-100bytes),在 hbase 内部, row key 保存为字节数组。Hbase 会对表中的数据按照 rowkey 排序(字典顺序)。存储时,数据按照 Row key 的字典序(byte order)排序存储。设计 key 时,要充分排序存储这个特性, 将经常一起读取的行存储放到一起。
(位置相关性)注意:字典序对 int 排序的结果1,10,100,11,12,13,14,15,16,17,18,19,2,20,21,…,9,91,92,93,94,95,96,97,98,99。要保持整形的自然序, 行键必须用 0 作左填充。行的一次读写是原子操作 (不论一次读写多少列)。这个设计决策能够使用户很容易的理解程序在对同一个行进行并发更新操作时的行为。
2)列族hbase
表中的每个列,都归属与某个列族。 列族是表的 schema 的一部分(而列不是),必须在使用表之前定义。列名都以列族作为前缀。例如 courses:history , courses:math 都属于 courses 这个列族。访问控制、磁盘和内存的使用统计都是在列族层面进行的。列族越多,在取一行数据时所要参与 IO、搜寻的文件就越多,所以,如果没有必要,不要设置太多的列族。一般设置 2-3 个比较合理。
3)时间戳
HBase 中通过 row 和 columns 确定的为一个存贮单元称为 cell。每个 cell 都保存着同一份数据的多个版本。版本通过时间戳来索引。时间戳的类型是 64 位整型。 时间戳可以由hbase(在数据写入时自动 )赋值,此时时间戳是精确到毫秒的当前系统时间。时间戳也可以由客户显式赋值。如果应用程序要避免数据版本冲突,就必须自己生成具有唯一性的时间戳。每个 cell 中,不同版本的数据按照时间倒序排序,即最新的数据排在最前面。为了避免数据存在过多版本造成的的管理 (包括存贮和索引)负担, hbase 提供了两种数据版本回收方式: 保存数据的最后 n 个版本 保存最近一段时间内的版本(设置数据的生命周期 TTL)。
4)Cell:由{row key, column( =<family> + <label>), version} 唯一确定的单元。cell 中的数据是没有类型的,全部是字节码形式存贮。
4.HBASE集群介绍:
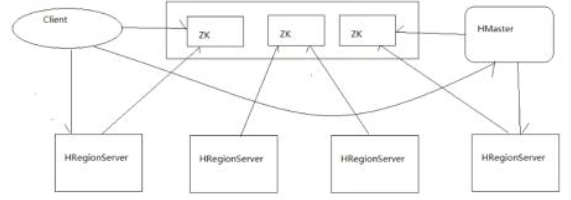
组件介绍:
Client:包含访问 Hbase 的接口,并维护 cache 来加快对 Hbase 的访问,比如 region 的位置信息。
HMaster:是 hbase 集群的主节点,可以配置多个,用来实现 HA为 RegionServer 分配 region负责 RegionServer 的负载均衡发现失效的 RegionServer 并重新分配其上的 region
RegionServer:Regionserver 维护 region,处理对这些 region 的 IO 请求;Regionserver 负责切分在运行过程中变得过大的 region
Region:分布式存储的最小单元。
Zookeeper 作用:
通过选举,保证任何时候,集群中只有一个活着的 HMaster, HMaster 与 RegionServers 启动时会向 ZooKeeper 注册
存贮所有 Region 的寻址入口
实时监控 Region server 的上线和下线信息。并实时通知给 HMaster
存储 HBase 的 schema 和 table 元数据
Zookeeper 的引入使得 HMaster 不再是单点故障
三、HBASE shell 基本命令
1.$>hbase shell; //进入shell命令行
2$hbase>help //帮助
3.$hbase>help 'create_namespace ' //查看创建名字空间的帮助命令
3$hbase>list_namespace //列出名字空间
4$hbase>list_namespace_tables 'default' //列出默认名字空间的表
5$hbase>list_namespace_tables 'hbase' //查看hbase名字空间下的表
6$hbase>create_namespace 'ns3'; //创建名称空间
7.$hbase>put 'ns4:t1','row1','f1:id',100; //向hbase中插入数据id
8.$hbase>put 'ns4:t1','row1','f1:name','tom' //向表中插入一行数据name
9.$hbase>put 'ns4:t1','row1','f1:age',23; //向表中插入一行数据age
10..$hbase>get 'ns4:t1','row1' //行查询
11..$hbase>scan 'ns4:t1' //扫描表
12.$hbase>disable 'ns1:t1'; //禁用表
13.$hbase>drop 'ns1:t1'; //删除表,记住在删除表之前需要禁用表
14.$hbase>flush 'ns4:t1' //清理内存数据到磁盘中去
15.$hbase>scan 'hbase:meta' //查看元数据表
16.$hbase>split 'ns4:t1' //切割表
17.$hbase>split 'regionName','splitKey' //对区域进行切割
18.$hbase>split 'ns4:t1,row5184,1531798673543.8990374fdac33a552623b6886bf57b7e.','//row8888'//按照给定的rowkey对region进行切割
19.$hbase>move '' move '0293961e341eabe080e63ca2fd0d09dd','s203,16020,1531457868571' //将region移动到另外一个region上
20.$hbase>merge_region merge_region '0293961e341eabe080e63ca2fd0d09dd','01cbc34b4048a2586ca171cf31046a30'//实现region的合并
21.$hbase>desc 'ns2:t1' //查看指定名称空间下面的表
四、HBASE代码开发
1.通过javaAPI访问HBASE,部分进行源码分析
1):创建HBASE模块,添加依赖
<?xml version="1.0" encoding="UTF-8"?>
<project xmlns="http://maven.apache.org/POM/4.0.0"
         xmlns:xsi="http://www.w3.org/2001/XMLSchema-instance"
         xsi:schemaLocation="http://maven.apache.org/POM/4.0.0 http://maven.apache.org/xsd/maven-4.0.0.xsd">
    <modelVersion>4.0.0</modelVersion>

    <groupId>com.it18zhang</groupId>
    <artifactId>HBaseDemo</artifactId>
    <version>1.0-SNAPSHOT</version>
    <dependencies>
        <dependency>
            <groupId>org.apache.hbase</groupId>
            <artifactId>hbase-client</artifactId>
            <version>1.2.6</version>
        </dependency>
        <dependency>
            <groupId>org.apache.hbase</groupId>
            <artifactId>hbase-server</artifactId>
            <version>1.2.6</version>
        </dependency>
        <dependency>
            <groupId>junit</groupId>
            <artifactId>junit</artifactId>
            <version>4.12</version>
        </dependency>
    </dependencies>
</project>
2.通过API来测试CRUD
1.测试put()
public  void put() throws IOException {
        //创建配置对象Configuration
        Configuration conf = HBaseConfiguration.create();
        //通过连接工厂创建连接对象
       Connection conn =  ConnectionFactory.createConnection(conf);
        //通过连接查询table对象
        TableName tname = TableName.valueOf("ns1:t1");
        //获得表
        Table table = conn.getTable(tname);
        //通过Bytes工具类创建字节数组,将字符串转换成字节数组
        byte[] rowid = Bytes.toBytes("row3");
       //创建put对象
        Put put = new Put(rowid);
        //
        byte[] f1 = Bytes.toBytes("f1");
        byte[] id = Bytes.toBytes("id");
        byte[] value = Bytes.toBytes(101);
        put.addColumn(f1,id,value);
        //将数据传进表中去,执行插入操作
        table.put(put);
    }
代码解析:
首先来进行相关的配置:Configuration conf = HBaseConfiguration.create(),接下来看看hbaseConfiguration的源码:
package org.apache.hadoop.hbase;
/**
 * Adds HBase configuration files to a Configuration
 */
@InterfaceAudience.Public
@InterfaceStability.Stable
public class HBaseConfiguration extends Configuration {
  private static final Log LOG = LogFactory.getLog(HBaseConfiguration.class);

  /**
   * Instantiating HBaseConfiguration() is deprecated. Please use
   * HBaseConfiguration#create() to construct a plain Configuration
   */
  @Deprecated
  public HBaseConfiguration() {
    //TODO:replace with private constructor, HBaseConfiguration should not extend Configuration
    super();
    addHbaseResources(this);
    LOG.warn("instantiating HBaseConfiguration() is deprecated. Please use"
        + " HBaseConfiguration#create() to construct a plain Configuration");
  }
您可以看到,HBaseConfiguration 这个类是在org.apache.hadoop.hbase这个包下面,继承自Configuration这个类,而Configuration这个类是实现了Writable和Comparable这两个接口。
HBaseConfiguration()这个方法已经过期了,推荐使用create()方法。
public static Configuration create() {
  Configuration conf = new Configuration();
  // In case HBaseConfiguration is loaded from a different classloader than
  // Configuration, conf needs to be set with appropriate class loader to resolve
  // HBase resources.
  conf.setClassLoader(HBaseConfiguration.class.getClassLoader());
  return addHbaseResources(conf);
}
HBaseConfiguration是从不同于Configuration的类来进行加载的,conf需要设置适当的类加载器来解析hbase资源,最终返回addHbaseResources(conf)
public static Configuration addHbaseResources(Configuration conf) {
conf.addResource("hbase-default.xml");
  conf.addResource("hbase-site.xml");

  checkDefaultsVersion(conf);
  HeapMemorySizeUtil.checkForClusterFreeMemoryLimit(conf);
  return conf;
}
这个方法添加了hbase-default.xml(类库自带不需要进行配置)和hbase-site.xml这两个配置文件,所以我们需要从集群中拷贝我们配置的hbase-site.xml文件,
再次我们来看:
Connection conn = ConnectionFactory.createConnection(conf);
A non-instantiable class that manages creation of {@link Connection}s.
* Managing the lifecycle of the {@link Connection}s to the cluster is the responsibility of
* the caller.
* From a {@link Connection}, {@link Table} implementations are retrieved
* with {@link Connection#getTable(TableName)}. Example:
* <pre>
* Connection connection = ConnectionFactory.createConnection(config);
* Table table = connection.getTable(TableName.valueOf("table1"));
* try {
*   // Use the table as needed, for a single operation and a single thread
* } finally {
*   table.close();
*   connection.close();
* }
ConnectionFactory这个类是一个不可被实例化的类,只能通过ConnectionFactory.createConnection()这种静态调用的方法来调用来实现连接,并且在调用的时候会抛出异常
通过connection.getTable(TableName.valueOf("table1"))的方式来创建表,返回值类型是Table,这个类已经被封装成对象了
接下来看看:
     byte[] rowid = Bytes.toBytes("row3");
       //创建put对象
        Put put = new Put(rowid);
/**
 * Create a Put operation for the specified row.
 * @param row row key
 */
public Put(byte [] row) {
  this(row, HConstants.LATEST_TIMESTAMP);
}
在Put构造中,参数的类型是字节数据,所以我们可以将内容转换成字节数据,在HBase中有Bytes工具类可以实现数据格式的转换,然后再调用put()方法,
public Put addColumn(byte[] family, byte[] qualifier, long ts, byte[] value) {
    if(ts < 0L) {
        throw new IllegalArgumentException("Timestamp cannot be negative. ts=" + ts);
    } else {
        List list = this.getCellList(family);
        KeyValue kv = this.createPutKeyValue(family, qualifier, ts, value);
        list.add(kv);
        this.familyMap.put(CellUtil.cloneFamily(kv), list);
        return this;
    }
}
将列族,列,以及列的值添加进去
    @Test
    //查询
    public void get() throws IOException {
        //创建conf对象
        Configuration conf  = HBaseConfiguration.create();
        //通过连接工厂创建对象
        Connection conn= ConnectionFactory.createConnection();
        //通过连接查询tableName对象
        TableName tname = TableName.valueOf("ns1:t1");
        //获得table
        Table table =conn.getTable(tname);
        //通过bytes工具创建字节数组
       byte[] rowid =  Bytes.toBytes("row3");
        Get get = new Get(Bytes.toBytes("row3"));
        Result r = table.get(get);
        byte[] idvalue = r.getValue(Bytes.toBytes("f1"),Bytes.toBytes("id"));
        System.out.println(Bytes.toInt(idvalue));//将字节数组转换成整形值进行输出
    }

}
首先来看看:
Get get = new Get();
/**
 * Create a Get operation for the specified row.
 * <p>
 * If no further operations are done, this will get the latest version of
 * all columns in all families of the specified row.
 * @param row row key
 */
public Get(byte [] row) {
  Mutation.checkRow(row);
  this.row = row;
}
为指定的列创建一个Get操作,如果之前的操作已经全部完成,那么这个操作会获得指定行的所有列族的所有列的最新版本的值,所以我们这个只需要指定行值为row3就可以了
接下来:
Result r = table.get(get);
**
 * Extracts certain cells from a given row.
 * @param get The object that specifies what data to fetch and from which row.
 * @return The data coming from the specified row, if it exists.  If the row
 * specified doesn't exist, the {@link Result} instance returned won't
 * contain any {@link org.apache.hadoop.hbase.KeyValue}, as indicated by {@link Result#isEmpty()}.
 * @throws IOException if a remote or network exception occurs.
 * @since 0.20.0
 */
Result get(Get get) throws IOException;
这个方法是从给定行汇总抽取特定的单元格,参数get是从指定行获取的数据,如果数据存在,就会返回指定行的数据
最后将取出的字节数据转换成整形值进行输出
3)通过JAVA API实现hbase数据库的百万数据插入
@Test
    public void testBigInsert() throws Exception {
        DecimalFormat format = new DecimalFormat();
        format.applyPattern("0000000");
        long start =System.currentTimeMillis();
        //创建配置对象
        Configuration conf = HBaseConfiguration.create();
        //创建连接对象
        Connection conn = ConnectionFactory.createConnection(conf);
        TableName tname = TableName.valueOf("ns4:t1");
        HTable table =(HTable) conn.getTable(tname);//获取表
        table.setAutoFlush(false);
        for(int i = 0 ;i<10000;i++){
            //向put中添加row key
            Put put = new Put(Bytes.toBytes("row"+format.format(i)));//在设置rowid的时候要进行格式化
            //在进行数据插入之前要关闭写前日志
            put.setWriteToWAL(false);
            //向列族中来添加id这个列
            put.addColumn(Bytes.toBytes("f1"),Bytes.toBytes("id"),Bytes.toBytes(i));
            //向表中来添加name这个列
            put.addColumn(Bytes.toBytes("f1"),Bytes.toBytes("name"),Bytes.toBytes("tom"+i));
            //向列族中添加age这个列
            put.addColumn(Bytes.toBytes("f1"),Bytes.toBytes("age"),Bytes.toBytes(i%100));
            table.put(put);
            if(i%2000==0){
                table.flushCommits();//数据满2000的时候清理一次缓冲区
            }

        }
        System.out.println(System.currentTimeMillis()-start);
        table.flushCommits();//数据满2000的时候清理一次缓冲区
    }
4)通过java-API实现namespace的建立,disable,删除,建表,删除表,扫描等操作等操作
import org.apache.hadoop.conf.Configuration;
import org.apache.hadoop.hbase.*;
import org.apache.hadoop.hbase.client.*;
import org.apache.hadoop.hbase.util.Bytes;
import org.junit.Test;

import java.io.IOException;
import java.text.DecimalFormat;
import java.util.Iterator;

/**
 * Created by Administrator on 2018/7/17 0017.
 */
public class HBaseTest1 {
    //本方法实现测试hbase名字空间的建立
    @Test
    public void testCreateNameSpace() throws Exception {
        //配置conf对象
        Configuration conf = HBaseConfiguration.create();
        //创建连接对象
        Connection conn = ConnectionFactory.createConnection(conf);
        NamespaceDescriptor nd = NamespaceDescriptor.create("ns3").build();
        Admin admin = conn.getAdmin();
        admin.createNamespace(nd);
    }

    //本方法实现测试删除名字空间
    @Test
    public void testDropNameSpace() throws Exception {
        Configuration conf = HBaseConfiguration.create();
        Connection conn = ConnectionFactory.createConnection(conf);
        Admin admin = conn.getAdmin();
        admin.deleteNamespace("ns3");
    }

    //本方式实现遍历名字空间
    @Test
    public void testReadNameSpace() throws Exception {
        Configuration conf = HBaseConfiguration.create();
        Connection conn = ConnectionFactory.createConnection(conf);
        Admin admin = conn.getAdmin();
        NamespaceDescriptor[] nsd = admin.listNamespaceDescriptors();
        for (NamespaceDescriptor n : nsd) {
            System.out.println(n.getName());
        }
    }

    //本方法试下在名字空间中创建表
    @Test
    public void testCreateTable() throws Exception {
        Configuration conf = HBaseConfiguration.create();
        Connection conn = ConnectionFactory.createConnection(conf);
        Admin admin = conn.getAdmin();
        TableName tname = TableName.valueOf("ns3:t1");
        HTableDescriptor htd = new HTableDescriptor(tname);
        HColumnDescriptor hcd = new HColumnDescriptor("f1");
        htd.addFamily(hcd);
        admin.createTable(htd);
    }

    //本方法实现表的插入
    @Test
    public void testPut() throws Exception {
        //配置configuration
        Configuration conf = HBaseConfiguration.create();
        //配置Connection
        Connection conn = ConnectionFactory.createConnection(conf);
        //
        TableName tname = TableName.valueOf("ns3:t1");
        Table table = conn.getTable(tname);
        //
        Put put = new Put(Bytes.toBytes("row1"));
        put.addColumn(Bytes.toBytes("f1"), Bytes.toBytes("id"), Bytes.toBytes(1));
        put.addColumn(Bytes.toBytes("f1"), Bytes.toBytes("name"), Bytes.toBytes("tom"));
        put.addColumn(Bytes.toBytes("f1"), Bytes.toBytes("age"), Bytes.toBytes(13));
        table.put(put);
    }
    //本方法实现table元素的查询
    @Test
    public void testRead() throws Exception {
        Configuration conf = HBaseConfiguration.create();
        Connection conn =ConnectionFactory.createConnection(conf);
        TableName tname =TableName.valueOf("ns3:t1");
        Table table = conn.getTable(tname);
        Get get = new Get("row1".getBytes());
        Result r = table.get(get);
        byte[] idarr = r.getValue(Bytes.toBytes("f1"),Bytes.toBytes("id"));
        System.out.println(Bytes.toInt(idarr));
    }
    //本方法实现对表的禁用
    @Test
    public  void testDisable() throws Exception {
        Configuration conf = HBaseConfiguration.create();
        Connection conn = ConnectionFactory.createConnection(conf);
        Admin admin =conn.getAdmin();
        admin.disableTables("ns3:t1");
    }
    //本方法实现对表的删除操作
    @Test
    public void testDroptable() throws Exception {
        Configuration conf = HBaseConfiguration.create();
        Connection conn = ConnectionFactory.createConnection(conf);
        Admin admin = conn.getAdmin();
        admin.disableTables("ns3:t1");
        TableName tname = TableName.valueOf("ns3:t1");
        admin.deleteTable(tname);
    }
    //本方法实现百万数据插入
    @Test
    public void testBigDataInsert() throws Exception {
        DecimalFormat format = new DecimalFormat();
        format.applyPattern("0000");
        Configuration conf = HBaseConfiguration.create();
        Connection conn= ConnectionFactory.createConnection(conf);
        TableName tname = TableName.valueOf("ns3:t1");
        HTable table = (HTable)conn.getTable(tname);
        table.setAutoFlush(false);
        for(int i = 1 ; i <10000;i++){
            //向put中添加rowkey
            Put put = new Put(Bytes.toBytes("row"+format.format(i)));
            //在数据写入之前关闭写前日志
            put.setWriteToWAL(false);
            put.addColumn(Bytes.toBytes("f1"),Bytes.toBytes("id"),Bytes.toBytes(i));
            put.addColumn(Bytes.toBytes("f1"),Bytes.toBytes("name"),Bytes.toBytes("tom"+i));
            put.addColumn(Bytes.toBytes("f1"),Bytes.toBytes("id"),Bytes.toBytes(i%100));
            table.put(put);
            if(i%2000==0){
                table.flushCommits();
            }

        }
        table.flushCommits();
    }
    //本方法实现测试scan扫描,扫描的方式是前包后不包的情况
    @Test
    public void testScan() throws Exception {
        Configuration conf =HBaseConfiguration.create();
        Connection conn = ConnectionFactory.createConnection(conf);
        TableName tname = TableName.valueOf("ns3:t1");
        Table table =conn.getTable(tname);
        Scan scan =new Scan();
        scan.setStartRow(Bytes.toBytes("row5000"));
        scan.setStopRow(Bytes.toBytes("row8888"));
        ResultScanner rs = table.getScanner(scan);
        Iterator<Result> it=rs.iterator();
        while (it.hasNext()){
            Result r =  it.next();
            System.out.println(Bytes.toString(r.getValue(Bytes.toBytes("f1"),Bytes.toBytes("name"))));
        }
    }
}
 //本方法实现指定版本数来进行查询
    @Test
    public void getWithVersions() throws IOException {
        Configuration conf = HBaseConfiguration.create();
        Connection conn = ConnectionFactory.createConnection(conf);
        TableName tname = TableName.valueOf("ns2:t1");
        Table table = conn.getTable(tname);
        Get get = new Get(Bytes.toBytes("00001"));
        //检索所有版本
        get.setMaxVersions();
        Result r = table.get(get);
        List<Cell> list =r.getColumnCells(Bytes.toBytes("f1"),Bytes.toBytes("name"));
        for(Cell c :list){
            String f = Bytes.toString(c.getFamily());
            String col = Bytes.toString(c.getQualifier());
            long time =c.getTimestamp();//获取时间戳
            String val = Bytes.toString(c.getValue());
            System.out.println(f+"/"+col+"/"+time+" = "+val);
        }
}