【目录】
二、jQuery绑定事件
1、操作类 class
js版本 jQuery版本
classList.add() addClass()
classList.remove() removeClass()
classList.contains() hasClass()
classList.toggle() toggleClass()addClass(class|fn) 为每个匹配的元素添加指定的类名 removeClass([class|fn]) 从所有匹配的元素中删除全部或者指定的类 toggleClass(class|fn[,sw]) 如果存在(不存在)就删除(添加)一个类 hasClass(class) 检查当前的元素是否含有某个特定的类,如果有,则返回true
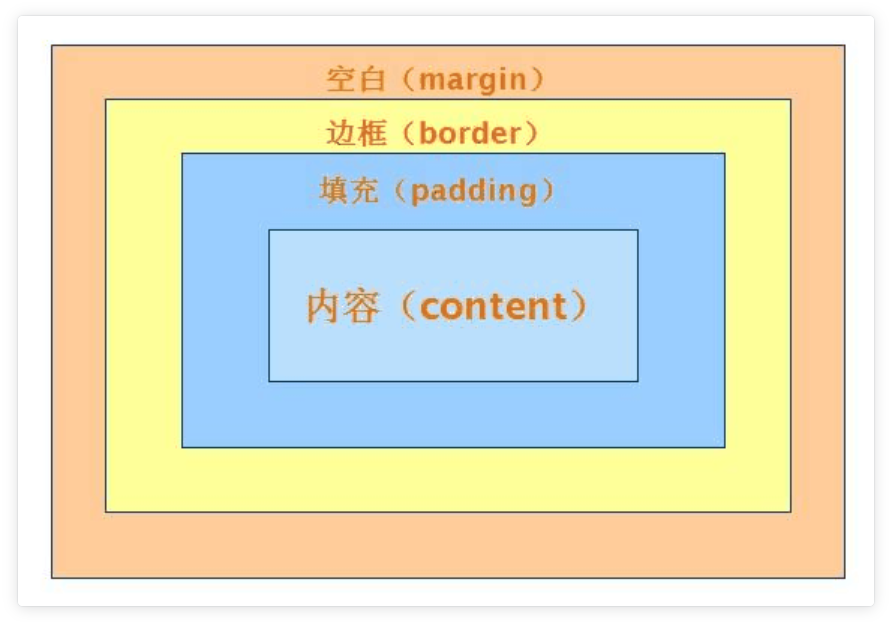
2、CSS操作
<p>111</p>
<p>222</p>
<p>333</p>
"""一行代码将第一个p标签变成红色,第二个p标签变成绿色 第三个p标签变成蓝色
"""
$('p').first().css('color','red').next().css('color','green').next().css('color','blue')
# jQuery的链式操作 使用jQuery可以做到一行代码操作很多标签
# jQuery对象调用jQuery方法之后返回的还是当前jQuery对象 也就可以继续调用其他方法# python 中 连续调用函数 — return self
class MyClass(object):
  def func1(self):
  print('func1')
  return self

def func2(self):
  print('func2')
  return self

obj = MyClass()
obj.func1().func2()
3、位置操作
offset() # 相对于浏览器窗口
position() # 相对于父标签scrollTop() # (需要了解) 返回顶部 (针对 侧栏滚动条)
$(window).scrollTop() # 括号内不加参数就是获取
1733
$(window).scrollTop(500) # 加了参数就是设置
n.fn.init [Window]
scrollLeft() # 向左滑动(针对 水平滚动条)# 方法类似 scrollTop()
4、尺寸设置
$('p').height() # 文本
$('p').width()$('p').innerHeight() # 文本+padding
$('p').innerWidth()$('p').outerHeight() # 文本+padding+border
$('p').outerWidth()
5、文本操作
# 操作标签内部文本
js jQuery
innerText text() 括号内不加参数就是获取加了就是设置
innerHTML html()# 获取标签文本:
$('div').text() # 仅获取 div里的文本内容
"有些话听听就过去了,不要在意,都是成年人!"
$('div').html() #获取 div里的 html 代码
"<p>有些话听听就过去了,不要在意,都是成年人!</p>"# 修改标签文本 (括号内 加值,就是赋值修改)
$('div').text('借问酒家何处有')
$('div').html('借问酒家何处有')
# .text 不能识别 html 代码,即 不能显示其效果。.html 则可以。
$('div').text('<h1>你们都是我的大宝贝</h1>')
$('div').html('<h1>你个臭妹妹</h1>')
6、获取值操作
js jQuery
.value .val()# 获取文本数据
$('#d1').val()
"sasdasdsadsadad"
$('#d1').val('520快乐') # 括号内不加参数就是获取,加了就是设置# 获取文件数据
$('#d2').val()
"C:fakepath�1_测试路由.png"
$('#d2')[0].files[0] # 牢记 js对象 和 jQuery 对象 之间的转换
File {name: "01_测试路由.png", lastModified: 1557043083000, lastModifiedDate: Sun May 05 2019 15:58:03 GMT+0800 (中国标准时间), webkitRelativePath: "", size: 28733, …}【温故而知新】 js对象 和 jQuery 对象 之间的转换
// jQuery对象 如何变成 标签对象 $('#d1')[0] <div id="d1">…</div> document.getElementById('d1') # 查看是否变为 标签对象(调用 标签对象) <div id="d1">…</div> // 标签对象 如何变成 jQuery对象 $(document.getElementById('d1')) w.fn.init [div#d1]
7、属性操作
js jQuery
setAttribute() attr(name,value)
getAttribute() attr(name)
removeAttribute() removeAttr(name)在用变量存储对象的时候,命名规则——
js中推荐使用
XXXEle 标签对象
jQuery中推荐使用
$XXXEle jQuery对象# 举例:
# 获取值
let $pEle = $('p') #定义 jQuery 对象$pEle.attr('id')
"d1"
$pEle.attr('class')
undefined#修改 / 赋值
$pEle.attr('class','c1')
w.fn.init [p#d1.c1, prevObject: w.fn.init(1)]
$pEle.attr('id','id666')
w.fn.init [p#id666.c1, prevObject: w.fn.init(1)]
$pEle.attr('password','jason123')
w.fn.init [p#id666.c1, prevObject: w.fn.init(1)]#删除
$pEle.removeAttr('password')
w.fn.init [p#id666.c1, prevObject: w.fn.init(1)]
"""
对于标签上有的能够看到的属性和自定义属性,用attr
对于返回布尔值,比如 checkbox radio option是否被选中,用prop
"""
$('#d3').attr('checked')
"checked"
$('#d2').attr('checked')
undefined
$('#d4').attr('checked')
undefined
$('#d3').attr('checked','checked') # 无效
w.fn.init [input#d3]
$('#d2').prop('checked')
false
$('#d2').prop('checked')
true
$('#d3').prop('checked',true) # 使其被选中
w.fn.init [input#d3]
$('#d3').prop('checked',false)
w.fn.init [input#d3]
8、文档处理
js jQuery
createElement('p') $('<p>')
appendChild() append()
let $pEle = $('<p>') # 创建一个 p 标签 jQuery 对象$pEle.text ('你好啊 草莓要不要来几个?') # 加入文本信息
$pEle.attr('id','d1') # 添加id 信息$('#d1').append($pEle) # 在id 为 d1 的标签内部尾部追加
$pEle.appendTo($('#d1'))
$('#d1').prepend($pEle) # 内部头部追加
w.fn.init [div#d1]
$pEle.prependTo($('#d1'))
w.fn.init [p#d1, prevObject: w.fn.init(1)]
$('#d2').after($pEle) # 放在某个标签 (此处为 id 为d2的标签)后面
w.fn.init [p#d2]
$pEle.insertAfter($('#d1'))
$('#d1').before($pEle)
w.fn.init [div#d1]
$pEle.insertBefore($('#d2'))$('#d1').remove() # 将标签从DOM树中删除
w.fn.init [div#d1]
$('#d1').empty() # 清空标签内部所有的内容
w.fn.init [div#d1]
参考阅读:https://www.cnblogs.com/xiaoyuanqujing/articles/11670119.html
https://www.cnblogs.com/xiaoyuanqujing/articles/11670128.html
二、jQuery绑定事件 以及 事件应用举例
1、绑定事件的两种方法
// 第一种
    $('#d1').click(function () {
            alert('你好呀')
    });

// 第二种(功能更加强大 还支持事件委托)
    $('#d2').on('click',function () {
            alert('好嗨哟')
    })
2、克隆事件
<button id="d1">护肤套装,点击就送</button>

<script>
    $('#d1').on('click',function () {
        // console.log(this)  // this指代是当前被操作的标签对象
        // $(this).clone().insertAfter($('body'))  // clone默认情况下只克隆html和css,不克隆事件
        $(this).clone(true).insertAfter($('body'))  // 括号内加true,即可克隆事件

    })
</script>


<!DOCTYPE html>
<html lang="en">
<head>
    <meta charset="UTF-8">
    <title>Title</title>
    <meta name="viewport" content="width=device-width, initial-scale=1">
    <link href="https://cdn.bootcss.com/twitter-bootstrap/3.4.1/css/bootstrap.min.css" rel="stylesheet">
    <script src="https://cdn.bootcss.com/jquery/3.3.1/jquery.min.js"></script>
    <script src="https://cdn.bootcss.com/twitter-bootstrap/3.4.1/js/bootstrap.min.js"></script>
    <style>
        #d1 {
            height: 100px;
            width: 100px;
            background-color: orange;
            border: 1px solid blue;
        }
    </style>
</head>
<body>
<button id="d1">屠龙宝刀,点击就送</button>

<script>
    $('#d1').on('click',function () {
        // console.log(this)  // this指代是当前被操作的标签对象
        // $(this).clone().insertAfter($('body'))  // clone默认情况下只克隆html和css 不克隆事件
        $(this).clone(true).insertAfter($('body'))  // 括号内加true即可克隆事件

    })
</script>
</body>
</html>
3、自定义模态框
模态框内部本质就是给标签移除或者添加上 hide属性
<!DOCTYPE html>
<html lang="zh-CN">
<head>
  <meta charset="UTF-8">
  <meta http-equiv="x-ua-compatible" content="IE=edge">
  <meta name="viewport" content="width=device-width, initial-scale=1">
  <title>自定义模态框</title>
  <style>
    .cover {
      position: fixed;
      left: 0;
      right: 0;
      top: 0;
      bottom: 0;
      background-color: darkgrey;
      z-index: 999;
    }
    .modal {
      width: 600px;
      height: 400px;
      background-color: white;
      position: fixed;
      left: 50%;
      top: 50%;
      margin-left: -300px;
      margin-top: -200px;
      z-index: 1000;
    }
    .hide {
      display: none;
    }
  </style>
</head>
<body>
<input type="button" value="弹" id="i0">

<div class="cover hide"></div>
<div class="modal hide">
  <label for="i1">姓名</label>
  <input id="i1" type="text">
   <label for="i2">爱好</label>
  <input id="i2" type="text">
  <input type="button" id="i3" value="关闭">
</div>
<script src="https://cdn.bootcss.com/jquery/3.2.1/jquery.min.js"></script>
<script>
  // var tButton = $("#i0")[0];
  $("#i0").click(function () {
    var coverEle = $(".cover")[0];  // 需要手动转
    var modalEle = $(".modal")[0];

    $(coverEle).removeClass("hide");
    $(modalEle).removeClass("hide");
  })
  // tButton.onclick=function () {
  //   var coverEle = $(".cover")[0];
  //   var modalEle = $(".modal")[0];
  //
  //   $(coverEle).removeClass("hide");
  //   $(modalEle).removeClass("hide");
  // };

  var cButton = $("#i3")[0];
  cButton.onclick=function () {
    var coverEle = $(".cover")[0];
    var modalEle = $(".modal")[0];

    $(coverEle).addClass("hide");
    $(modalEle).addClass("hide");
  }
</script>
</body>
</html>
4、左侧菜单(有显隐效果)
<script>
    $('.title').click(function () {
        // 先给所有的items加hide
        $('.items').addClass('hide')
        // 然后将被点击标签内部的hide移除
        $(this).children().removeClass('hide')
    })
</script>
<!--尝试用一行代码搞定上面的操作-->
<!DOCTYPE html>
<html lang="en">
<head>
    <meta charset="UTF-8">
    <title>Title</title>
    <meta name="viewport" content="width=device-width, initial-scale=1">
    <link href="https://cdn.bootcss.com/twitter-bootstrap/3.4.1/css/bootstrap.min.css" rel="stylesheet">
    <script src="https://cdn.bootcss.com/jquery/3.3.1/jquery.min.js"></script>
    <script src="https://cdn.bootcss.com/twitter-bootstrap/3.4.1/js/bootstrap.min.js"></script>
    <style>
        .left {
            float: left;
            background-color: darkgray;
            width: 20%;
            height: 100%;
            position: fixed;
        }
        .title {
            font-size: 36px;
            color: white;
            text-align: center;
        }
        .items {
            border: 1px solid black;
        }
        .hide {
            display: none;
        }
    </style>
</head>
<body>
<div class="left">
    <div class="menu">
        <div class="title">菜单一
            <div class="items">111</div>
            <div class="items">222</div>
            <div class="items">333</div>
        </div>
        <div class="title">菜单二
            <div class="items">111</div>
            <div class="items">222</div>
            <div class="items">333</div>
        </div>
        <div class="title">菜单三
            <div class="items">111</div>
            <div class="items">222</div>
            <div class="items">333</div>
        </div>
    </div>
</div>

<script>
    $('.title').click(function () {
        // 先给所有的items加hide
        $('.items').addClass('hide')
        // 然后将被点击标签内部的hide移除
        $(this).children().removeClass('hide')
    })
</script>
</body>
</html>
5、返回顶部
<script>
    $(window).scroll(function () {
        if($(window).scrollTop() > 300){
            $('#d1').removeClass('hide')
        }else{
            $('#d1').addClass('hide')
        }
    })
</script>
<!DOCTYPE html>
<html lang="en">
<head>
    <meta charset="UTF-8">
    <title>Title</title>
    <meta name="viewport" content="width=device-width, initial-scale=1">
    <link href="https://cdn.bootcss.com/twitter-bootstrap/3.4.1/css/bootstrap.min.css" rel="stylesheet">
    <script src="https://cdn.bootcss.com/jquery/3.3.1/jquery.min.js"></script>
    <script src="https://cdn.bootcss.com/twitter-bootstrap/3.4.1/js/bootstrap.min.js"></script>
    <style>
        .hide {
            display: none;
        }
        #d1 {
            position: fixed;
            background-color: black;

            right: 20px;
            bottom: 20px;
            height: 50px;
            width: 50px;
        }
    </style>
</head>
<body>
<a href="" id="d1"></a>
<div style="height: 500px;background-color: red"></div>
<div style="height: 500px;background-color: greenyellow"></div>
<div style="height: 500px;background-color: blue"></div>
<a href="#d1" class="hide">回到顶部</a>

<script>
    $(window).scroll(function () {
        if($(window).scrollTop() > 300){
            $('#d1').removeClass('hide')
        }else{
            $('#d1').addClass('hide')
        }
    })
</script>
</body>
</html>
6、自定义登录校验
# 在获取用户的用户名和密码的时候 用户如果没有填写 应该给用户展示提示信息
<p>username:
    <input type="text" id="username">
    <span style="color: red"></span>
</p>
<p>password:
    <input type="text" id="password">
    <span style="color: red"></span>
</p>
<button id="d1">提交</button>

<script>
    let $userName = $('#username')
    let $passWord = $('#password')
    $('#d1').click(function () {
        // 获取用户输入的用户名和密码 做校验
        let userName = $userName.val()
        let passWord = $passWord.val()
        if (!userName){
            $userName.next().text("用户名不能为空")
        }
        if (!passWord){
            $passWord.next().text('密码不能为空')
        }
    })
    $('input').focus(function () {
        $(this).next().text('')
    })
</script>
<!DOCTYPE html>
<html lang="en">
<head>
    <meta charset="UTF-8">
    <title>Title</title>
    <meta name="viewport" content="width=device-width, initial-scale=1">
    <link href="https://cdn.bootcss.com/twitter-bootstrap/3.4.1/css/bootstrap.min.css" rel="stylesheet">
    <script src="https://cdn.bootcss.com/jquery/3.3.1/jquery.min.js"></script>
    <script src="https://cdn.bootcss.com/twitter-bootstrap/3.4.1/js/bootstrap.min.js"></script>
</head>
<body>
<p>username:
    <input type="text" id="username">
    <span style="color: red"></span>
</p>
<p>password:
    <input type="text" id="password">
    <span style="color: red"></span>
</p>
<button id="d1">提交</button>

<script>
    let $userName = $('#username')
    let $passWord = $('#password')
    $('#d1').click(function () {
        // 获取用户输入的用户名和密码 做校验
        let userName = $userName.val()
        let passWord = $passWord.val()
        if (!userName){
            $userName.next().text("用户名不能为空")
        }
        if (!passWord){
            $passWord.next().text('密码不能为空')
        }
    })
    $('input').focus(function () {
        $(this).next().text('')
    })
</script>
</body>
</html>
7、input实时监控
<input type="text" id="d1">

<script>
    $('#d1').on('input',function () {
        console.log(this.value)
    })
</script>
<!DOCTYPE html>
<html lang="en">
<head>
    <meta charset="UTF-8">
    <title>k</title>
    <meta name="viewport" content="width=device-width, initial-scale=1">
    <link href="https://cdn.bootcss.com/twitter-bootstrap/3.4.1/css/bootstrap.min.css" rel="stylesheet">
    <script src="https://cdn.bootcss.com/jquery/3.3.1/jquery.min.js"></script>
    <script src="https://cdn.bootcss.com/twitter-bootstrap/3.4.1/js/bootstrap.min.js"></script>
</head>
<body>
<input type="text" id="d1">

<script>
    $('#d1').on('input',function () {
        console.log(this.value)
    })
</script>
</body>
</html>
8、hover事件
<script>
    // $("#d1").hover(function () {  // 鼠标悬浮 + 鼠标移开
    //     alert(123)
    // })

    $('#d1').hover(
        function () {
            alert('我来了')  // 悬浮
    },
        function () {
            alert('我溜了')  // 移开
        }
    )
</script>
<!DOCTYPE html>
<html lang="en">
<head>
    <meta charset="UTF-8">
    <title>Title</title>
    <meta name="viewport" content="width=device-width, initial-scale=1">
    <link href="https://cdn.bootcss.com/twitter-bootstrap/3.4.1/css/bootstrap.min.css" rel="stylesheet">
    <script src="https://cdn.bootcss.com/jquery/3.3.1/jquery.min.js"></script>
    <script src="https://cdn.bootcss.com/twitter-bootstrap/3.4.1/js/bootstrap.min.js"></script>

</head>
<body>
<p id="d1">到家啊就是度假酒店</p>

<script>
    // $("#d1").hover(function () {  // 鼠标悬浮 + 鼠标移开
    //     alert(123)
    // })

    $('#d1').hover(
        function () {
            alert('我来了')  // 悬浮
    },
        function () {
            alert('我溜了')  // 移开
        }
    )
</script>
</body>
</html>
9、键盘按键按下事件
<script>
    $(window).keydown(function (event) {
        console.log(event.keyCode)
        if (event.keyCode === 16){
            alert('你按了shift键')
        }
    })
</script>
<!DOCTYPE html>
<html lang="en">
<head>
    <meta charset="UTF-8">
    <title>Title</title>
    <meta name="viewport" content="width=device-width, initial-scale=1">
    <link href="https://cdn.bootcss.com/twitter-bootstrap/3.4.1/css/bootstrap.min.css" rel="stylesheet">
    <script src="https://cdn.bootcss.com/jquery/3.3.1/jquery.min.js"></script>
    <script src="https://cdn.bootcss.com/twitter-bootstrap/3.4.1/js/bootstrap.min.js"></script>
</head>
<body>

<script>
    $(window).keydown(function (event) {
        console.log(event.keyCode)
        if (event.keyCode === 16){
            alert('你按了shift键')
        }
    })
</script>
</body>
</html>
10、
<script>
    $('#d2').click(function (e) {
        $('#d1').text('宝贝 你能看到我吗?')
        // 阻止标签后续事件的执行 方式1
        // return false
        // 阻止标签后续事件的执行 方式2
        // e.preventDefault()
    })
</script>
<!DOCTYPE html>
<html lang="en">
<head>
    <meta charset="UTF-8">
    <title>Title</title>
    <meta name="viewport" content="width=device-width, initial-scale=1">
    <link href="https://cdn.bootcss.com/twitter-bootstrap/3.4.1/css/bootstrap.min.css" rel="stylesheet">
    <script src="https://cdn.bootcss.com/jquery/3.3.1/jquery.min.js"></script>
    <script src="https://cdn.bootcss.com/twitter-bootstrap/3.4.1/js/bootstrap.min.js"></script>
</head>
<body>
<form action="">
    <span id="d1" style="color: red"></span>
    <input type="submit" id="d2">
</form>

<script>
    $('#d2').click(function (e) {
        $('#d1').text('宝贝 你能看到我吗?')
        // 阻止标签后续事件的执行 方式1
        // return false
        // 阻止标签后续事件的执行 方式2
        // e.preventDefault()
    })
</script>

</body>
</html>
11、
<script>
        $('#d1').click(function () {
            alert('div')
        })
        $('#d2').click(function () {
            alert('p')
        })
        $('#d3').click(function (e) {
            alert('span')
            // 阻止事件冒泡的方式1
            // return false
            // 阻止事件冒泡的方式2
            // e.stopPropagation()
        })
</script>
<!DOCTYPE html>
<html lang="en">
<head>
    <meta charset="UTF-8">
    <title>Title</title>
    <meta name="viewport" content="width=device-width, initial-scale=1">
    <link href="https://cdn.bootcss.com/twitter-bootstrap/3.4.1/css/bootstrap.min.css" rel="stylesheet">
    <script src="https://cdn.bootcss.com/jquery/3.3.1/jquery.min.js"></script>
    <script src="https://cdn.bootcss.com/twitter-bootstrap/3.4.1/js/bootstrap.min.js"></script>
</head>
<body>
    <div id="d1">div
        <p id="d2">div>p
            <span id="d3">span</span>
        </p>
    </div>


    <script>
        $('#d1').click(function () {
            alert('div')
        })
        $('#d2').click(function () {
            alert('p')
        })
        $('#d3').click(function (e) {
            alert('span')
            // 阻止事件冒泡的方式1
            // return false
            // 阻止事件冒泡的方式2
            // e.stopPropagation()
        })
    </script>
</body>
</html>
12、
<button>是兄弟,就两肋插刀</button>

<script>
    // 给页面上所有的button标签绑定点击事件
    // $('button').click(function () {  // 无法影响到动态创建的标签
    //     alert(123)
    // })

    // 事件委托
    $('body').on('click','button',function () {
        alert(123)  // 在指定的范围内 将事件委托给某个标签 无论该标签是事先写好的,还是后面动态创建的
    })
</script>
<!DOCTYPE html>
<html lang="en">
<head>
    <meta charset="UTF-8">
    <title>Title</title>
    <meta name="viewport" content="width=device-width, initial-scale=1">
    <link href="https://cdn.bootcss.com/twitter-bootstrap/3.4.1/css/bootstrap.min.css" rel="stylesheet">
    <script src="https://cdn.bootcss.com/jquery/3.3.1/jquery.min.js"></script>
    <script src="https://cdn.bootcss.com/twitter-bootstrap/3.4.1/js/bootstrap.min.js"></script>
    <script src="../../Desktop/bootstrap-3.3.7-dist/js/bootstrap.min.js"></script>
</head>
<body>
<button>是兄弟,就两肋插刀</button>

<script>
    // 给页面上所有的button标签绑定点击事件
    // $('button').click(function () {  // 无法影响到动态创建的标签
    //     alert(123)
    // })

    // 事件委托
    $('body').on('click','button',function () {
        alert(123)  // 在指定的范围内 将事件委托给某个标签 无论该标签是事先写好的还是后面动态创建的
    })
</script>
</body>
</html>
13、页面加载(等待页面加载完毕再执行代码)
# js 等待页面加载完毕再执行代码
window.onload = function(){
  // js代码
}

"""jQuery中等待页面加载完毕"""
# 第一种
$(document).ready(function(){
  // js代码
})
# 第二种
$(function(){
  // js代码
})
# 第三种
"""直接写在body内部最下方"""
14、动画效果
<!DOCTYPE html>
<html lang="en">
<head>
    <meta charset="UTF-8">
    <title>Title</title>
    <meta name="viewport" content="width=device-width, initial-scale=1">
    <link href="https://cdn.bootcss.com/twitter-bootstrap/3.4.1/css/bootstrap.min.css" rel="stylesheet">
    <script src="https://cdn.bootcss.com/jquery/3.3.1/jquery.min.js"></script>
    <script src="https://cdn.bootcss.com/twitter-bootstrap/3.4.1/js/bootstrap.min.js"></script>
    <style>
        #d1 {
            height: 1000px;
            width: 400px;
            background-color: red;

        }
    </style>
</head>
<body>
    <div id="d1"></div>
</body>
</html>
【 浏览器console 里的操作】
$('#d1').hide(5000)
w.fn.init [div#d1]
$('#d1').show(5000)
w.fn.init [div#d1]
$('#d1').slideUp(5000)
w.fn.init [div#d1]
$('#d1').slideDown(5000)
w.fn.init [div#d1]
$('#d1').fadeOut(5000)
w.fn.init [div#d1]
$('#d1').fadeIn(5000)
w.fn.init [div#d1]
$('#d1').fadeTo(5000,0.4)
w.fn.init [div#d1]
15、补充——each / data
(1)each()
$('div').each(function(index){console.log(index)})
$('div').each(function(index,obj){return[index,obj]})
$.each([111,222,333],function(index,obj){console.log(index,obj)})
$.each([111,222,333],function(index,obj){return[index,obj]})
# each()
# 第一种方式
<!DOCTYPE html>
<html lang="en">
<head>
    <meta charset="UTF-8">
    <title>Title</title>
    <meta name="viewport" content="width=device-width, initial-scale=1">
    <link href="https://cdn.bootcss.com/twitter-bootstrap/3.4.1/css/bootstrap.min.css" rel="stylesheet">
    <script src="https://cdn.bootcss.com/jquery/3.3.1/jquery.min.js"></script>
    <script src="https://cdn.bootcss.com/twitter-bootstrap/3.4.1/js/bootstrap.min.js"></script>
    <link rel="stylesheet" href="../../Desktop/bootstrap-3.3.7-dist/css/bootstrap.css">
</head>
<body>
<div id="d1" username="jason">1</div>
<div>2</div>
<div>3</div>
<div>4</div>
<div>5</div>
<div>6</div>
<div>7</div>
<div>8</div>
<div>9</div>
<div>10</div>
</body>
</html>
【浏览器 console 操作】
$('div') w.fn.init(10) [div, div, div, div, div, div, div, div, div, div, prevObject: w.fn.init(1)] $('div').each(function(index){console.log(index)}) VM181:1 0 VM181:1 1 VM181:1 2 VM181:1 3 VM181:1 4 VM181:1 5 VM181:1 6 VM181:1 7 VM181:1 8 VM181:1 9 $('div').each(function(index,obj){console.log(index,obj)}) VM243:1 0 <div>1</div> VM243:1 1 <div>2</div> VM243:1 2 <div>3</div> VM243:1 3 <div>4</div> VM243:1 4 <div>5</div> VM243:1 5 <div>6</div> VM243:1 6 <div>7</div> VM243:1 7 <div>8</div> VM243:1 8 <div>9</div> VM243:1 9 <div>10</div> # 第二种方式 $.each([111,222,333],function(index,obj){console.log(index,obj)}) VM484:1 0 111 VM484:1 1 222 VM484:1 2 333 (3) [111, 222, 333] """ 有了each之后 就无需自己写for循环了 用它更加的方便 """
(2)data()
.data('attrName', 'attrVlue')
.data('attrName')
$('对象名').first().data('attrName')
$('对象名').last().data('attrName')
.removeData(attrName)
"""
能够让标签帮我们存储数据 并且用户肉眼看不见(即 检查网页html也无法查看到)
"""
# 添加数据
$('div').data('info','回来吧,我原谅你了!')
w.fn.init(10) [div#d1, div, div, div, div, div, div, div, div, div, prevObject: w.fn.init(1)]

$('div').first().data('info')
"回来吧,我原谅你了!"
$('div').last().data('info')
"回来吧,我原谅你了!"

# 未定义的数据
$('div').first().data('xxx')
undefined

# 删除数据
$('div').first().removeData('info')
w.fn.init [div#d1, prevObject: w.fn.init(10)]
$('div').first().data('info')
undefined
$('div').last().data('info')
"回来吧,我原谅你了!"