CMDB是运维自动化的基础,它为日志系统,发布系统,监控系统等运维系统(ELK,zabbix,open-falcon)提供接口函数,
第一种方式:Agent方法实现,agent不能直接访问数据库,因为agent端有可能被入侵,入侵之后,黑客可以获取数据库权限,造成删库等损失,所以得用url方式


####server

from django.shortcuts import render,HttpResponse

# Create your views here.

def asset(request):
    if request.method == "POST":
        print(request.POST)
        # 写入到数据
        return HttpResponse('1002')
    else:
        return HttpResponse('姿势不对')


####agent
import subprocess
import requests

v1 = subprocess.getoutput("ifconfig")
value1 = (v1[51:55])

v2 = subprocess.getoutput("dir")
value2 = (v2[14:20])

url = "http://127.0.0.1:8000/asset.html"

response = requests.post(url,data={"k1":value1,"k2":value2})
print(response.text)
#Agent方式
api
    - URL
    - 发送数据格式
    - 返回值
agent
    - 采集数据,发送数据
好处:
    - 简单
    - 采集速度快,响应速度快
坏处:
    - 每台agent装的插件多,性能损耗严重
    - 更新需要更新每台agent服务器

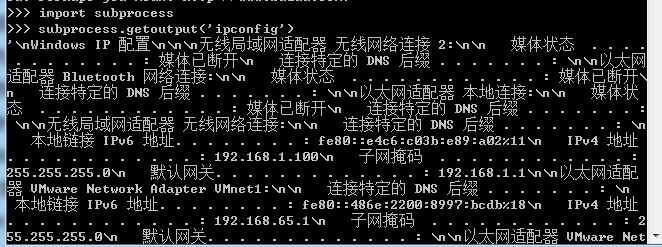
当然subprocess不能用于CMDB采集数据,因为这个模块通常用于本机
>>> import subprocess
>>> subprocess.getoutput('ipconfig')
'
Windows IP 配置
无线局域网适配器 无线网络连接 2:
媒体状态 . . . .
. . . . . . . . : 媒体已断开
连接特定的 DNS 后缀 . . . . . . . :
以太网
适配器 Bluetooth 网络连接:
媒体状态 . . . . . . . . . . . . : 媒体已断开
n 连接特定的 DNS 后缀 . . . . . . . :
以太网适配器 本地连接:
媒体状
态 . . . . . . . . . . . . : 媒体已断开
连接特定的 DNS 后缀 . . . . . . . :
无线局域网适配器 无线网络连接:
连接特定的 DNS 后缀 . . . . . . . :
本地链接 IPv6 地址. . . . . . . . : fe80::e4c6:c03b:e89:a02%11
IPv4 地址
. . . . . . . . . . . . : 192.168.1.100
子网掩码 . . . . . . . . . . . . :
255.255.255.0
默认网关. . . . . . . . . . . . . : 192.168.1.1
以太网适配
器 VMware Network Adapter VMnet1:
连接特定的 DNS 后缀 . . . . . . . :
本地链接 IPv6 地址. . . . . . . . : fe80::486e:2200:8997:bcdb%18
IPv4 地址
. . . . . . . . . . . . : 192.168.65.1
子网掩码 . . . . . . . . . . . . : 2
55.255.255.0
默认网关. . . . . . . . . . . . . :
以太网适配器 VMware Net
work Adapter VMnet8:
连接特定的 DNS 后缀 . . . . . . . :
本地链接 IPv
6 地址. . . . . . . . : fe80::d851:ee0a:c90a:db52%19
IPv4 地址 . . . . . . .
. . . . . : 192.168.117.1
子网掩码 . . . . . . . . . . . . : 255.255.255.0
默认网关. . . . . . . . . . . . . :
隧道适配器 isatap.localdomain:
媒体状态 . . . . . . . . . . . . : 媒体已断开
连接特定的 DNS 后缀 . . . .
. . . :
隧道适配器 isatap.{7F17396E-53DB-47A4-BD5C-9EADDC5E9FAC}:
媒
体状态 . . . . . . . . . . . . : 媒体已断开
连接特定的 DNS 后缀 . . . . . .
. :
隧道适配器 Teredo Tunneling Pseudo-Interface:
连接特定的 DNS 后缀
. . . . . . . :
IPv6 地址 . . . . . . . . . . . . : 2001:0:9d38:6ab8:2882:
ac2:49ed:92f9
本地链接 IPv6 地址. . . . . . . . : fe80::2882:ac2:49ed:92f9%1
4
默认网关. . . . . . . . . . . . . : ::
隧道适配器 isatap.{5200D41D-66DB
-404B-B054-927048C61572}:
媒体状态 . . . . . . . . . . . . : 媒体已断开
连接特定的 DNS 后缀 . . . . . . . :
隧道适配器 isatap.{24E33A31-E0FB-45FF
-B380-39AD751E3A09}:
媒体状态 . . . . . . . . . . . . : 媒体已断开
连
接特定的 DNS 后缀 . . . . . . . :
隧道适配器 isatap.{28CBEECB-4F9E-4214-B9CA
-E42439ECC9D4}:
媒体状态 . . . . . . . . . . . . : 媒体已断开
连接特
定的 DNS 后缀 . . . . . . . : '
>>>
>>> import requests
>>> requests.get('http://www.cnblogs.com/wupeiqi/articles/6192986.html') #也可以是POST请求
<Response [200]>
>>> ret = requests.get('http://www.cnblogs.com/wupeiqi/articles/6192986.html')
>>> ret.text#把整个页面都渲染出来,相当于一个字符串

第二种方式:用SSH方式实现,用中控机采集资产, 下图的中间部分就是中控机
##server

from django.shortcuts import render,HttpResponse

# Create your views here.

def asset(request):
    if request.method == "POST":
        print(request.POST)
        # 写入到数据
        return HttpResponse('1002')
    else:
        return HttpResponse('姿势不对')


##Paramiko中控机


import paramiko
import requests

# 创建SSH对象
ssh = paramiko.SSHClient()

# 允许连接不在know_hosts文件中的主机
ssh.set_missing_host_key_policy(paramiko.AutoAddPolicy())

# 连接服务器
ssh.connect(hostname='10.37.129.3', port=22, username='root', password="123456")

# 执行命令
stdin, stdout, stderr = ssh.exec_command('ifconfig')

# 获取命令结果
result = stdout.read()[0:20]

# 关闭连接
ssh.close()

url = "http://127.0.0.1:8000/asset.html"

response = requests.post(url,data={"k1":result})
print(response.text)
#ssh方式
    - fabric(本质是Paramiko)
    - ansible(本质是Paramiko)
    - Paramiko


#Paramiko模块

原理: Paramiko中控机远程连接服务器,执行命令,获取结果,将结果发送Api
应用场景:服务器少,ssh可以忽略

好处
   - 无需Agent
坏处
   - 连接客户机时每次需要ssh连接,速度慢


http://www.cnblogs.com/wupeiqi/articles/5095821.html
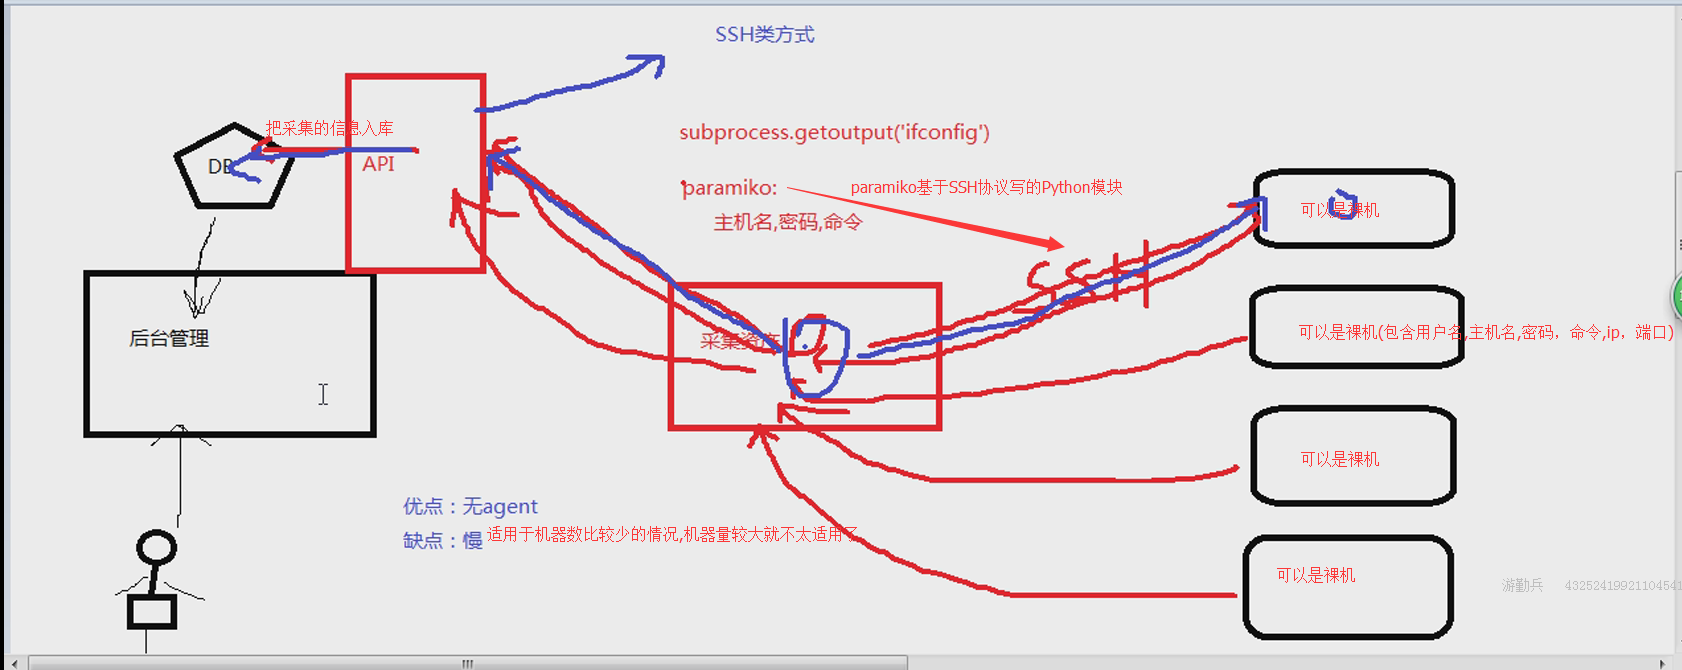
很多运维工具基于Python的paramiko模块做了封装,比如fabric,ansible,最新的ansible用了另外的方式实现
第三种方式:依赖第三方工具saltstack
    http://www.cnblogs.com/wupeiqi/articles/6415436.html

    API:Django接收数据并入库

    应用场景:针对服务器较多的公司【推荐】

    master:
        v = subprocess.getoutput('salt "*" cmd.run "ls"')

    saltstack内部原理是通过RPC来实现得消息队列
以saltstack为例,在saltstack-master上可以远程执行命令,然后利用RPC采集资产
RPC的本质是维护一个队列

RPC方式比SSH要快

第四种方式:基于puppet方式采集:
4.  puppet【ruby语言】

    内部原理:puppet客户端每30秒钟自动汇报数据给puppet服务端。

    应用场景:主要是针对已经在使用puppet的公司。

同时使用前三种方式:通过修改配置文件实现前三种方式的切换 (前三种必须要会,第四种了解)
一般设置每天采集一次数据
CMDB要解决的就是自动收集
程序实现
1.下面这段程序放在agent机器上: agent方式
#1.采集数据发送到API
import subprocess
import requests
#pip3 install requests
result = subprocess.getoutput('ipconfig')#获取本机的信息
#result正则处理获取想要的数据

#整理资产信息
data_dict = {
    'net':{},
    'disk':{},
    'mem':{},
}

#2.发送数据
requests.post('http://www.127.0.0.1/assets.html',data=data_dict)
客户端:
subprocess模块详解
subprocess – 创建附加进程
subprocess模块提供了一种一致的方法来创建和处理附加进程,与标准库中的其它模块相比,提供了一个更高级的接口。用于替换如下模块:
os.system() , os.spawnv() , os和popen2模块中的popen()函数,以及 commands().

程序如下:
import subprocess

v1 = subprocess.getoutput('ipconfig')#利用subprocess模块
print(v1)
print(v1[10:20])
v2 = subprocess.getoutput('dir')#执行一个Windows cmd命令
print(v2)
print(type(v2))

url = "http://127.0.0.1:8000/asset.html"#指定一个URL
import requests
response = requests.post(url,data={'k1':v1,'k2':v2})#把url和数据用post方式提交
print(response.text)#输出命令的内容
服务端:
from django.shortcuts import render,HttpResponse

def asset(request):
    if request.method == "POST":
        print(request.POST)#输出从客户端发送过来的数据
        #写入数据
        return HttpResponse('ok')
    else:
        return HttpResponse('姿势不对,请换一下姿势')
2. 这里可以封装成一个函数,放在中控机上: SSH方式
#####################通过paramiko连接远程服务器,执行命令#################
#创建SSH对象
ssh = paramiko.SSHClient()
#允许连接不在know_hosts文件中的主机
ssh.set_missing_host_key_policy(paramiko.AutoAddPolicy())
#连接服务器
ssh.connect(hostname='192.168.117.130',port=22,username='root',password='123456')
#执行命令
stdin,stdout,stderr=ssh.exec_command('ifconfig')
#输入,输出,输出错误信息
#yum 安装时输入Y或者N会出现stdin
#获取命令结果
result = stdout.read()
#关闭连接
ssh.close()
print(result) #输出命令的结果
#result有必要做格式化处理

# result = requests.get('http://www.127.0.0.1/assets.html')#取数据
# 举例result是列表类型
# result = ['c1.com','c2.com']
在列表做循环
3.saltstack方式
salt-master配置:
[root@python-web2 ~]#  rpm --import https://repo.saltstack.com/yum/redhat/7/x86_64/latest/SALTSTACK-GPG-KEY.pub
[root@python-web2 ~]#  yum install salt-master
[root@python-web2 ~]#  vi /etc/salt/master  编辑master配置文件
修改ip(本机ip)
配置文件监听本机ip
interface: 192.168.117.130
[root@python-web2 ~]# /usr/bin/salt-master start 启动saltstack 这里是centos7,这种方式启动会失败
[root@python-web2 ~]# systemctl start salt-master这里启动成功
[root@python-web2 ~]# salt-key -a 192.168.117.128 确认指定的证书
The following keys are going to be accepted:
Unaccepted Keys:
192.168.117.128
Proceed? [n/Y] Y
Key for minion 192.168.117.128 accepted.
[root@python-web2 ~]# salt-key -L 列出所有证书
Accepted Keys:
192.168.117.128
Denied Keys:
Unaccepted Keys:
Rejected Keys:
salt-minion配置:
[root@localhost ~]# yum install salt-minion
[root@localhost ~]# vi /etc/salt/minion 修改配置文件
master: 192.168.117.130 服务端ip
[root@python-web2 ~]#  systemctl start salt-minion这里启动成功

master远程执行命令:
[root@python-web2 ~]# salt '192.168.117.128' cmd.run 'ifconfig'
192.168.117.128:
ens33: flags=4163<UP,BROADCAST,RUNNING,MULTICAST> mtu 1500
inet 192.168.117.128 netmask 255.255.255.0 broadcast 192.168.117.255
inet6 fe80::20c:29ff:fed1:6595 prefixlen 64 scopeid 0x20<link>
ether 00:0c:29:d1:65:95 txqueuelen 1000 (Ethernet)
RX packets 25872 bytes 28850791 (27.5 MiB)
RX errors 0 dropped 0 overruns 0 frame 0
TX packets 12135 bytes 1231060 (1.1 MiB)
TX errors 0 dropped 0 overruns 0 carrier 0 collisions 0
lo: flags=73<UP,LOOPBACK,RUNNING> mtu 65536
inet 127.0.0.1 netmask 255.0.0.0
inet6 ::1 prefixlen 128 scopeid 0x10<host>
loop txqueuelen 1 (Local Loopback)
RX packets 72 bytes 5876 (5.7 KiB)
RX errors 0 dropped 0 overruns 0 frame 0
TX packets 72 bytes 5876 (5.7 KiB)
TX errors 0 dropped 0 overruns 0 carrier 0 collisions 0
[root@python-web2 ~]# python
>>> import salt.client
>>> local = salt.client.LocalClient()
>>> result = local.cmd('192.168.117.128','cmd.run',['ifconfig'])
>>> print(result)#result是一个字典
{'192.168.117.128': 'ens33: flags=4163<UP,BROADCAST,RUNNING,MULTICAST> mtu 1500
inet 192.168.117.128 netmask 255.255.255.0 broadcast 192.168.117.255
inet6 fe80::20c:29ff:fed1:6595 prefixlen 64 scopeid 0x20<link>
ether 00:0c:29:d1:65:95 txqueuelen 1000 (Ethernet)
RX packets 26160 bytes 28870174 (27.5 MiB)
RX errors 0 dropped 0 overruns 0 frame 0
TX packets 12207 bytes 1237294 (1.1 MiB)
TX errors 0 dropped 0 overruns 0 carrier 0 collisions 0
lo: flags=73<UP,LOOPBACK,RUNNING> mtu 65536
inet 127.0.0.1 netmask 255.0.0.0
inet6 ::1 prefixlen 128 scopeid 0x10<host>
loop txqueuelen 1 (Local Loopback)
RX packets 72 bytes 5876 (5.7 KiB)
RX errors 0 dropped 0 overruns 0 frame 0
TX packets 72 bytes 5876 (5.7 KiB)
TX errors 0 dropped 0 overruns 0 carrier 0 collisions 0'}
>>> result.keys()
['192.168.117.128']
>>> result.values()
['ens33: flags=4163<UP,BROADCAST,RUNNING,MULTICAST> mtu 1500
inet 192.168.117.128 netmask 255.255.255.0 broadcast 192.168.117.255
inet6 fe80::20c:29ff:fed1:6595 prefixlen 64 scopeid 0x20<link>
ether 00:0c:29:d1:65:95 txqueuelen 1000 (Ethernet)
RX packets 26160 bytes 28870174 (27.5 MiB)
RX errors 0 dropped 0 overruns 0 frame 0
TX packets 12207 bytes 1237294 (1.1 MiB)
TX errors 0 dropped 0 overruns 0 carrier 0 collisions 0
lo: flags=73<UP,LOOPBACK,RUNNING> mtu 65536
inet 127.0.0.1 netmask 255.0.0.0
inet6 ::1 prefixlen 128 scopeid 0x10<host>
loop txqueuelen 1 (Local Loopback)
RX packets 72 bytes 5876 (5.7 KiB)
RX errors 0 dropped 0 overruns 0 frame 0
TX packets 72 bytes 5876 (5.7 KiB)
TX errors 0 dropped 0 overruns 0 carrier 0 collisions 0']
salt其实是一个py文件
打开/usr/bin/salt文件,会出现如下画面:


一、salt介绍
Salt是一个新的配置管理工具,部署容易,几分钟之内就能运行,可伸缩的足以管理成千上万的服务器,并且他们通讯很快,在秒级别
Salt的底层提供了一个动态的通讯机制,基于zeromq,能被用于编制、远程执行、配置管理等,
基于C/S形式,服务端是master,客户端是minion,类似于puppet,但是比puppet强大,基于python。可以抛弃小日本的ruby啦!
如果厌倦puppet的繁琐,可以试试这个,如果是puppet是apache,那么salt就是nginx,非常轻量级

二、salt安装(基于centos6.4)
1、安装epel源(只有5和6,4的版本就不用想啦)
2、最新版本安装:yum --enablerepo=epel-testing install zeromq3 zeromq3-devel salt-master
yum --enablerepo=epel-testing install zeromq3 zeromq3-devel salt-minion
3、稳定版安装:yum install zeromq3 zeromq3-devel salt-master
      yum install zeromq3 zeromq3-devel salt-minion
注:5的版本装不了zeromq3,zeromq2有BUG,5安装方式用源代码安装,具体安装请看最下面的脚本
三、salt配置
配置文件位置:/etc/salt
master:基本上不需要修改
minion:指定master的地址,和id,如果不修改id,它默认通过 python函数socket.getfqdn()来获得主机名

四、启动salt
/etc/init.d/salt-master start  #master端
/etc/init.d/salt-minion start  #minion端

五、确认证书
master与minion交互都是加密的,所以在minion启动后,会向master发送key,然后master来确认。
salt-key 常用的命令选项
-a [option] 确认指定的证书
-A          确认所有的证书
-d [option] 删除指定的证书
-D删除所有的证书
-L          列出所有证书

[root@localhost soft]# salt-key -L
Accepted Keys:
Unaccepted Keys:
192.168.0.9
Rejected Keys:
[root@localhost soft]# salt-key -a 192.168.0.9
Key for minion 192.168.0.9 accepted.

注:如果master没确认证书,minion端会一直报以下错:
[salt.crypt][ERROR   ] The Salt Master has cached the public key for this node,
this salt minion will wait for 10 seconds before attempting to re-authenticate
补充知识:
ssh-keygen的使用方法 :用于生成公钥和私钥,使A机器登录B机器不需要密码登录
一、概述
1、就是为了让两个Linux机器之间使用ssh不需要用户名和密码。采用了数字签名RSA或者DSA来完成这个操作
2、模型分析
假设 A (192.168.20.59)为客户机器,B(192.168.20.60)为目标机;

要达到的目的:
A机器ssh登录B机器无需输入密码;
加密方式选 rsa|dsa均可以,默认dsa

二、具体操作流程

单向登陆的操作过程(能满足上边的目的):
1、登录A机器
2、ssh-keygen -t [rsa|dsa],将会生成密钥文件和私钥文件 id_rsa,id_rsa.pub或id_dsa,id_dsa.pub
3、将 .pub 文件复制到B机器的 .ssh 目录, 并 cat id_dsa.pub >> ~/.ssh/authorized_keys
4、大功告成,从A机器登录B机器的目标账户,不再需要密码了;(直接运行 #ssh 192.168.20.60 )

双向登陆的操作过程:
1、ssh-keygen做密码验证可以使在向对方机器上ssh ,scp不用使用密码.具体方法如下:
2、两个节点都执行操作:#ssh-keygen -t rsa
  然后全部回车,采用默认值.

3、这样生成了一对密钥,存放在用户目录的~/.ssh下。
将公钥考到对方机器的用户目录下 ,并将其复制到~/.ssh/authorized_keys中(操作命令:#cat id_dsa.pub >> ~/.ssh/authorized_keys )。


4、设置文件和目录权限:
设置authorized_keys权限
$ chmod 600 authorized_keys
设置.ssh目录权限
$ chmod 700 -R .ssh