写在前面
在《【String注解驱动开发】面试官再问你BeanPostProcessor的执行流程,就把这篇文章甩给他!》一文中,我们详细的介绍了BeanPostProcessor的执行流程。那么,BeanPostProcessor在Spring底层是如何使用的?今天,我们就一起来探讨下Spring的源码,一探BeanPostProcessor在Spring底层的使用情况。
项目工程源码已经提交到GitHub:https://github.com/sunshinelyz/spring-annotation
BeanPostProcessor接口
我们先来看下BeanPostProcessor接口的源码,如下所示。
package org.springframework.beans.factory.config;
import org.springframework.beans.BeansException;
import org.springframework.lang.Nullable;

public interface BeanPostProcessor {

	@Nullable
	default Object postProcessBeforeInitialization(Object bean, String beanName) throws BeansException {
		return bean;
	}

	@Nullable
	default Object postProcessAfterInitialization(Object bean, String beanName) throws BeansException {
		return bean;
	}
}
可以看到,在BeanPostProcessor接口中,提供了两个方法:postProcessBeforeInitialization()方法和postProcessAfterInitialization()方法。postProcessBeforeInitialization()方法会在bean初始化之前调用,postProcessAfterInitialization()方法会在bean初始化之后调用。接下来,我们就分析下BeanPostProcessor接口在Spring中的实现。
注意:这里,我列举几个BeanPostProcessor接口在Spring中的实现类,来让大家更加清晰的理解BeanPostProcessor接口在Spring底层的应用。
ApplicationContextAwareProcessor类
org.springframework.context.support.ApplicationContextAwareProcessor是BeanPostProcessor接口的实现类,这个类的作用是可以向组件中注入IOC容器,大致的源码如下所示。
package org.springframework.context.support;

import java.security.AccessControlContext;
import java.security.AccessController;
import java.security.PrivilegedAction;

import org.springframework.beans.BeansException;
import org.springframework.beans.factory.config.BeanPostProcessor;
import org.springframework.beans.factory.config.EmbeddedValueResolver;
import org.springframework.context.ApplicationContextAware;
import org.springframework.context.ApplicationEventPublisherAware;
import org.springframework.context.ConfigurableApplicationContext;
import org.springframework.context.EmbeddedValueResolverAware;
import org.springframework.context.EnvironmentAware;
import org.springframework.context.MessageSourceAware;
import org.springframework.context.ResourceLoaderAware;
import org.springframework.lang.Nullable;
import org.springframework.util.StringValueResolver;
class ApplicationContextAwareProcessor implements BeanPostProcessor {
    /****************************省略N多行代码************************/
}
这里,省略了源码的细节,只给出了类结构,感兴趣的小伙伴们可自行翻阅Spring源码进行查看,我这里的Spring版本为5.2.6.RELEASE。
那具体如何使用ApplicationContextAwareProcessor类向组件中注入IOC容器呢?别急,我用一个例子来说明下,相信小伙伴们看完后会有一种豁然开朗的感觉——哦,原来是它啊,我之前在项目中使用过的!
要想使用ApplicationContextAwareProcessor类向组件中注入IOC容器,我们就不得不提Spring中的另一个接口:ApplicationContextAware,如果需要向组件中注入IOC容器,可以使组件实现ApplicationContextAware接口。
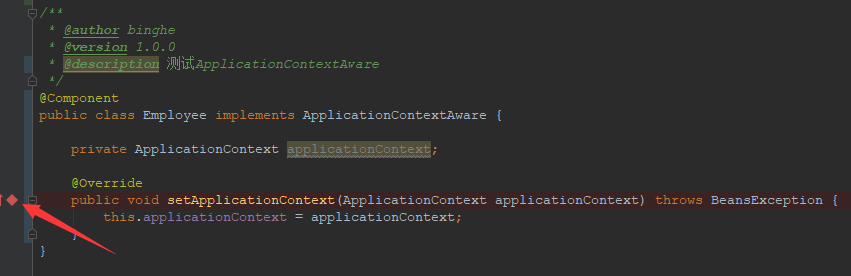
例如,我们创建一个Employee类,使其实现ApplicationContextAware接口,此时,我们需要实现ApplicationContextAware接口的setApplicationContext()方法,在setApplicationContext()方法中有一个ApplicationContext类型的参数,这个就是IOC容器对象,我们可以在Employee类中定义一个ApplicationContext类型的成员变量,然后在setApplicationContext()方法中为这个成员变量赋值,此时就可以在Employee中的其他方法中使用ApplicationContext对象了,如下所示。
package io.mykit.spring.plugins.register.bean;

import org.springframework.beans.BeansException;
import org.springframework.context.ApplicationContext;
import org.springframework.context.ApplicationContextAware;
import org.springframework.stereotype.Component;
/**
 * @author binghe
 * @version 1.0.0
 * @description 测试ApplicationContextAware
 */
@Component
public class Employee implements ApplicationContextAware {
    private ApplicationContext applicationContext;
    @Override
    public void setApplicationContext(ApplicationContext applicationContext) throws BeansException {
        this.applicationContext = applicationContext;
    }
}
看到这里,相信不少小伙伴们都有一种很熟悉的感觉:没错,我之前也在项目中使用过!是的,这就是BeanPostProcessor在Spring底层的一种使用场景。至于上面的案例代码为何会在setApplicationContext()方法中获取到ApplicationContext对象,这就是ApplicationContextAwareProcessor类的功劳了!
接下来,我们就深入分析下ApplicationContextAwareProcessor类。
我们先来看下ApplicationContextAwareProcessor类中对于postProcessBeforeInitialization()方法的实现,如下所示。
@Override
@Nullable
public Object postProcessBeforeInitialization(Object bean, String beanName) throws BeansException {
    if (!(bean instanceof EnvironmentAware || bean instanceof EmbeddedValueResolverAware ||
          bean instanceof ResourceLoaderAware || bean instanceof ApplicationEventPublisherAware ||
          bean instanceof MessageSourceAware || bean instanceof ApplicationContextAware)){
        return bean;
    }

    AccessControlContext acc = null;

    if (System.getSecurityManager() != null) {
        acc = this.applicationContext.getBeanFactory().getAccessControlContext();
    }

    if (acc != null) {
        AccessController.doPrivileged((PrivilegedAction<Object>) () -> {
            invokeAwareInterfaces(bean);
            return null;
        }, acc);
    }
    else {
        invokeAwareInterfaces(bean);
    }

    return bean;
}
在bean初始化之前,首先对当前bean的类型进行判断,如果当前bean的类型不是EnvironmentAware,不是EmbeddedValueResolverAware,不是ResourceLoaderAware,不是ApplicationEventPublisherAware,不是MessageSourceAware,也不是ApplicationContextAware,则直接返回bean。如果是上面类型中的一种类型,则最终会调用invokeAwareInterfaces()方法,并将bean传递给invokeAwareInterfaces()方法。invokeAwareInterfaces()方法又是个什么鬼呢?我们继续看invokeAwareInterfaces()方法的源码,如下所示。
private void invokeAwareInterfaces(Object bean) {
    if (bean instanceof EnvironmentAware) {
        ((EnvironmentAware) bean).setEnvironment(this.applicationContext.getEnvironment());
    }
    if (bean instanceof EmbeddedValueResolverAware) {
        ((EmbeddedValueResolverAware) bean).setEmbeddedValueResolver(this.embeddedValueResolver);
    }
    if (bean instanceof ResourceLoaderAware) {
        ((ResourceLoaderAware) bean).setResourceLoader(this.applicationContext);
    }
    if (bean instanceof ApplicationEventPublisherAware) {
        ((ApplicationEventPublisherAware) bean).setApplicationEventPublisher(this.applicationContext);
    }
    if (bean instanceof MessageSourceAware) {
        ((MessageSourceAware) bean).setMessageSource(this.applicationContext);
    }
    if (bean instanceof ApplicationContextAware) {
        ((ApplicationContextAware) bean).setApplicationContext(this.applicationContext);
    }
}
可以看到invokeAwareInterfaces()方法的源码比较简单,就是判断当前bean属于哪种接口类型,则将bean强转为哪种接口类型的对象,然后调用接口的方法,将相应的参数传递到接口的方法中。这里,我们在创建Employee类时,实现的是ApplicationContextAware接口,所以,在invokeAwareInterfaces()方法中,会执行如下的逻辑代码。
if (bean instanceof ApplicationContextAware) {
    ((ApplicationContextAware) bean).setApplicationContext(this.applicationContext);
}
我们可以看到,此时会将this.applicationContext传递到ApplicationContextAware接口的setApplicationContext()方法中。所以,我们在Employee类中的setApplicationContext()方法中就可以直接接收到ApplicationContext对象了。
我们也可以在IDEA中通过Debug的形式来看一下程序的执行过程,此时我们在Employee类的setApplicationContext()方法上设置断点,如下所示。
接下来,我们以Debug的方式来运行SpringBeanTest类的testAnnotationConfig2()方法,运行后的效果如下图所示。

在IDEA的左下角可以看到方法的调用堆栈,通过对方法调用栈的分析,我们看到在执行Employee类中的setApplicationContext()方法之前,执行了ApplicationContextAwareProcessor类的invokeAwareInterfaces方法,如下所示。
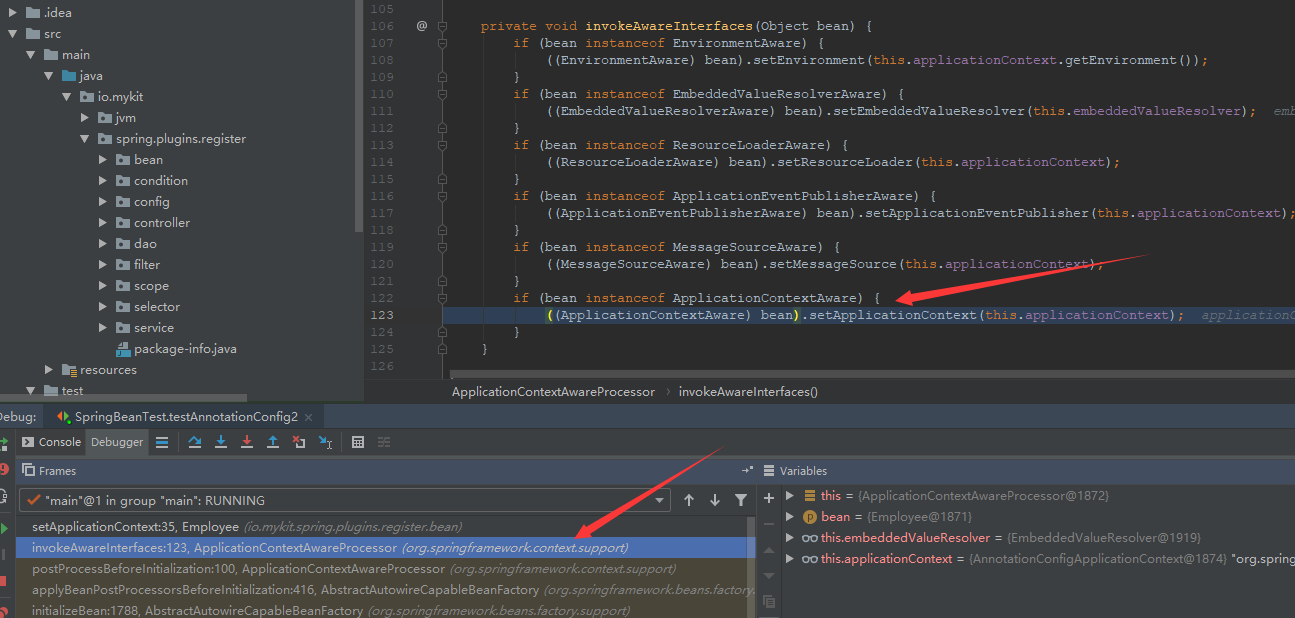
当我们点击方法调用栈中的invokeAwareInterfaces()方法时,代码的执行定位到如下一行代码。
((ApplicationContextAware) bean).setApplicationContext(this.applicationContext);
和我们之前分析的逻辑一致。
BeanValidationPostProcessor类
org.springframework.validation.beanvalidation.BeanValidationPostProcessor类主要是用来为bean进行校验操作,当我们创建bean,并为bean赋值后,我们可以通过BeanValidationPostProcessor类为bean进行校验操作。BeanValidationPostProcessor类的结构如下所示。
package org.springframework.validation.beanvalidation;

import java.util.Iterator;
import java.util.Set;

import javax.validation.ConstraintViolation;
import javax.validation.Validation;
import javax.validation.Validator;
import javax.validation.ValidatorFactory;

import org.springframework.aop.framework.AopProxyUtils;
import org.springframework.beans.BeansException;
import org.springframework.beans.factory.BeanInitializationException;
import org.springframework.beans.factory.InitializingBean;
import org.springframework.beans.factory.config.BeanPostProcessor;
import org.springframework.lang.Nullable;
import org.springframework.util.Assert;

public class BeanValidationPostProcessor implements BeanPostProcessor, InitializingBean {
    /*******************************省略N行代码**********************************/
}
这里,我们也来看看postProcessBeforeInitialization()方法和postProcessAfterInitialization()方法的实现,如下所示。
@Override
public Object postProcessBeforeInitialization(Object bean, String beanName) throws BeansException {
    if (!this.afterInitialization) {
        doValidate(bean);
    }
    return bean;
}

@Override
public Object postProcessAfterInitialization(Object bean, String beanName) throws BeansException {
    if (this.afterInitialization) {
        doValidate(bean);
    }
    return bean;
}
可以看到,在postProcessBeforeInitialization()方法和postProcessAfterInitialization()方法中的主要逻辑都是调用doValidate()方法对bean进行校验,只不过在两个方法中都会对afterInitialization这个boolean类型的成员变量进行判断,如果afterInitialization的值为false,则在postProcessBeforeInitialization()方法中调用doValidate()方法对bean进行校验;如果afterInitialization的值为true,则在postProcessAfterInitialization()方法中调用doValidate()方法对bean进行校验。
InitDestroyAnnotationBeanPostProcessor类
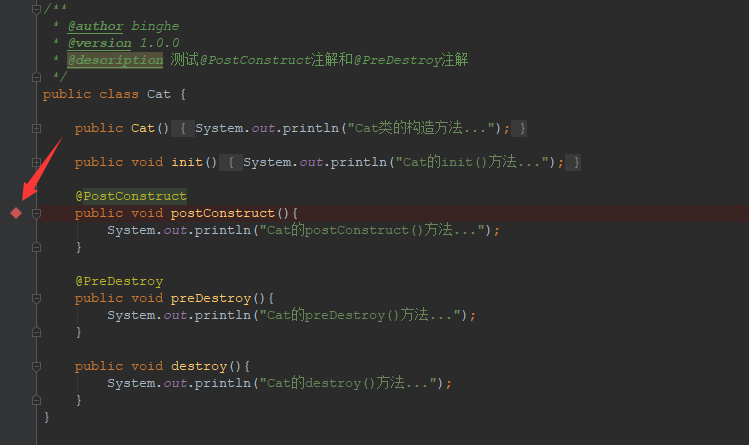
org.springframework.beans.factory.annotation.InitDestroyAnnotationBeanPostProcessor类主要用来处理@PostConstruct注解和@PreDestroy注解。
例如,我们之前创建的Cat类中就使用了@PostConstruct注解和@PreDestroy注解,如下所示。
package io.mykit.spring.plugins.register.bean;
import javax.annotation.PostConstruct;
import javax.annotation.PreDestroy;
/**
 * @author binghe
 * @version 1.0.0
 * @description 测试@PostConstruct注解和@PreDestroy注解
 */
public class Cat {

    public Cat(){
        System.out.println("Cat类的构造方法...");
    }

    public void init(){
        System.out.println("Cat的init()方法...");
    }

    @PostConstruct
    public void postConstruct(){
        System.out.println("Cat的postConstruct()方法...");
    }

    @PreDestroy
    public void preDestroy(){
        System.out.println("Cat的preDestroy()方法...");
    }

    public void destroy(){
        System.out.println("Cat的destroy()方法...");
    }
}
那么,在Cat类中使用了 @PostConstruct注解和@PreDestroy注解来标注方法,Spring怎么就知道什么时候执行 @PostConstruct注解标注的方法,什么时候执行@PreDestroy标注的方法呢?这就要归功于InitDestroyAnnotationBeanPostProcessor类的实现了。
接下来,我们也通过Debug的方式来跟进下代码的执行流程。首先,在Cat类的postConstruct()方法上打上断点,如下所示。
接下来,我们以Debug的方式运行BeanLifeCircleTest类的testBeanLifeCircle04()方法,效果如下所示。
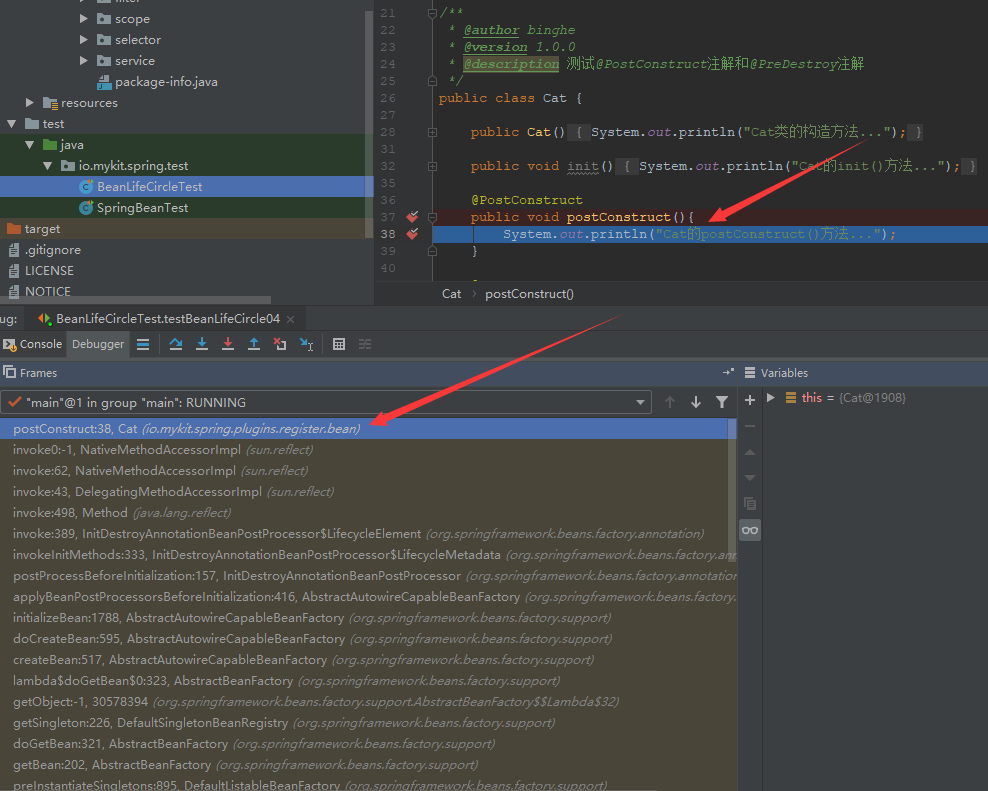
我们还是带着问题来分析,Spring怎么就能定位到使用@PostConstruct注解标注的方法呢?通过分析方法的调用栈我们发现了在进入使用@PostConstruct注解标注的方法之前,Spring调用了InitDestroyAnnotationBeanPostProcessor类的postProcessBeforeInitialization()方法,如下所示。
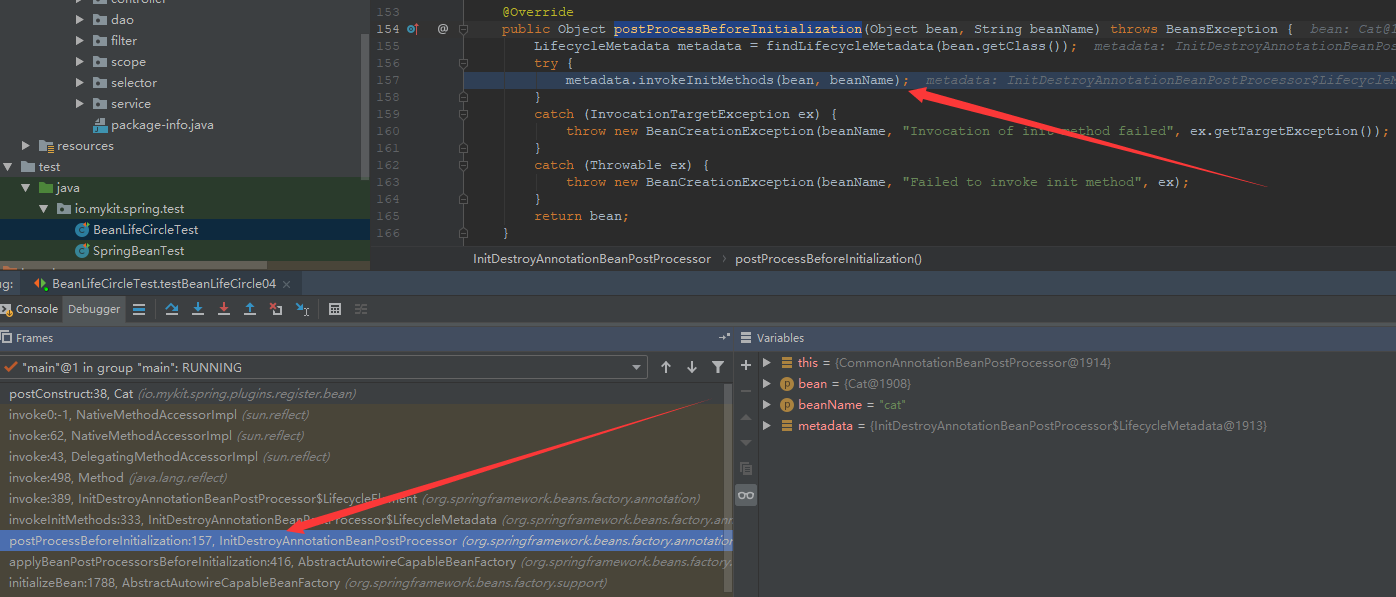
在InitDestroyAnnotationBeanPostProcessor类的postProcessBeforeInitialization()方法中,首先会找到bean中有关生命周期的注解,比如@PostConstruct注解等,找到这些注解之后,则将这些信息赋值给LifecycleMetadata类型的变量metadata,之后调用metadata的invokeInitMethods()方法,通过反射来调用标注了@PostConstruct注解的方法。这就是为什么标注了@PostConstruct注解的方法被Spring执行。
AutowiredAnnotationBeanPostProcessor类
org.springframework.beans.factory.annotation.AutowiredAnnotationBeanPostProcessor类主要是用于处理标注了@Autowired注解的变量或方法。
Spring为何能够自动处理标注了@Autowired注解的变量或方法,就交给小伙伴们自行分析了。大家可以写一个测试方法并通过方法调用堆栈来分析AutowiredAnnotationBeanPostProcessor类的源码,从而找到自己想要的答案。
好了,咱们今天就聊到这儿吧!别忘了给个在看和转发,让更多的人看到,一起学习一起进步!!
项目工程源码已经提交到GitHub:https://github.com/sunshinelyz/spring-annotation
写在最后
如果觉得文章对你有点帮助,请微信搜索并关注「 冰河技术 」微信公众号,跟冰河学习Spring注解驱动开发。公众号回复“spring注解”关键字,领取Spring注解驱动开发核心知识图,让Spring注解驱动开发不再迷茫。