三、数据绑定与模板样式
说明:通过学习本文内容,您将了解到怎样动态地进行关于TreeView组件的数据绑定以及TreeViewItem组件的模板样式更改。本文给出基本的使用方法。
注:在Silverlight项目文件夹下建立Icon文件夹,向里面添加3个16*16的png格式的图像。关于动态数据绑定这里只给出了基本的使用方法,在实际开发中可以使用WebService、XML等进行数据绑定。
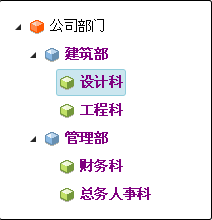
效果图:
Feature.cs(业务模型)代码:
using System.Collections.ObjectModel;
using System.ComponentModel;
using System.Windows.Markup;
namespace SilverlightClient
{
[ContentProperty("Subcomponents")] //声明可在XAML文件中显示的内容属性
public class Feature : INotifyPropertyChanged //继承接口INotifyPropertyChanged用于双向数据绑定
{
//Feature对象的属性
public string FeatureName { get; set; }
public string Description { get; set; }
public string Icon { get; set; }//用以添加TreeViewItem项的图标
//声明全局变量
public Collection<Feature> Subcomponents { get; private set; }
private bool? _shouldInstall;
//是否有子组件
public bool HasSubcomponents
{
get
{
return Subcomponents.Count > 0;
}
}
//是否允许Feature进行安置
public bool? ShouldInstall
{
get
{
return _shouldInstall;
}
set
{
if (value != _shouldInstall)
{
_shouldInstall = value;
OnPropertyChanged("ShouldInstall");
}
}
}
//构造函数
public Feature()
{
Subcomponents = new Collection<Feature>();
ShouldInstall = true;
}
//事件委托
public event PropertyChangedEventHandler PropertyChanged;
//实现接口INotifyPropertyChanged定义函数
private void OnPropertyChanged(string propertyName)
{
PropertyChangedEventHandler handler = PropertyChanged;
if (null != handler)
{
handler.Invoke(this, new PropertyChangedEventArgs(propertyName));
}
}
}
}
MainPage.xaml文件代码:
<UserControl
xmlns="http://schemas.microsoft.com/winfx/2006/xaml/presentation"
xmlns:x="http://schemas.microsoft.com/winfx/2006/xaml"
xmlns:d="http://schemas.microsoft.com/expression/blend/2008" xmlns:mc="http://schemas.openxmlformats.org/markup-compatibility/2006"
xmlns:toolkit="clr-namespace:System.Windows.Controls;assembly=System.Windows.Controls.Toolkit"
xmlns:controls="clr-namespace:System.Windows.Controls;assembly=System.Windows.Controls"
xmlns:common="clr-namespace:System.Windows;assembly=System.Windows.Controls"
xmlns:samplesCommon="clr-namespace:SilverlightClient"
mc:Ignorable="d" x:Class="SilverlightClient.MainPage"
Width="640" Height="480">
<Grid x:Name="LayoutRoot" Background="White" Width="640" Height="480">
<StackPanel>
<StackPanel.Resources>
<!-- TreeViewItem风格设定 -->
<Style x:Key="PurpleItemStyle" TargetType="controls:TreeViewItem">
<Setter Property="Foreground" Value="Purple" />
<Setter Property="FontWeight" Value="Bold" />
</Style>
<!-- 代表一个Feature项的模板 -->
<common:HierarchicalDataTemplate x:Key="NodeTemplate" ItemsSource="{Binding Subcomponents}" ItemContainerStyle="{StaticResource PurpleItemStyle}">
<StackPanel Orientation="Horizontal" ToolTipService.ToolTip="{Binding Description}">
<Image Source="{Binding Icon}" /><!-- 图标绑定 -->
<ContentPresenter Content=" " />
<ContentPresenter Content="{Binding FeatureName}" />
</StackPanel>
</common:HierarchicalDataTemplate>
</StackPanel.Resources>
<Grid>
<Grid.ColumnDefinitions>
<ColumnDefinition Width="*" />
<ColumnDefinition Width="2*" />
</Grid.ColumnDefinitions>
<controls:TreeView x:Name="tvFeature"
ItemTemplate="{StaticResource NodeTemplate}"
Grid.Column="0"
FontSize="14">
<!-- 用来一次展开TreeView所有结点 -->
<controls:TreeView.ItemContainerStyle>
<Style TargetType="controls:TreeViewItem">
<Setter Property="IsExpanded" Value="True" />
</Style>
</controls:TreeView.ItemContainerStyle>
</controls:TreeView>
</Grid>
</StackPanel>
</Grid>
</UserControl>
MainPage.xaml.cs文件代码:
using System;
using System.Collections.Generic;
using System.Linq;
using System.Net;
using System.Windows;
using System.Windows.Controls;
using System.Windows.Documents;
using System.Windows.Input;
using System.Windows.Media;
using System.Windows.Media.Animation;
using System.Windows.Shapes;
namespace SilverlightClient
{
public partial class MainPage : UserControl
{
public MainPage()
{
InitializeComponent();
this.Loaded += new RoutedEventHandler(MainPage_Loaded);
}
void MainPage_Loaded(object sender, RoutedEventArgs e)
{
Feature ft = new Feature();
Feature ftRoot = new Feature();
ftRoot.FeatureName = "公司部门";
ftRoot.Description = "公司各部门的结构";
ftRoot.Icon = "Icon/l1.png";
Feature ftChild1 = new Feature();
ftChild1.FeatureName = "建筑部";
ftChild1.Description = "负责公司的工程项目";
ftChild1.Icon = "Icon/l2.png";
Feature ftChild1_1 = new Feature();
ftChild1_1.FeatureName = "设计科";
ftChild1_1.Description = "负责项目的设计";
ftChild1_1.Icon = "Icon/l3.png";
Feature ftChild1_2 = new Feature();
ftChild1_2.FeatureName = "工程科";
ftChild1_2.Description = "负责项目的具体实施";
ftChild1_2.Icon = "Icon/l3.png";
ftChild1.Subcomponents.Add(ftChild1_1);
ftChild1.Subcomponents.Add(ftChild1_2);
Feature ftChild2 = new Feature();
ftChild2.FeatureName = "管理部";
ftChild2.Description = "负责管理公司的财务与人事";
ftChild2.Icon = "Icon/l2.png";
Feature ftChild2_1 = new Feature();
ftChild2_1.FeatureName = "财务科";
ftChild2_1.Description = "负责公司的对内对外的财务事宜";
ftChild2_1.Icon = "Icon/l3.png";
Feature ftChild2_2 = new Feature();
ftChild2_2.FeatureName = "总务人事科";
ftChild2_2.Description = "负责公司日常事务及员工招聘";
ftChild2_2.Icon = "Icon/l3.png";
ftChild2.Subcomponents.Add(ftChild2_1);
ftChild2.Subcomponents.Add(ftChild2_2);
ftRoot.Subcomponents.Add(ftChild1);
ftRoot.Subcomponents.Add(ftChild2);
ft.Subcomponents.Add(ftRoot);
tvFeature.ItemsSource = ft.Subcomponents;
}
}