接上篇:单点登录(SSO)解决方案之 CAS服务端数据源设置及页面改造
Spring Security
Spring Security是一个能够为基于Spring的企业应用系统提供声明式的安全访问控制解决方案的安全框架。它提供了一组可以在Spring应用上下文中配置的Bean,充分利用了Spring IoC,DI(控制反转Inversion of Control ,DI:Dependency Injection 依赖注入)和AOP(面向切面编程)功能,为应用系统提供声明式的安全访问控制功能,减少了为企业系统安全控制编写大量重复代码的工作。
为什么使用CAS集成Spring Security?
首先我们要明白,一个系统都需要有认证和授权的过程:
所谓认证,就是当用户试图进入系统,而系统发现用户没有登陆,就调转到登陆页面,然后用户输入用户名,密码,点击登陆按钮,系统进行用户名,密码的校验过程,称之为认证。
所谓授权,指的是系统对用户名,密码进行认证通过,然后对该用户赋权限,即该用户能够访问这个系统的哪些功能(即该用户能够访问这个系统的哪些url地址及按钮)。
Spring Security本身是具有认证功能的,但是我们使用CAS做单点登录就相当于把认证这一部分放在了CAS上,也就是说我们使用CAS做认证。
我们大部分的系统都会有用户、角色以及权限表,我们在CAS做过认证以后使用Spring Security进行授权,也就是认证过的用户取出该用户的权限,根据权限来控制该用户能访问哪些页面等。
CAS客户端与Spring Security集成Demo:
1,搭建客户端casclient_demo3,引入spring依赖和spring secrity 相关依赖 ,tomcat端口设置为9003
pom.xml
<?xml version="1.0" encoding="UTF-8"?>
<project xmlns="http://maven.apache.org/POM/4.0.0"
         xmlns:xsi="http://www.w3.org/2001/XMLSchema-instance"
         xsi:schemaLocation="http://maven.apache.org/POM/4.0.0 http://maven.apache.org/xsd/maven-4.0.0.xsd">
    <parent>
        <artifactId>project_demo</artifactId>
        <groupId>com.zy</groupId>
        <version>1.0-SNAPSHOT</version>
    </parent>
    <modelVersion>4.0.0</modelVersion>

    <artifactId>casclient_demo3</artifactId>
    <packaging>war</packaging>

    <properties>
        <spring.version>4.2.4.RELEASE</spring.version>
    </properties>

    <dependencies>
        <!--spring-->
        <dependency>
            <groupId>org.springframework</groupId>
            <artifactId>spring-core</artifactId>
            <version>${spring.version}</version>
        </dependency>
        <dependency>
            <groupId>org.springframework</groupId>
            <artifactId>spring-web</artifactId>
            <version>${spring.version}</version>
        </dependency>

        <dependency>
            <groupId>org.springframework</groupId>
            <artifactId>spring-webmvc</artifactId>
            <version>${spring.version}</version>
        </dependency>

        <dependency>
            <groupId>org.springframework</groupId>
            <artifactId>spring-context-support</artifactId>
            <version>${spring.version}</version>
        </dependency>

        <dependency>
            <groupId>org.springframework</groupId>
            <artifactId>spring-test</artifactId>
            <version>${spring.version}</version>
        </dependency>

        <dependency>
            <groupId>org.springframework</groupId>
            <artifactId>spring-jdbc</artifactId>
            <version>${spring.version}</version>
        </dependency>

        <!--security-->
        <dependency>
            <groupId>org.springframework.security</groupId>
            <artifactId>spring-security-web</artifactId>
            <version>4.1.0.RELEASE</version>
        </dependency>

        <dependency>
            <groupId>org.springframework.security</groupId>
            <artifactId>spring-security-config</artifactId>
            <version>4.1.0.RELEASE</version>
        </dependency>

        <!--servlet-->
        <dependency>
            <groupId>javax.servlet</groupId>
            <artifactId>servlet-api</artifactId>
            <version>2.5</version>
            <scope>provided</scope>
        </dependency>

        <!--spring和cas集成需要的两个jar包-->
        <dependency>
            <groupId>org.springframework.security</groupId>
            <artifactId>spring-security-cas</artifactId>
            <version>4.1.0.RELEASE</version>
        </dependency>
        <dependency>
            <groupId>org.jasig.cas.client</groupId>
            <artifactId>cas-client-core</artifactId>
            <version>3.3.3</version>
            <exclusions>
                <exclusion>
                    <groupId>org.slf4j</groupId>
                    <artifactId>log4j-over-slf4j</artifactId>
                </exclusion>
            </exclusions>
        </dependency>

    </dependencies>
    <build>
        <plugins>
            <!-- java编译插件 -->
            <plugin>
                <groupId>org.apache.maven.plugins</groupId>
                <artifactId>maven-compiler-plugin</artifactId>
                <version>3.2</version>
                <configuration>
                    <source>1.8</source>
                    <target>1.8</target>
                    <encoding>UTF-8</encoding>
                </configuration>
            </plugin>
            <plugin>
                <groupId>org.apache.tomcat.maven</groupId>
                <artifactId>tomcat7-maven-plugin</artifactId>
                <configuration>
                    <!-- 指定端口 -->
                    <port>9003</port>
                    <!-- 请求路径 -->
                    <path>/</path>
                </configuration>
            </plugin>
        </plugins>
    </build>
</project>
2,修改web.xml ,添加过滤器等配置
web.xml
<?xml version="1.0" encoding="UTF-8"?>
<web-app xmlns:xsi="http://www.w3.org/2001/XMLSchema-instance"
         xmlns="http://java.sun.com/xml/ns/javaee"
         xsi:schemaLocation="http://java.sun.com/xml/ns/javaee http://java.sun.com/xml/ns/javaee/web-app_2_5.xsd"
         version="2.5">

    <context-param>
        <param-name>contextConfigLocation</param-name>
        <param-value>classpath:spring-security.xml</param-value>
    </context-param>
    <listener>
        <listener-class>
            org.springframework.web.context.ContextLoaderListener
        </listener-class>
    </listener>

    <!--security过滤器链-->
    <filter>
        <filter-name>springSecurityFilterChain</filter-name>
        <filter-class>org.springframework.web.filter.DelegatingFilterProxy</filter-class>
    </filter>
    <filter-mapping>
        <filter-name>springSecurityFilterChain</filter-name>
        <url-pattern>/*</url-pattern>
    </filter-mapping>


    <!--springMVC DispatcherServlet-->
    <servlet>
        <servlet-name>springmvc</servlet-name>
        <servlet-class>org.springframework.web.servlet.DispatcherServlet</servlet-class>
        <!-- 指定加载的配置文件 ,通过参数contextConfigLocation加载-->
        <init-param>
            <param-name>contextConfigLocation</param-name>
            <param-value>classpath:springmvc.xml</param-value>
        </init-param>
    </servlet>

    <servlet-mapping>
        <servlet-name>springmvc</servlet-name>
        <url-pattern>*.do</url-pattern>
    </servlet-mapping>
</web-app>
3,创建配置文件springmvc.xml及spring-security.xml
resources/springmvc.xml
<?xml version="1.0" encoding="UTF-8"?>
<beans xmlns="http://www.springframework.org/schema/beans"
       xmlns:xsi="http://www.w3.org/2001/XMLSchema-instance"
       xmlns:context="http://www.springframework.org/schema/context"
       xmlns:mvc="http://www.springframework.org/schema/mvc"
       xsi:schemaLocation="http://www.springframework.org/schema/beans http://www.springframework.org/schema/beans/spring-beans.xsd
        http://www.springframework.org/schema/mvc http://www.springframework.org/schema/mvc/spring-mvc.xsd

        http://www.springframework.org/schema/context http://www.springframework.org/schema/context/spring-context.xsd">

    <context:component-scan base-package="com.zy.demo.controller"/>

    <mvc:annotation-driven/>

</beans>
resources/spring-security.xml
<?xml version="1.0" encoding="UTF-8"?>
<beans:beans xmlns="http://www.springframework.org/schema/security"
             xmlns:beans="http://www.springframework.org/schema/beans"
             xmlns:xsi="http://www.w3.org/2001/XMLSchema-instance"
             xsi:schemaLocation="http://www.springframework.org/schema/beans http://www.springframework.org/schema/beans/spring-beans.xsd
                        http://www.springframework.org/schema/security http://www.springframework.org/schema/security/spring-security.xsd">


    <!--拦截规则  entry-point-ref为入口点引用 use-expressions默认是true -->
    <http use-expressions="false" entry-point-ref="casProcessingFilterEntryPoint">
        <!--允许匿名访问的连接地址-->
        <intercept-url pattern="/public/*.do" access="IS_AUTHENTICATED_ANONYMOUSLY"></intercept-url>
        <!-- /* 当前级别目标 子目录是不拦截-->
        <!--如果是ROLE_ADMIN则不拦截admin文件夹下的-->
        <intercept-url pattern="/admin/**" access="ROLE_ADMIN"></intercept-url>
        <!--如果是ROLE_LEADER则不拦截leader文件夹下的-->
        <intercept-url pattern="/leader/**" access="ROLE_LEADER"></intercept-url>
        <!--如果两个角色都有 所有的都不拦截-->
        <intercept-url pattern="/**" access="ROLE_ADMIN,ROLE_LEADER"></intercept-url>
        <!--关闭防CSRF攻击-->
        <csrf disabled="true"></csrf>

        <!--配置认证过滤器-->
        <!-- custom-filter为过滤器, position 表示将过滤器放在指定的位置上, before表示放在指定位置之前, after表示放在指定的位置之后  -->
        <custom-filter ref="casAuthenticationFilter" position="CAS_FILTER"/>
        <custom-filter ref="requestSingleLogoutFilter" before="LOGOUT_FILTER"/>
        <custom-filter ref="singleLogoutFilter" before="CAS_FILTER"/>
    </http>


    <!-- CAS入口点 开始 -->
    <!--入口点的引用-->
    <beans:bean id="casProcessingFilterEntryPoint"
                class="org.springframework.security.cas.web.CasAuthenticationEntryPoint">
        <!-- 单点登录服务器登录URL -->
        <!--<beans:property name="loginUrl" value="http://localhost:9100/cas/login"/>-->
        <beans:property name="loginUrl" value="http://192.168.44.31:9100/cas/login"/>
        <beans:property name="serviceProperties" ref="serviceProperties"/>
    </beans:bean>

    <beans:bean id="serviceProperties" class="org.springframework.security.cas.ServiceProperties">
        <!--service 配置自身工程的根地址+/login/cas   -->
        <beans:property name="service" value="http://localhost:9003/login/cas"/>
    </beans:bean>
    <!-- CAS入口点 结束 -->


    <!-- 认证过滤器 开始 -->
    <beans:bean id="casAuthenticationFilter" class="org.springframework.security.cas.web.CasAuthenticationFilter">
        <beans:property name="authenticationManager" ref="authenticationManager"/>
    </beans:bean>

    <!-- 认证管理器 -->
    <authentication-manager alias="authenticationManager">
        <authentication-provider ref="casAuthenticationProvider">
        </authentication-provider>
    </authentication-manager>

    <!-- 认证提供者 -->
    <beans:bean id="casAuthenticationProvider"
                class="org.springframework.security.cas.authentication.CasAuthenticationProvider">
        <beans:property name="authenticationUserDetailsService">
            <beans:bean class="org.springframework.security.core.userdetails.UserDetailsByNameServiceWrapper">
                <beans:constructor-arg ref="userDetailsService"/>
            </beans:bean>
        </beans:property>
        <beans:property name="serviceProperties" ref="serviceProperties"/>
        <!-- ticketValidator 为票据验证器 -->
        <beans:property name="ticketValidator">
            <beans:bean class="org.jasig.cas.client.validation.Cas20ServiceTicketValidator">
                <!--<beans:constructor-arg index="0" value="http://localhost:9100/cas"/>-->
                <beans:constructor-arg index="0" value="http://192.168.44.31:9100/cas"/>
            </beans:bean>
        </beans:property>
        <beans:property name="key" value="an_id_for_this_auth_provider_only"/>
    </beans:bean>

    <!--获取授权信息的bean-->
    <!-- 认证类 -->
    <beans:bean id="userDetailsService" class="com.zy.demo.service.UserDetailsServiceImpl"/>
    <!-- 认证过滤器 结束 -->


    <!--退出的过滤器-->
    <!-- 单点登出  开始  -->
    <beans:bean id="singleLogoutFilter" class="org.jasig.cas.client.session.SingleSignOutFilter"/>
    <beans:bean id="requestSingleLogoutFilter"
                class="org.springframework.security.web.authentication.logout.LogoutFilter">
        <!--退出登录后跳转到百度-->
        <!--<beans:constructor-arg value="http://localhost:9100/cas/logout?service=http://www.baidu.com"/>-->
        <beans:constructor-arg value="http://192.168.44.31:9100/cas/logout?service=http://www.baidu.com"/>
        <beans:constructor-arg>
            <beans:bean class="org.springframework.security.web.authentication.logout.SecurityContextLogoutHandler"/>
        </beans:constructor-arg>
        <beans:property name="filterProcessesUrl" value="/logout/cas"/>
    </beans:bean>
    <!-- 单点登出  结束 -->
</beans:beans>
4,编写认证类java.com.zy.demo.controller.service.UserDetailsServiceImpl 需要实现UserDetailsService接口
package com.zy.demo.service;

import org.springframework.security.core.GrantedAuthority;
import org.springframework.security.core.authority.SimpleGrantedAuthority;
import org.springframework.security.core.userdetails.User;
import org.springframework.security.core.userdetails.UserDetails;
import org.springframework.security.core.userdetails.UserDetailsService;
import org.springframework.security.core.userdetails.UsernameNotFoundException;
import org.springframework.stereotype.Component;

import java.util.ArrayList;
import java.util.List;

/**
 * 使用security控制权限
 */
@Component
public class UserDetailsServiceImpl implements UserDetailsService {

    @Override
    public UserDetails loadUserByUsername(String username) throws UsernameNotFoundException {
        //可以根据用户名取数据库取出来权限
        String authorityLeader = "ROLE_LEADER";
        String authorityAdmin = "ROLE_ADMIN";

        //然后授权
        List<GrantedAuthority> authorityList = new ArrayList<>();//权限列表
        //GrantedAuthority authority = new SimpleGrantedAuthority(authorityLeader);//权限
        authorityList.add(new SimpleGrantedAuthority(authorityLeader));
        //authorityList.add(new SimpleGrantedAuthority(authorityAdmin));

        System.out.println("对用户进行授权");
        return new User(username, "", authorityList);
    }
}
5,添加测试html页面
在webapp下新建leader和admin两个文件夹,并在文件夹内分别新建index.jsp页面(当前页可以建其他页面,此处主要用来演示权限限制):
webapp/admin/index.jsp
<%@ page language="java" contentType="text/html; charset=utf-8"
         pageEncoding="utf-8" %>
<!DOCTYPE html PUBLIC "-//W3C//DTD HTML 4.01 Transitional//EN" "http://www.w3.org/TR/html4/loose.dtd">
<head>
    <meta http-equiv="Content-Type" content="text/html; charset=utf-8">
</head>
<body>
<h1>admin页面</h1>
<%=request.getRemoteUser()%>
<br/>
<a href="/logout/cas">单点退出</a>
</body>
</html>
webapp/leader/index.jsp
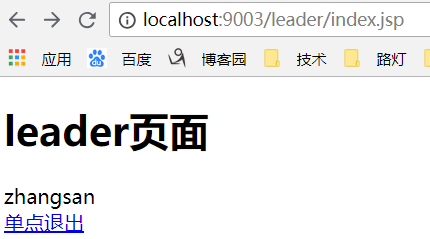
<%@ page language="java" contentType="text/html; charset=utf-8"
         pageEncoding="utf-8" %>
<!DOCTYPE html PUBLIC "-//W3C//DTD HTML 4.01 Transitional//EN" "http://www.w3.org/TR/html4/loose.dtd">
<head>
    <meta http-equiv="Content-Type" content="text/html; charset=utf-8">
</head>
<body>
<h1>leader页面</h1>
<%=request.getRemoteUser()%>
<br/>
<a href="/logout/cas">单点退出</a>
</body>
</html>
以上工程搭建完成。
启动项目,浏览器输入localhost:9003/leader/index.jsp,登录后:
浏览器输入localhost:9003/admin/index.jsp:

拒绝访问,因为我们在UserDetailsServiceImpl 只给用户赋予了ROLE_LEADER的权限。
以上。
后续补充:Demo及所需资料百度云地址:链接:https://pan.baidu.com/s/1Dr4Aq9-FWGnL3kRCZ3uwVA 密码:0i30