项目初始化
为此,我们先初始化一个新的 Laravel 应用 thrift:
laravel new thrift
在 thrift 项目根目录下新增一个 thrift 子目录,然后在该子目录下创建 Thrift IDL 文件 org.thrift,用于定义和用户相关的服务接口(语言为 PHP,命名空间为 AppThriftOrg):
namespace php App.Thrift.OrgThrift
service OrgThrift {
string routeRequest(1:i32 request)
}
接着在项目根目录下运行如下命令,根据上述 IDL 文件生成相关的服务代码:
thrift -r --gen php:server -out ./ thrift/org.thrift
这样就会在 AppThriftOrgThrift命名空间下生成对应的服务代码:

然后通过 Composer 安装 Thrift PHP 依赖包:
composer require apache/thrift
编写服务端代码
接下来,我们就可以编写服务端代码了,在 app 目录下新建一个 Services/Server 子目录,然后在该目录下创建服务接口类OrgService,该类实现自 AppThriftorgOrgIf 接口:
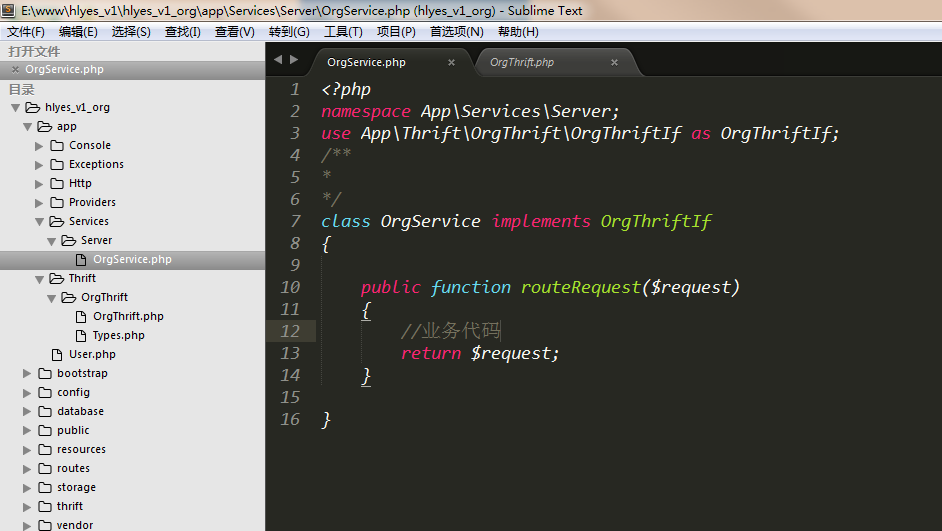
在服务接口实现中,我们通过传入参数查询数据库并返回对应的记录,这里为了简化逻辑,我们直接返回,将参数校验、缓存优化、异常处理通通省略。
接下来,我们来编写服务端启动命令类,在 Laravel 框架中,这可以通过 Artisan 控制台来完成,首先创建命令类:
php artisan make:command RpcServerStart
该命令会在 app/Console/Commands 目录下生成 RpcServerStart.php,我们编写 RpcServerStart 命令类代码如下:
<?php
namespace AppConsoleCommands;

use AppServicesServerOrgService;
use AppThriftOrgThriftOrgThriftProcessor;
use IlluminateConsoleCommand;
use ThriftExceptionTException;
use ThriftFactoryTBinaryProtocolFactory;
use ThriftFactoryTTransportFactory;
use ThriftServerTServerSocket;
use ThriftServerTSimpleServer;
use ThriftTMultiplexedProcessor;

class RpcServerStart extends Command
{
    /**
     * The name and signature of the console command.
     *
     * @var string
     */
    protected $signature = 'rpc:start';

    /**
     * The console command description.
     *
     * @var string
     */
    protected $description = 'Start Thrift RPC Server';

    /**
     * Create a new command instance.
     *
     * @return void
     */
    public function __construct()
    {
        parent::__construct();
    }

    /**
     * Execute the console command.
     *
     * @return mixed
     */
    public function handle()
    {
        try {
            $thriftProcess = new OrgThriftProcessor(new OrgService());
            $tFactory = new TTransportFactory();
            $pFactory = new TBinaryProtocolFactory();
            $processor = new TMultiplexedProcessor();
            // 注册服务
            $processor->registerProcessor('OrgService', $thriftProcess);
            // 监听本地 8888 端口,等待客户端连接请求
            $transport = new TServerSocket('127.0.0.1', 8001);
            $server = new TSimpleServer($processor, $transport, $tFactory, $tFactory, $pFactory, $pFactory);
            $this->info("Server Start [127.0.0.1:8001]!");
            $server->serve();
        } catch (TException $exception) {
            $this->error("服务启动失败!");
        }
    }
}
别忘了在 app/Console/Kernel.php 中注册上述命令类使其生效:
use AppConsoleCommandsRpcServerStart;

protected $commands = [
    RpcServerStart::class,
];
这样,服务端接口和启动命令都已经完成了,接下来我们继续编写客户端建立连接和请求通信代码。
编写客户端代码
在 客户端(client) 项目根目录下新增一个 thrift 子目录,然后在该子目录下创建 Thrift IDL 文件 org.thrift,用于定义和用户相关的服务接口(语言为 PHP,命名空间为 AppThriftOrg):
namespace php App.Thrift.OrgThrift
service OrgThrift {
string routeRequest(1:i32 request)
}
接着在项目根目录下运行如下命令,根据上述 IDL 文件生成相关的服务代码:
thrift -r --gen php -out ./ thrift/org.thrift
这样就会在 AppThriftOrgThrift命名空间下生成对应的服务代码:

这个客户端并不是前端、移动端,而是相对于 RPC 服务器的 RPC 客户端,我们在 app/Services/Client 目录下创建 OrgService.php,用于存放 RPC 客户端连接与请求服务接口方法:
<?php
namespace AppServicesClient;

use AppThriftOrgThriftOrgThriftClient;
use ThriftProtocolTMultiplexedProtocol;
use ThriftExceptionTException;
use ThriftProtocolTBinaryProtocol;
use ThriftTransportTBufferedTransport;
use ThriftTransportTSocket;

class OrgService
{
    public function routeOrg()
    {
        $request=Request::all();
        try {
            // 建立与 RpcServer 的连接
            $socket = new TSocket("127.0.0.1", "8001");
            $socket->setRecvTimeout(30000);  // 超时时间
            $socket->setDebug(true);
            $transport = new TBufferedTransport($socket, 1024, 1024);
            $protocol = new TBinaryProtocol($transport);
            $thriftProtocol = new TMultiplexedProtocol($protocol, 'OrgService');
            $client = new OrgThriftClient($thriftProtocol);
            $transport->open();
            $result = $client->routeRequest($request);
            $transport->close();
            return $result;
        } catch (TException $TException) {
            dd($TException);
        }
    }
}
同样,为了简化代码和流程,我这里将连接和请求代码写到一起了,如果有多个服务接口,传输层是可以共用的,需要拆分开。这里我们先建立与 RPC 服务器的连接,
最后,我们在 routes/web.php 中注册客户端请求路由:
use AppServicesClientOrgService;

Route::get('/org/{id}', function($id) {
    $OrgService = new OrgService();
    // dd($userService);
    $Org = $OrgService->routeOrg($id);
    return $Org;
});
测试 RPC 服务调用
至此,RPC 客户端和服务端代码都已经编写好了,接下来我们来测试这个 RPC 接口调用
接下来,在项目根目录下启动 Thrift RPC 服务端:
php artisan rpc:start
注意:
1、根目录新建目录需配置composer.json中的psr-4
2、取消http/kernel.php中web中间件内容

然后composer更新:
composer dump-autoload