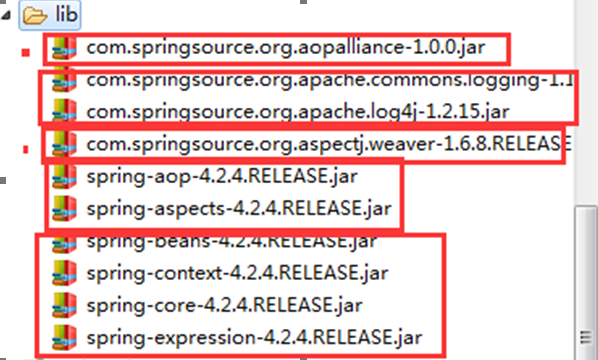
AOP:
原理:底层利用动态代理(两种动态代理技术都使用了)
两种实现方案:
第一种:JDK动态代理技术
实现的InvocationHandler接口,要想实现某个类的动态代理对象,必须有接口有实现类。
第二种:cglib动态代理技术(需要导入spring包--4个核心包)
实现了MethodInterceptor接口,原理是继承要代理的类。
第一步:导入包 4+2+2+2

第二步:准备肉鸡
编写一个接口UserService 和 UserServiceImpl,具体详见代码
第三步:编写通知类
public class MyAdvice {
//Spring中的代码增强,方式非常多
// 前置通知
//--目标对象方法(切入点)执行之前调用
// 后置通知(如果出现异常不会执行)
//--目标对象方法(切入点)执行之后调用
// 环绕通知
//--目标对象方法(切入点)执行之前和之后调用
// 异常拦截通知
//--切入点执行异常才会调用
// 后置通知(不论是否出现异常都会执行)
//--目标对象方法(切入点)执行之后调用
// 前置通知
public void before(){
System.out.println("这是前置通知代码");
}
// 后置通知
public void after01(){
System.out.println("这是后置通知代码(出现异常不调用)");
}
// 后置通知
public void after02(){
System.out.println("这是后置通知代码(都调用)");
}
//异常通知
public void afterException(){
System.out.println("妈呀,出异常了,怎么办?");
}
//环绕通知
public Object around(ProceedingJoinPoint pip) throws Throwable{
System.out.println("这是环绕通知前");
Object obj=pip.proceed();
System.out.println("这是环绕通知后");
return obj;
}
}
第四步:书写配置文件
<?xml version="1.0" encoding="UTF-8"?>
<beans xmlns:xsi="http://www.w3.org/2001/XMLSchema-instance"
xmlns="http://www.springframework.org/schema/beans" xmlns:context="http://www.springframework.org/schema/context"
xmlns:aop="http://www.springframework.org/schema/aop"
xsi:schemaLocation="http://www.springframework.org/schema/beans http://www.springframework.org/schema/beans/spring-beans-4.2.xsd http://www.springframework.org/schema/context http://www.springframework.org/schema/context/spring-context-4.2.xsd http://www.springframework.org/schema/aop http://www.springframework.org/schema/aop/spring-aop-4.2.xsd ">
<bean name="userService" class="com.xcy.service.UserServiceImpl"></bean>
<bean name="myAdvice" class="com.xcy.advice.MyAdvice"></bean>
<!-- weaving -->
<aop:config>
<!--
public void com.xcy.service.UserServiceImpl.save()
void com.xcy.service.UserServiceImpl.save()
* com.xcy.service.UserServiceImpl.*()
* com.xcy.service.*ServiceImpl.*(..)
* com.xcy.service..*ServiceImpl.*(..)
-->
<!-- 切入點: 想要增強的方法 -->
<aop:pointcut expression="execution(* com.xcy.service..*ServiceImpl.*(..))" id="pc"/>
<!-- 切面:增強、通知 + 切入點 -->
<aop:aspect ref="myAdvice">
<!-- 前置增強 -->
<aop:before method="before" pointcut-ref="pc"/>
<aop:after-returning method="after01" pointcut-ref="pc"/>
<aop:after method="after02" pointcut-ref="pc"/>
<aop:after-throwing method="afterException" pointcut-ref="pc"/>
<aop:around method="around" pointcut-ref="pc"/>
</aop:aspect>
</aop:config>
</beans>
第五步:测试 如果使用junit和spring整合的方式测试,需要导入包(3个)
package com.xcy.test;
import org.junit.Test;
import org.junit.runner.RunWith;
import org.springframework.beans.factory.annotation.Autowired;
import org.springframework.test.context.ContextConfiguration;
import org.springframework.test.context.junit4.SpringJUnit4ClassRunner;
import com.xcy.service.UserService;
//帮我们创建容器
@RunWith(SpringJUnit4ClassRunner.class)
//创建容器时,需要指定配置文件
@ContextConfiguration("classpath:applicationContext02.xml")
public class SpringJUnit {
//代理對象
@Autowired
private UserService userService;
@Test
public void testAop(){
userService.save();
}
}
注解方式:以上是通过xml配置方式书写,以下是通过注解方法书写。
package com.xcy.advice;
。。。相关包
@Aspect//表示该类为通知类、增强类
publicclass MyAdvice02 {
//Spring中的代码增强,方式非常多
// 前置通知
//--目标对象方法(切入点)执行之前调用
// 后置通知(如果出现异常不会执行)
//--目标对象方法(切入点)执行之后调用
// 环绕通知
//--目标对象方法(切入点)执行之前和之后调用
// 异常拦截通知
//--切入点执行异常才会调用
// 后置通知(不论是否出现异常都会执行)
//--目标对象方法(切入点)执行之后调用
// 前置通知
@Before("execution(* com.xcy.service..*ServiceImpl.*(..))")
publicvoid before(){
System.out.println("这是前置通知代码");
}
// 后置通知
@AfterReturning("execution(* com.xcy.service..*ServiceImpl.*(..))")
publicvoid after01(){
System.out.println("这是后置通知代码(出现异常不调用)");
}
// 后置通知
@After("execution(* com.xcy.service..*ServiceImpl.*(..))")
publicvoid after02(){
System.out.println("这是后置通知代码(都调用)");
}
//异常通知
@AfterThrowing("execution(* com.xcy.service..*ServiceImpl.*(..))")
publicvoid afterException(){
System.out.println("妈呀,出异常了,怎么办?");
}
//环绕通知
@Around("execution(* com.xcy.service..*ServiceImpl.*(..))")
public Object around(ProceedingJoinPoint pip) throws Throwable{
System.out.println("这是环绕通知前");
Object obj=pip.proceed();
System.out.println("这是环绕通知后");
return obj;
}
}
配置文件:
<?xml version="1.0" encoding="UTF-8"?>
<beans xmlns:xsi="http://www.w3.org/2001/XMLSchema-instance"
xmlns="http://www.springframework.org/schema/beans" xmlns:context="http://www.springframework.org/schema/context"
xmlns:aop="http://www.springframework.org/schema/aop"
xsi:schemaLocation="http://www.springframework.org/schema/beans http://www.springframework.org/schema/beans/spring-beans-4.2.xsd http://www.springframework.org/schema/context http://www.springframework.org/schema/context/spring-context-4.2.xsd http://www.springframework.org/schema/aop http://www.springframework.org/schema/aop/spring-aop-4.2.xsd ">
<bean name="userService" class="com.xcy.service.UserServiceImpl"></bean>
<bean name="myAdvice" class="com.xcy.advice.MyAdvice02"></bean>
<!-- 开启使用注解织入 -->
<aop:aspectj-autoproxy></aop:aspectj-autoproxy>
</beans>
错误总结:
不要忘记写execution单词
|
package com.xcy.advice;
import org.aspectj.lang.ProceedingJoinPoint; import org.aspectj.lang.annotation.After; import org.aspectj.lang.annotation.AfterReturning; import org.aspectj.lang.annotation.AfterThrowing; import org.aspectj.lang.annotation.Around; import org.aspectj.lang.annotation.Aspect; import org.aspectj.lang.annotation.Before;
@Aspect//表示该类为通知类、增强类 publicclass MyAdvice02 {
//Spring中的代码增强,方式非常多 // 前置通知 //--目标对象方法(切入点)执行之前调用 // 后置通知(如果出现异常不会执行) //--目标对象方法(切入点)执行之后调用 // 环绕通知 //--目标对象方法(切入点)执行之前和之后调用 // 异常拦截通知 //--切入点执行异常才会调用 // 后置通知(不论是否出现异常都会执行) //--目标对象方法(切入点)执行之后调用
// 前置通知 @Before("execution(* com.xcy.service..*ServiceImpl.*(..))") publicvoid before(){ System.out.println("这是前置通知代码"); }
// 后置通知 @AfterReturning("execution(* com.xcy.service..*ServiceImpl.*(..))") publicvoid after01(){ System.out.println("这是后置通知代码(出现异常不调用)"); }
// 后置通知 @After("execution(* com.xcy.service..*ServiceImpl.*(..))") publicvoid after02(){ System.out.println("这是后置通知代码(都调用)"); }
//异常通知 @AfterThrowing("execution(* com.xcy.service..*ServiceImpl.*(..))") publicvoid afterException(){ System.out.println("妈呀,出异常了,怎么办?"); }
//环绕通知 @Around("execution(* com.xcy.service..*ServiceImpl.*(..))") public Object around(ProceedingJoinPoint pip) throws Throwable{ System.out.println("这是环绕通知前"); Object obj=pip.proceed(); System.out.println("这是环绕通知后"); return obj; }
}
|