本文首发于 码友网 -- 《基于ASP.NET Core 3.x的端点路由(Endpoint Routing)实现控制器(Controller)和操作(Action)分离的接口服务》
前言
如题,今天为大家分享一种基于ASP.NET Core 3.x的端点路由(Endpoint Routing)实现控制器(Controller)和操作(Action)分离的接口服务方案。
为什么写这篇文章?为什么控制器(Controller)和操作(Action)分离?这来源由Github上的一个开源ASP.NET Core项目--Ardalis.ApiEndpoints,其中的Readme中描述了为什么要控制器和操作分离,为什么有ApiEndpoints这个项目的出现,引用并总结如下:
常规的MVC模式本质上是一种反模式,这种模式集合了许多但从不相互调用的方法,并且很少在相同的状态下操作。随着项目的发展,一个控制器会变得越来越臃肿,甚至可能无法控制。当你需要创建一个不同类型的接口服务的时候,还得首先创建相应的控制器,无法做到业务逻辑分开处理等等问题。
其实,在常规的MVC或者Web API应用程序中,许多开发者也许已经意识到了这种问题的存在,但仍然没有更好的办法来组织,拆分和管理这些控制器和操作,所以就出现了Ardalis.ApiEndpoints这个项目。
Ardalis.ApiEndpoints简介
如上所述,Ardalis.ApiEndpoints是为了解决分离控制器(Controller)类和操作(Action)服务的解决方案。有了它,你可以按照不同的业务来分开组织并管理服务接口端点,甚至可以为不同服务创建独立的文件夹,就像ASP.NET Razor Pages的项目结构类似,而不同把所有服务放到一个控制器中。下面我们就使用Ardalis.ApiEndpoints来创建一个示例。
Ardalis.ApiEndpoints示例
1.首先,我们创建一个ASP.NET Core 3.x 的Web项目,命名为:EndpointDemo,然后使用Nuget安装Ardalis.ApiEndpoints
2.创建一个路径为[Endpoints/v1/Student/]的文件目录,在此目录中创建一个继承至BaseEndpoint<TRequest, TResponse>的类GetById.cs,其中的TRequest表示接口的请求参数实体类,TResponse表示接口的返回实体类。
3.在GetById.cs类中实现抽象类中的Handle()方法。
4.标记Handle()方法的HTTP请求类型,如:HttpGet,HttpPost...
5.定义返回实体类TResponse,示例中的类名为StudentResponse.cs
代码如下:
using Ardalis.ApiEndpoints;
using Microsoft.AspNetCore.Mvc;

namespace EndpointDemo.Endpoints.v1.Students
{
    /// <summary>
    /// 获取指定ID的学生信息
    /// </summary>
    public class GetById : BaseEndpoint<int, StudentResponse>
    {
        /// <summary>
        /// 获取指定ID的学生信息
        /// </summary>
        /// <param name="id"></param>
        /// <returns></returns>
        [HttpGet, Route("api/v1/student/{id:int}")]
        public override ActionResult<StudentResponse> Handle(int id)
        {
            var response = new StudentResponse
            {
                Id = id,
                Name = "Rector"
            };
            return Ok(response);
        }
    }
}
StudentResponse.cs
namespace EndpointDemo.Endpoints.v1.Students
{
    /// <summary>
    /// 返回的学生信息响应实体类
    /// </summary>
    public class StudentResponse
    {
        /// <summary>
        /// ID
        /// </summary>
        public int Id { get; set; }
        /// <summary>
        /// 姓名
        /// </summary>
        public string Name { get; set; }
    }
}
以上就完成了一个基于ASP.NET Core 3.x的端点服务接口,这里我们并没有创建任何控制器,请求地址为:http://localhost:12345/api/v1/student/{id:int}
Startup.cs文件中需要注册控制器的服务,如:
services.AddControllers();
app.UseEndpoints(endpoints =>
{
endpoints.MapDefaultControllerRoute();
});
以下我们来集成Swagger接口文档,还是使用Nuget安装Swashbuckle.AspNetCore.Annotations,然后在Startup.cs文件中配置Swagger(同时配置了Swagger的权限访问),如下:
using Microsoft.AspNetCore.Authentication.JwtBearer;
using Microsoft.AspNetCore.Builder;
using Microsoft.AspNetCore.Hosting;
using Microsoft.Extensions.Configuration;
using Microsoft.Extensions.DependencyInjection;
using Microsoft.Extensions.Hosting;
using Microsoft.IdentityModel.Tokens;
using Microsoft.OpenApi.Models;
using System;
using System.IO;
using System.Text;

namespace EndPointDemo
{
    public class Startup
    {
        public Startup(IConfiguration configuration)
        {
            Configuration = configuration;
        }

        public IConfiguration Configuration { get; }

        public void ConfigureServices(IServiceCollection services)
        {
            services.AddSwaggerGen(c =>
            {
                c.SwaggerDoc("v1", new OpenApiInfo { Title = "My API", Version = "v1" });
                c.EnableAnnotations();
                c.AddSecurityDefinition("Bearer", new OpenApiSecurityScheme
                {
                    Description = "JWT Authorization header using the Bearer scheme (Example: 'Bearer 12345abcdef')",
                    Name = "Authorization",
                    Type = SecuritySchemeType.ApiKey,
                    Scheme = "Bearer",
                    BearerFormat = "JWT",
                    In = ParameterLocation.Header
                });

                c.AddSecurityRequirement(new OpenApiSecurityRequirement
                {
                    {
                        new OpenApiSecurityScheme
                        {
                            Reference = new OpenApiReference
                            {
                                Type = ReferenceType.SecurityScheme,
                                Id = "Bearer"
                            }
                        },
                        new string[] {}

                    }
                });
                var filePath = Path.Combine(AppContext.BaseDirectory, "EndpointDemo.xml");
                c.IncludeXmlComments(filePath);
            });
            services.AddAuthentication(option =>
            {
                option.DefaultAuthenticateScheme = JwtBearerDefaults.AuthenticationScheme;
                option.DefaultChallengeScheme = JwtBearerDefaults.AuthenticationScheme;

            }).AddJwtBearer(options =>
            {
                options.TokenValidationParameters = new TokenValidationParameters
                {
                    ValidateIssuer = true,
                    ValidateAudience = true,
                    ValidateLifetime = false,
                    ValidateIssuerSigningKey = true,
                    ValidIssuer = Configuration["JwtToken:Issuer"],
                    ValidAudience = Configuration["JwtToken:Issuer"],
                    IssuerSigningKey = new SymmetricSecurityKey(Encoding.UTF8.GetBytes(Configuration["JwtToken:SecretKey"]))
                };
            });
            services.AddControllers();
            services.AddRazorPages();
        }

        public void Configure(IApplicationBuilder app, IWebHostEnvironment env)
        {
            if (env.IsDevelopment())
            {
                app.UseDeveloperExceptionPage();
            }
            else
            {
                app.UseExceptionHandler("/Error");
            }

            app.UseStaticFiles();

            app.UseRouting();

            app.UseAuthentication();
            app.UseAuthorization();

            app.UseSwagger();

            app.UseSwaggerUI(c => c.SwaggerEndpoint("/swagger/v1/swagger.json", "My API V1"));
            app.UseEndpoints(endpoints =>
            {
                endpoints.MapDefaultControllerRoute();
                endpoints.MapRazorPages();
            });
        }
    }
}
修改appsettings.json文件,如下:
{
    "Logging": {
        "LogLevel": {
            "Default": "Information",
            "Microsoft": "Warning",
            "Microsoft.Hosting.Lifetime": "Information"
        }
    },
    "AllowedHosts": "*",
    "JwtToken": {
        "SecretKey": "SecretKeywqewqeqqqqqqqqqqqweeeeeeeeeeeeeeeeeee",
        "Issuer": "http://localhost:56369/"
    }
}
接下来,我们使用SwaggerOperation来丰富接口文档的注释,修改GetById.cs文件如下:
using Ardalis.ApiEndpoints;
using Microsoft.AspNetCore.Authorization;
using Microsoft.AspNetCore.Mvc;
using Swashbuckle.AspNetCore.Annotations;

namespace EndpointDemo.Endpoints.v1.Students
{
    /// <summary>
    /// 获取指定ID的学生信息
    /// </summary>
    public class GetById : BaseEndpoint<int, StudentResponse>
    {
        /// <summary>
        /// 获取指定ID的学生信息
        /// </summary>
        /// <param name="id"></param>
        /// <returns></returns>
        [Authorize]
        [HttpGet, Route("api/v1/student/{id:int}")]
        [SwaggerOperation(
            Summary = "获取指定ID的学生信息",
            Description = "获取指定ID的学生信息",
            OperationId = "Student.GetById",
            Tags = new[] { "StudentEndpoint" }
            )]
        public override ActionResult<StudentResponse> Handle(int id)
        {
            var response = new StudentResponse
            {
                Id = id,
                Name = "Rector"
            };
            return Ok(response);
        }
    }
}
同时,我还创建了一个Create.cs文件,用来演示[HttpPost]请求,如下:
using System;
using Ardalis.ApiEndpoints;
using Microsoft.AspNetCore.Mvc;
using Swashbuckle.AspNetCore.Annotations;

namespace EndpointDemo.Endpoints.v1.Students
{
    /// <summary>
    /// 创建新的学生记录
    /// </summary>
    public class Create : BaseEndpoint<NewStudentRequest, StudentResponse>
    {
        /// <summary>
        /// 创建新的学生记录
        /// </summary>
        /// <param name="request"></param>
        /// <returns></returns>

        [HttpPost, Route("api/v1/student/create")]
        [SwaggerOperation(
            Summary = "创建新的学生记录",
            Description = "创建新的学生记录",
            OperationId = "Student.Create",
            Tags = new[] { "StudentEndpoint" }
        )]
        public override ActionResult<StudentResponse> Handle(NewStudentRequest request)
        {
            var response = new StudentResponse
            {
                Name = request.Name,
                Id = new Random().Next(1, 100)
            };
            return Ok(response);
        }
    }
}
NewStudentRequest.cs
using System.ComponentModel.DataAnnotations;

namespace EndpointDemo.Endpoints.v1.Students
{
    /// <summary>
    /// 创建学生的实体类
    /// </summary>
    public class NewStudentRequest
    {
        /// <summary>
        /// 姓名
        /// </summary>
        [Required]
        public string Name { get; set; }
    }
}
创建用于用户授权的目录v1/Auth,并创建获取令牌的类GrantToken.cs,代码如下:
using Ardalis.ApiEndpoints;
using Microsoft.AspNetCore.Mvc;
using System;
using System.IdentityModel.Tokens.Jwt;
using System.Text;
using Microsoft.AspNetCore.Authorization;
using Microsoft.Extensions.Configuration;
using Microsoft.IdentityModel.Tokens;
using Swashbuckle.AspNetCore.Annotations;

namespace EndpointDemo.Endpoints.v1.Auth
{
    /// <summary>
    ///
    /// </summary>
    public class GrantToken : BaseEndpoint<AuthInfoRequest, TokenResponse>
    {
        private readonly IConfiguration _config;

        public GrantToken(IConfiguration config)
        {
            _config = config;
        }

        [SwaggerOperation(
            Summary = "用户登录",
            Description = "用户登录",
            OperationId = "Auth.GrantToken",
            Tags = new[] { "AuthEndpoint" }
        )]
        [AllowAnonymous]
        [HttpPost, Route("api/v1/auth/grant_token")]
        public override ActionResult<TokenResponse> Handle(AuthInfoRequest request)
        {
            if (request == null) return Unauthorized();
            var validUser = Authenticate(request);
            var token = "";
            if (validUser)
            {
                token = BuildToken();
            }
            else
            {
                return Unauthorized();
            }
            var response = new TokenResponse
            {
                Token = token
            };
            return Ok(response);
        }

        private string BuildToken()
        {
            var key = new SymmetricSecurityKey(Encoding.UTF8.GetBytes(_config["JwtToken:SecretKey"]));
            var creds = new SigningCredentials(key, SecurityAlgorithms.HmacSha256);

            var token = new JwtSecurityToken(_config["JwtToken:Issuer"],
                _config["JwtToken:Issuer"],
                expires: DateTime.Now.AddMinutes(30),
                signingCredentials: creds);

            return new JwtSecurityTokenHandler().WriteToken(token);
        }

        private bool Authenticate(AuthInfoRequest login)
        {
            var validUser = login.Username == "admin" && login.Password == "123456";

            return validUser;
        }
    }
}
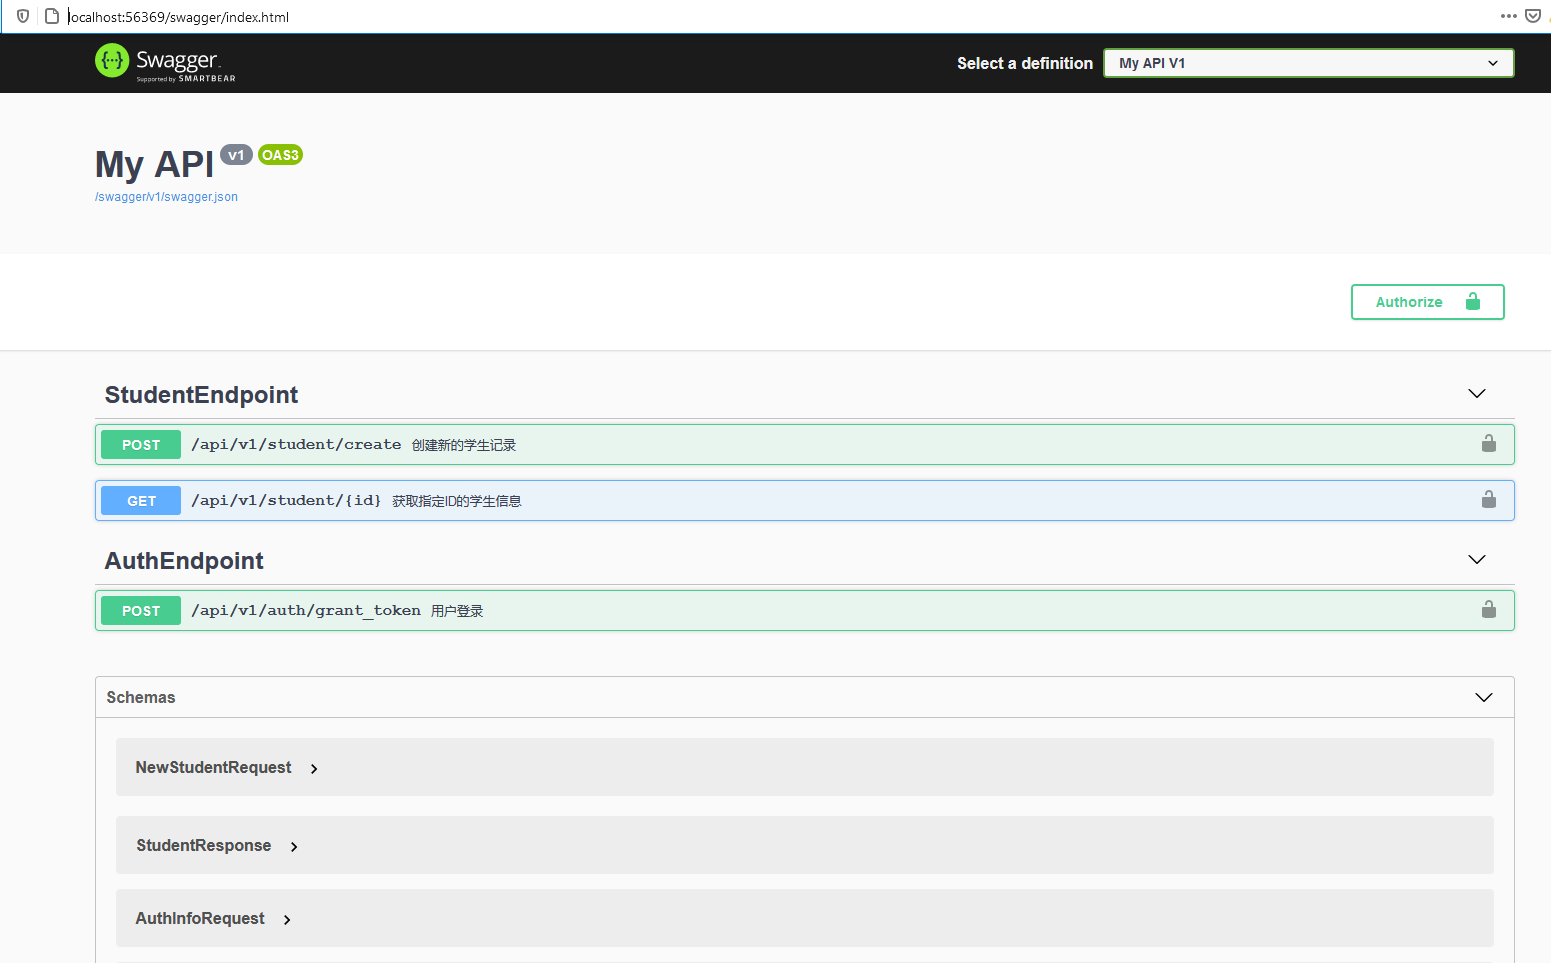
运行项目,打开地址:http://localhost:56369/swagger 如果运行成功,你将看到如下界面:
这时,如果你直接点击【获取指定ID的学生信息】,接口返回的是401错误,如图:
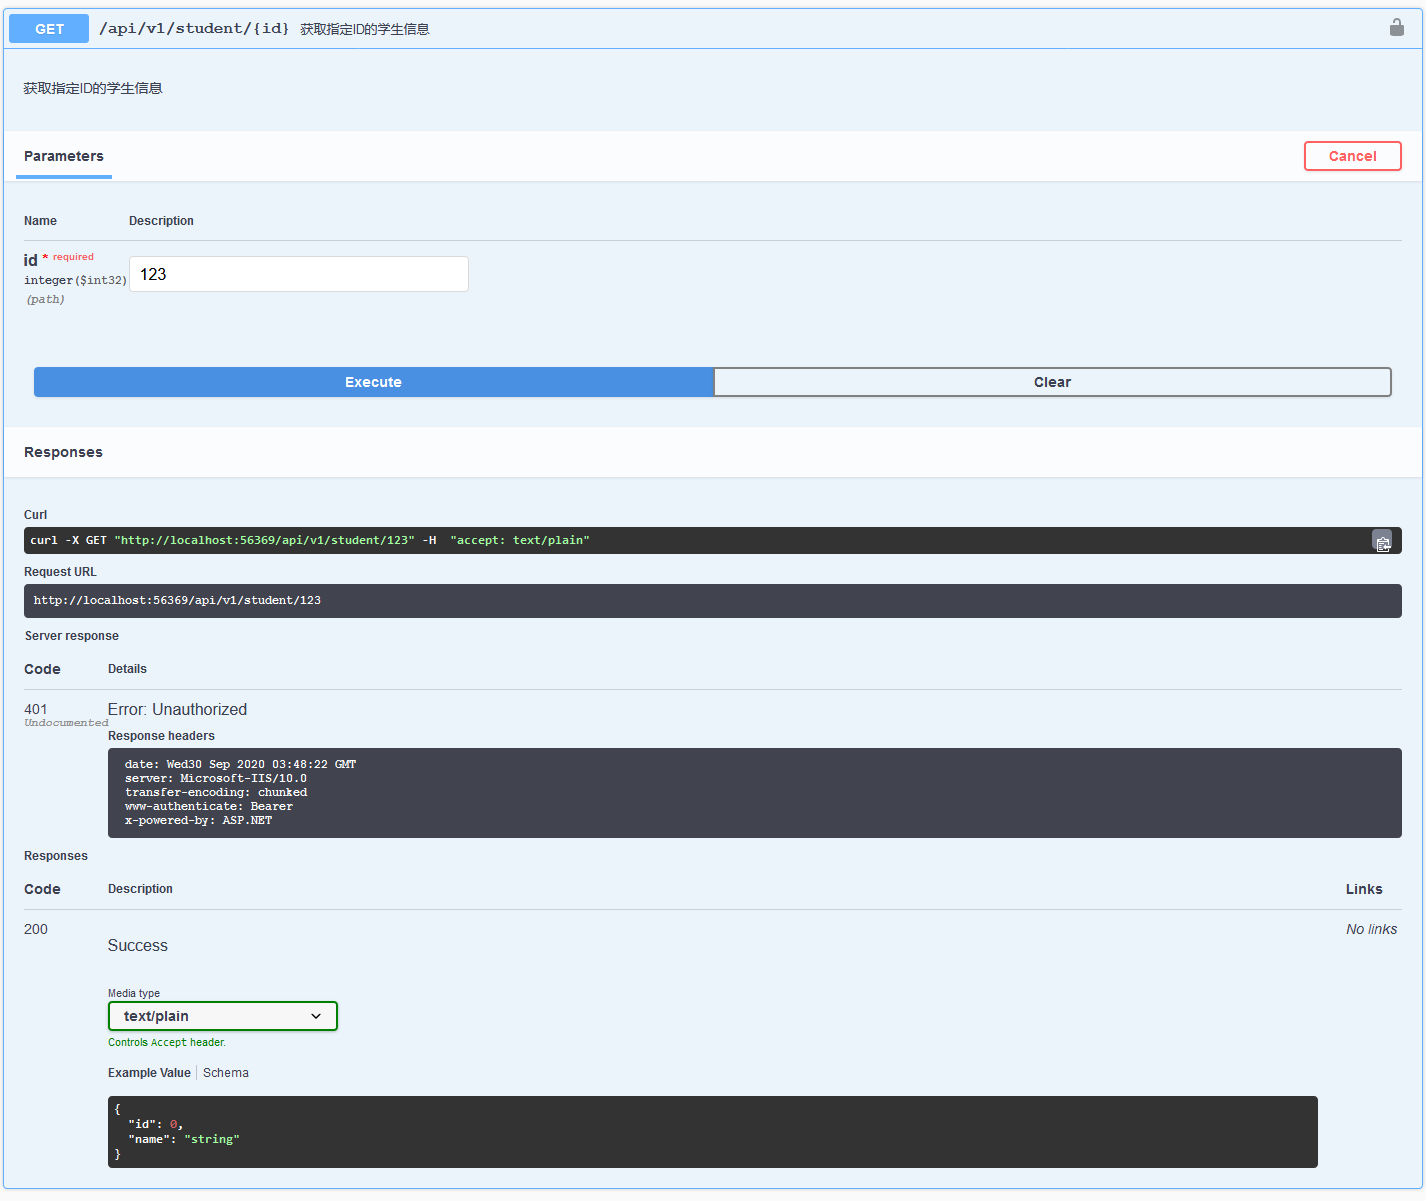
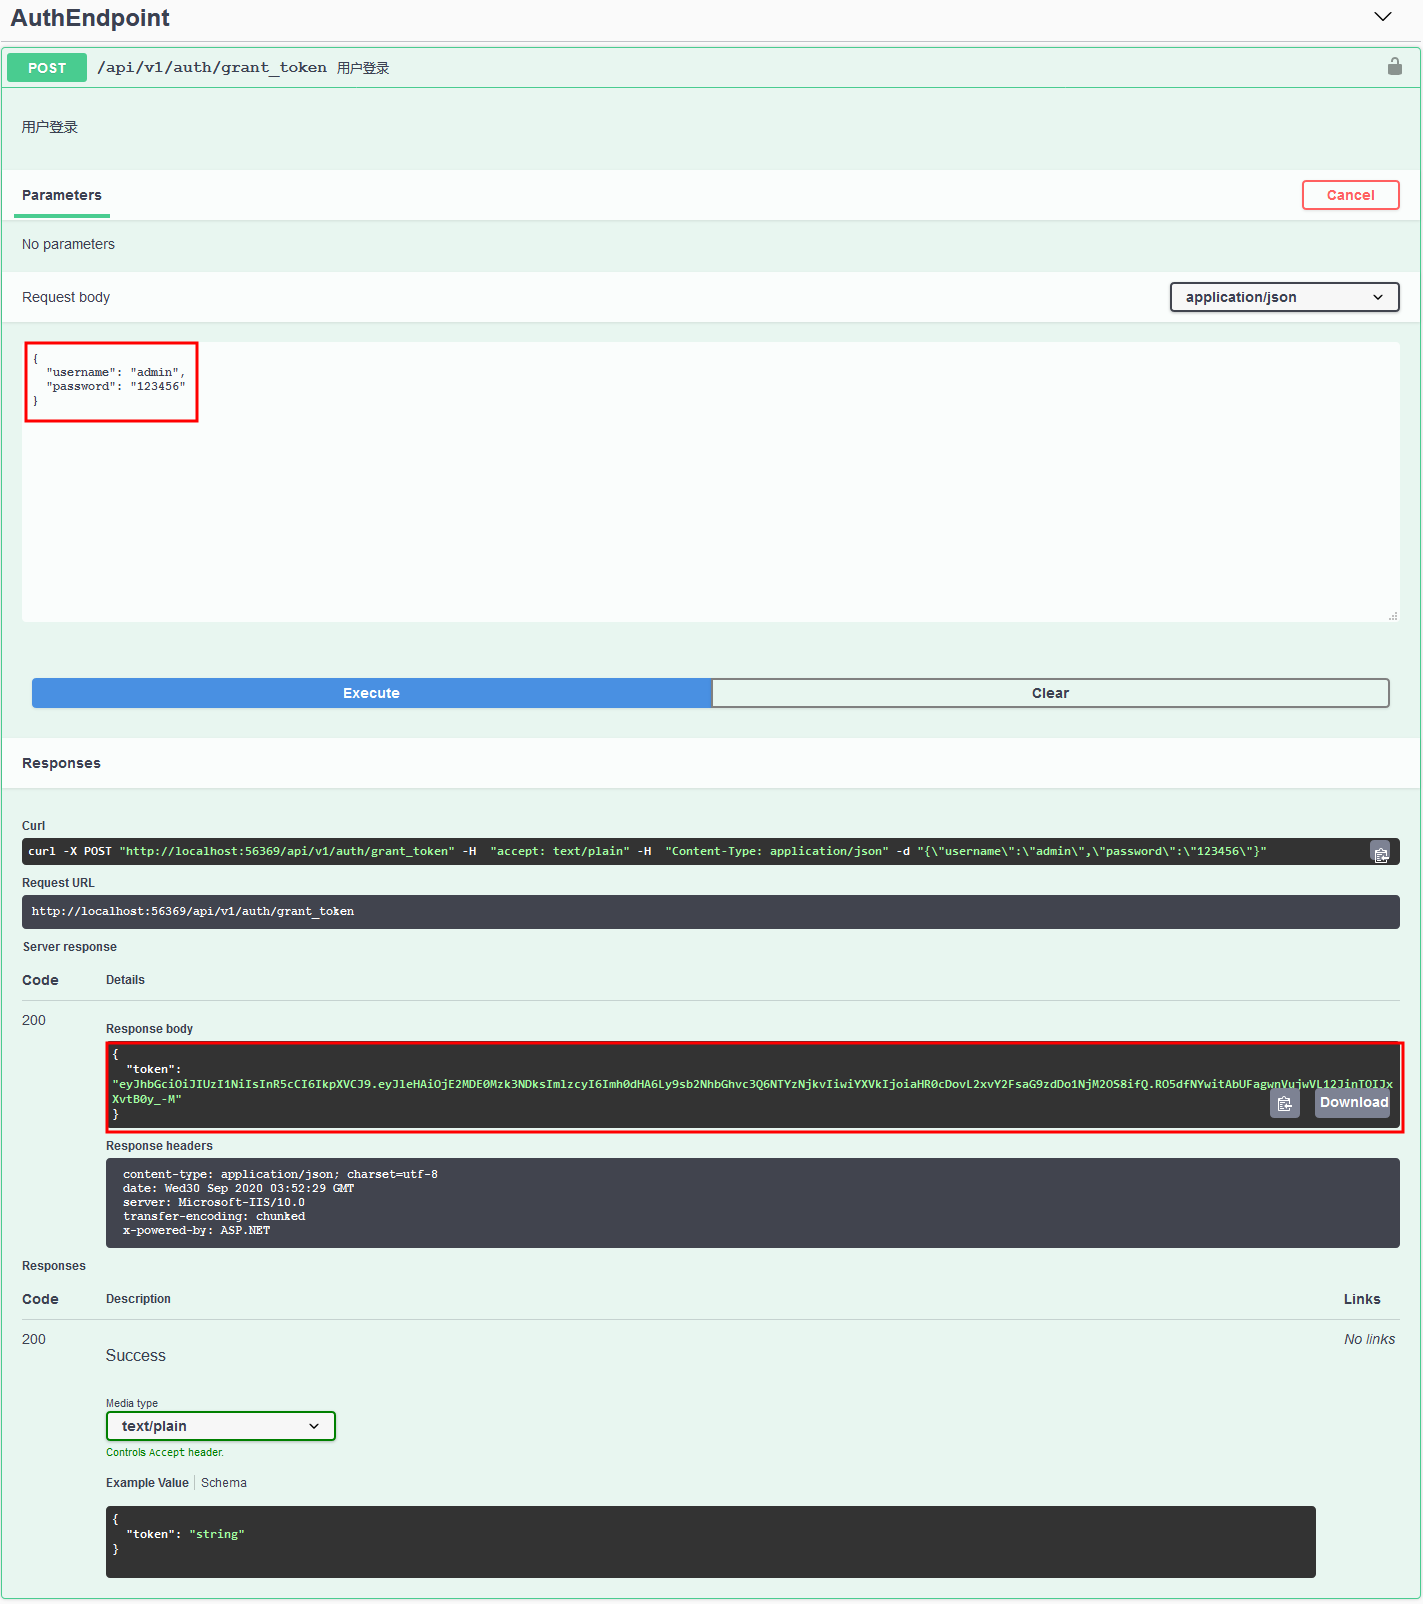
因为我们还未对接口访问进行授权,那么我们需要先请求授权接口:/api/v1/auth/grant_token,以获取用户令牌,如下:
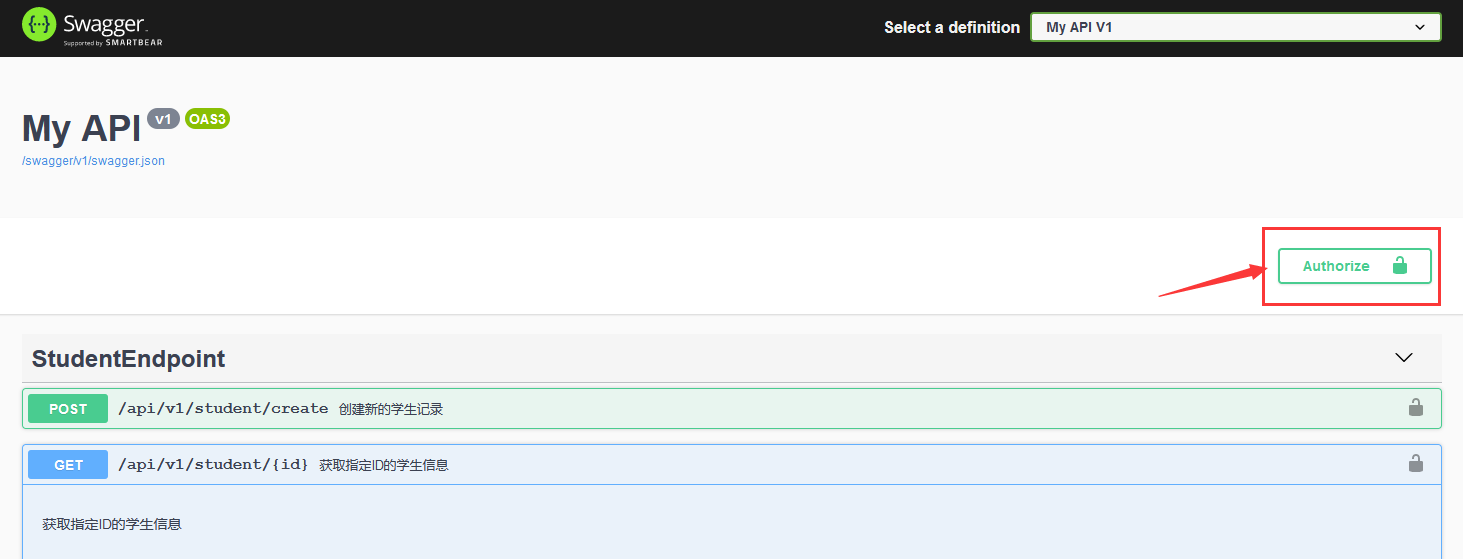
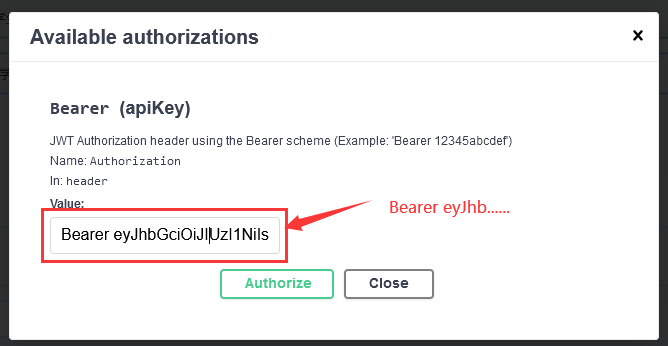
将获取到的令牌填入授权窗口中,如下:
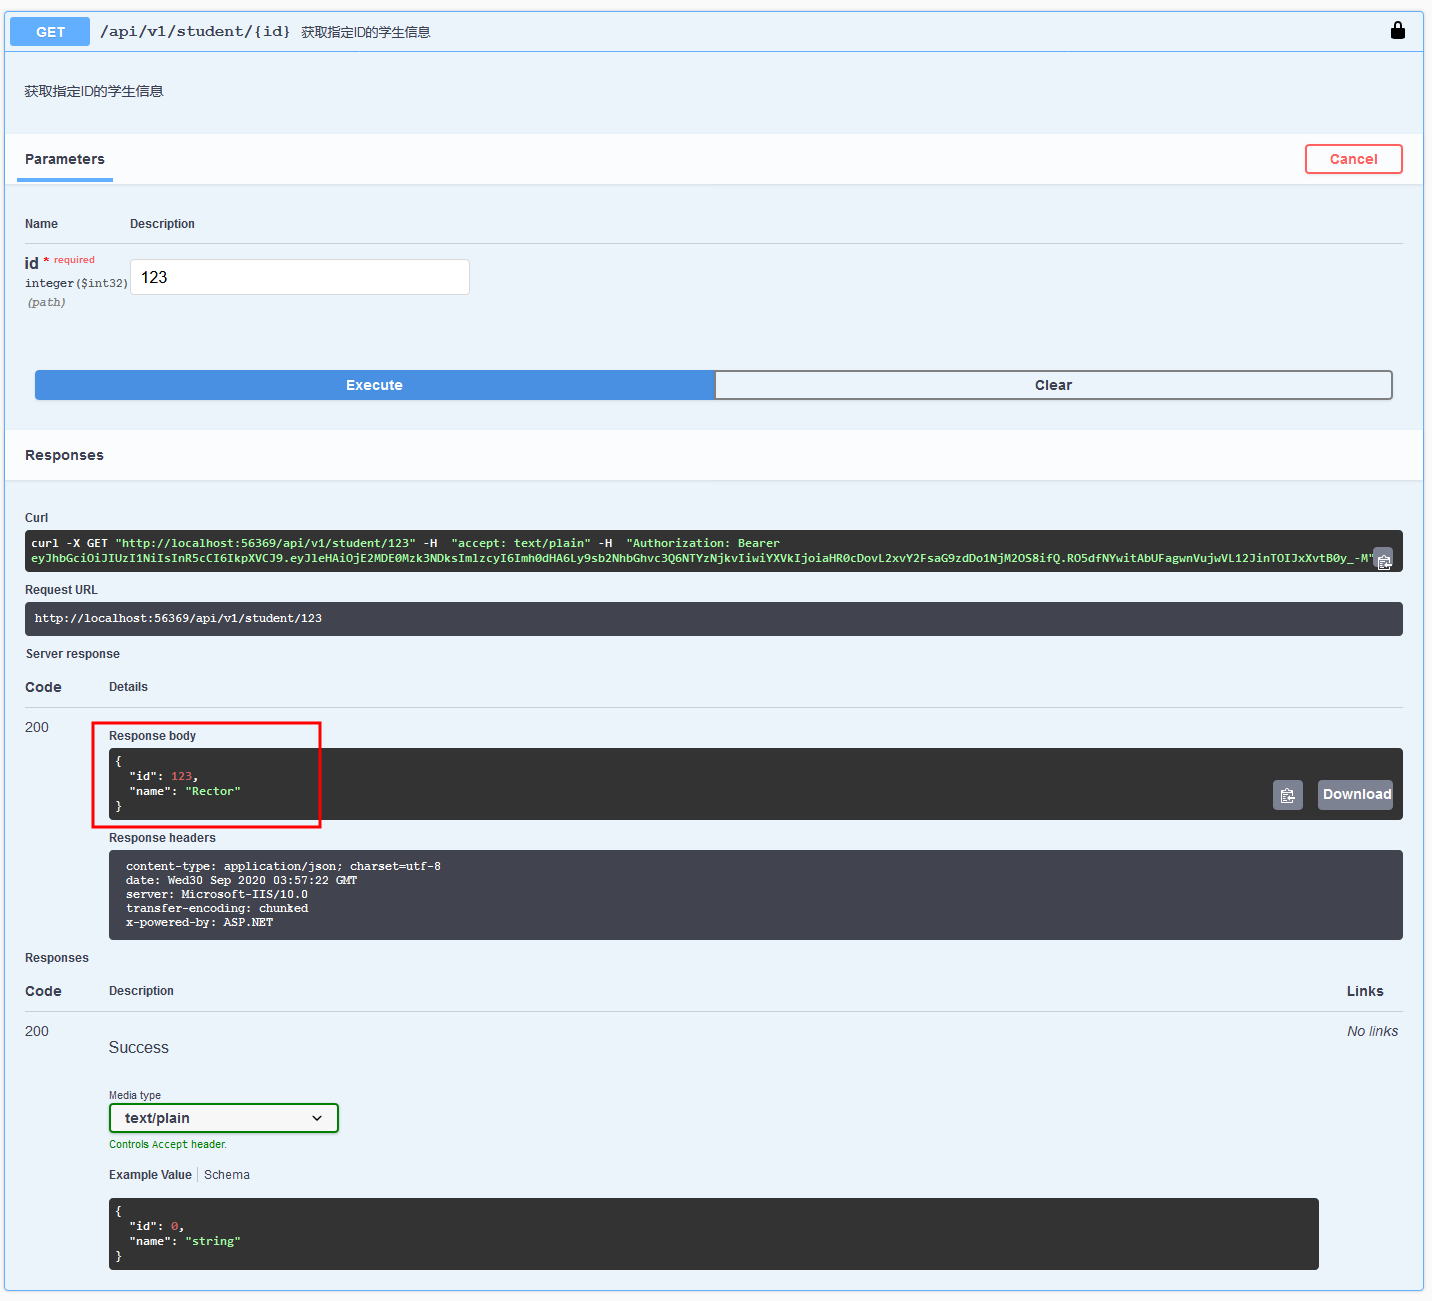
最后,再请求【获取指定ID的学生信息】,得到正确的接口返回内容,如下:
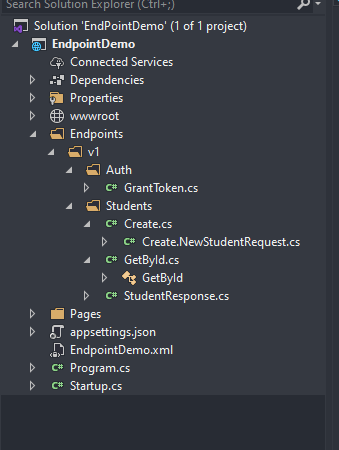
项目结构如下:
本文为你分享的Ardalis.ApiEndpoints内容就到这里,使用Ardalis.ApiEndpoints,你可在不用创建控制器的场景下任意地组织和管理你的接口服务端点。感谢你的阅读!
本文示例源码托管地址请至原文获取:《基于ASP.NET Core 3.x的端点路由(Endpoint Routing)实现控制器(Controller)和操作(Action)分离的接口服务》