写在前面
Git 的官网上有很详细的使用教程(当然有翻译版本),具体地址是 https://git-scm.com/book/zh/v2。唯一不足就是,很多讲解并没有实机演示。但是,毫无疑问,官网资料是最全面的!如果有任何疑问,可以去官网看看!
分支
使用分支意味着你可以把你的工作从开发主线上分离开来,以免影响开发主线。 Git 的一大特点就是对于分支的支持!Git 的分支可谓是难以置信的轻量级,它的新建操作几乎可以在瞬间完成,并且在不同分支间切换起来也差不多一样快。
远程分支
在了解分支之前,必须要先了解远程分支。因为在分支管理命令 git branch 中很多参数都是与远程分支有关系的。在之前的博文中说过,Git 也可以有一个服务器中心仓库!自然,服务器中的中心仓库也会有多个分支。其中,Git 引入了一个概念:upstream。一个分支的 upstream,其实就是与远程分支做关联,告诉 Git,默认此分支为推送及拉取的远程分支的信息。如下图所示:

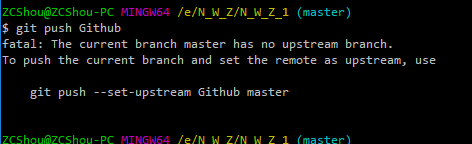
在 Git 中,建立本地分支与远程分支的关联是通过 git branch 命令的参数 -u <upstream> 或 --set-upstream-to=<upstream> 或者 git branch -t 或 --track 来设置。这个过程被称为为当前分支设置 upstream。在建立了分支之间的关联之后,我们提交代码时就会自动使用关联的分支。如果不设置,则在提交代码时必须指定 git push -u origin master(只需要指定一次即可)。否则将出现以下错误:
关于远程分支的详细介绍,参见博文Git 之四 通信协议(HTTPS、SSH、Git)、使用远程仓库(GitHub、GitLab、Gitee等)。
创建与管理
Git 分支创建与管理是通过命令 git branch 来进行处理(增、删、改、查)。创建分支非常简单,如下图使用不带任何参数的 git branch 命令来创建一个名为 Dev 和 Feature 的分支:

下图显示了创建分支的示意图

下图显示了创建了分支之后,当前工作目录下 .git 目录的情况

该命令实际上还有许多的参数,具体格式有如下这些:
git branch [--color[=<when>] | --no-color] [--show-current]
[-v [--abbrev=<length> | --no-abbrev]]
[--column[=<options>] | --no-column] [--sort=<key>]
[(--merged | --no-merged) [<commit>]]
[--contains [<commit]] [--no-contains [<commit>]]
[--points-at <object>] [--format=<format>]
[(-r | --remotes) | (-a | --all)]
[--list] [<pattern>…]
git branch [--track | --no-track] [-f] <branchname> [<start-point>] # 创建名为 <branchname> 的分支
git branch (--set-upstream-to=<upstream> | -u <upstream>) [<branchname>]
git branch --unset-upstream [<branchname>]
git branch (-m | -M) [<oldbranch>] <newbranch>
git branch (-c | -C) [<oldbranch>] <newbranch>
git branch (-d | -D) [-r] <branchname>…
git branch --edit-description [<branchname>]下面是常用的一些参数:
-d、--delete、-D:删除一个分支。 分支必须在其上游分支中完全合并,或者如果没有使用--track或--set-upstream-to设置上游,则必须在 HEAD 中合并。其中,-D表示--delete和--force的组合。

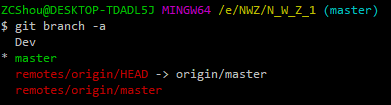
--create-reflog:创建分支的 reflog。 这将激活对分支引用所做的所有更改的记录,从而可以使用基于日期的 sha1 表达式,例如“<branchname> @ {yesterday}”。-f、--force:将 <branchname> 重置为 <startpoint>,即使 <branchname> 已存在。 没有-f,git branch拒绝更改现有分支。 与-d(或–delete)组合使用,允许删除分支,而不管其合并状态如何。 与-m(或–move)结合使用,即使新分支名称已存在,也允许重命名分支,这同样适用于-c(或 --copy)。-m、--move、-M:移动/重命名分支和相应的 reflog。其中,-M表示--move和--force的组合。-c、--copy、-C:复制分支和相应的 reflog。其中,-C表示--copy和--force的组合。-r、--remotes:列出或删除(如果与-d一起使用)远程跟踪分支。 与--list组合以匹配可选模式。-a、--all:列出远程跟踪分支和本地分支。 与–list组合以匹配可选模式。
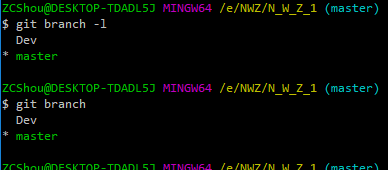
-l、--list:列出分支。 使用可选的 <pattern> …,例如 git branch --list’maint- *’,仅列出与模式匹配的分支。该命令与 不带任何参数的git branch结果相同。
--show-current:打印当前分支的名称。 在分离的 HEAD 状态下,不打印任何内容。

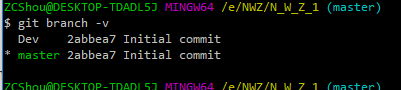
-v、-vv、--verbose:在列表模式下,显示每个头的sha1和提交主题行,以及与上游分支(如果有)的关系。 如果给出两次,则打印链接的工作树的路径(如果有的话)和上游分支的名称(另请参阅git remote show <remote>)。 请注意,当前工作树的HEAD将不会打印其路径(它将始终是您当前的目录)。
- :新的分支头将指向此提交。 它可以作为分支名称,commit- 如果省略此选项,则将使用当前 HEAD。
-t、--track:When creating a new branch, set upbranch.<name>.remoteandbranch.<name>.mergeconfiguration entries to mark the start-point branch as “upstream” from the new branch. This configuration will tell git to show the relationship between the two branches in git status and git branch -v. Furthermore, it directs git pull without arguments to pull from the upstream when the new branch is checked out.
This behavior is the default when the start point is a remote-tracking branch. Set the branch.autoSetupMerge configuration variable to false if you want git switch, git checkout and git branch to always behave as if --no-track were given. Set it to always if you want this behavior when the start-point is either a local or remote-tracking branch.--set-upstream:该参数以弃用。使用--track或--set-upstream-to代替。-u <upstream>、--set-upstream-to=<upstream>:设置本地分支<branchname> 的跟踪信息,即将远程仓库分支 <upstream> 与本地分支 <branchname> 关联。 如果未指定本地分支 <branchname>,则默认为当前分支。--no-track:Do not set up “upstream” configuration, even if the branch.autoSetupMerge configuration variable is true.--edit-description:Open an editor and edit the text to explain what the branch is for, to be used by various other commands (e.g. format-patch, request-pull, and merge (if enabled)). Multi-line explanations may be used.--merged [<commit>]:Only list branches whose tips are reachable from the specified commit (HEAD if not specified). Implies --list, incompatible with --no-merged.--no-merged [<commit>]:Only list branches whose tips are not reachable from the specified commit (HEAD if not specified). Implies --list, incompatible with --merged.
切换分支
Git 中切换指定的分支是通过命令 git switch 和 git checkout 来实现的。其中,命令 git switch 为新增的一个命令,从官网可能找不到该命令的介绍。
git switch
该命令用来切换到指定的分支。 更新工作树和索引以匹配分支。 所有新提交都将添加到此分支。下图显示了分支切换前后,当前工作目录下 .git 目录的情况

该命令还支持很多参数,具有以下 4 种格式:
git switch [<options>] [--no-guess] <branch>
git switch [<options>] --detach [<start-point>]
git switch [<options>] (-c|-C) <new-branch> [<start-point>]
git switch [<options>] --orphan <new-branch>
下面是常用的一些参数:
<branch>:要切换到的分支的名字。如下图所示:

<new-branch>:新分支的名字<start-point>:新分支的起点。 指定 <start-point> 允许您基于历史记录中的某个其他点创建分支,而不是 HEAD 当前指向的分支。 (或者,在–detach的情况下,允许您检查和从其他点分离。)-c <new-branch>、--create <new-branch>:从 <start-point> 处先创建一个名为 <new-branch> 的新分支,然后在切换到创建的分支。 这个参数用于简化以下这个流程,相当于两个命令合二为一:$ git branch <new-branch> $ git switch <new-branch>-C <new-branch>、--force-create <new-branch>:与--create类似,只是如果 <new-branch> 已经存在,它将被重置为 <start-point>。 这个参数用于简化以下这个流程,相当于两个命令合二为一:$ git branch -f <new-branch> $ git switch <new-branch>--orphan <new-branch>:创建一个名为 <new-branch> 的新孤立分支。 删除所有跟踪的文件。-t、--track:创建新分支时,设置 “upstream” 配置。 -c 是隐含的。 有关详细信息,请参阅 git-branch 中的 --track。
If no -c option is given, the name of the new branch will be derived from the remote-tracking branch, by looking at the local part of the refspec configured for the corresponding remote, and then stripping the initial part up to the “*”. This would tell us to use hack as the local branch when branching off of origin/hack (or remotes/origin/hack, or even refs/remotes/origin/hack). If the given name has no slash, or the above guessing results in an empty name, the guessing is aborted. You can explicitly give a name with -c in such a case.--no-track:Do not set up “upstream” configuration, even if the branch.autoSetupMerge configuration variable is true.
git checkout
该命令用来切换分支或还原工作树文件。命令格式如下:
git checkout [-q] [-f] [-m] [<branch>]
git checkout [-q] [-f] [-m] --detach [<branch>]
git checkout [-q] [-f] [-m] [--detach] <commit>
git checkout [-q] [-f] [-m] [[-b|-B|--orphan] <new_branch>] [<start_point>]
git checkout [-f|--ours|--theirs|-m|--conflict=<style>] [<tree-ish>] [--] <paths>…
git checkout [<tree-ish>] [--] <pathspec>…
git checkout (-p|--patch) [<tree-ish>] [--] [<paths>…]合并分支
命令 git merge 将指定分支的提交的更改(自其历史记录与当前分支分开时)合并到当前分支中。 git pull 使用此命令来合并来自另一个存储库的更改,并且可以手动使用此命令将更改从一个分支合并到另一个分支。该命令还支持很多参数,具有如下 2 种格式:
git merge [-n] [--stat] [--no-commit] [--squash] [--[no-]edit]
[-s <strategy>] [-X <strategy-option>] [-S[<keyid>]]
[--[no-]allow-unrelated-histories]
[--[no-]rerere-autoupdate] [-m <msg>] [-F <file>] [<commit>…]
git merge (--continue | --abort | --quit)下面是常用的一些参数:
--commit、--no-commit:执行合并并提交结果。 使用 --no-commit 执行合并并在创建合并提交之前停止,以使用户有机会在提交之前检查并进一步调整合并结果。--edit、-e、--no-edit:在提交成功的机械合并之前调用编辑器以进一步编辑自动生成的合并消息,以便用户可以解释并证明合并。 --no-edit选项可用于接受自动生成的消息(通常不鼓励这样做)。 如果从命令行使用-m选项提供草稿消息并希望在编辑器中编辑它,则–edit(或-e)选项仍然有用。
注意:该命令是指将指定分支合并到当前分支。因此,在合并前必须要切换当要合并的目的分支中执行该命令。 下面我们我们来实际操作一下:
ZCShou@ZCShou-PC MINGW64 /e/N_W_Z/N_W_Z_1 (master)
$ git switch Dev
Switched to branch 'Dev'            # 切换到 Dev 分支

ZCShou@ZCShou-PC MINGW64 /e/N_W_Z/N_W_Z_1 (Dev)
$ vim a.txt                         # 编辑 a.txt

ZCShou@ZCShou-PC MINGW64 /e/N_W_Z/N_W_Z_1 (Dev)
$ git add a.txt
warning: LF will be replaced by CRLF in a.txt.
The file will have its original line endings in your working directory

ZCShou@ZCShou-PC MINGW64 /e/N_W_Z/N_W_Z_1 (Dev)
$ git commit -m "Dev 分支的修改"
[Dev a33bc75] Dev 分支的修改            # 提交修改(目前是 Dev 分支)
 1 file changed, 1 insertion(+)

ZCShou@ZCShou-PC MINGW64 /e/N_W_Z/N_W_Z_1 (Dev)
$ git switch master
Switched to branch 'master'         # 这里 切换回 maser 分支

ZCShou@ZCShou-PC MINGW64 /e/N_W_Z/N_W_Z_1 (master)
$ git merge Dev                     # 将 Dev 分支合并到当前分支(当前分支为 master)
Updating 7d6d9bc..a33bc75
Fast-forward
 a.txt | 1 +
 1 file changed, 1 insertion(+)

ZCShou@ZCShou-PC MINGW64 /e/N_W_Z/N_W_Z_1 (master)
$ git branch -v                     # 合并之后的分支情况
  Dev     a33bc75 Dev 分支的修改
  Feature 7d6d9bc 第一次提交
* master  a33bc75 Dev 分支的修改

ZCShou@ZCShou-PC MINGW64 /e/N_W_Z/N_W_Z_1 (master)
$
如下图所示:

由于当前 master 分支所指向的提交是你当前提交(有关 hotfix 的提交)的直接上游,所以 Git 只是简单的将指针向前移动。 换句话说,当你试图合并两个分支时,如果顺着一个分支走下去能够到达另一个分支,那么 Git 在合并两者的时候,只会简单的将指针向前推进(指针右移),因为这种情况下的合并操作没有需要解决的分歧——这就叫做 “快进(fast-forward)”。
通常,在合并完成分支之后,我们要删除已经被合并的分支。因为分支已经被合并,我们一般不再需要它。有新需求时,我们会再次创建新的分支。

如上图,如果我们要合并 Feature 分支,操作流程与上面合并 Dev 分支相同,但是 Git 的合并行为却不相同。因为 master 指向的提交并不是 Feature 分支的直接上游。Git 不得不做一些额外的工作。 出现这种情况的时候,Git 会使用两个分支的末端所指的快照(8 和 4)以及这两个分支的工作祖先(2),做一个简单的三方合并。

需要指出的是,Git 会自行决定选取哪一个提交作为最优的共同祖先,并以此作为合并的基础;这和更加古老的 CVS 系统或者 Subversion (1.5 版本之前)不同,在这些古老的版本管理系统中,用户需要自己选择最佳的合并基础。 Git 的这个优势使其在合并操作上比其他系统要简单很多。
遇到冲突时的分支合并
如果你在两个不同的分支中,对同一个文件的同一个部分进行了不同的修改,Git 就没法干净的合并它们,在合并它们的时候就会产生合并冲突:
此时 Git 做了合并,但是没有自动地创建一个新的合并提交。 Git 会暂停下来,等待你去解决合并产生的冲突。 你可以在合并冲突后的任意时刻使用 git status 命令来查看那些因包含合并冲突而处于未合并(unmerged)状态的文件
其他
用到时再添加!
参考
- https://git-scm.com/book/zh/v2/Git-%E5%88%86%E6%94%AF-%E5%88%86%E6%94%AF%E7%9A%84%E6%96%B0%E5%BB%BA%E4%B8%8E%E5%90%88%E5%B9%B6
- 转载于:https://blog.csdn.net/ZCShouCSDN/article/details/100808546