本文来自 “简时空”:《【Yeoman】热部署web前端开发环境》(自动同步导入到博客园)
1、序言
记得去年的暑假看RequireJS的时候,曾少不更事般地惊为前端利器,写了《Speed up! 提速你的网站访问速度[压缩JS与CSS]》。随着学习的深入,发现前端的还有许多东西需要整合,纯手工劳动无疑降低了开发效率。这四天的工作,真是把这两年所学习到的知识综合应用了一番:
软实力层面包括:使用Photoshop+Bootstrap3+Grid System 设计页面UI图;
工具语言包括:CoffeeScript、LESS、Handlebars等;
图形库的使用:Highchart、jvectorMap、D3等这些一年前就开始用的库
>>>>> 页面效果:http://www.janscon.com/weibo/index.html <<<<
当然重点不在于这个,这次学习的重点在于使用Yeoman热部署了前端环境,使用Grunt、NPM、Bower等工具 起“穿针引线”作用将这些技术互相联系起来,使得前端的开发从未如此“一气呵成”~
既然这些工具都把重要的工作做了,那么作为程序猿的我意义何在呢?
呃~ OK,“我们不生产代码,我们只是英文字母的搬运工而已啦”
这几天的工作还是留下遗憾的,就是没能用上前端自动化测试工具——以后得好好学习Qunit+Mocha+ Selenium这些玩意儿了
2、工作准备
如果读者对Grunt、Yeoman还不是很了解,建议先参看这几篇文章,非常适合入门:
① Xianjing.《Grunt - 基于任务的Javascript构建工具》. 2013-05-16
② RIA之家. 《前端项目可以更简单—Yeoman入门指南》.2013-4-25
③ 阮一峰. 《任务管理工具Grunt》.
上面这三篇文章已经将Yeoman、Grunt等语法讲解非常明了了,所以我的文章里就不在这些方面多费口舌。这里将只重点讲解我工作的流程,作文以记之。
找到目标:如何使用Yeoman搭建单页面、多页面的开发环境
使用工具:Bootstrap(基于LESS)、Handlebars、CoffeeScript,使用RequireJS组织JS代码
示例代码:
本文所讲的程序代码可以从这儿下载:
① 单页面前端环境搭建示例代码:jscon-single-page.zip (百度云盘)
② 多页面前端环境搭建示例代码:jscon-multi-pages.zip (百度云盘)
3、构建单页面开发环境
3.1、使用Bootstrap-less生成器
使用Yeoman入门的时候,使用的webapp这个生成器,不过里面的Bootstrap是基于SASS的。个人倾向于使用LESS语言的,毕竟它是基于我熟悉的Node环境而非Ruby。
Step 1: 安装Bootstrap-less生成器
npm install generator-bootstrap-less
Step 2: 生成程序脚手架
yo bootstrap-less
Step 3: 代码热部署
grunt server
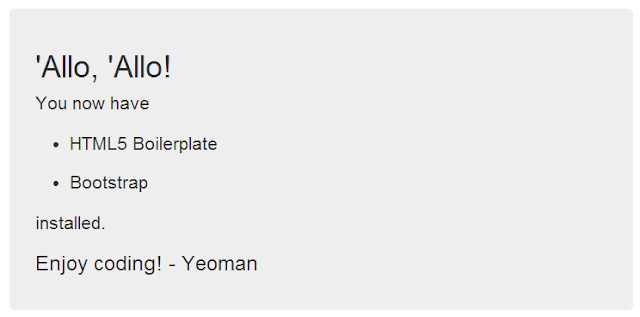
看到这个自动跳出来的 “Allo,“Allo! 页面,说明已经成功搭建环境了。可以开始在这个基础上编写代码,只是我还有使用Handlebars以及RequireJS,所以还得自己安装这些组件。
在继续之前,在这里顺便对比一下webapp与bootstrap-less这两个脚手架的区别:
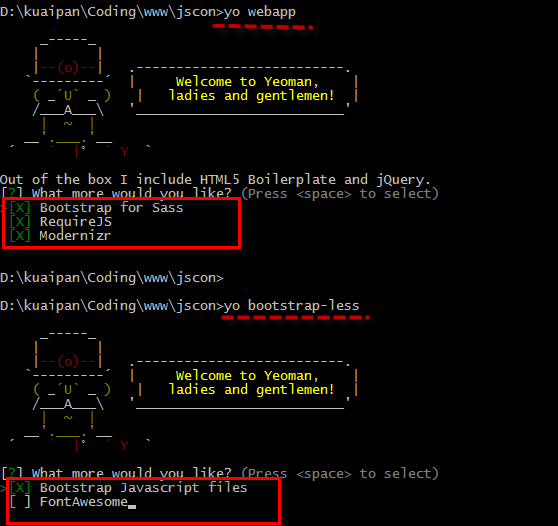
如果除去我想要的Bootstrap之外,bootstrap-less生成器是一无所有啊(Bootstrap的JS文件和FontAwesome都勾上吧,因为都要用到的),而webapp还有RequireJS和Modernizr呢,显然是“高富帅”一枚。
不过我还是选bootstrap-less,因为它使用的是LESS而不是SASS(我难道有强迫症?);至于RequireJS和Modernizr的使用可以借鉴webapp生成的index.html中写法即可——我就是这么干的!
3.2、引入Handlebars
引入Handlebars是看中了它使用方便且能够预编译这两优点的。一般使用bower工具引入所需要的包,不过Handlebar是个例外,这是因为官方Github并不提供现成的前端页面的Handlebar.js文件,需要通过其文档主页到Amazon的S3平台(http://handlebarsjs.com/)上下载;所以不要使用bower install handlebar.js命令
在模板预编译的时候是需要借助Node环境,所以使用npm安装Handlebars插件:
Step 1: 使用npm,下载contrib模块
npm install --save-dev grunt-contrib-handlebars
Step 2: 同时在Gruntfile.js中注册下面的Task:
(在Gruntfile.js文件中修改)
    handlebars:{
        dist: {
          options: {
            namespace: "JST",
            wrapped:true
          },
          // files: {"<%= yeoman.app %>/hbs/templates.js":["<%= yeoman.app %>/hbs/*.hb"]}
          expand:true,
          src:"<%= yeoman.app %>/hbs/*.hb",
          ext:".js"
        }
    }
默认的namespace是“Handlebars.templates”,后期使用uglify.js进行优化的时候会将Handlebars用变量“a”(或者其他名字)代替,从而提示该变量没有templates属性;因此推荐像上面那样使用“JST”等作为命名空间。
Step 3: 还需要配置编译及livereload功能
首先在watch任务中添加对.hb文件的监视即可
(在Gruntfile.js文件中修改)
    watch: {
     handlebars:{
        files:['<%= yeoman.app %>/hbs/{,*/}*.hb'],
        tasks:['handlebars']
     },
      ….
      livereload: {
        files: [
          '<%= yeoman.app %>/*.html',
          '{.tmp,<%= yeoman.app %>}/styles/{,*/}*.css',
          '{.tmp,<%= yeoman.app %>}/{scripts,hbs}/{,*/}*.js',
          '<%= yeoman.app %>/images/{,*/}*.{png,jpg,jpeg,gif,webp,svg}'
        ],
        tasks: ['livereload']
      }
    },
Step 4: 注册预编译任务
在concurrent任务中注册handlebars任务,确保项目发布的时候所有模板都经过编译:
(在Gruntfile.js文件中修改)
    concurrent: {
      dist: [
        'handlebars',
        'coffee',
        'recess',
        'imagemin',
        'svgmin',
        'htmlmin'
      ]
    }
配置完后,这里就简单的举个例子表明如何使用:
Step 1:创建模板
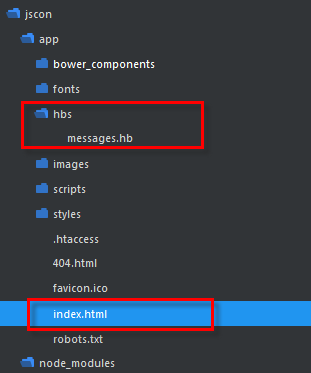
创建hbs文件夹,并在其下面新建一个messages.hb文件,此时文件夹结构如下:
messages.hb内容如下:
   {{#messages}}
    <div class="message">
        <h2 class="name">{{name}}</h2>
        <div class="msgContent">{{msgContent}}</div>
        <div class="msgTime">{{msgTime}}</div>
    </div>
    {{/messages}}
Step 2:添加JS代码
先在index.html页面中添加ID为“list”的空白DIV:
<div id="list"></div>
再在index.html文件中添加runtime.js官方文件,以及messages.js文件(注意不是messages.hb文件,热部署的时候会自动调用Node将其编译成messages.js文件):
(在app/index.html文件中修改)
<!-- build:js scripts/main.js -->
<script src="bower_components/jquery/jquery.js"></script>
<script src="scripts/lib/handlebars/handlebars.runtime-v1.1.2.js"></script>
<script type="text/javascript" src="hbs/messages.js"></script>
<script src="scripts/main.js"></script>
<!-- endbuild -->
其中的main.js是逻辑实现代码:
app/scripts/main.js
$(function(){
    var data = {
        messages:
            [
                {name:"Zhang",msgContent:"I'm San",msgTime:"Yesterday"},
                {name:"Li",msgContent:"I'm Si",msgTime:"Today"},
                {name:"Wang",msgContent:"I'm Wu",msgTime:"Tomorrow"}
            ],
        name:"jscon"
    };
    var template = JST["app/hbs/messages.hb"];
    console.log(template)
    $("#list").html(template(data));
});
这里下划线标出的:
var template = JST["app/hbs/messages.hb"];
需要注意两个地方,一个是命名空间“JST”要与配置文件中保持一致;另外一个当调用模板的时候注意路径是相对app的路径。至于如何去掉“app/hbs”这个路径,目前还不知道如何解决。
Step 3:查看效果
在程序根目录下运行:
grunt server
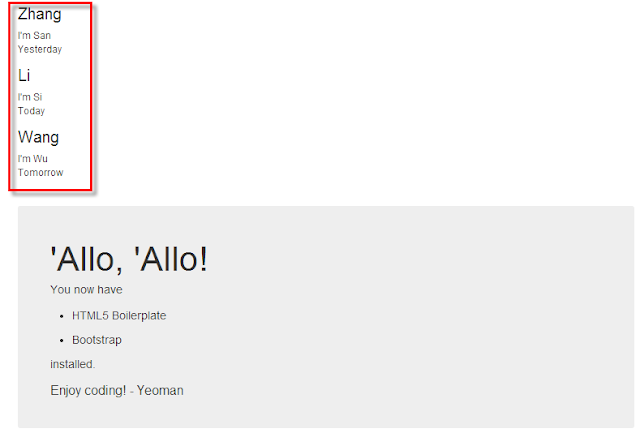
发现还是之前的页面,调出chrome console会提示找不到“messages.js”文件;好吧下面见证奇迹的时刻,打开messages.hb文件,直接按下“Ctrl+S”保存文件,触发watch任务,其中就包括执行handlebars任务(其他的还有coffee、recess任务),然后自动执行livereload任务刷新页面。现在看看效果页面:
参考文章:
[1] 官方Github文档《grunt-contrib-handlebars》
[2] 官方Grunt文档:https://npmjs.org/package/grunt-contrib-handlebars
3.3、使用RequireJS组织JS文件
我们看看现在的index.html页面的截图:
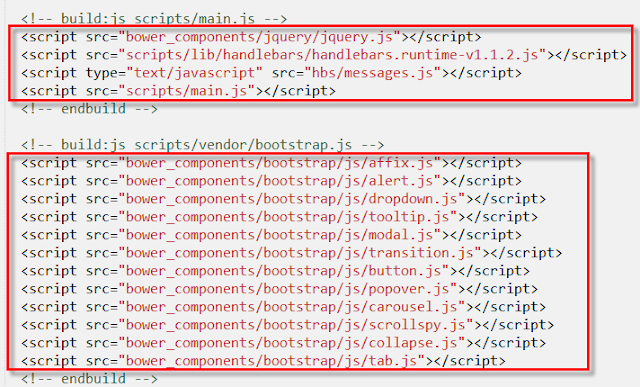
可以看到这么简单的页面里面有一大串的JS文件需要加载,主要包括:
1) 个人的JS文件,比如上节讲的模板文件(message.js)和逻辑文件(main.js)。
2) 官方的JS库文件,比如jQuery、还有许多BootStrap需要的组件JS文件;
通过RequireJS组织JS文件,到时就只用一句话就够了:
<!-- build:js scripts/main.js -->
<script data-main="scripts/main" src="bower_components/requirejs/require.js"></script>
<!-- endbuild -->
Step 1:安装RequireJS包
bower install --save requirejs
执行此语句之后,就会自动更新bower.json文件,同时在app/bower_components中下载官方的requirejs组件。
Step 2:添加RequireJS的Node模块
npm install grunt-contrib-requirejs --save-dev
这样能够将grunt-contrib-requirejs组件自动下载到node_modules文件夹下,同时因为使用了--save-dev会自动更新package.json文件。
官方文档:https://github.com/gruntjs/grunt-contrib-requirejs
Step 3:修改Gruntfils.js文件,配置requirejs任务
为了能够利用RequireJS的r.js文件对输出文件进行优化,需要在Gruntfiles.js中注册相应任务。关于r.js的详细配置可以参考官方示例:
(在Gruntfile.js文件中修改)
requirejs: {
          dist: {
              // Options: https://github.com/jrburke/r.js/blob/master/build/example.build.js
              options: {
                  // `name` and `out` is set by grunt-usemin
                  baseUrl: yeomanConfig.app + '/scripts',
                  mainConfigFile:'<%= yeoman.app %>/scripts/config.js',
                  optimize: 'none',
                  // TODO: Figure out how to make sourcemaps work with grunt-usemin
                  // https://github.com/yeoman/grunt-usemin/issues/30
                  //generateSourceMaps: true,
                  // required to support SourceMaps
                  // http://requirejs.org/docs/errors.html#sourcemapcomments
                  preserveLicenseComments: false,
                  useStrict: true,
                  wrap: true
                  //uglify2: {} // https://github.com/mishoo/UglifyJS2
              }
          }
      },
这里的config.js是专门的RequireJS配置文件,主要是所有文件中的依赖关系,配置了paths和shim项:
app/scripts/config.coffee
require.config
    paths:
        ## jQuery
        'jquery':'../bower_components/jquery/jquery'

        ## BootStrap
        'bootstrap-affix': "../bower_components/bootstrap/js/affix"
        'bootstrap-transition': "../bower_components/bootstrap/js/transition"
        "bootstrap-alert": "../bower_components/bootstrap/js/alert"
        "bootstrap-button": "../bower_components/bootstrap/js/button"
        "bootstrap-collapse": "../bower_components/bootstrap/js/collapse"
        "bootstrap-dropdown": "../bower_components/bootstrap/js/dropdown"
        "bootstrap-modal": "../bower_components/bootstrap/js/modal"
        "bootstrap-tooltip": "../bower_components/bootstrap/js/tooltip"
        "bootstrap-popover": "../bower_components/bootstrap/js/popover"
        "bootstrap-scrollspy": "../bower_components/bootstrap/js/scrollspy"
        "bootstrap-tab": "../bower_components/bootstrap/js/tab"
        "bootstrap-carousel": "../bower_components/bootstrap/js/carousel"

        ## Handlebars runtime
        'runtime':'lib/handlebars/handlebars.runtime-v1.1.2'

        ## Templates
        'messages':'../hbs/messages'
Step 4:将requirejs添加build任务中
为了能够在发布时,使用r.js进行页面优化(合并、压缩等),需要将requirejs任务作为build任务的子任务:
(在Gruntfile.js文件中修改)
grunt.registerTask('build', [
        'clean:dist',
        'useminPrepare',
        'concurrent:dist',
        'autoprefixer',
        'requirejs',
        'concat',
        'cssmin',
        'uglify',
        'modernizr',
        'copy:dist',
        'rev',
        'usemin'
    ]);
Step 5:重新组织index.html页面中的js文件
接下来删除Figure 9中的所有script标签,代之以下面的语句:
(在app/index.html文件中修改)
<!-- build:js scripts/main.js -->
<script data-main="scripts/main" src="bower_components/requirejs/require.js"></script>
<!-- endbuild -->
入口文件还是main.js,只是现在改成RequireJS要求的格式:
app/scripts/main.coffee
require.config
    paths:
        'jquery':'../bower_components/jquery/jquery',
        'runtime':'lib/handlebars/handlebars.runtime-v1.1.2',
        'messages':'../hbs/messages'

require ['jquery','runtime','messages','bootstrap'],($)->
    'use strict';
    $ ->
        data =
            messages:[
                {name:"Zhang",msgContent:"I'm San",msgTime:"Yesterday"}
                {name:"Li",msgContent:"I'm Si",msgTime:"Today"}
                {name:"Wang",msgContent:"I'm Wu",msgTime:"Tomorrow"}
            ]
            name:"jscon"
        template = JST["app/hbs/messages.hb"]
        $("#list").html(template(data))
注意这里的bootstrap依赖文件用来配置需要哪些bootstrap组件用的,可以自己定制所需要的插件内容,挺方便的。这里给出最全的配置,内容如下:(参考自https://gist.github.com/taxilian/4790603)
app/scripts/bootstrap.coffee
require.config
    paths:
                'jquery':'../bower_components/jquery/jquery',
                'bootstrap-affix':"../bower_components/bootstrap/js/affix",
                'bootstrap-transition':"../bower_components/bootstrap/js/transition",
                "bootstrap-alert":"../bower_components/bootstrap/js/alert",
                "bootstrap-button":"../bower_components/bootstrap/js/button",
                "bootstrap-collapse":"../bower_components/bootstrap/js/collapse",
                "bootstrap-dropdown":"../bower_components/bootstrap/js/dropdown",
                "bootstrap-modal":"../bower_components/bootstrap/js/modal",
                "bootstrap-tooltip":"../bower_components/bootstrap/js/tooltip",
                "bootstrap-popover":"../bower_components/bootstrap/js/popover",
                "bootstrap-scrollspy":"../bower_components/bootstrap/js/scrollspy",
                "bootstrap-tab":"../bower_components/bootstrap/js/tab",
                "bootstrap-carousel":"../bower_components/bootstrap/js/carousel"
    shim:
                "bootstrap-affix": ["jquery"],
                "bootstrap-transition": ["bootstrap-affix"],
                "bootstrap-alert": ["bootstrap-transition"],
                "bootstrap-button": ["bootstrap-alert"],
                "bootstrap-collapse": ["bootstrap-button"],
                "bootstrap-dropdown": ["bootstrap-collapse"],
                "bootstrap-modal": ["bootstrap-dropdown"],
                "bootstrap-tooltip": ["bootstrap-modal"],
                "bootstrap-popover": ["bootstrap-tooltip"],
                "bootstrap-scrollspy": ["bootstrap-popover"],
                "bootstrap-tab": ["bootstrap-scrollspy"],
                "bootstrap-carousel": ["bootstrap-tab"]
define ['jquery',
        "bootstrap-affix",
        "bootstrap-transition",
        "bootstrap-alert",
        "bootstrap-button",
        "bootstrap-collapse",
        "bootstrap-dropdown",
        "bootstrap-modal",
        "bootstrap-tooltip",
        "bootstrap-popover",
        "bootstrap-scrollspy",
        "bootstrap-tab",
        "bootstrap-carousel"
        ],($)->
至此配置完成,在命令行中输入 grunt server 就可以看到以前熟悉的页面了,没错,you make it!
3.4、发布程序
程序的发布,使用
grunt build --force 或者 grunt --force
加force选项的目的是为了在执行任务时的出现warning提示时,并不中断任务的执行而是继续执行到完成(或出现Error)。
此时你会在根目录下出现一个dist文件夹, 这个文件夹的结构和app文件夹相似
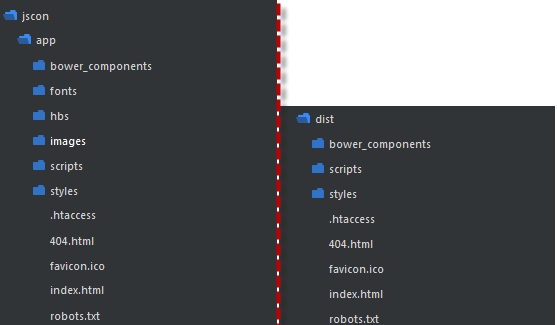
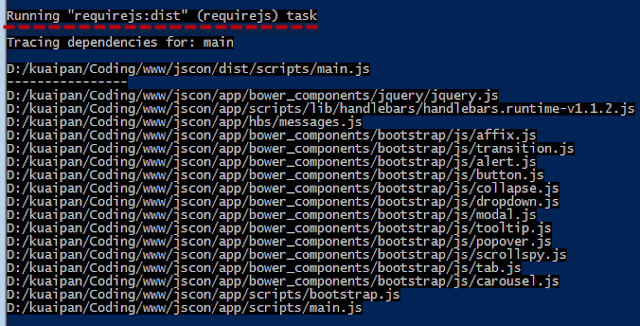
可以发现只有一个js文件和css文件,都是经过压缩的。js的压缩是RequireJS、concat和uglify共同的作用结果,css的压缩则是concat和cssmin的作用结果。使用RequireJS会根据入口文件main.js中找到所有的依赖,然后合并成一个大的main.js文件:
这个dist文件夹就是可以发布的版本了,(改个名字后)扔到服务器上就可以了。
4、构建多页面前端环境
还记得小时候看过的童话故事中的那只偷香油的小老鼠么?有时候,一种优势在另外一种情况下就成了弊端。上面我们讲的usemin就是这个一个情况。
我们回过头来看发布时命令窗口中的几行提示:
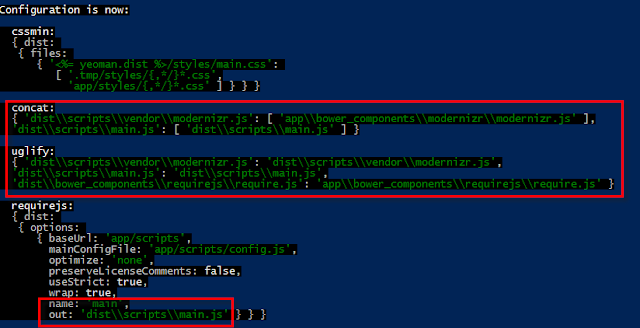
这些反馈信息都来自usemin的工作,usemin组件能够自动更新Gruntfile中诸如concat、uglify、requirejs的配置文件,所以前面我们在单页面环境时根本不用考虑如何合并、压缩文件,因为usemin默默地帮你完成了——真是人民的好公仆呢。
usemin所做的工作对单页面来讲非常有用,增加了配置过程的自动化。不过在RequireJS用于多页面开发时,需要使用dir以及modules配置,但是usemin“仍然不知情”,还是会自动给requirejs任务添加name属性和out属性(单页面配置),从而导致配置冲突。
要想自动部署多页面,那么只能忍痛割爱抛弃usemin组件,需要自己写concat和uglify任务,还好这些都不难。在前面单页面环境搭建的基础上,配置多页面环境也是非常方便快捷的。
4.1、抛弃usemin任务
因为usemin和requirejs任务都是用于发布时执行的,所以只要在build任务中除名即可,除名之后build任务的配置如下:
grunt.registerTask('build', [
    'clean:dist',
    'copy:server',
    'concurrent',
    'requirejs',
    'cssmin',
    'concat',
    'uglify',
    'copy'
  ]);
4.2、修改requirejs任务
修改requirejs任务,添加用于多任务的dir和modules配置:
(在Gruntfile.js文件中修改)
 requirejs: {
        dist: {
                …
                baseUrl:'<%= yeoman.app %>/scripts',
                mainConfigFile:'<%= yeoman.app %>/scripts/config.js',
                optimize: 'none',
                dir: '.tmp/scripts/requirejs/',
                modules:[
                  {name:"main"},
                  {name:"main2"}
                ],
                …
        }
    },
注意
① 输出的文件暂时放在 .tmp临时文件夹下,这样到时clean任务会清空这个临时文件夹。
② 这里的modules中模块的名字都是以“main”开头的,是为了方便后面concat任务找文件。
4.3、修改concat、uglify任务
移走了usemin任务之后,concat和uglify需要自己定制。其实concat任务更像是copy功能,因为合并的工作已经由requirejs做了。
(在Gruntfile.js文件中修改)
concat:{
  dist:{
    expand:true,
    cwd:".tmp/scripts/requirejs/",
    src:['main*.js'],
    dest:'<%= yeoman.dist %>/scripts/',
    ext:'.js'
  },
  dep:{
    files:{
    "<%= yeoman.dist %>/scripts/vendor/modernizr.js":["<%= yeoman.app %>/bower_components/modernizr/modernizr.js"],
    '<%= yeoman.dist %>/bower_components/requirejs/require.js':['<%= yeoman.app %>/bower_components/requirejs/require.js']
    }
  }
},
这里的“dist”任务是用来搬运的之前requirejs放在.tmp中的入口文件(main*.js)到结果文件夹dist下。而“dep”任务则是搬运其他需要的js文件,这里是modernizr.js和require.js两个文件。
由于requirejs和concat已经把该合并的文件都放到目标文件下面去了,所以uglify的任务就非常简单了,把这些目标文件下的文件“就地”压缩一下即可:
uglify: {
  src:['<%= yeoman.dist %>/{,*/}*.js']
},
4.4、测试
把index.html另存一份为index2.html,并将其中的入口文件改成main2:
<script data-main="scripts/main2" src="bower_components/requirejs/require.js"></script>
然后把main.js另存为一份main2.js。接下去使用 grunt --force 发布程序,可以看到效果。

参考文献:
[1] 科学的爱情. 《Grunt + RequireJS with multi-page website》. 2013-03-11
[2] Xianjing《玩转Grunt(一): Minification》.2013-10-7
最后友情提醒一句,本文所讲的程序代码可以从这儿下载:
单页面前端环境搭建示例代码:jscon-single-page.zip
多页面前端环境搭建示例代码:jscon-multi-pages.zip
~~The End~~