一、基础环境的准备
1、准备3台centos7服务器(纯净的)
2、配置三台服务器之间的免密通信
/*三台服务器都这样操作*/
vim /etc/hosts
172.16.117.172 test
172.16.117.173 test1
172.16.117.174 test2
//每台机器的各自本身的无密码访问
[root@test ~]# ssh-keygen -t rsa
Generating public/private rsa key pair.
Enter file in which to save the key (/root/.ssh/id_rsa):
Enter passphrase (empty for no passphrase):
Enter same passphrase again:
Your identification has been saved in /root/.ssh/id_rsa.
Your public key has been saved in /root/.ssh/id_rsa.pub.
The key fingerprint is:
12:83:d4:af:0e:d2:74:36:a3:0f:04:bb:60:96:0b:1c root@test.novalocal
The key's randomart image is:
+--[ RSA 2048]----+
| .. |
| E.. .. |
|. oo. o. |
|o=. o =o. |
|+..= +.+S |
| .o = .. |
| . = |
| o |
| |
+-----------------+
[root@test ~]# cd .ssh
[root@test .ssh]# cat id_rsa.pub >> authorized_keys
[root@test .ssh]# ls
authorized_keys id_rsa id_rsa.pub known_hosts
[root@test .ssh]# cd ..
[root@test ~]# chmod 700 .ssh
[root@test ~]# chmod 600 .ssh/*
[root@test ~]# ls -a
. .. .bash_logout .bash_profile .bashrc .cshrc .ssh .tcshrc .viminfo
[root@test ~]#

//测试是否能访问自己

[root@test ~]# ssh test
The authenticity of host 'test (172.16.117.172)' can't be established.
ECDSA key fingerprint is d2:70:75:9e:e9:5a:79:cb:e4:50:d6:6d:1b:75:e1:df.
Are you sure you want to continue connecting (yes/no)? yes
Warning: Permanently added 'test,172.16.117.172' (ECDSA) to the list of known hosts.
[root@test ~]#

//后面两台服务器的操作一样

[root@test1 ~]# ssh-keygen -t rsa
Generating public/private rsa key pair.
Enter file in which to save the key (/root/.ssh/id_rsa):
Enter passphrase (empty for no passphrase):
Enter same passphrase again:
Your identification has been saved in /root/.ssh/id_rsa.
Your public key has been saved in /root/.ssh/id_rsa.pub.
The key fingerprint is:
9b:87:2e:03:a3:de:10:3b:5d:f8:85:9b:9f:d6:eb:98 root@test1.novalocal
The key's randomart image is:
+--[ RSA 2048]----+
| |
| |
| |
| . . |
| . . o S |
| +oo + + |
| +..o+ +.. |
| .+ oo.=. |
| .. . +E.o. |
+-----------------+
[root@test1 ~]# cd .ssh
[root@test1 .ssh]# cat id_rsa.pub >> authorized_keys
[root@test1 .ssh]# ls
authorized_keys id_rsa id_rsa.pub
[root@test1 .ssh]# cd ..
[root@test1 ~]# chmod 700 .ssh
[root@test1 ~]# chmod 600 .ssh/*
[root@test1 ~]# ssh test1
The authenticity of host 'test1 (172.16.117.173)' can't be established.
ECDSA key fingerprint is c2:0c:31:67:1e:f3:64:7f:a9:b0:36:51:f8:2b:37:f4.
Are you sure you want to continue connecting (yes/no)? yes
Warning: Permanently added 'test1,172.16.117.173' (ECDSA) to the list of known hosts.
[root@test1 ~]# exit
logout
Connection to test1 closed.


[root@test2 ~]# ssh-keygen -t rsa
Generating public/private rsa key pair.
Enter file in which to save the key (/root/.ssh/id_rsa):
Enter passphrase (empty for no passphrase):
Enter same passphrase again:
Your identification has been saved in /root/.ssh/id_rsa.
Your public key has been saved in /root/.ssh/id_rsa.pub.
The key fingerprint is:
87:b8:be:cf:ac:ab:bb:3b:05:08:c6:a7:db:f9:c3:02 root@test2.novalocal
The key's randomart image is:
+--[ RSA 2048]----+
|. |
|.o . |
|..o. |
| .. . . . |
| o ... S . |
| E o .. . |
| . o.. |
| ..= o |
| ***=+ |
+-----------------+
[root@test2 ~]# cd .ssh
[root@test2 .ssh]# cat id_rsa.pub >> authorized_keys
[root@test2 .ssh]# ls
authorized_keys id_rsa id_rsa.pub
[root@test2 .ssh]# cd ..
[root@test2 ~]# chmod 700 .ssh
[root@test2 ~]# chmod 600 .ssh/*
[root@test2 ~]# ssh test2
The authenticity of host 'test2 (172.16.117.174)' can't be established.
ECDSA key fingerprint is 0d:3d:28:3e:28:bb:7b:9a:0a:d0:db:80:af:3b:0a:2e.
Are you sure you want to continue connecting (yes/no)? yes
Warning: Permanently added 'test2,172.16.117.174' (ECDSA) to the list of known hosts.
[root@test2 ~]# exit
logout
Connection to test2 closed.
//每台机器之间的无密码访问的设置

//完成test1与test的访问
[root@test1 ~]# cat ~/.ssh/id_rsa.pub | ssh root@test 'cat >> ~/.ssh/authorized_keys'
The authenticity of host 'test (172.16.117.172)' can't be established.
ECDSA key fingerprint is d2:70:75:9e:e9:5a:79:cb:e4:50:d6:6d:1b:75:e1:df.
Are you sure you want to continue connecting (yes/no)? yes
Warning: Permanently added 'test,172.16.117.172' (ECDSA) to the list of known hosts.
root@test's password: (test的访问密码)
//完成test2与test的访问
[root@test2 ~]# cat ~/.ssh/id_rsa.pub | ssh root@test 'cat >> ~/.ssh/authorized_keys'
The authenticity of host 'test (172.16.117.172)' can't be established.
ECDSA key fingerprint is d2:70:75:9e:e9:5a:79:cb:e4:50:d6:6d:1b:75:e1:df.
Are you sure you want to continue connecting (yes/no)? yes
Warning: Permanently added 'test,172.16.117.172' (ECDSA) to the list of known hosts.
root@test's password:
//将test的authorized_keys分发给test1
[root@test .ssh]# scp -r authorized_keys root@test1:~/.ssh/
The authenticity of host 'test1 (172.16.117.173)' can't be established.
ECDSA key fingerprint is c2:0c:31:67:1e:f3:64:7f:a9:b0:36:51:f8:2b:37:f4.
Are you sure you want to continue connecting (yes/no)? yes
Warning: Permanently added 'test1' (ECDSA) to the list of known hosts.
root@test1's password:
authorized_keys 100% 1607 1.6KB/s 00:00
//将test的authorized_keys分发给test2
[root@test .ssh]# scp -r authorized_keys root@test2:~/.ssh/
The authenticity of host 'test2 (172.16.117.174)' can't be established.
ECDSA key fingerprint is 0d:3d:28:3e:28:bb:7b:9a:0a:d0:db:80:af:3b:0a:2e.
Are you sure you want to continue connecting (yes/no)? yes
Warning: Permanently added 'test2,172.16.117.174' (ECDSA) to the list of known hosts.
root@test2's password:
authorized_keys 100% 1607 1.6KB/s 00:00
[root@test .ssh]#
3、docker离线部署
//上传docker离线包,并解压
[root@test modules]# ls
docker-18.09.6.tgz
[root@test modules]# tar -zxf docker-18.09.6.tgz
[root@test modules]# ls
docker docker-18.09.6.tgz
//复制解压缩后的文件到指定文件夹
[root@test modules]# pwd
/opt/modules
[root@test modules]# ls
docker docker-18.09.6.tgz
[root@test modules]# cp docker/* /usr/bin/
//注册编辑docker服务
[root@test modules]# vim /etc/systemd/system/docker.service
//复制下列内容到该文档中
[root@test modules]# chmod +x /etc/systemd/system/docker.service
//重新加载配置文件
[root@test modules]# systemctl daemon-reload
//启动Docker
[root@test modules]# systemctl start docker
//设置开机启动
[root@test modules]# systemctl enable docker.service
Created symlink from /etc/systemd/system/multi-user.target.wants/docker.service to /etc/systemd/system/docker.service.
//验证是否安装成功
[root@test modules]# systemctl enable docker.service
Created symlink from /etc/systemd/system/multi-user.target.wants/docker.service to /etc/systemd/system/docker.service.
[root@test modules]# systemctl status docker
● docker.service - Docker Application Container Engine
Loaded: loaded (/etc/systemd/system/docker.service; enabled; vendor preset: disabled)
Active: active (running) since Thu 2021-02-25 14:11:40 CST; 1min 55s ago
Docs: https://docs.docker.com
Main PID: 18851 (dockerd)
CGroup: /system.slice/docker.service
├─18851 /usr/bin/dockerd
└─18861 containerd --config /var/run/docker/containerd/containerd.toml --log-level info
Feb 25 14:11:39 test.novalocal dockerd[18851]: time="2021-02-25T14:11:39.851271331+08:00" level=info msg="Graph migration to content-addressability took ... seconds"
Feb 25 14:11:39 test.novalocal dockerd[18851]: time="2021-02-25T14:11:39.856665139+08:00" level=warning msg="mountpoint for pids not found"
Feb 25 14:11:39 test.novalocal dockerd[18851]: time="2021-02-25T14:11:39.856968479+08:00" level=info msg="Loading containers: start."
Feb 25 14:11:39 test.novalocal dockerd[18851]: time="2021-02-25T14:11:39.940601709+08:00" level=warning msg="Running modprobe bridge br_netfilter failed with mess...
Feb 25 14:11:40 test.novalocal dockerd[18851]: time="2021-02-25T14:11:40.096185913+08:00" level=info msg="Default bridge (docker0) is assigned with an IP... address"
Feb 25 14:11:40 test.novalocal dockerd[18851]: time="2021-02-25T14:11:40.186053577+08:00" level=info msg="Loading containers: done."
Feb 25 14:11:40 test.novalocal dockerd[18851]: time="2021-02-25T14:11:40.192011995+08:00" level=info msg="Docker daemon" commit=481bc77 graphdriver(s)=vf...n=18.09.6
Feb 25 14:11:40 test.novalocal dockerd[18851]: time="2021-02-25T14:11:40.192136694+08:00" level=info msg="Daemon has completed initialization"
Feb 25 14:11:40 test.novalocal dockerd[18851]: time="2021-02-25T14:11:40.220186484+08:00" level=info msg="API listen on /var/run/docker.sock"
Feb 25 14:11:40 test.novalocal systemd[1]: Started Docker Application Container Engine.
Hint: Some lines were ellipsized, use -l to show in full.
[root@test modules]# docker -v
Docker version 18.09.6, build 481bc77
//另外两台服务器也是同样的操作安装docker离线包
4、安装jdk
//上传jdk压缩包并接压
[root@test modules]# ls
docker docker-18.09.6.tgz jdk-8u201-linux-x64.tar.gz
[root@test modules]# tar -zxf jdk-8u201-linux-x64.tar.gz
[root@test modules]# ls
docker docker-18.09.6.tgz jdk1.8.0_201 jdk-8u201-linux-x64.tar.gz
//配置jdk环境变量
[root@test modules]# vim /etc/profile
#java
export JAVA_HOME=/opt/modules/jdk1.8.0_201
export CLASSPATH=.:$JAVA_HOME/jre/lib/rt.jar:$JAVA_HOME/lib/dt.jar:$JAVA_HOME/lib/tools.jar
export PATH=$PATH:$JAVA_HOME/bin
//使环境变量生效
[root@test jdk1.8.0_201]# source /etc/profile
[root@test jdk1.8.0_201]# java -version
java version "1.8.0_201"
Java(TM) SE Runtime Environment (build 1.8.0_201-b09)
Java HotSpot(TM) 64-Bit Server VM (build 25.201-b09, mixed mode)
//另外两台服务器也是同样的操作
5、关闭防火墙
查看防火墙状态
firewall-cmd --state

停止firewall
systemctl stop firewalld.service

禁止firewall开机启动
systemctl disable firewalld.service
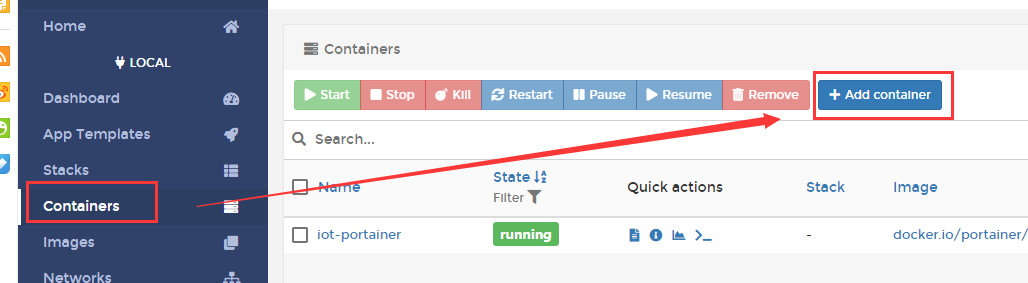
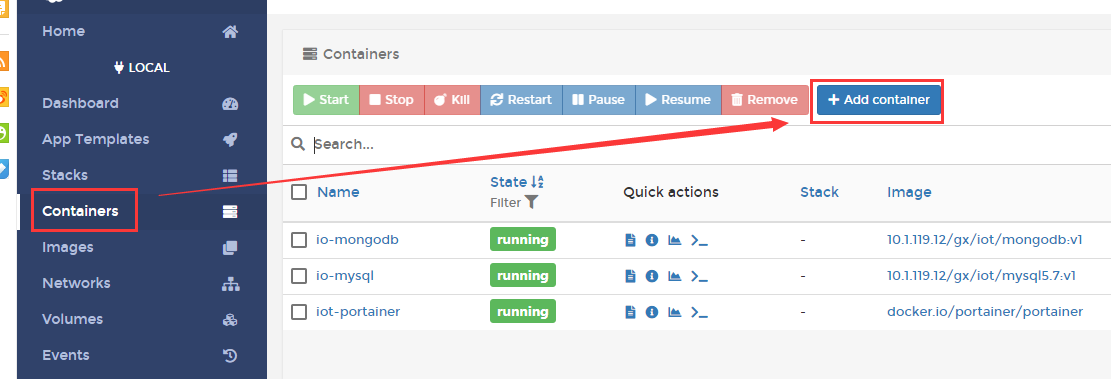
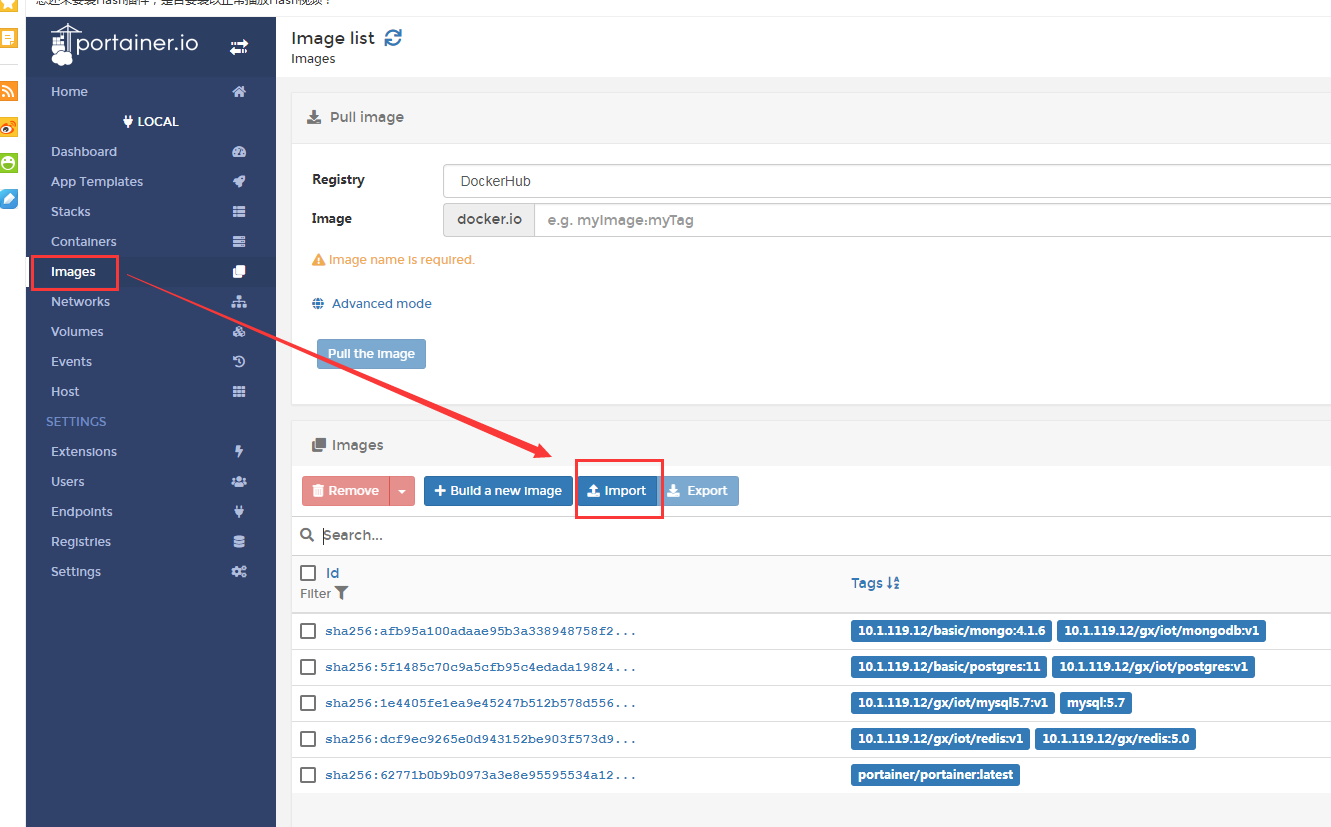
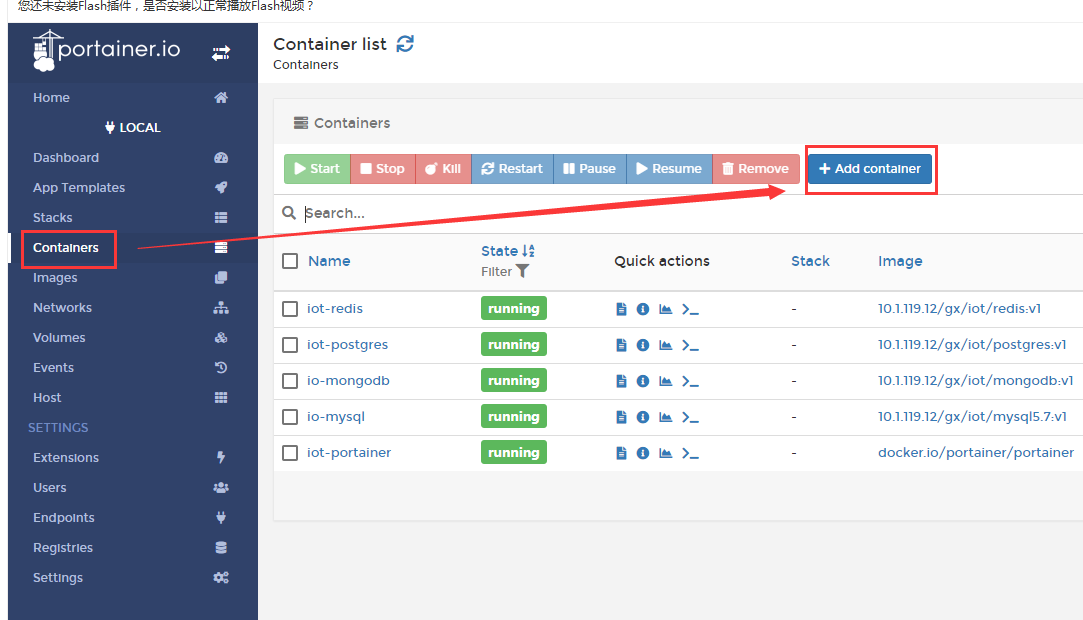
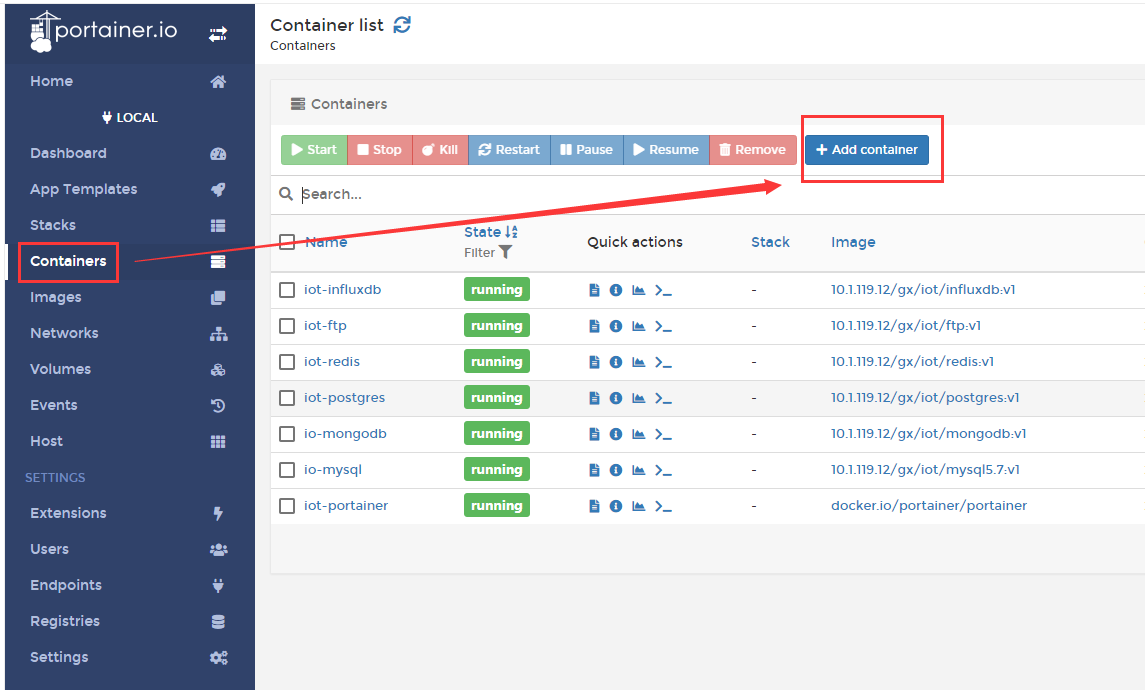
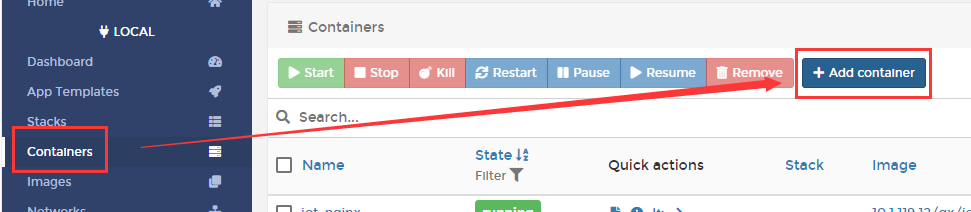
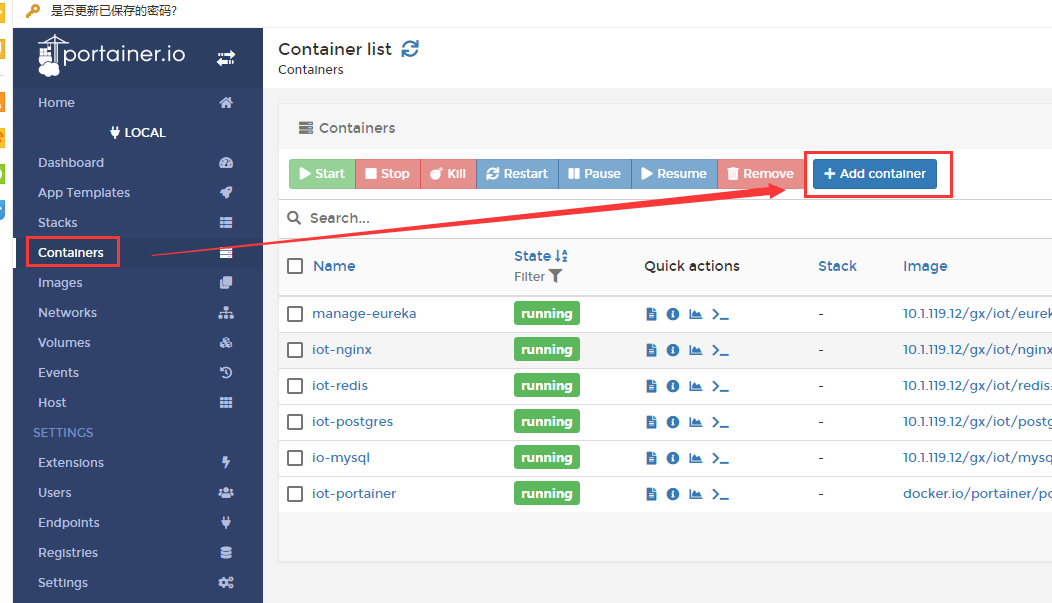
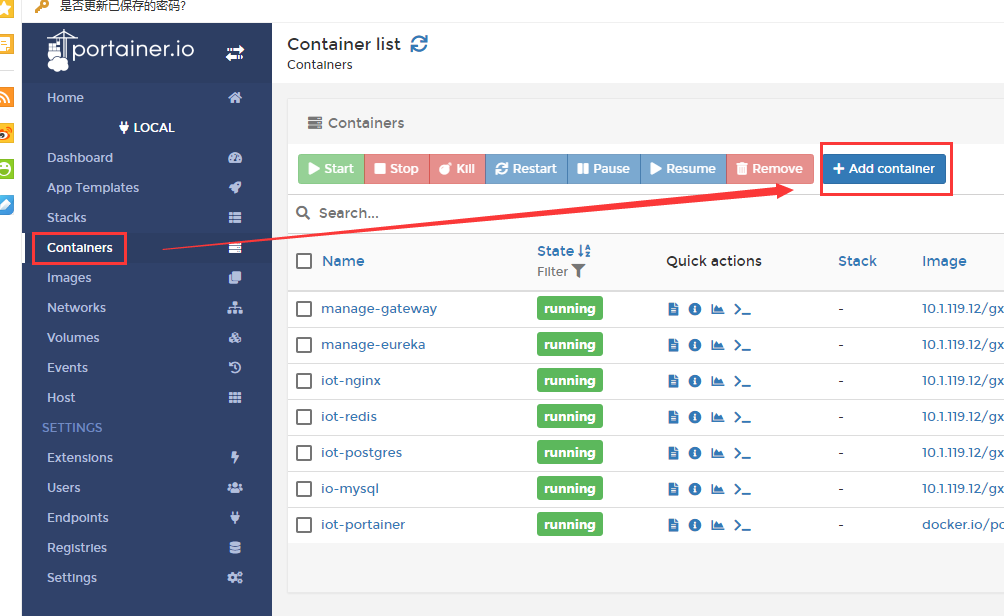
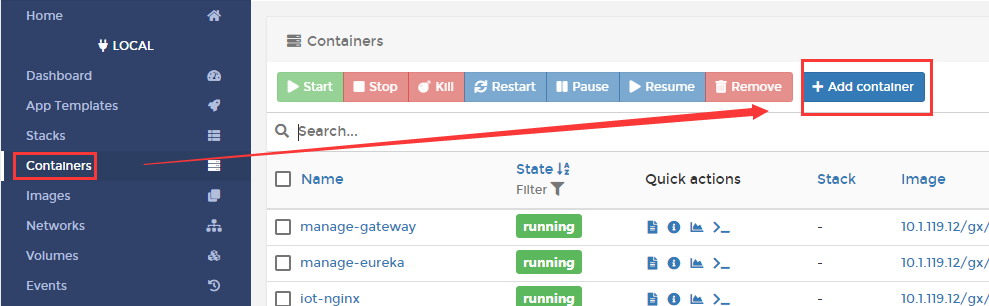
6、portainer离线部署
//portainer镜像加载到服务器
[root@test modules]# ls
docker docker-18.09.6.tgz jdk1.8.0_201 jdk-8u201-linux-x64.tar.gz portainer.tar
[root@test modules]# docker load < portainer.tar
dd4969f97241: Loading layer [==================================================>] 278kB/278kB
5c40d26fba08: Loading layer [==================================================>] 78.89MB/78.89MB
Loaded image: portainer/portainer:latest
//单机版运行portainer
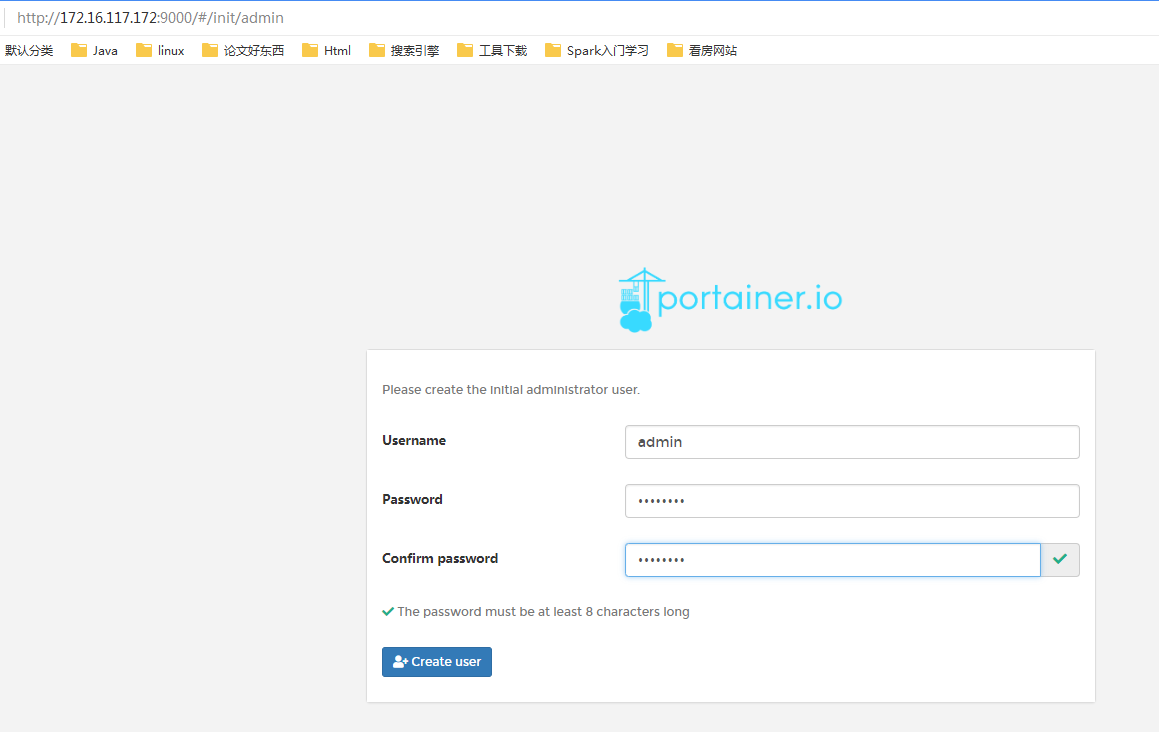
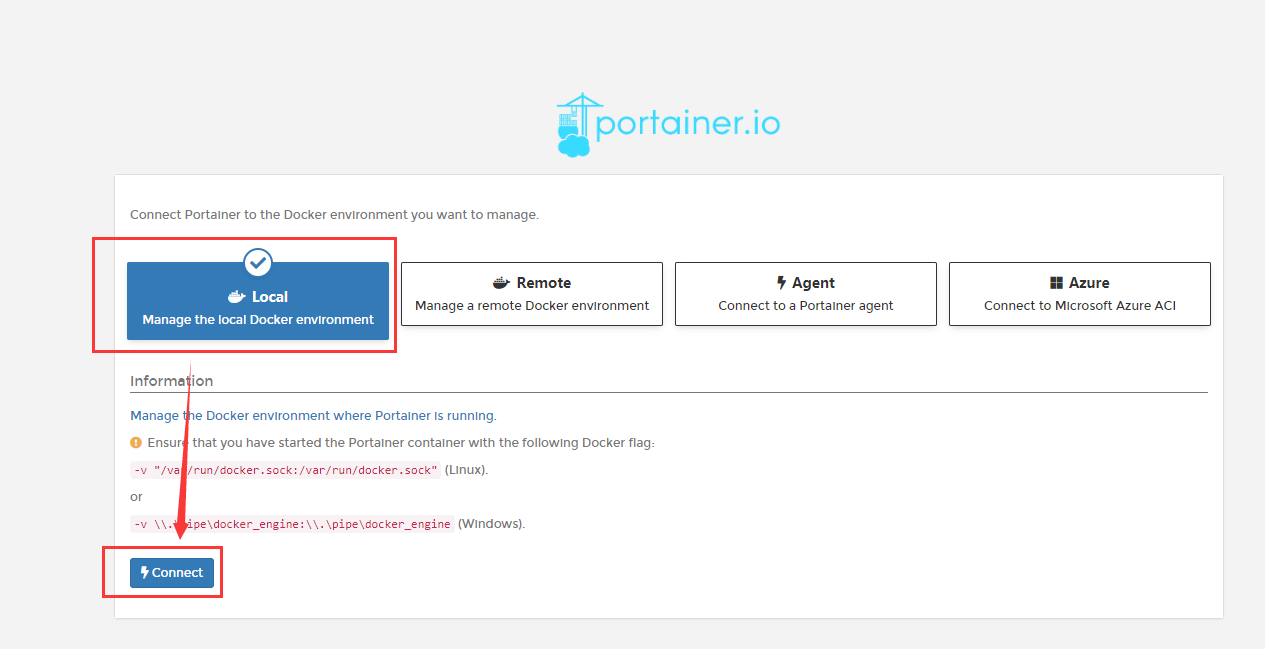
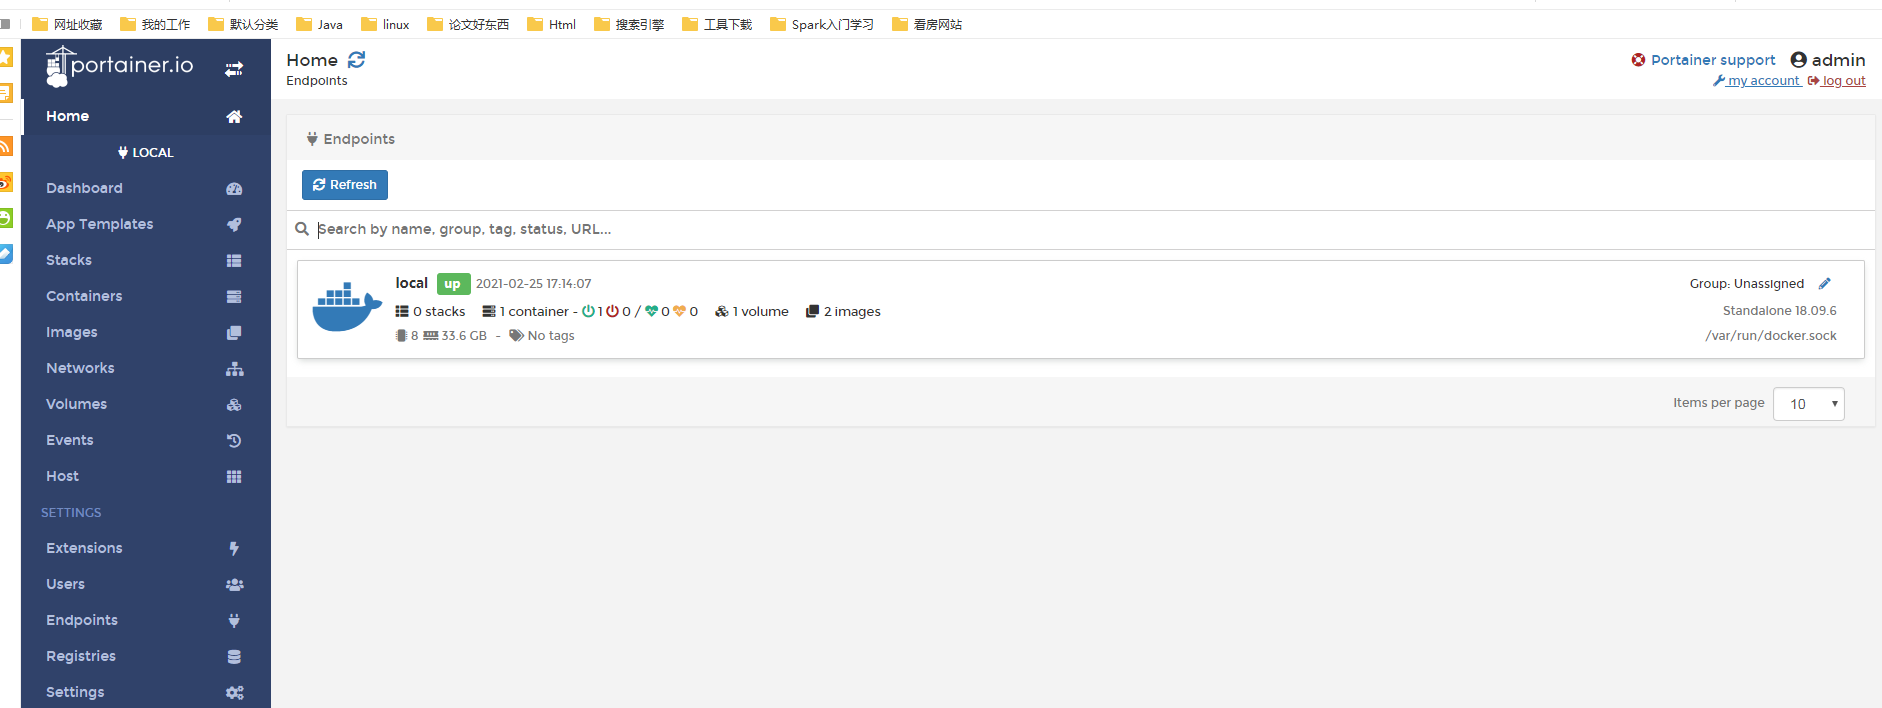
打开浏览器访问地址:http://服务器IP地址:9000
设置用户名和密码,我这里设置的密码是admin123
二、数据库搭建
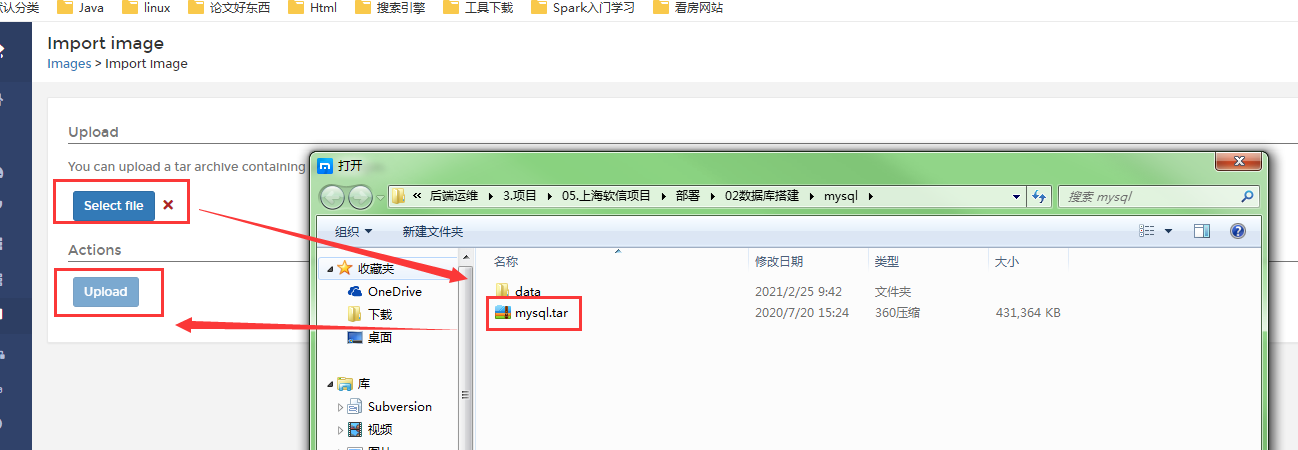
上传mysql数据库的镜像

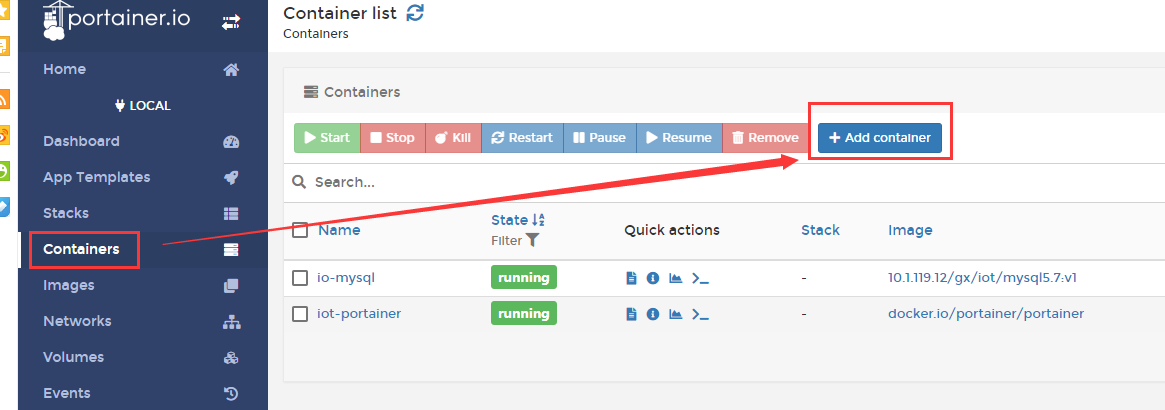
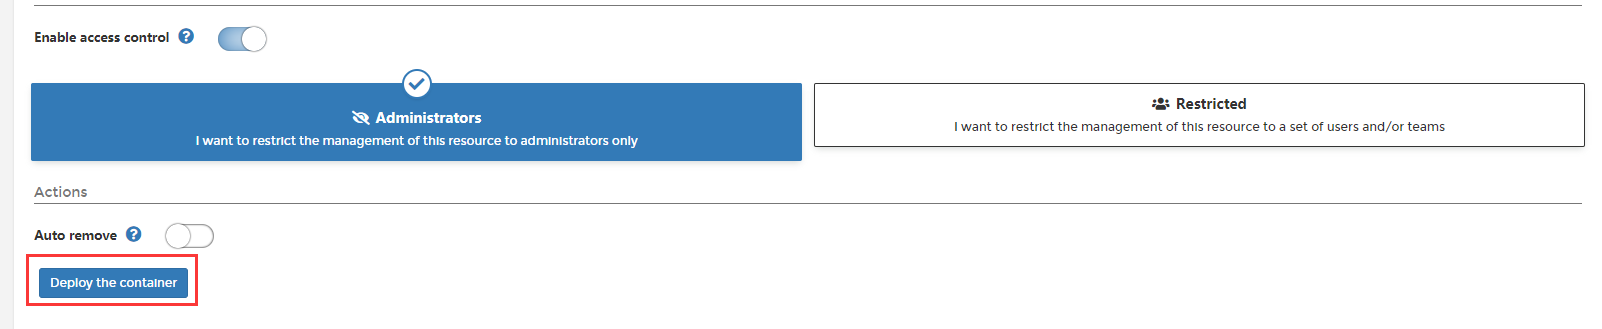
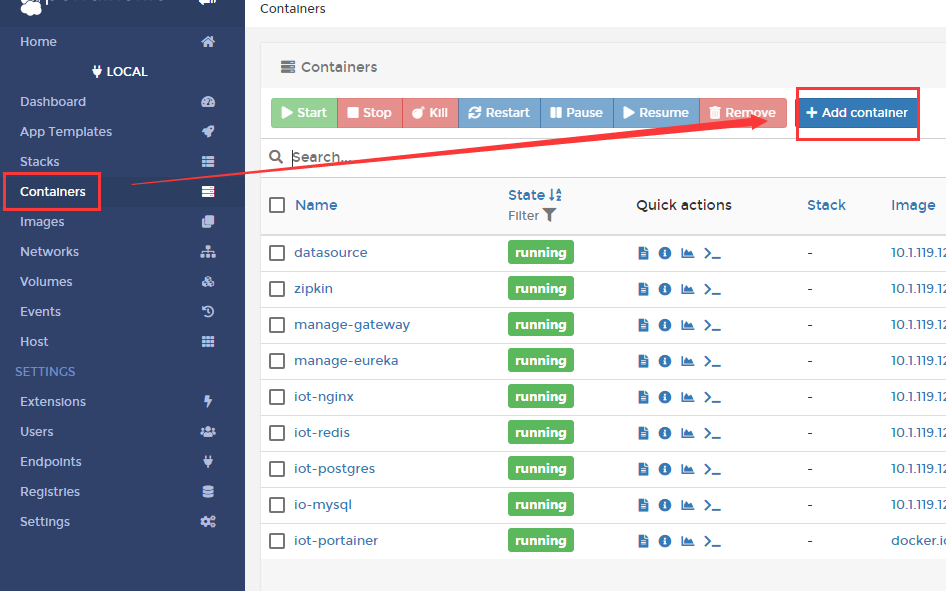
创建一个mysql容器
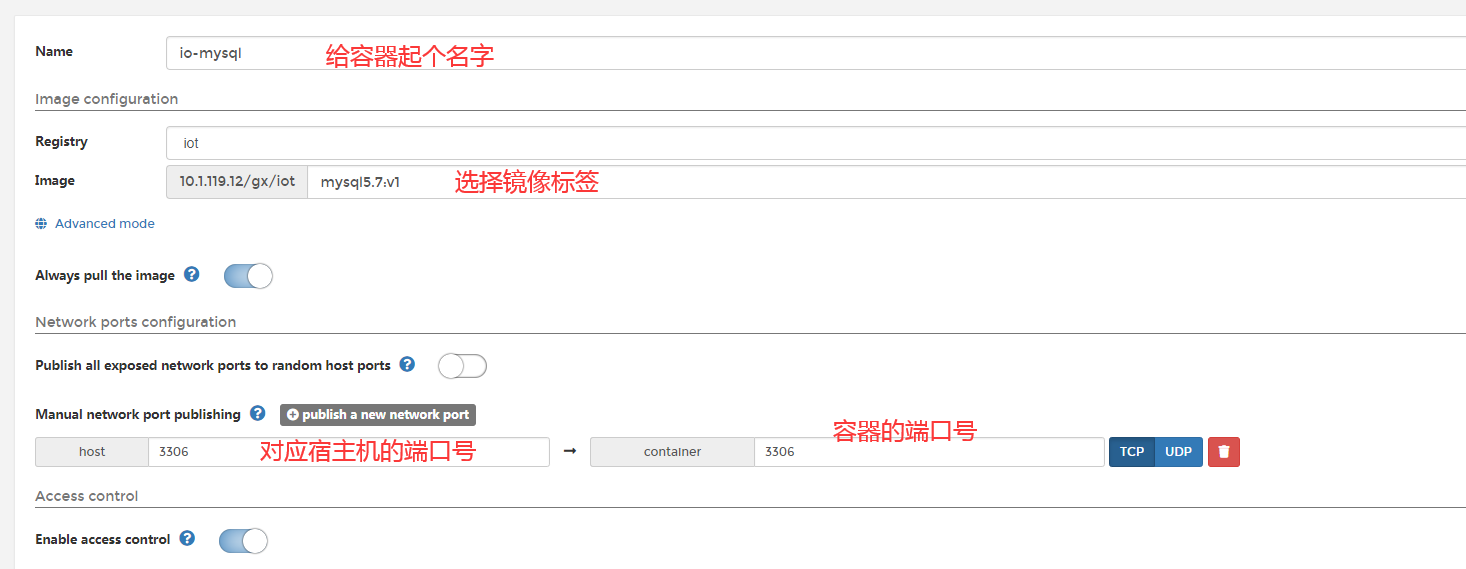
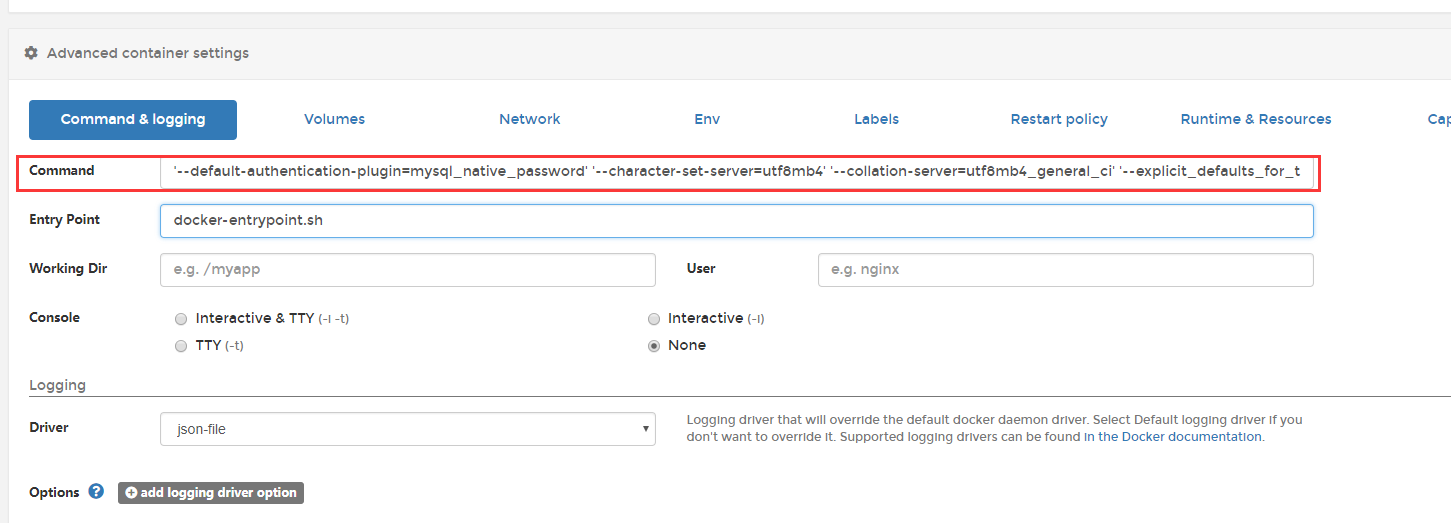
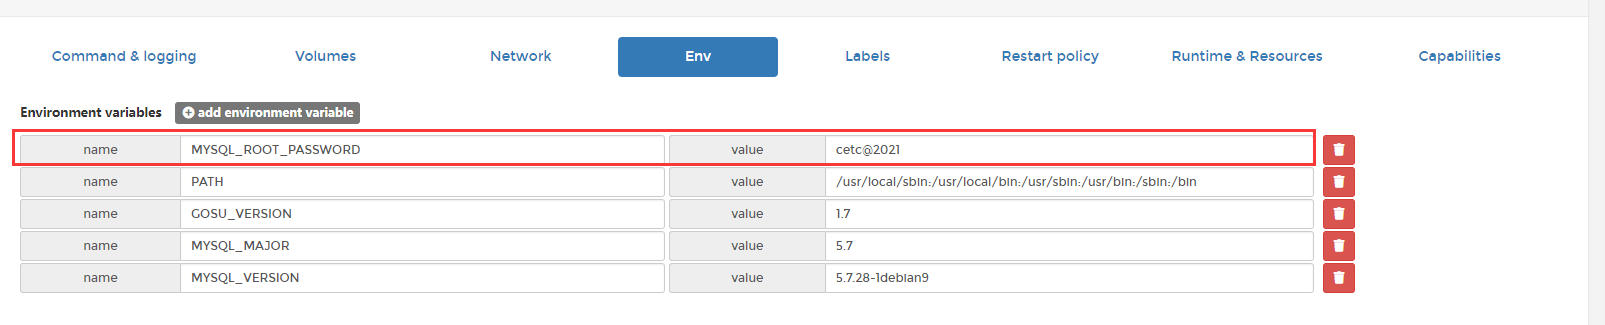
port:3306
Command:
'--default-authentication-plugin=mysql_native_password' '--character-set-server=utf8mb4' '--collation-server=utf8mb4_general_ci'
'--explicit_defaults_for_timestamp=true' '--lower_case_table_names=1' '--sql-mode=NO_ZERO_IN_DATE,NO_ZERO_DATE,ERROR_FOR_DIVISION_BY_ZERO,NO_AUTO_CREATE_USER,NO_ENGINE_SUBSTITUTION'
Env: MYSQL_ROOT_PASSWORD    cetc@2021
生成容器

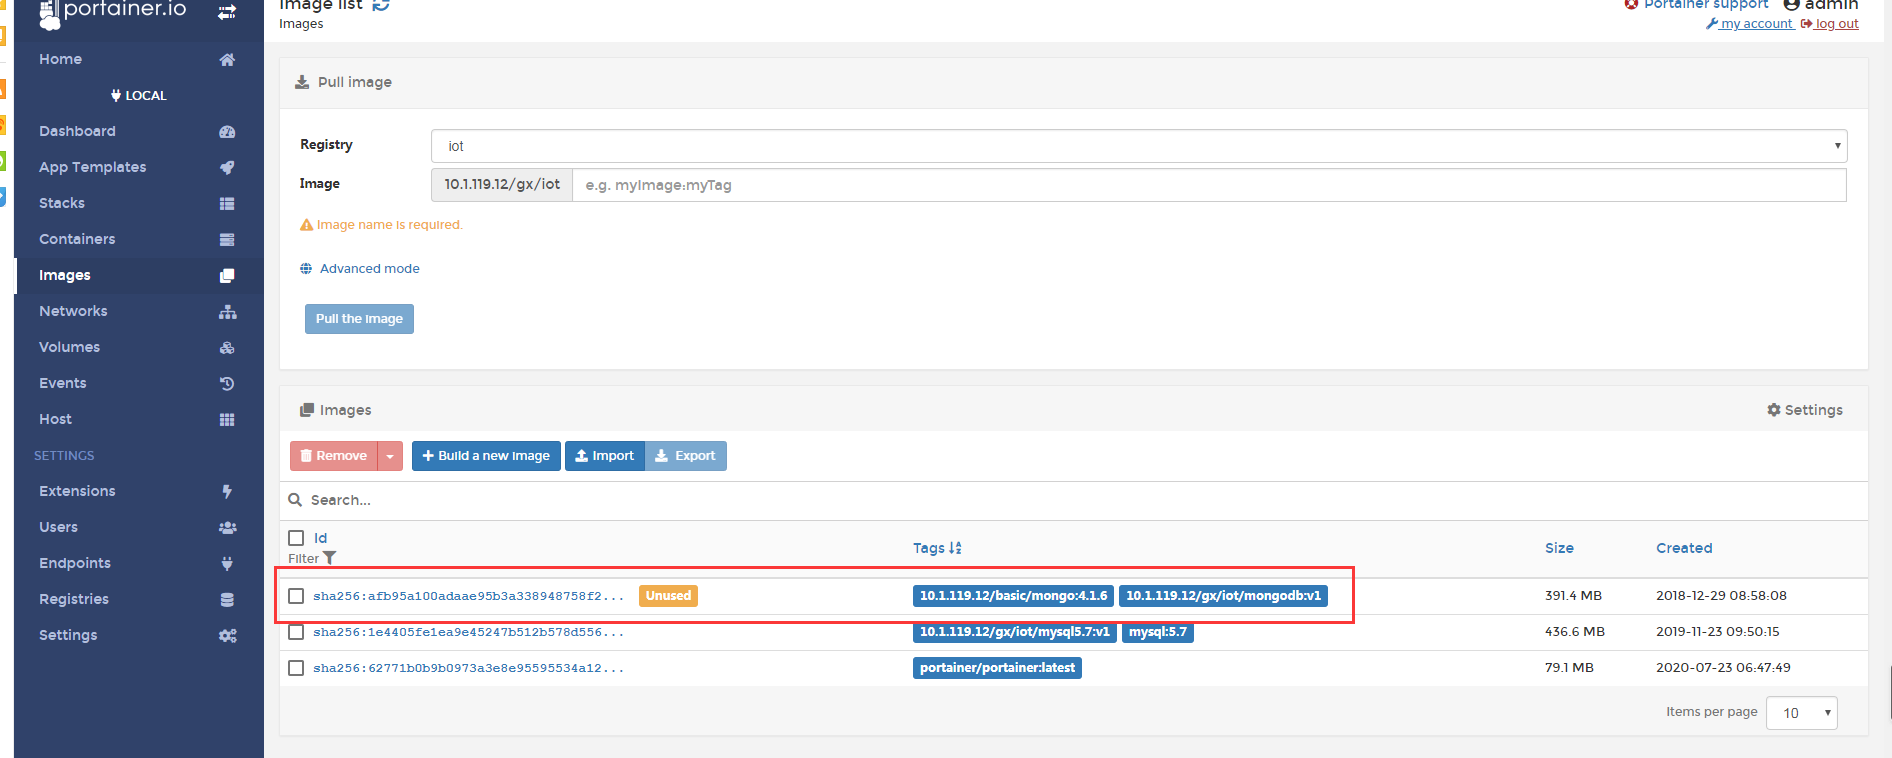
2、mongodb部署
上传mongodb镜像
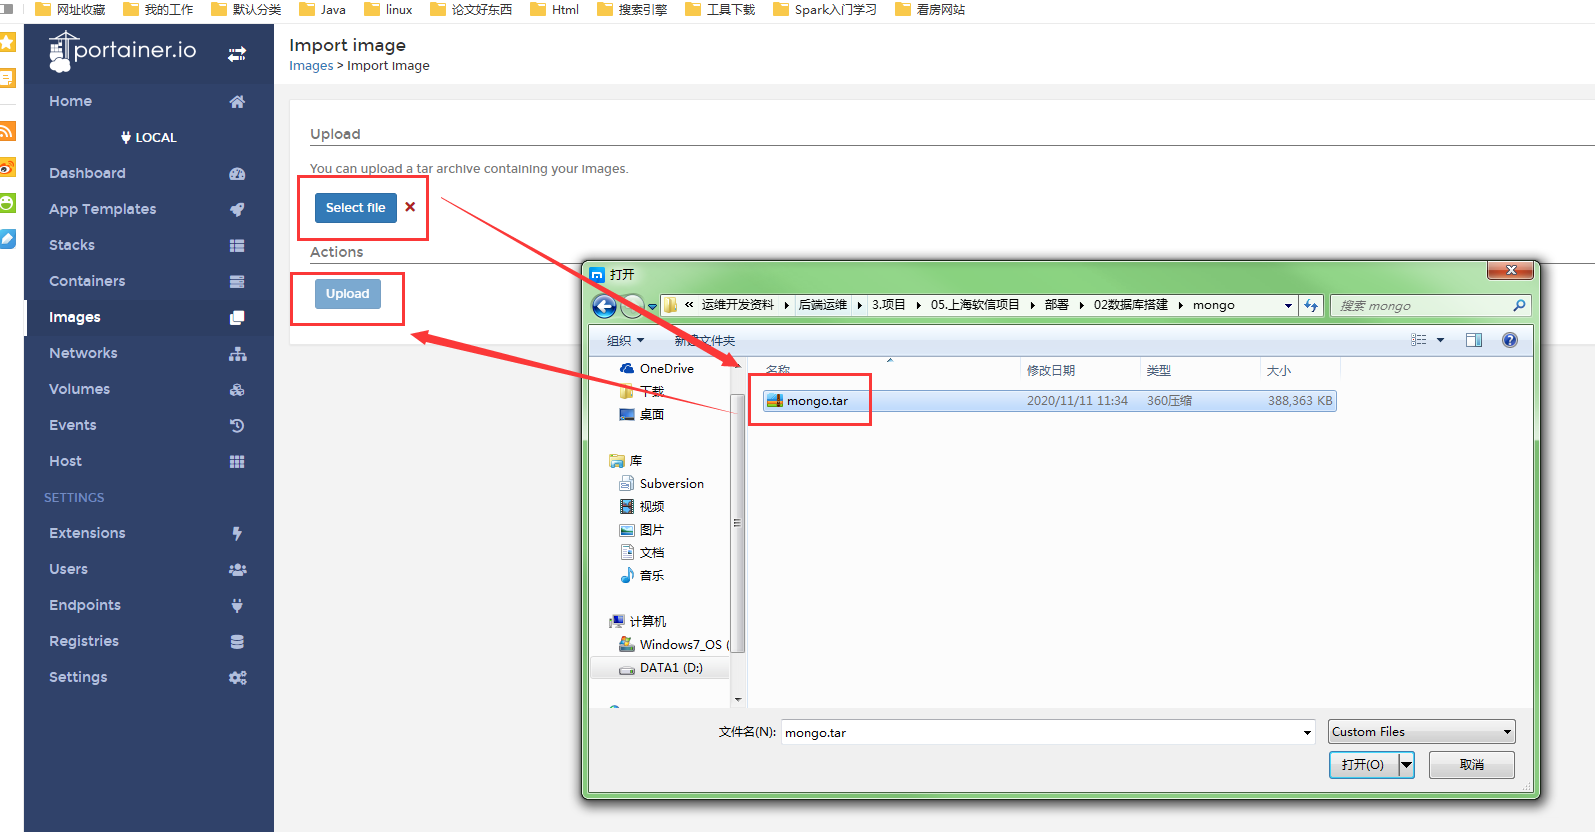
创建mongodb容器

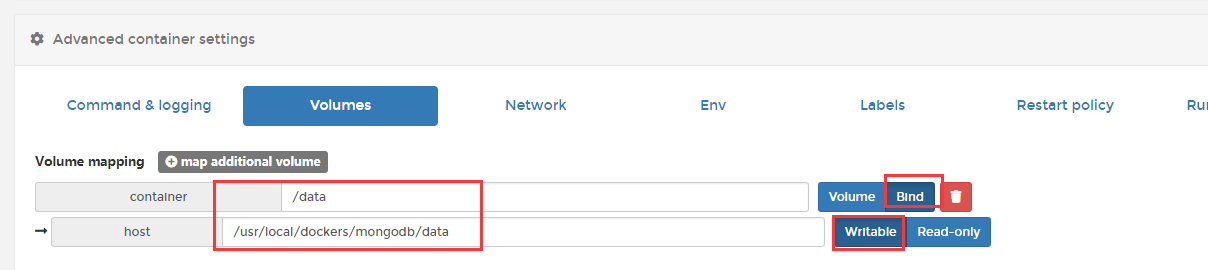
生成容器

port:27017
Volumes: host ->/usr/local/dockers/mongodb/data   container->/data
上传postges的镜像

创建postgres容器
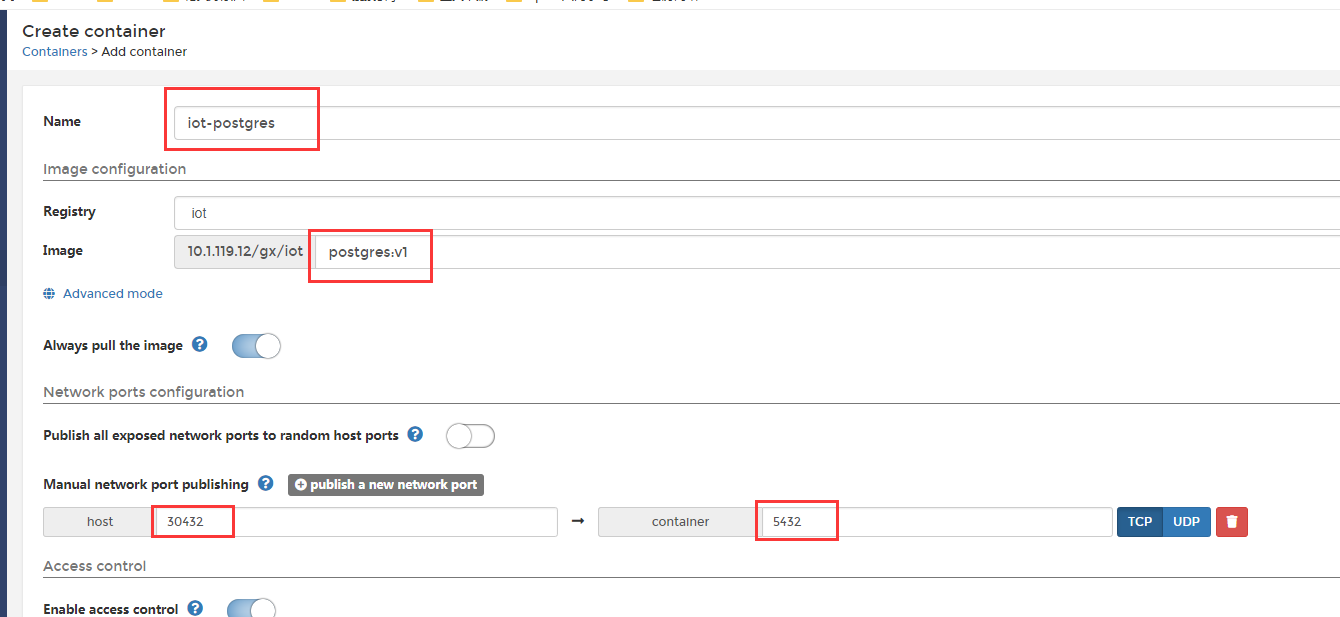


ort: host->30432 container->5432
Volumes: host ->/usr/local/dockers/postgres/data   container->/var/lib/postgresql/data

host ->/usr/local/dockers/postgres/sql container->/sql

Env:POSTGRES_PASSWORD   cetc@2021
生成容器

4、redis部署
上传redis镜像

创建redis容器

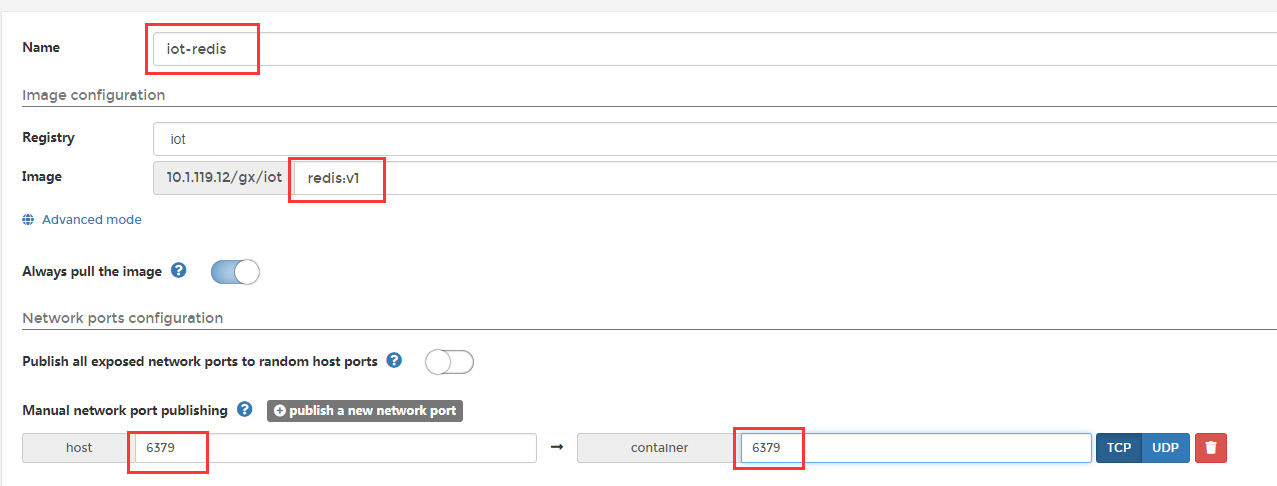
生成容器


生成容器

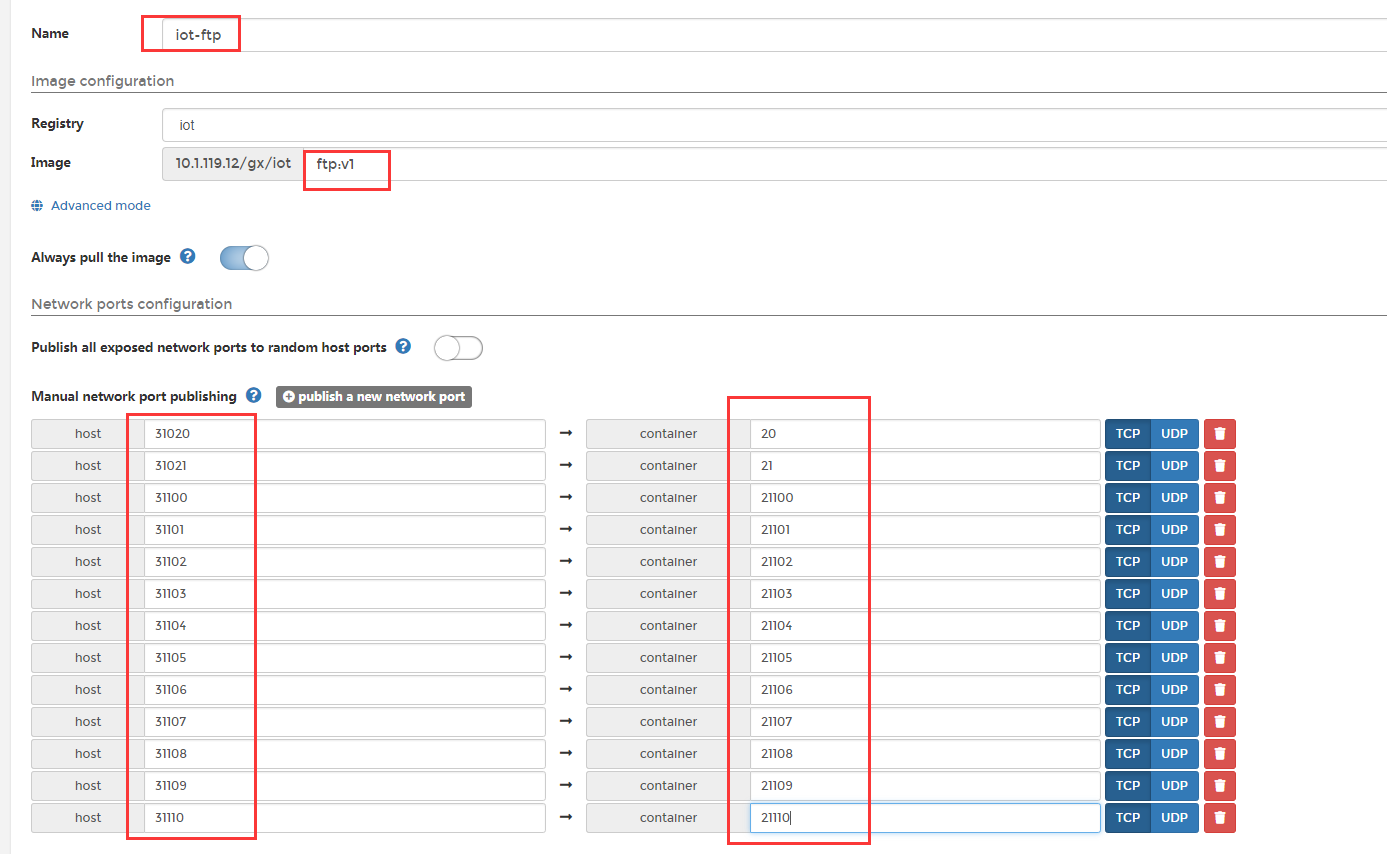
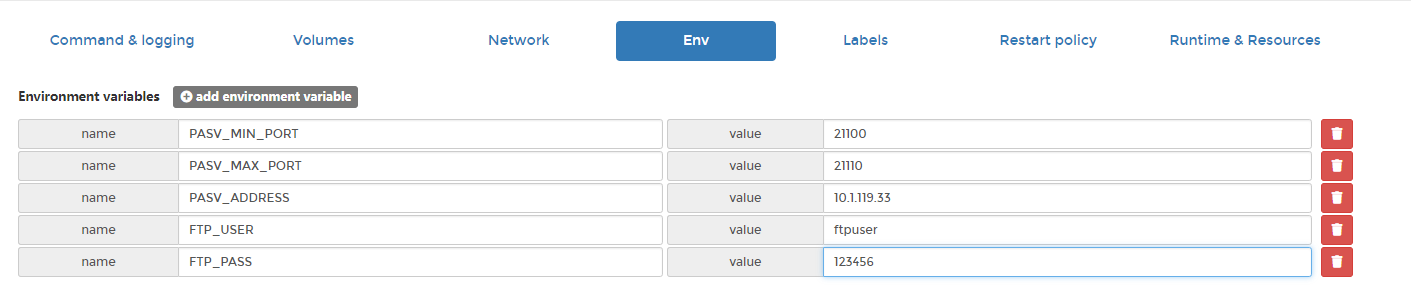
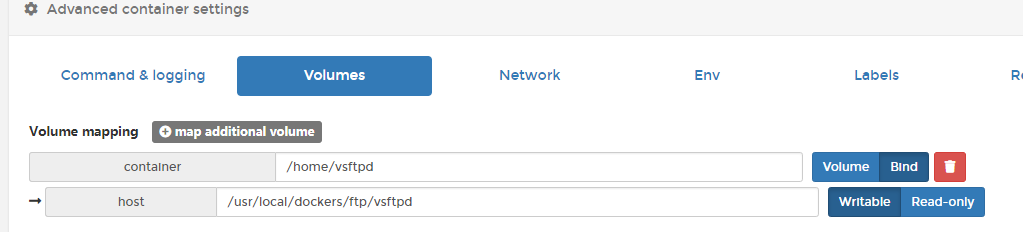
port:
容器端口                         宿主机端口
20         TCP         NodePort             31020
21         TCP         NodePort             31021
21100         TCP         NodePort         31100
21101         TCP         NodePort         31101
21102         TCP         NodePort         31102
21103         TCP         NodePort         31103
21104         TCP         NodePort         31104
21105         TCP         NodePort         31105
21106         TCP         NodePort         31106
21107         TCP         NodePort         31107
21108         TCP         NodePort         31108
21109         TCP         NodePort         31109
21110         TCP         NodePort         31110
Env(环境变量):
PASV_MIN_PORT    21100
PASV_MAX_PORT    21110
PASV_ADDRESS    10.1.119.33
FTP_USER    ftpuser
FTP_PASS    123456
Volumes(数据卷):
主机路径
/usr/local/dockers/ftp/vsftpd
容器路径
/home/vsftpd

Network(网络模式):host
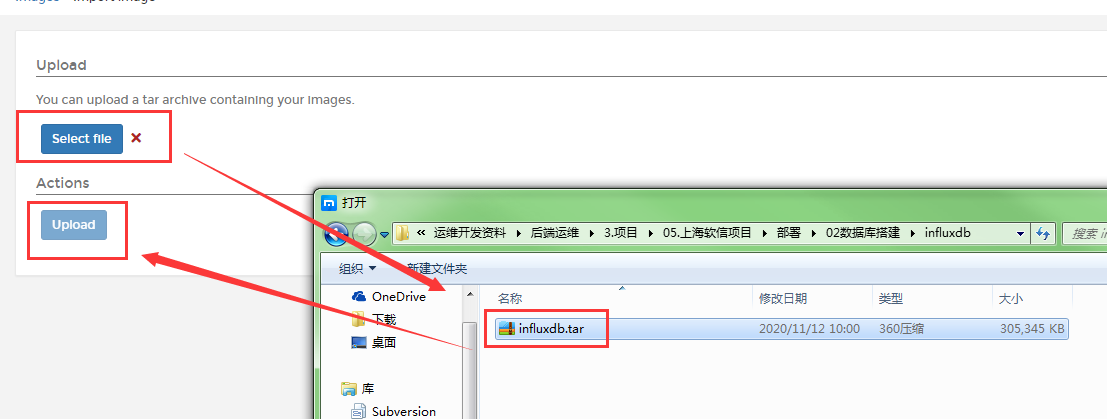
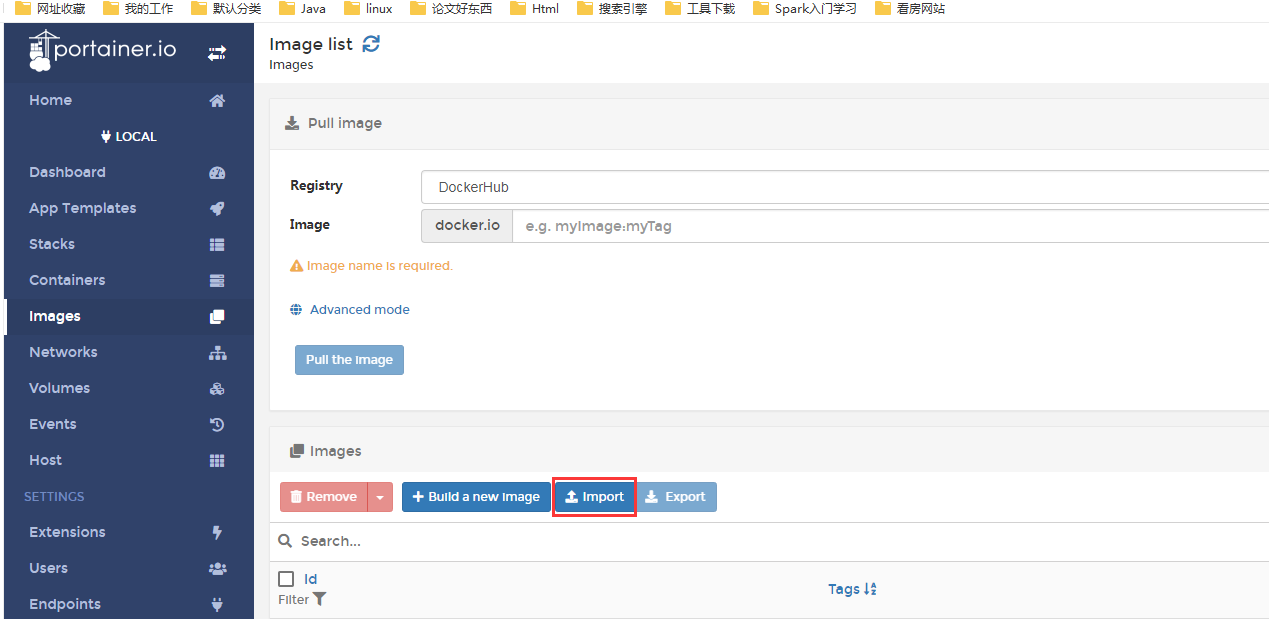
上传influxdb镜像

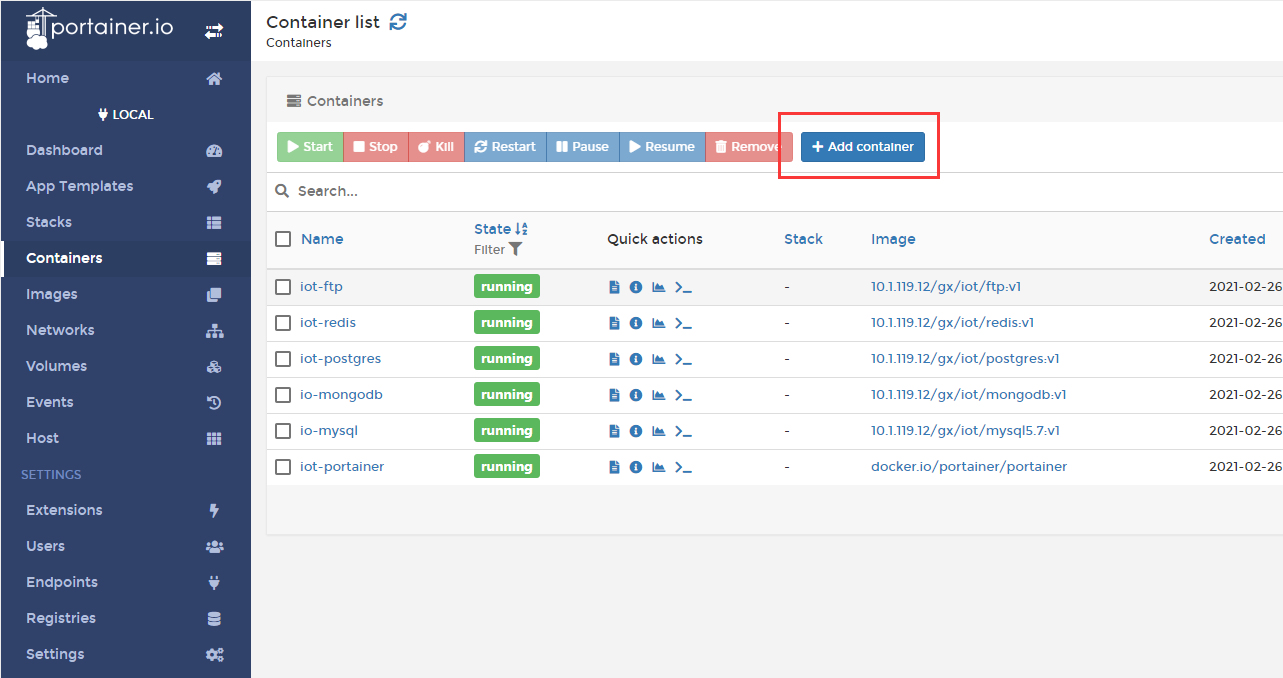
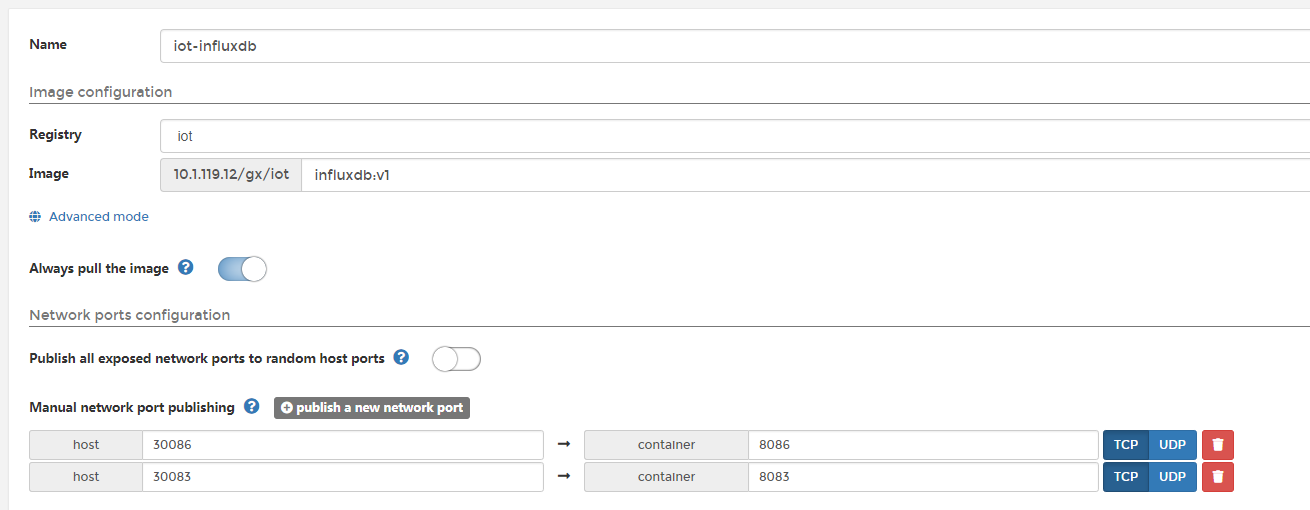
创建influxdb容器

生成容器

port:
容器端口                             主机端口
8086         TCP         HostPort         30086
8083         TCP         HostPort         30083
Volumes(数据卷):
主机路径
/etc/localtime
容器路径
/etc/localtime
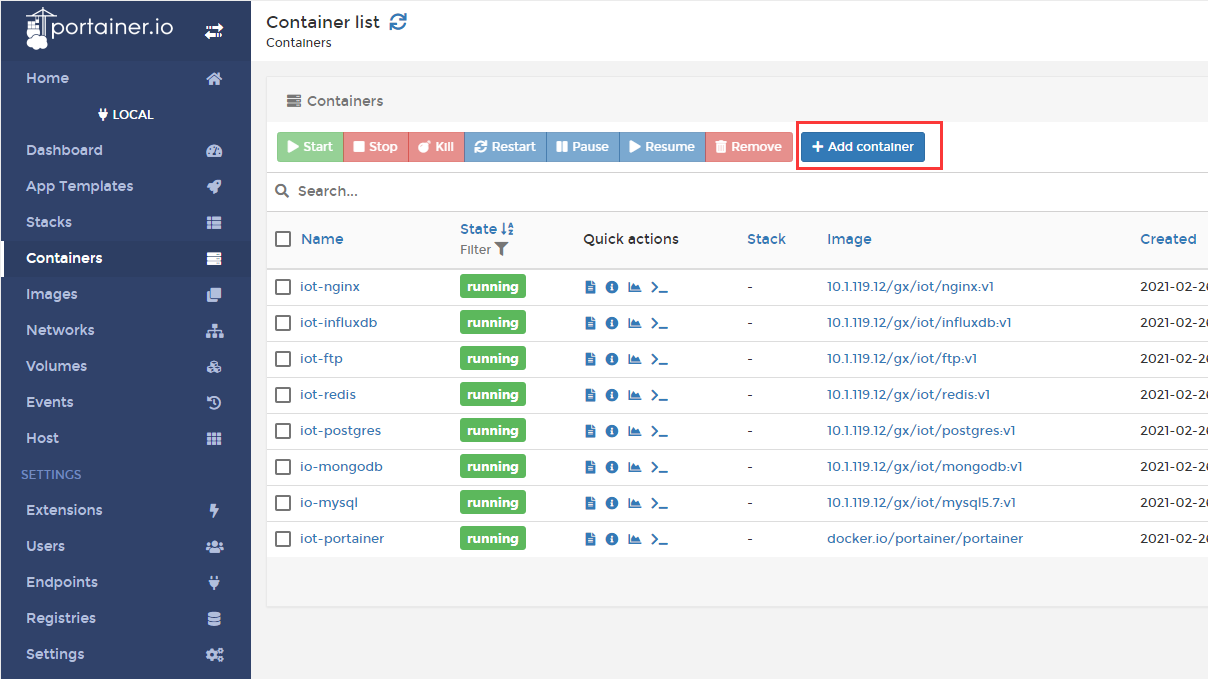
1、nginx部署
上传nginx镜像
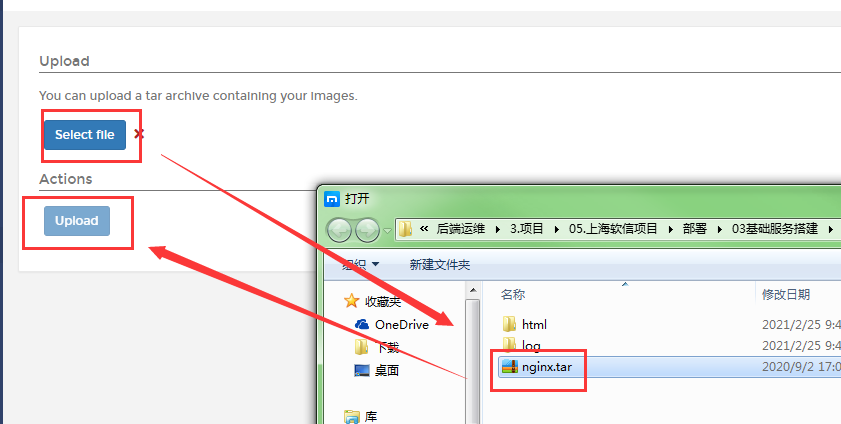


生成容器

port:
容器   主机
80    80
Volumes(数据卷):
主机路径
/usr/local/dockers/nginx/nginx.conf
容器路径
/etc/nginx/nginx.conf

主机路径
/usr/local/dockers/nginx/log
容器路径
/var/log/nginx

主机路径
/usr/local/dockers/nginx/html
容器路径
/usr/share/nginx/html
生成容器

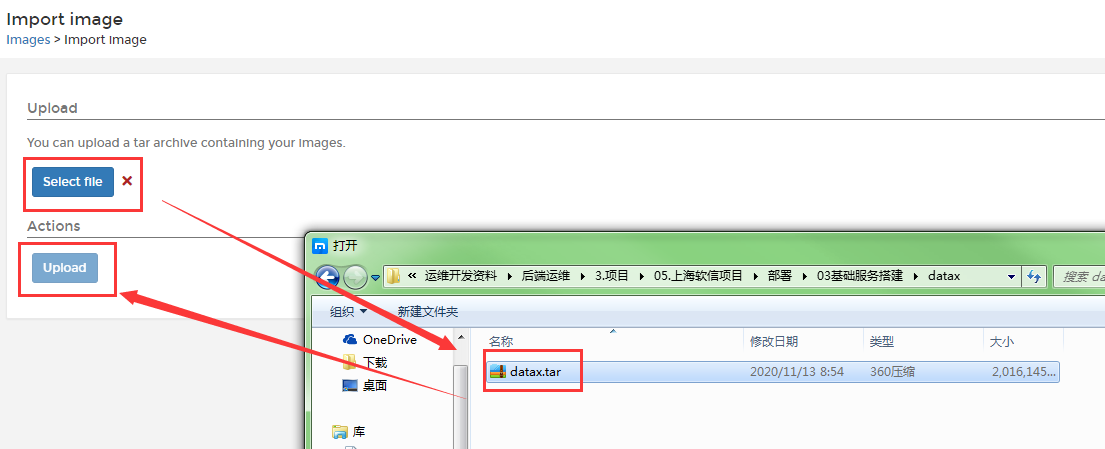
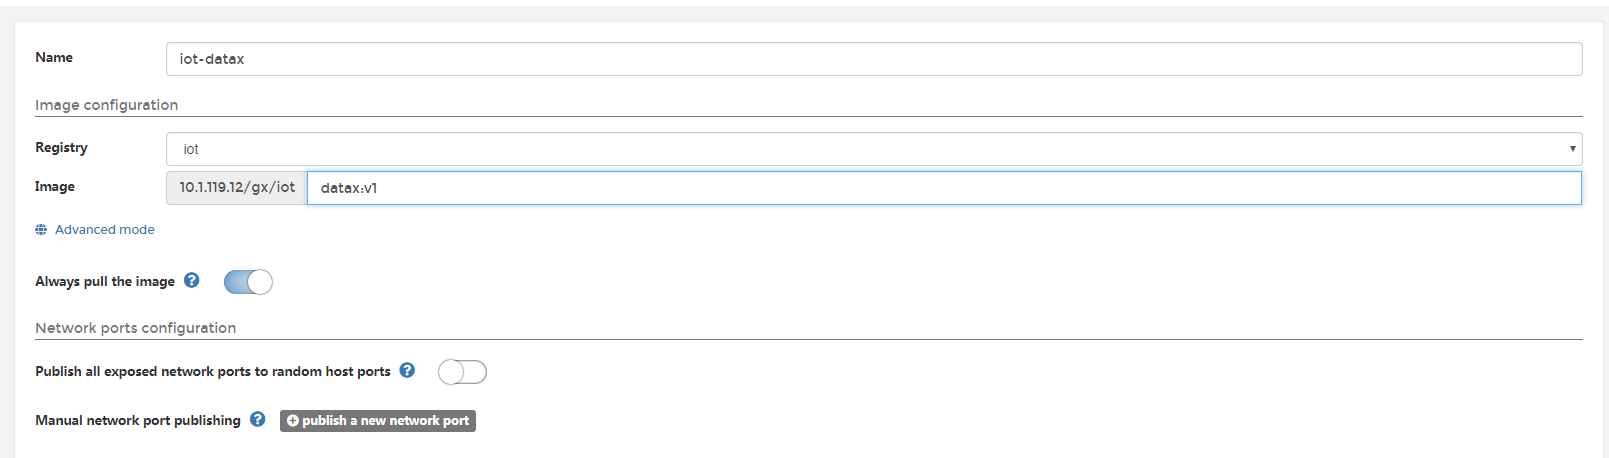
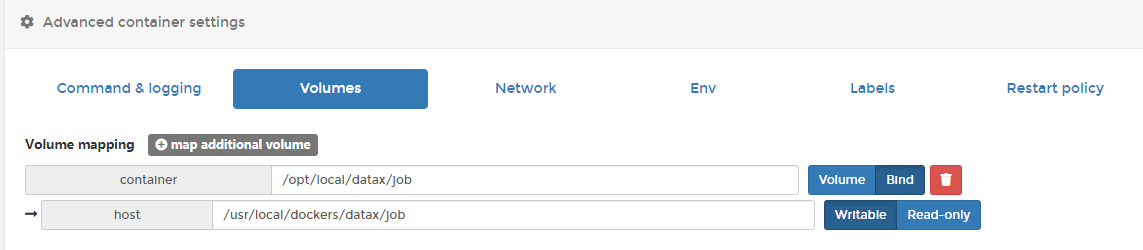
Volumes(数据卷):
主机路径
/usr/local/dockers/datax/job
容器路径
/opt/local/datax/job
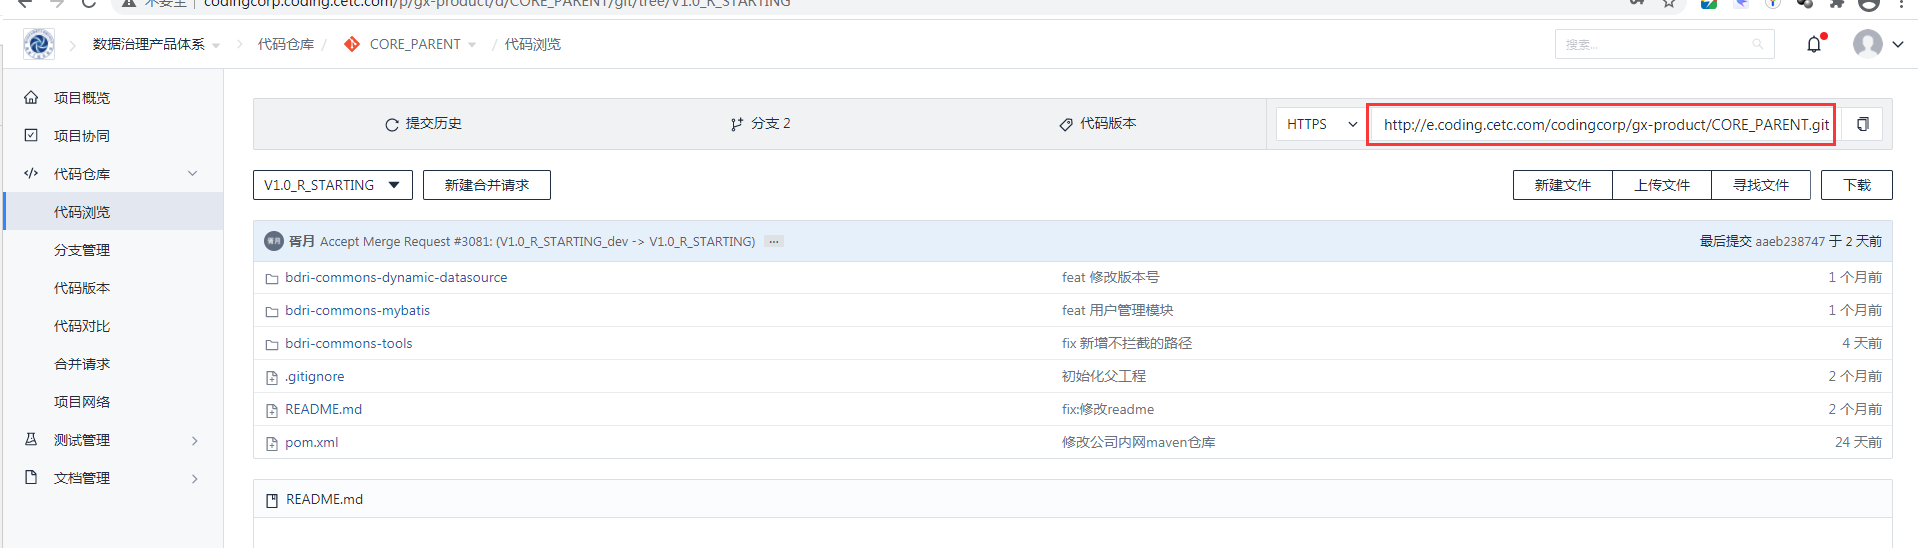
这里提醒一下,登录到coding下载,一定要用git clone方式,不要直接点击下载到本地
参考命令
git clone http://e.coding.cetc.com/codingcorp/gx-product/CORE_PARENT.git -b V1.0_R_STARTING
微服务的地址
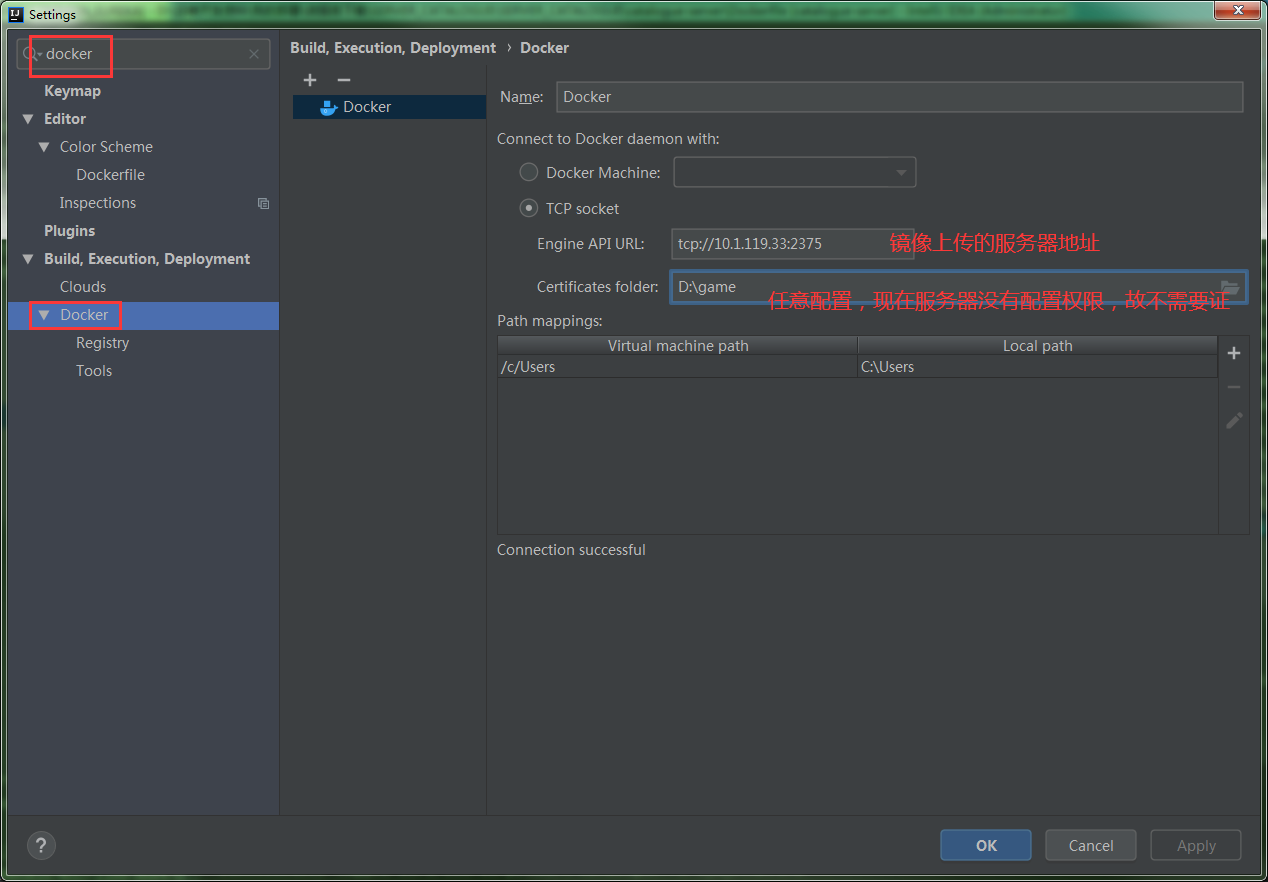
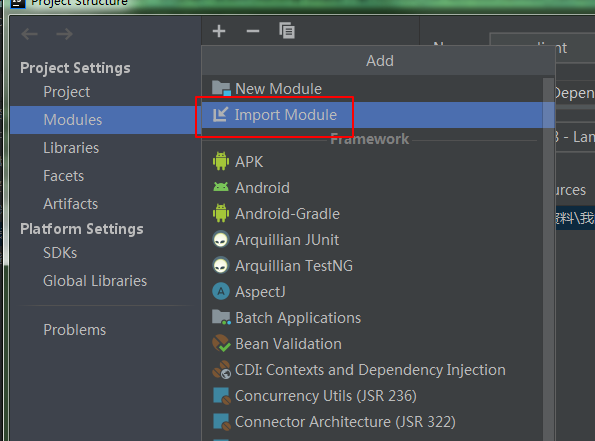
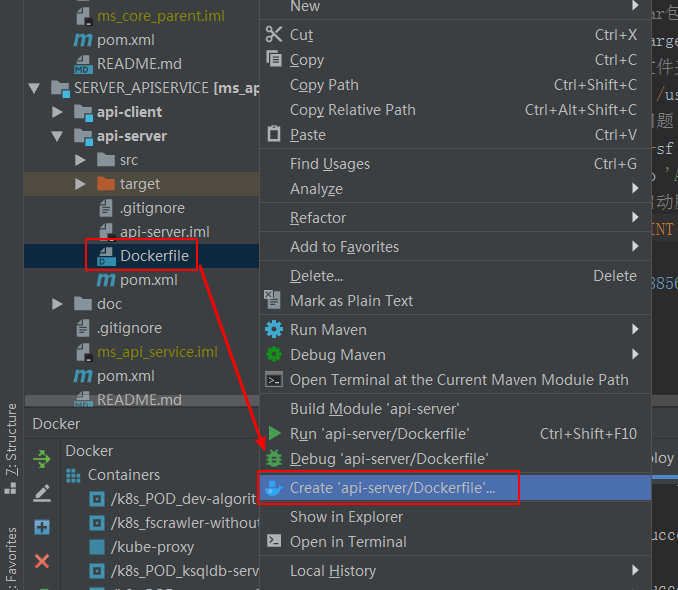
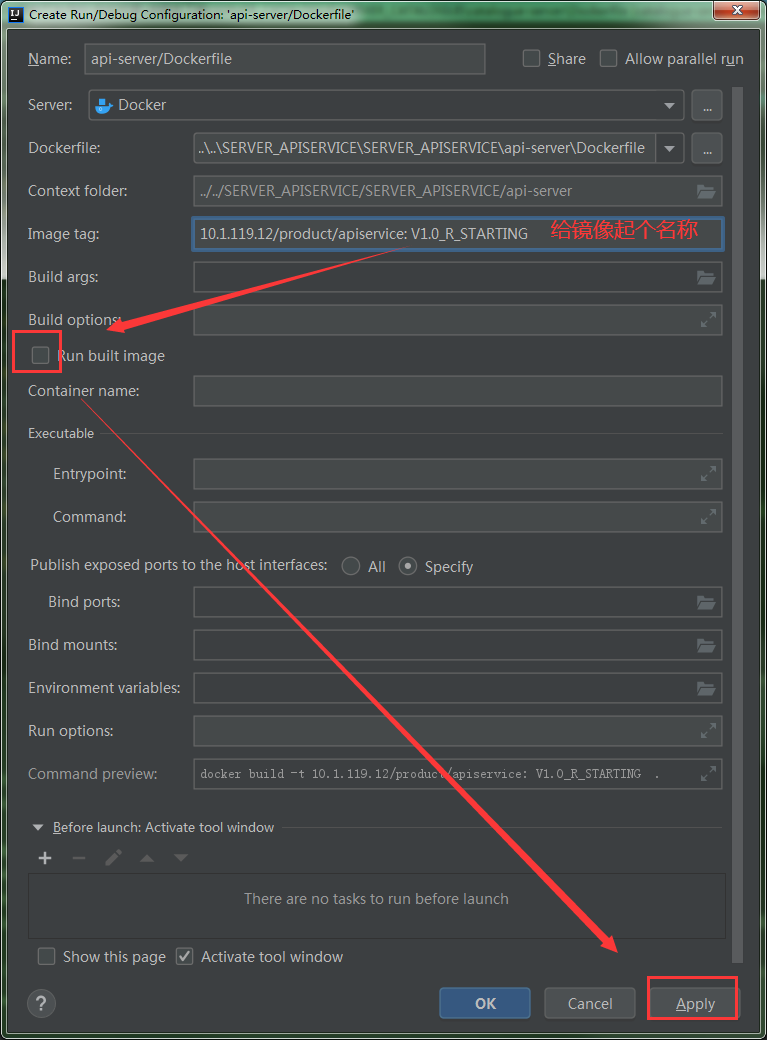
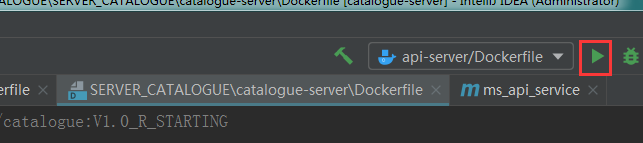
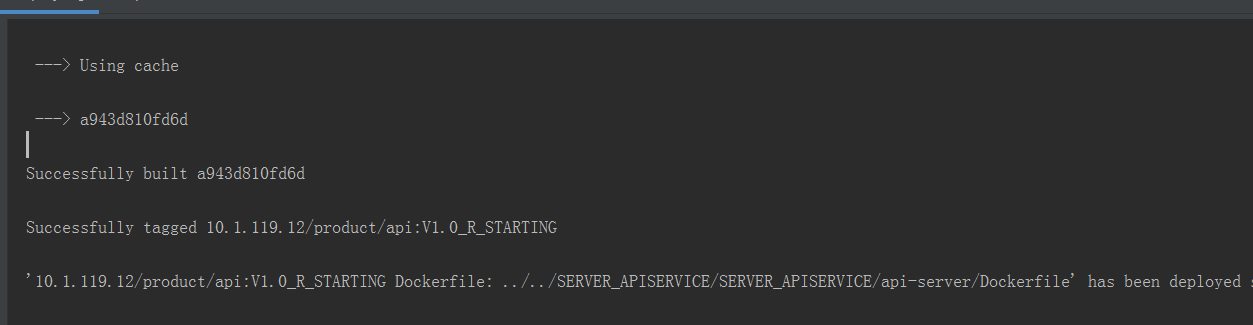
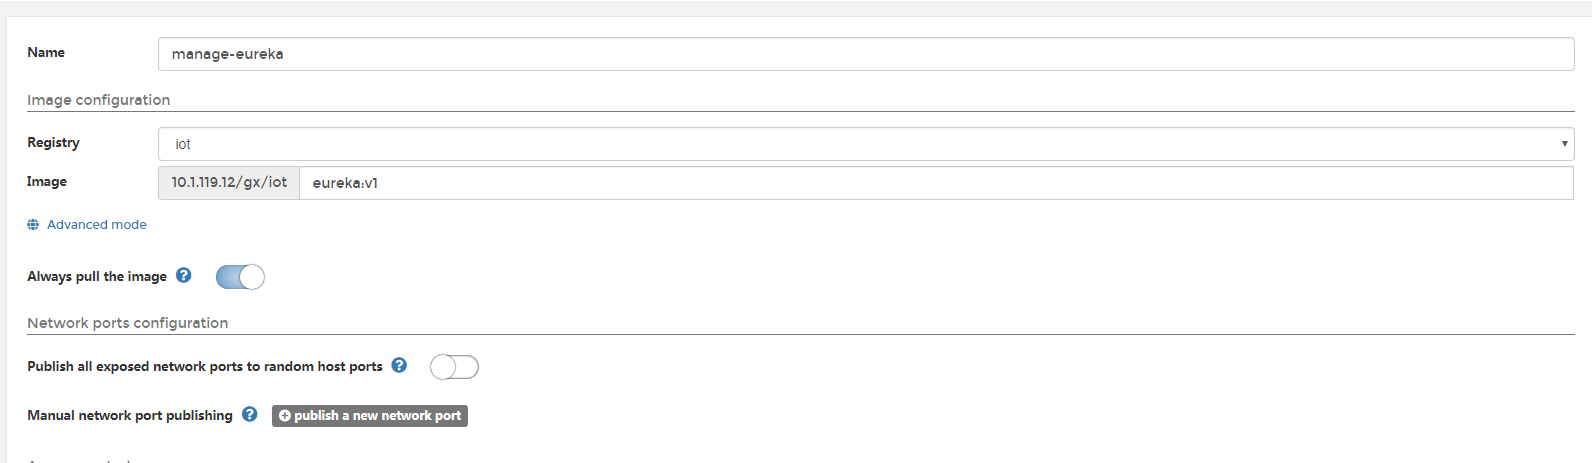
2、通过idea把微服务打成镜像并上传到指定的服务器
先通过open的方式导入其中一个微服务到idea,同时添加docker插件
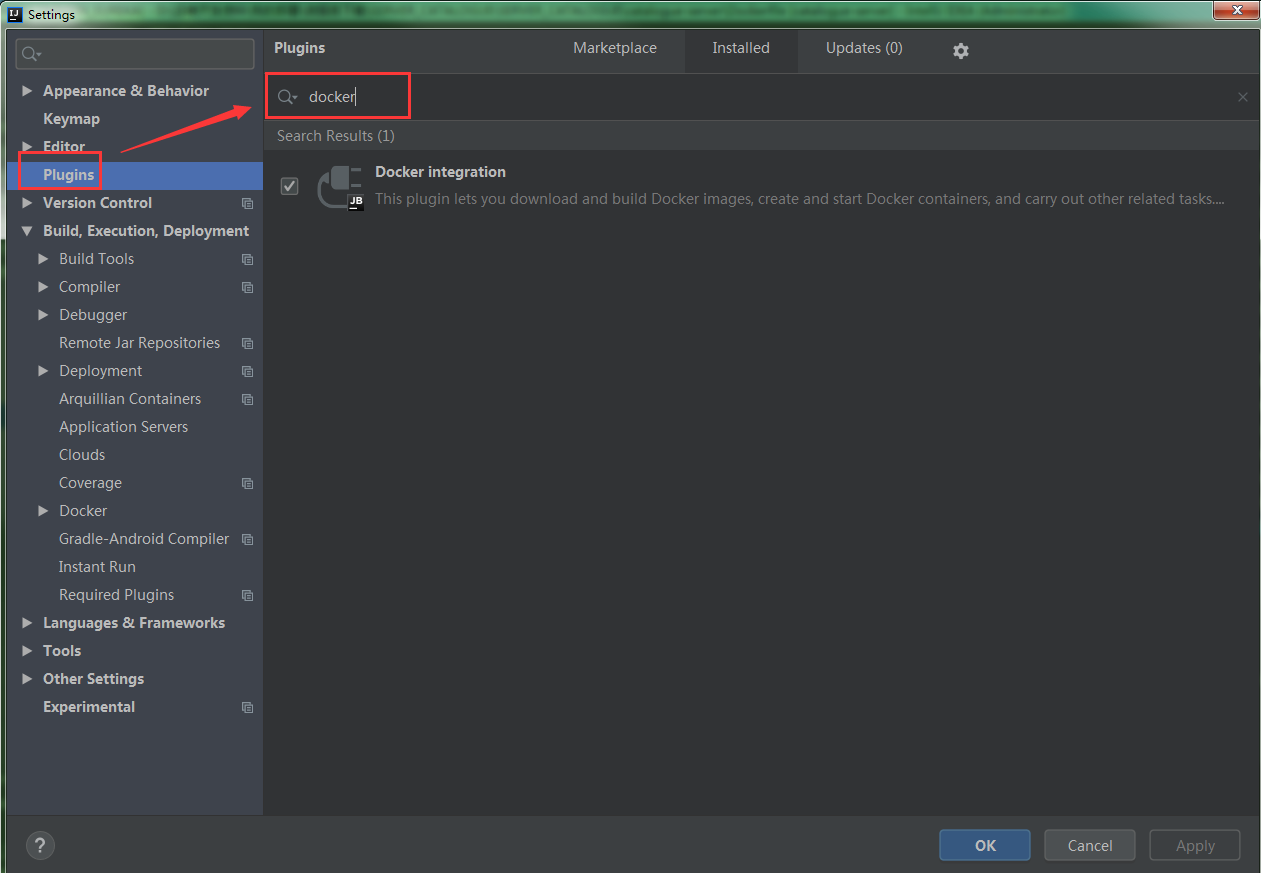
配置docker参数
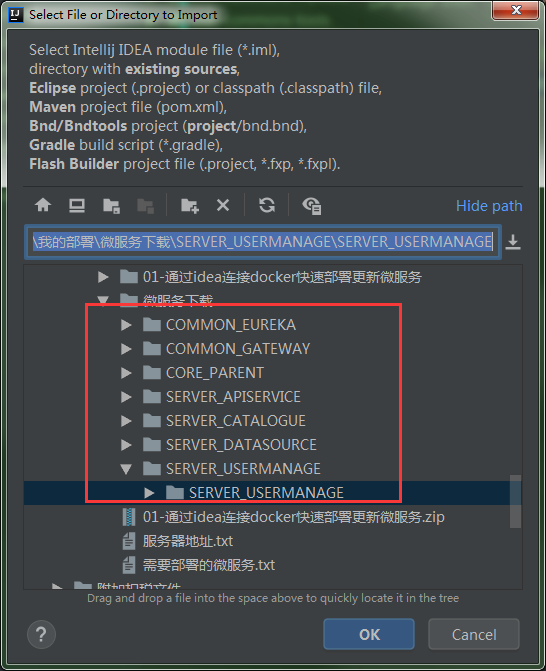
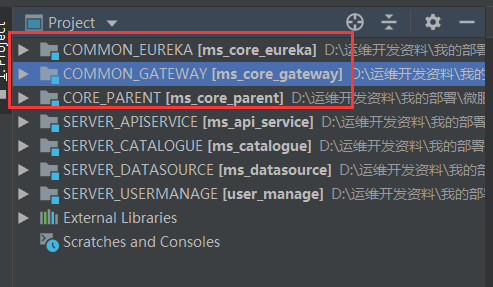
把其他的微服务都添加进来
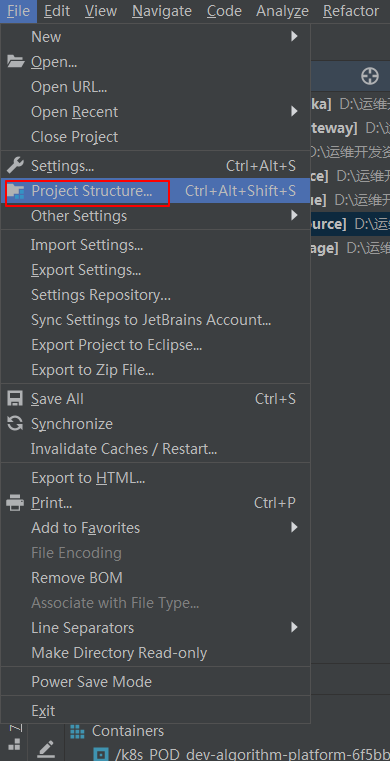
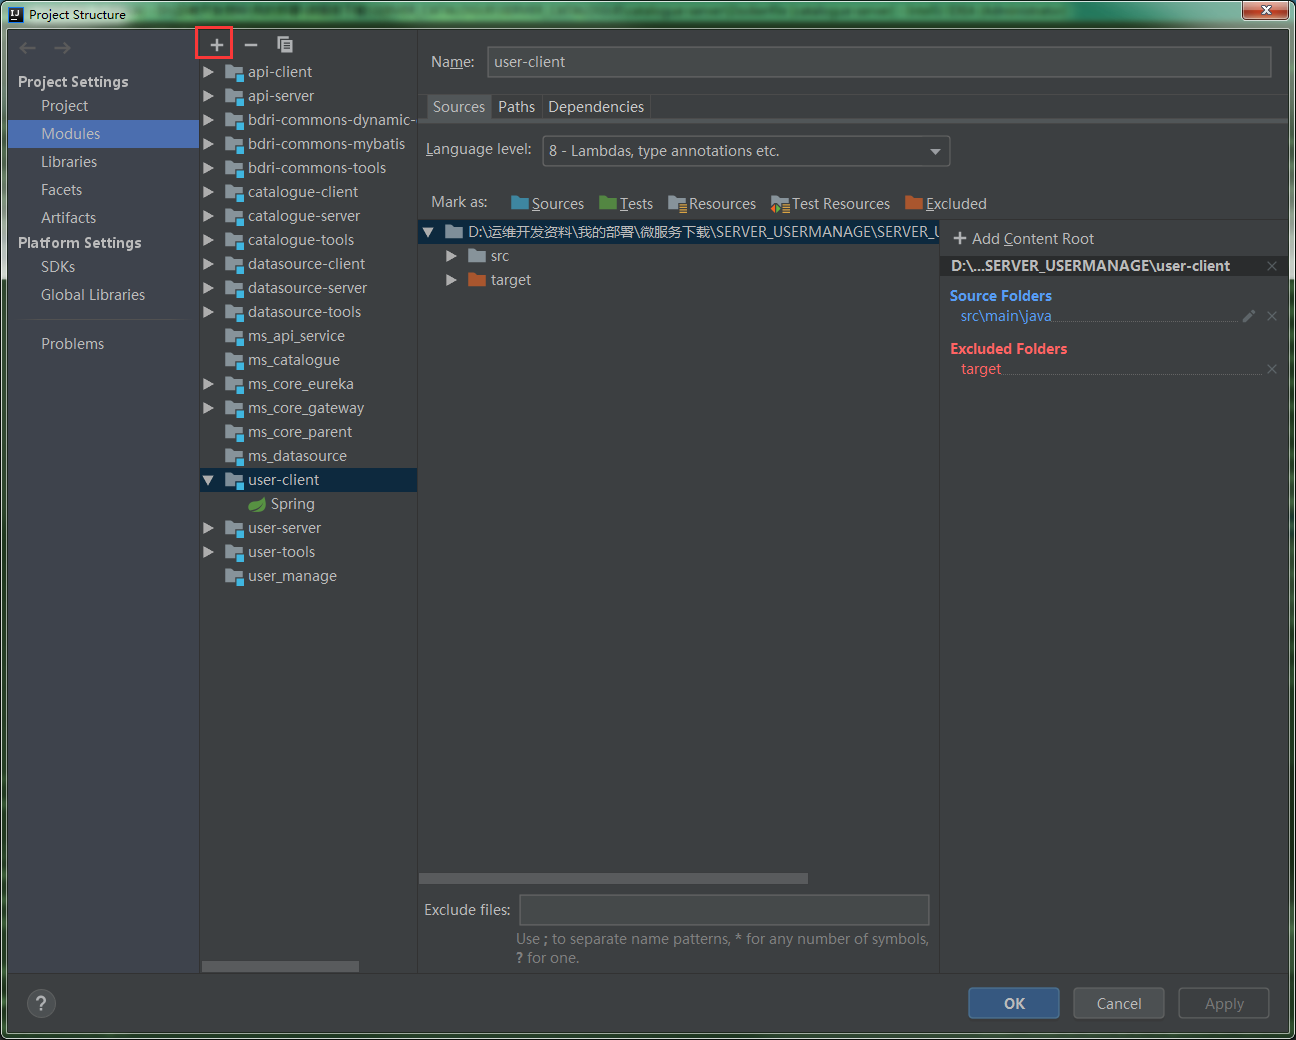
将这些微服务逐个导进来
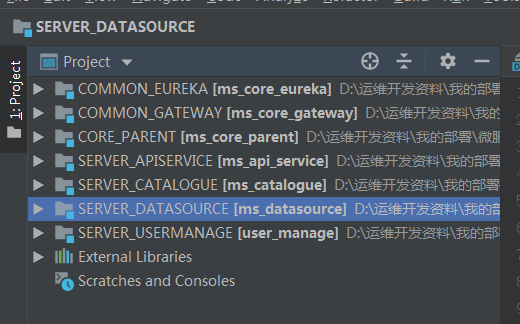
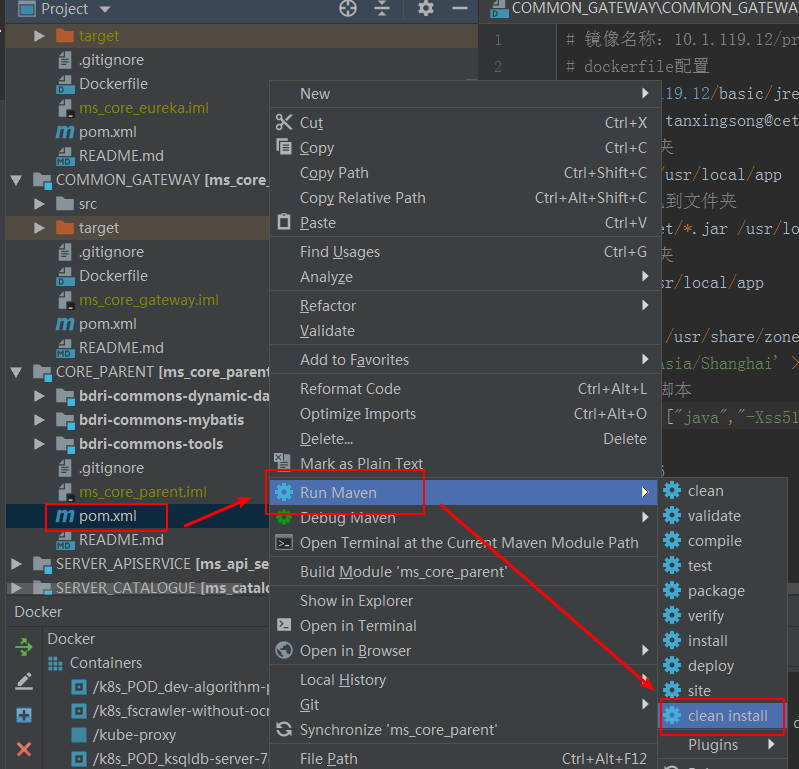
每个的操作步骤都一样,这里不作赘述
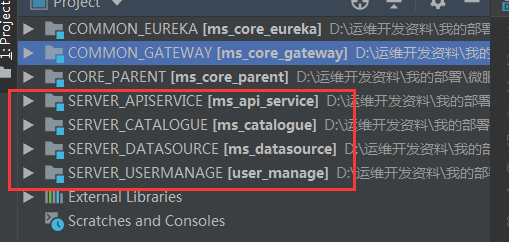

每个的操作步骤都一样,这里不作赘述
其他微服务也是同样的操作。

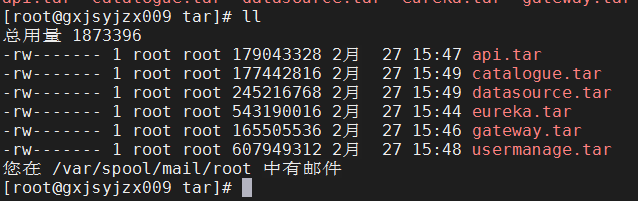
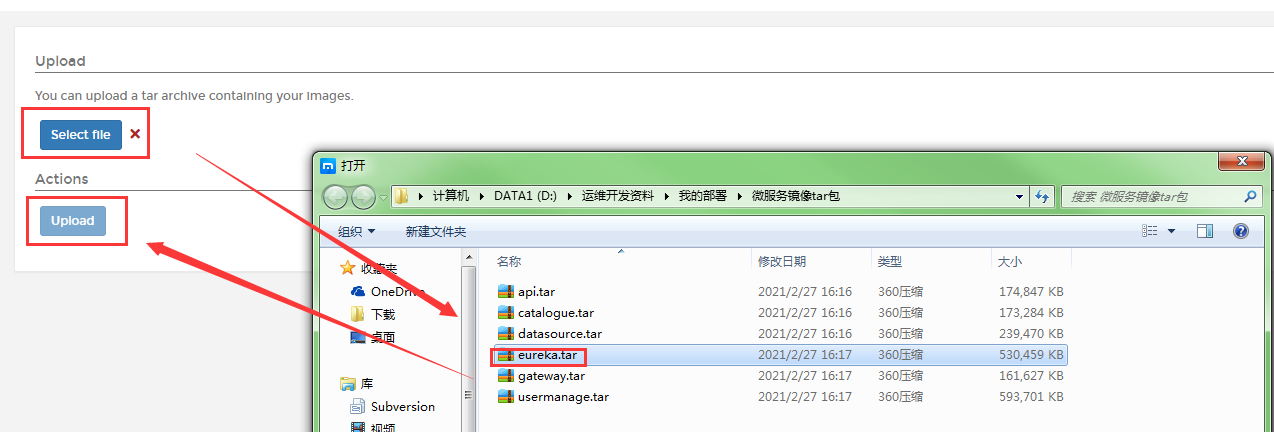
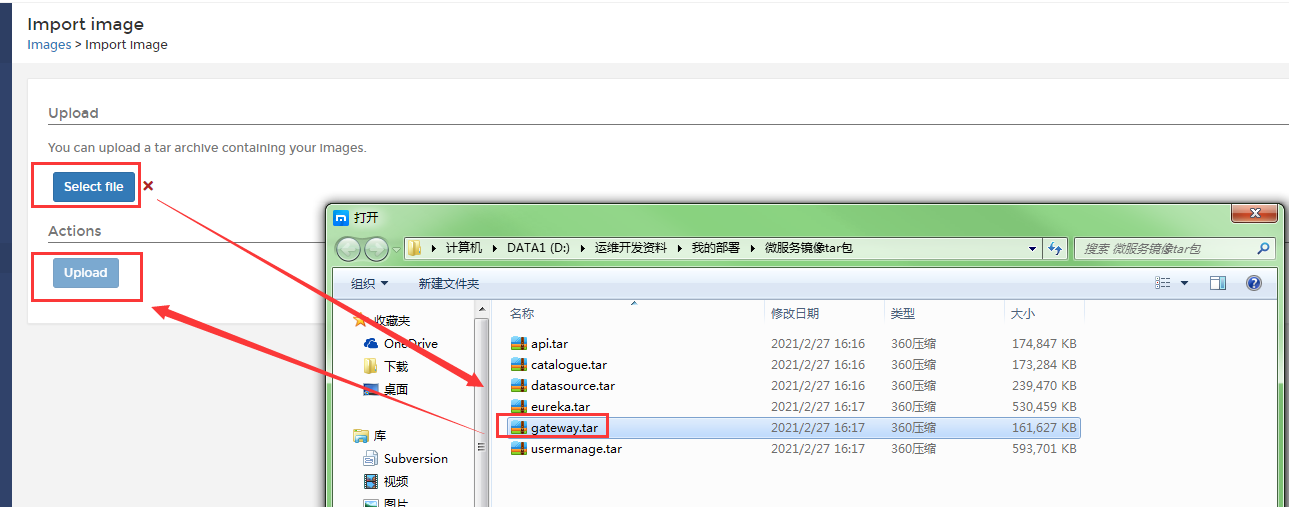
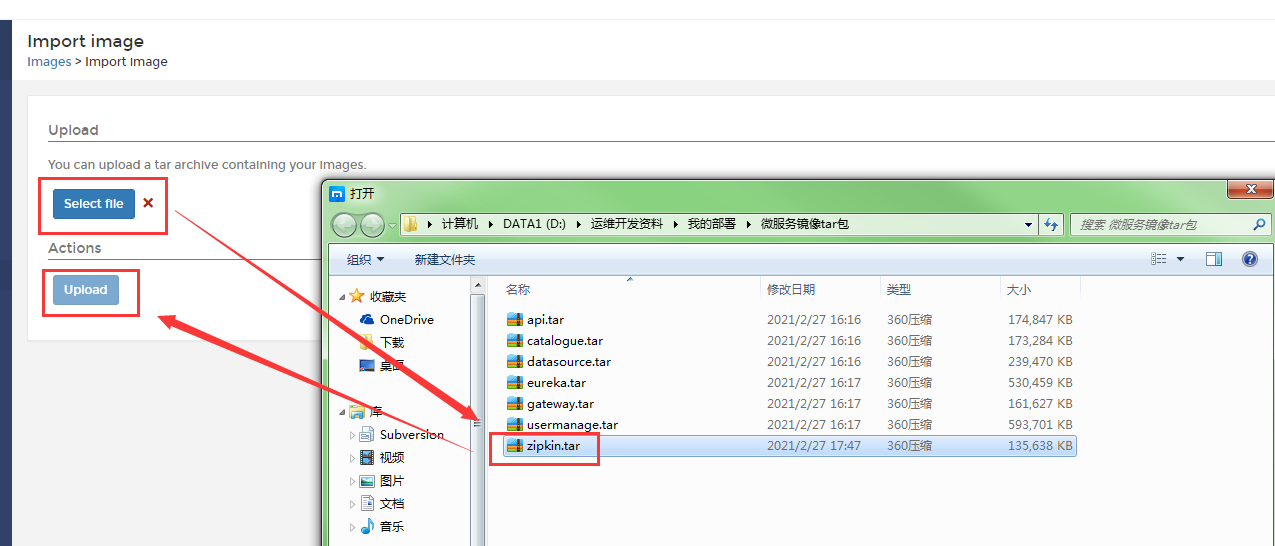
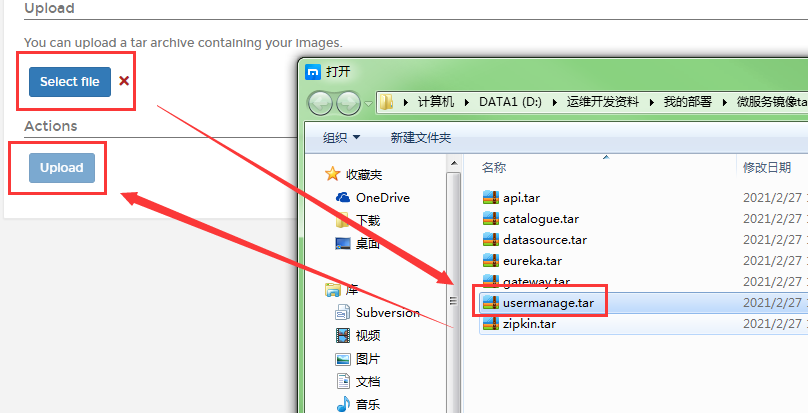
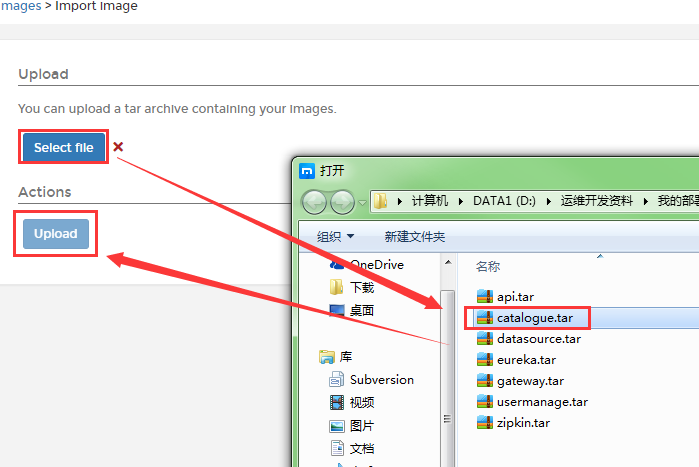
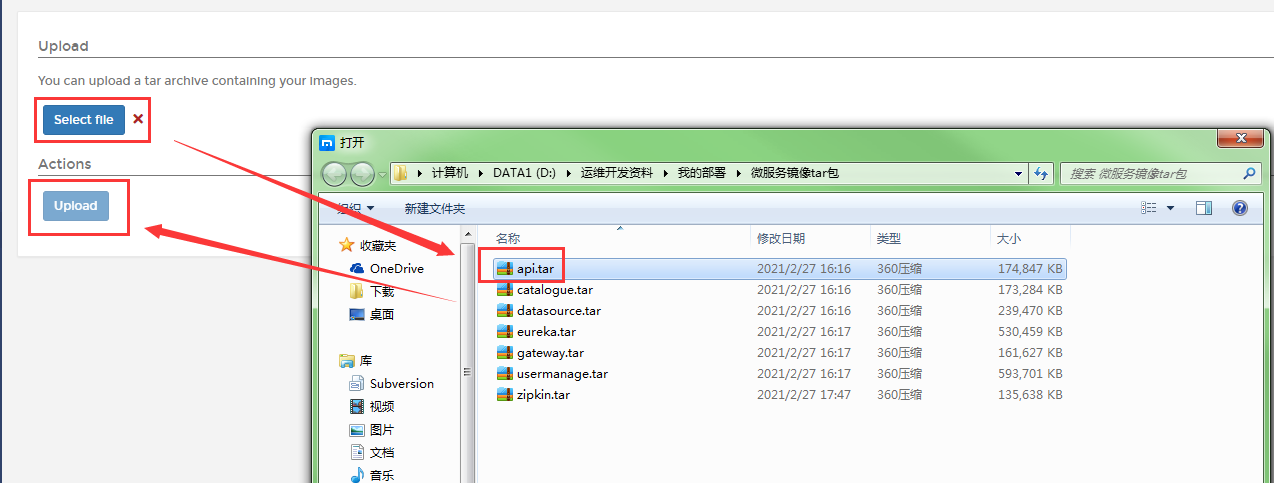
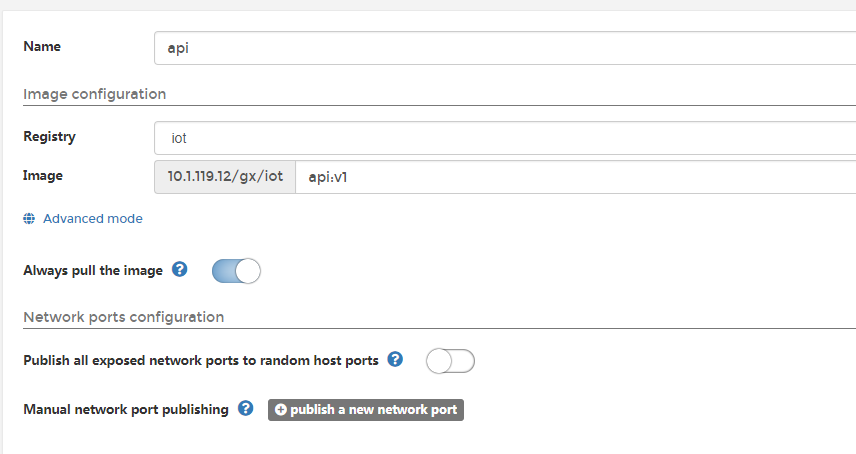
3、把各个微服务的镜像打成tar包
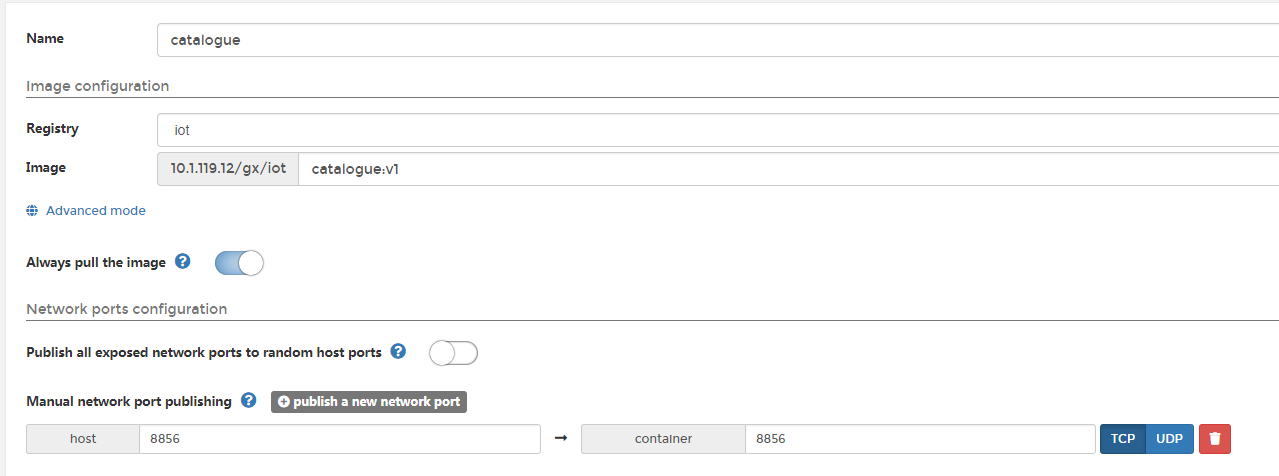
docker save -o eureka.tar 10.1.119.12/product/eureka:V1.0_R_STARTING
docker save -o gateway.tar 10.1.119.12/product/gateway:V1.0_R_STARTING
docker save -o api.tar 10.1.119.12/product/api:V1.0_R_STARTING
docker save -o usermanage.tar 10.1.119.12/product/usermanage:V1.0_R_STARTING
docker save -o datasource.tar 10.1.119.12/product/datasource:V1.0_R_STARTING
docker save -o catalogue.tar 10.1.119.12/product/catalogue:V1.0_R_STARTING


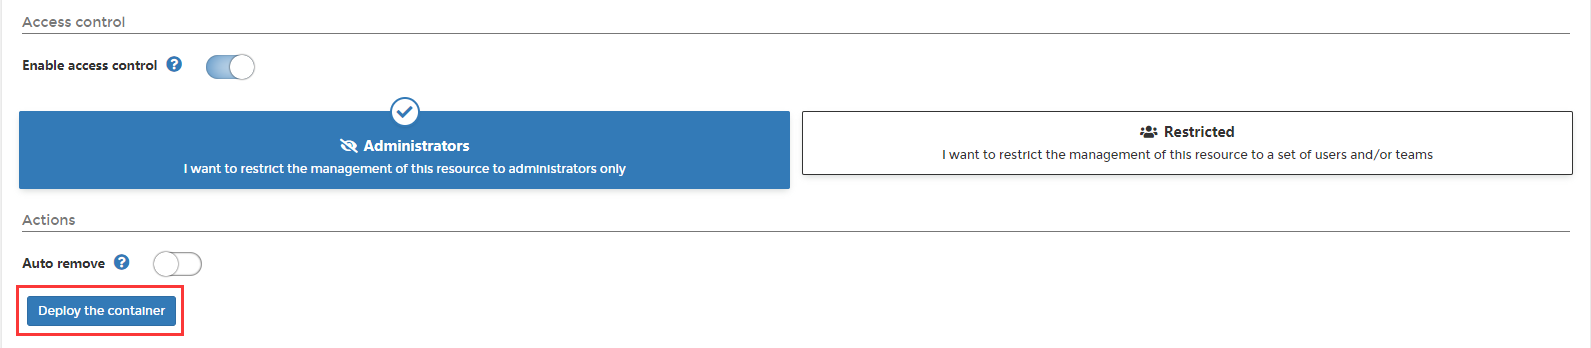
生成容器
Env:
PORT    50100
INFO    logging.level.org.springframework.web
EUREKA_SERVER    172.16.117.172:50100/eureka/
Network: host

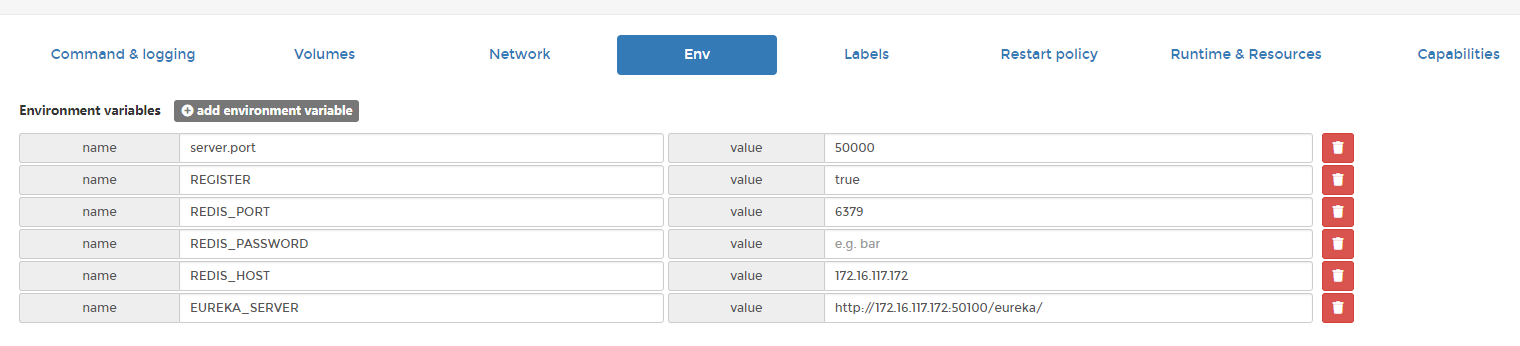

server.port 50000
REGISTER true
REDIS_PORT 6379
REDIS_PASSWORD
REDIS_HOST 10.1.119.27
EUREKA_SERVER http://10.1.119.27:50100/eureka/
3、zipkin部署
上传镜像
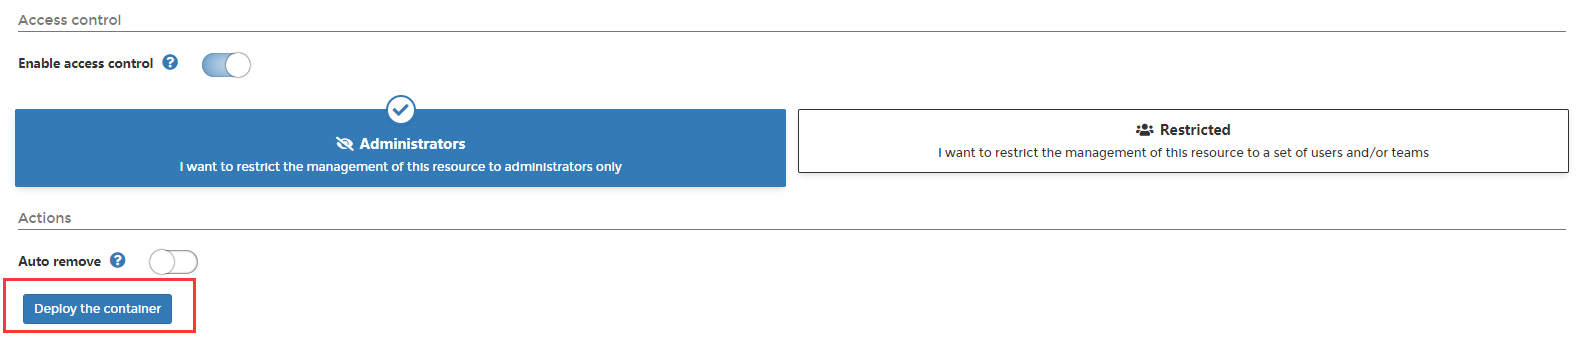
创建容器
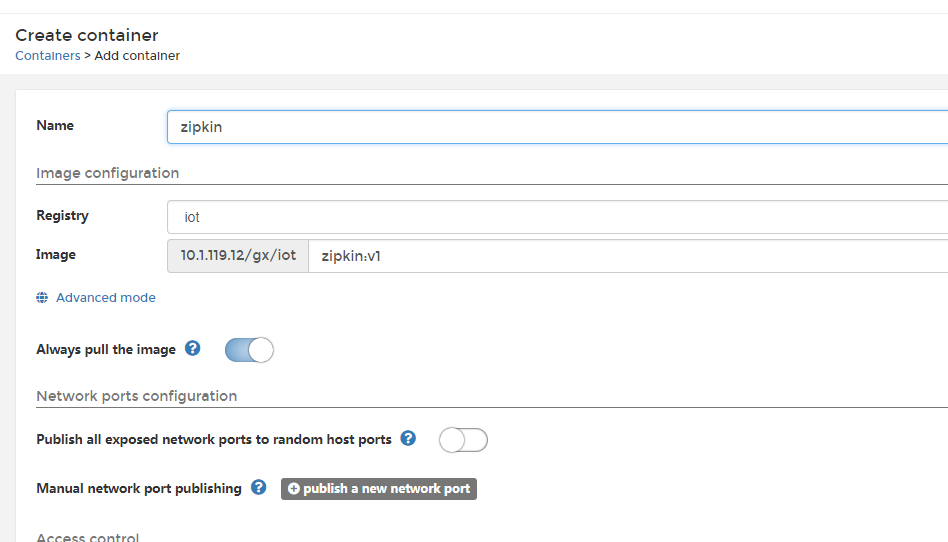


生成容器
Env:
spring.application.name     zipkin
REGISTER    true
EUREKA_SERVER    http://172.16.117.172:50100/eureka/
Network: host
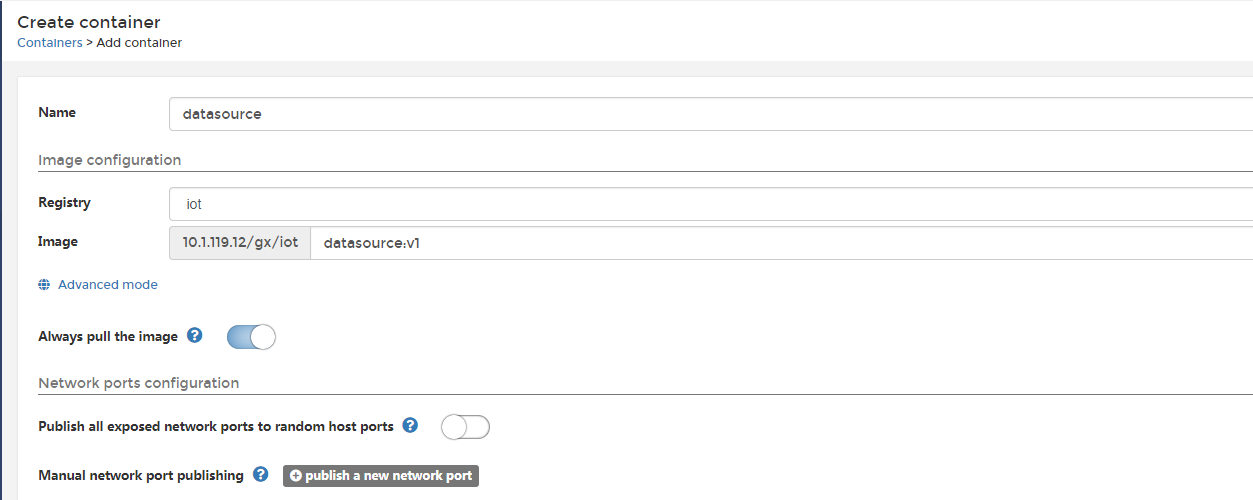
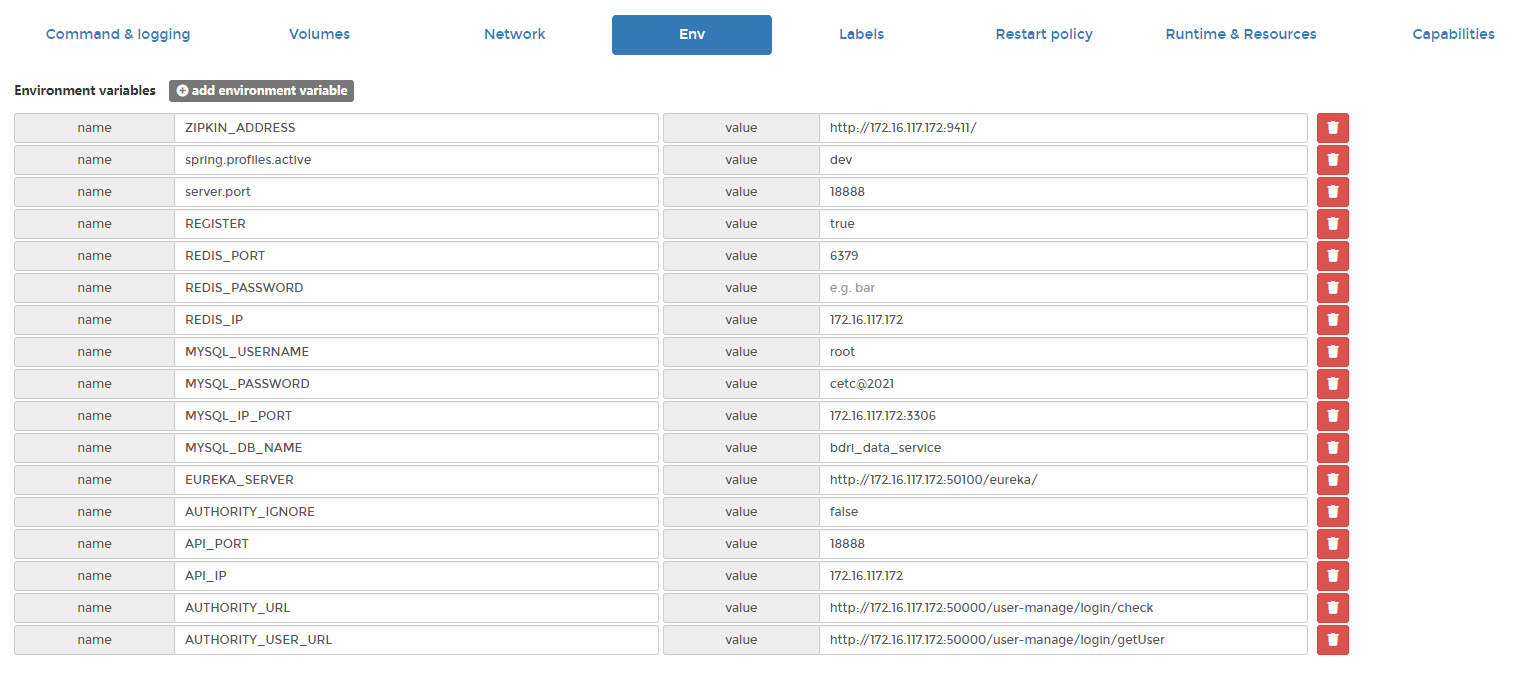
4、dataresource部署
上传镜像
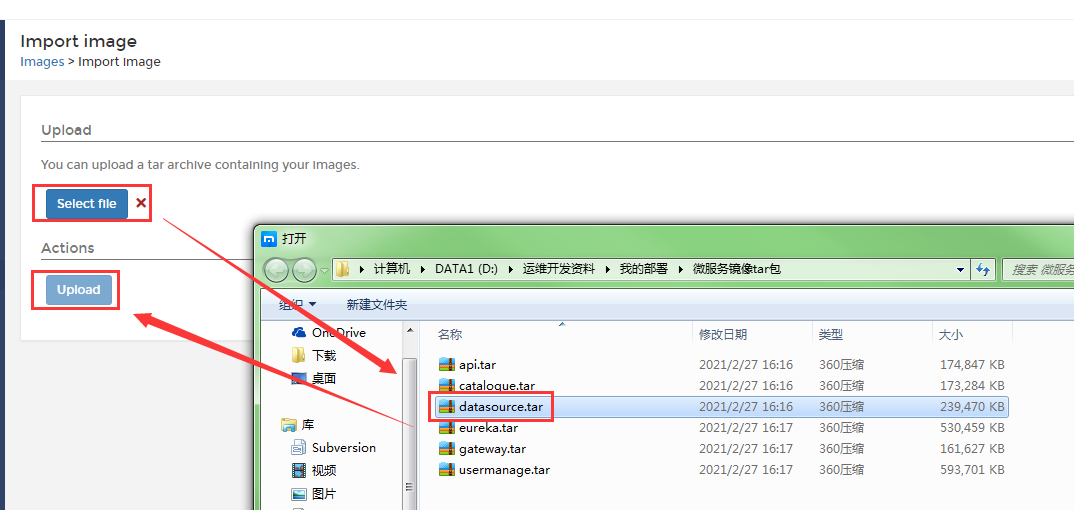
创建容器
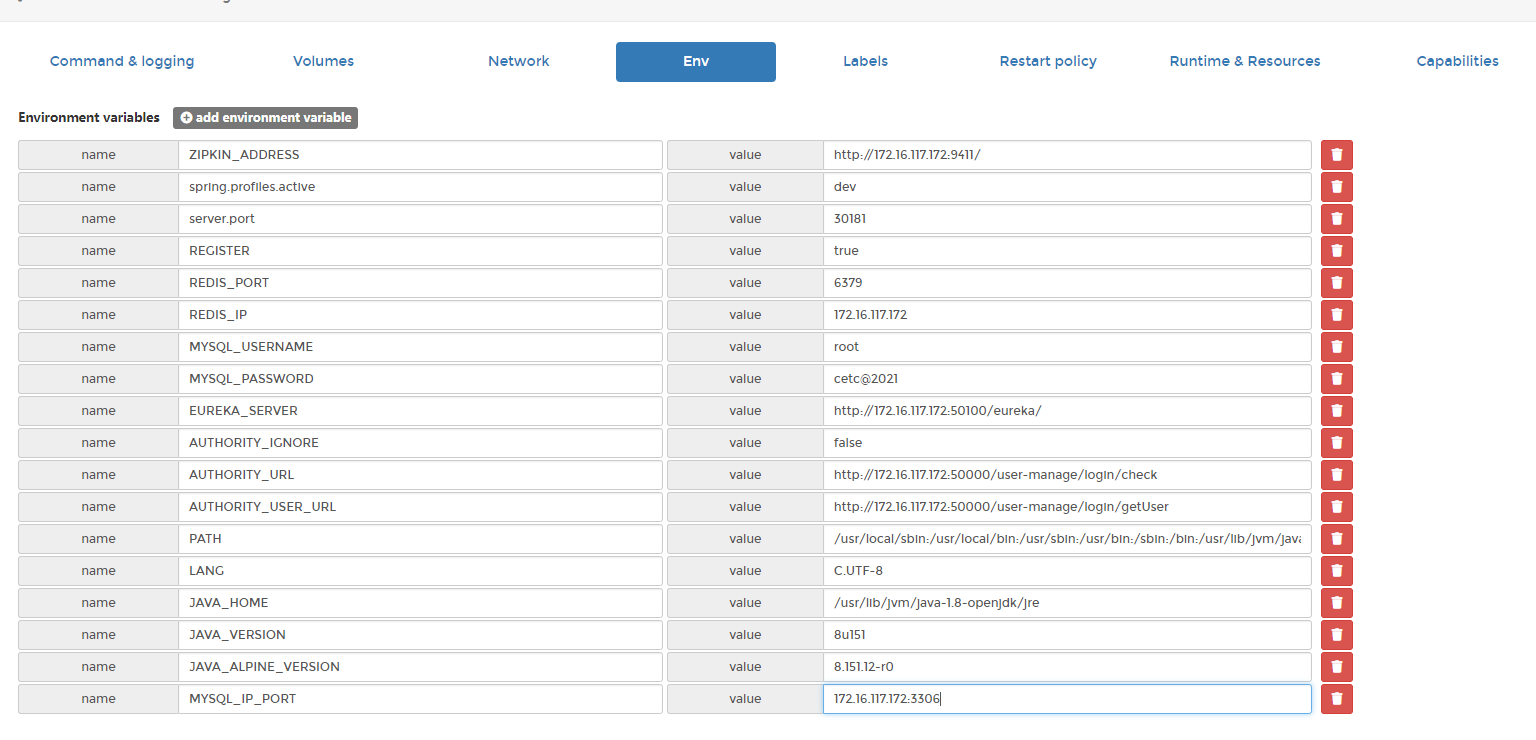
ENV:
ZIPKIN_ADDRESS    http://172.16.117.172:9411/
spring.profiles.active    dev
server.port    30181
REGISTER    true
REDIS_PORT    6379
REDIS_PASSWORD
REDIS_IP    172.16.117.172
MYSQL_USERNAME    root
MYSQL_PASSWORD    cetc@2021
EUREKA_SERVER    http://172.16.117.172:50100/eureka/
AUTHORITY_IGNORE    false
AUTHORITY_URL  http://172.16.117.172:50000/user-manage/login/check
AUTHORITY_USER_URL  http://172.16.117.172:50000/user-manage/login/getUser
MYSQL_IP_PORT   172.16.117.172:3306
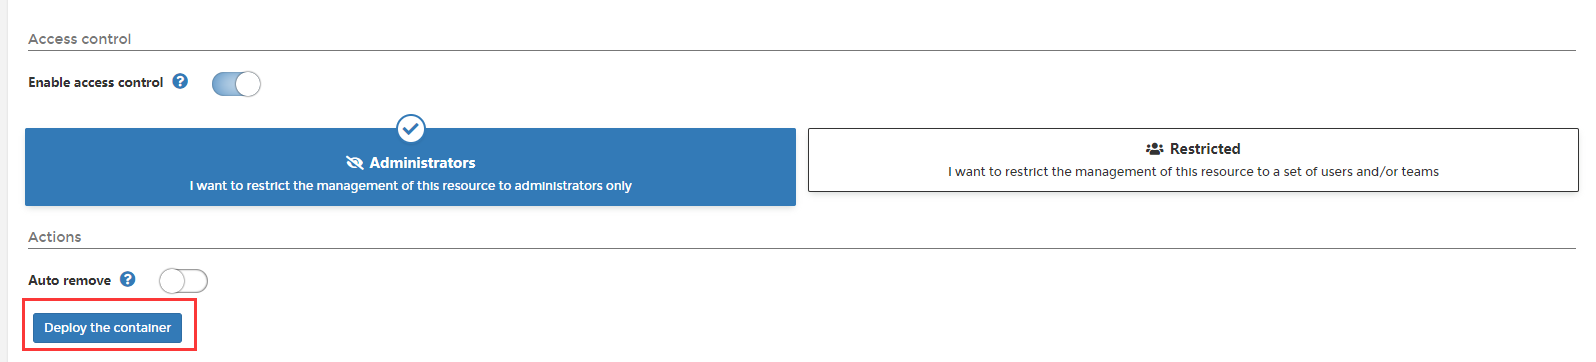
创建容器


ZIPKIN_ADDRESS    http://172.16.117.172:9411/
REGISTER    true
REDIS_PORT    6379
REDIS_IP    172.16.117.172
MYSQL_USERNAME    root
MYSQL_PASSWORD    cetc@2021
MYSQL_IP_PORT    172.16.117.172:3306
MYSQL_DB_NAME    bdri_user_manage
EUREKA_SERVER    http://172.16.117.172:50100/eureka/
DOCUMENT_FILE    /root/bdri-user-manage/document
AUTHORITY_IGNORE    false
AUTHORITY_URL  http://172.16.117.172:50000/user-manage/login/check
AUTHORITY_USER_URL  http://172.16.117.172:50000/user-manage/login/getUser
生成容器

创建容器

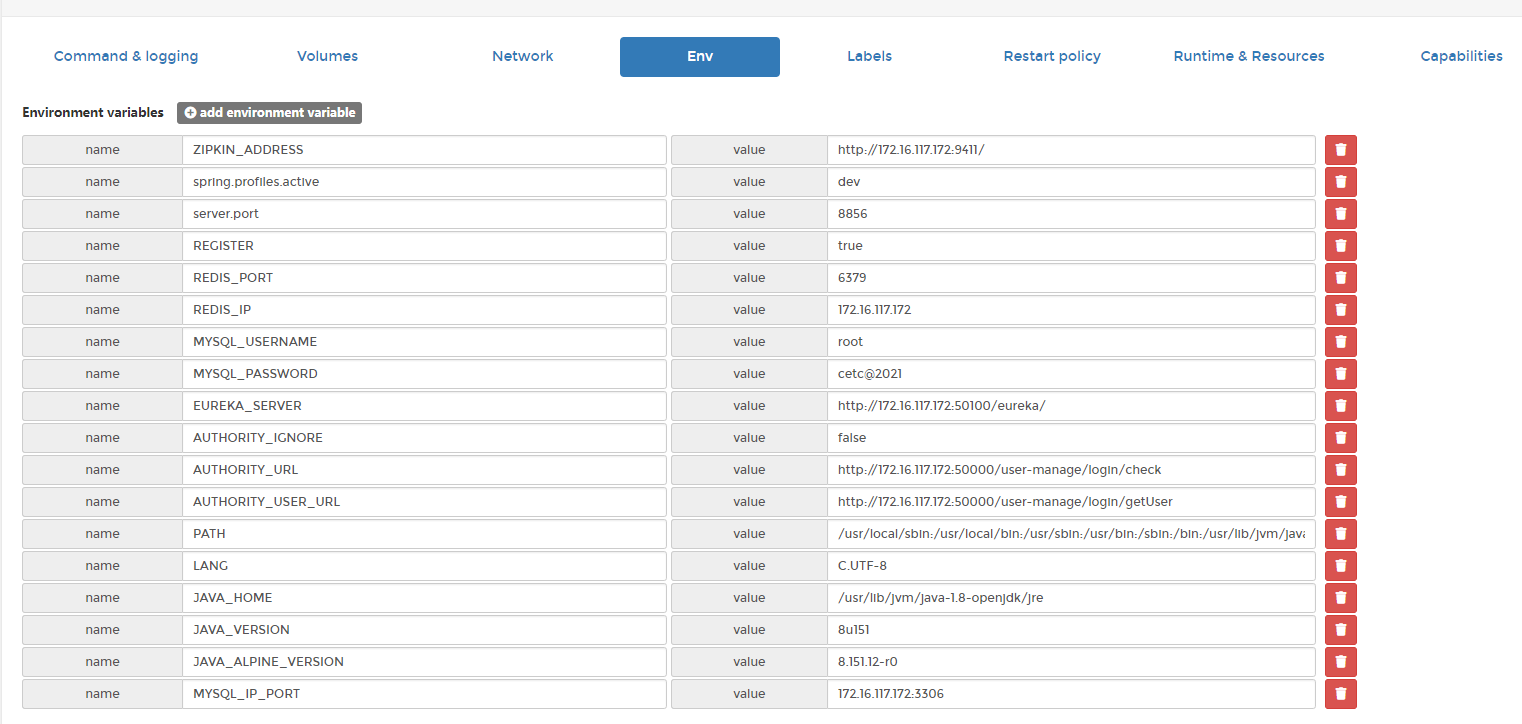
ZIPKIN_ADDRESS    http://172.16.117.172:9411/
spring.profiles.active    dev
server.port      8856
REGISTER    true
REDIS_PORT    6379
REDIS_PASSWORD
REDIS_IP    172.16.117.172
MYSQL_USERNAME    root
MYSQL_PASSWORD    cetc@2021
EUREKA_SERVER    http://172.16.117.172:50100/eureka/
AUTHORITY_IGNORE    false
AUTHORITY_URL  http://172.16.117.172:50000/user-manage/login/check
AUTHORITY_USER_URL  http://172.16.117.172:50000/user-manage/login/getUser
MYSQL_IP_PORT    172.16.117.172:3306
ZIPKIN_ADDRESS    http://172.16.117.172:9411/
spring.profiles.active    dev
server.port    18888
REGISTER    true
REDIS_PORT    6379
REDIS_PASSWORD
REDIS_IP    172.16.117.172
MYSQL_USERNAME    root
MYSQL_PASSWORD    cetc@2021
MYSQL_IP_PORT    172.16.117.172:3306
MYSQL_DB_NAME    bdri_data_service
EUREKA_SERVER    http://172.16.117.172:50100/eureka/
AUTHORITY_IGNORE    false
API_PORT    18888
API_IP    172.16.117.172
AUTHORITY_URL  http://172.16.117.172:50000/user-manage/login/check
AUTHORITY_USER_URL  http://172.16.117.172:50000/user-manage/login/getUser
生成容器

六、前端部署
跟前端沟通,拿到对应的压缩包
数据服务平台 ---- dataservice
政务数据治理平台 ---- systemlogin
统一用户管理系统 ---- user
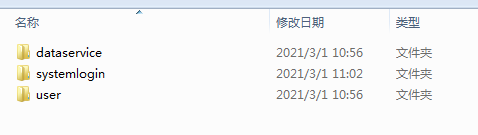
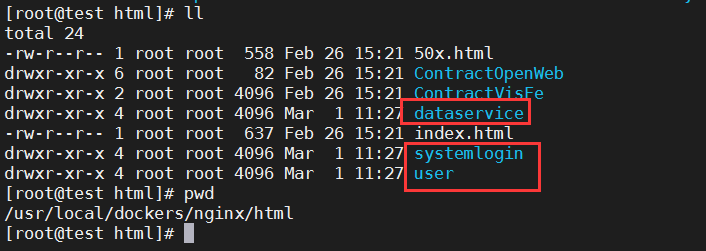
在服务器的
/usr/local/dockers/nginx/html目录下创建这三个文件夹,并将对应的压缩包解压的内容上传到对应目录下
修改 nginx.conf配置文件,修改后重启nginx容器

user  root;
worker_processes  1;

#error_log  logs/error.log;
#error_log  logs/error.log  notice;
#error_log  logs/error.log  info;

#pid        logs/nginx.pid;


events {
    worker_connections  1024;
}


http {
    include       mime.types;
    default_type  application/octet-stream;

    #log_format  main  '$remote_addr - $remote_user [$time_local] "$request" '
    #                  '$status $body_bytes_sent "$http_referer" '
    #                  '"$http_user_agent" "$http_x_forwarded_for"';

    #access_log  logs/access.log  main;

    sendfile        on;
    #tcp_nopush     on;

    #keepalive_timeout  0;
    keepalive_timeout  65;

    #gzip  on;

    server {
        listen       80;
        server_name  localhost;
        client_max_body_size 500M;
        #charset koi8-r;

        #access_log  logs/host.access.log  main;

        location / {
            root   /usr/share/nginx/html;
            index  index.html index.htm;
        }


        location /api/ {
            proxy_set_header Host $host;
            proxy_pass http://172.16.117.172:50000/;
            #add_header 'Access-Control-Allow-Origin' '*';
            #add_header 'Access-Control-Allow-Credentials' 'true';
            #add_header 'Access-Control-Allow-Methods' 'GET, POST, PUT, DELETE, OPTIONS';
        }

        #error_page  404              /404.html;

        # redirect server error pages to the static page /50x.html
        #
        error_page   500 502 503 504  /50x.html;
        location = /50x.html {
            root   html;
        }

     }

}
登录 统一用户管理系统 ---- user
http://172.16.117.172/user/#/login
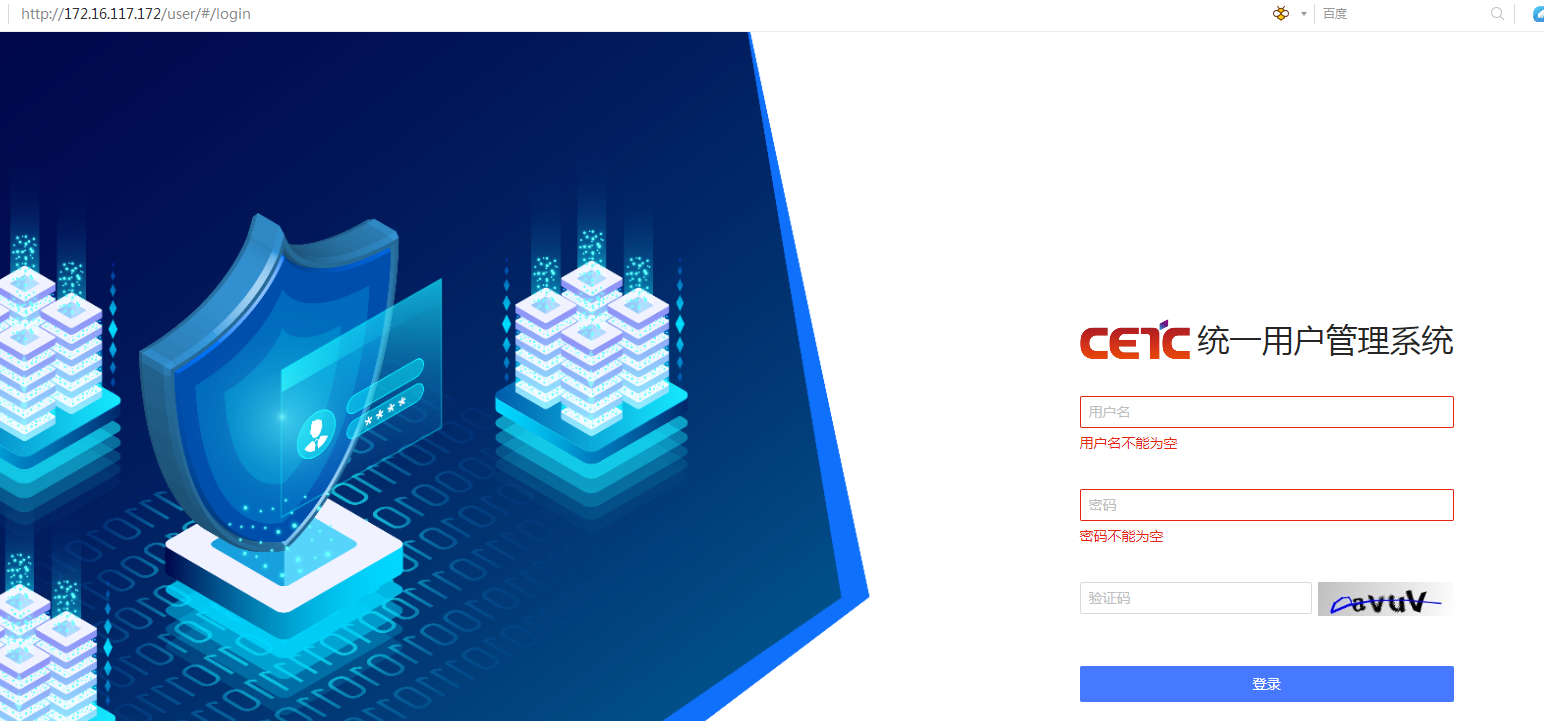
统一用户管理系统的账号密码:
        用户名:useradmin
        密码:admin@123
http://172.16.117.172/systemlogin/#/login 政务数据治理平台
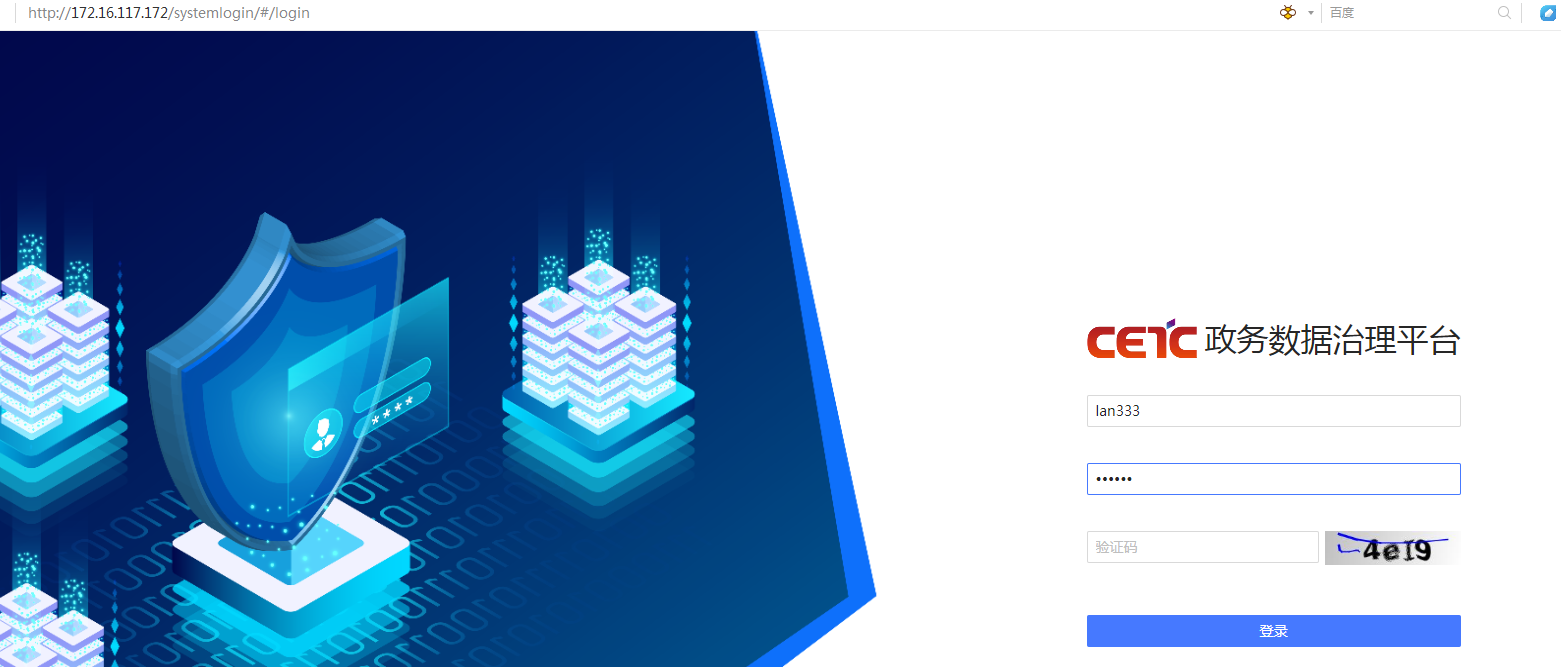
用户名 : lan333
密码:123456